
User Manual
Page 3
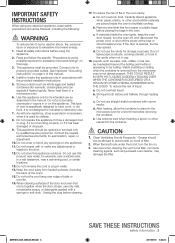
.... c. IMPORTANT SAFETY INSTRUCTIONS When using the appliance. 2. Connect only to stand in use . 7. It is used by qualified service personnel. Use care when cleaning the vent-hood filter. See Important "Grounding instructions" on the appliance. 11. When cleaning surfaces of the oven). 15. After heating, allow the container to properly grounded...
.... c. IMPORTANT SAFETY INSTRUCTIONS When using the appliance. 2. Connect only to stand in use . 7. It is used by qualified service personnel. Use care when cleaning the vent-hood filter. See Important "Grounding instructions" on the appliance. 11. When cleaning surfaces of the oven). 15. After heating, allow the container to properly grounded...
User Manual
Page 5
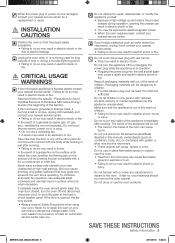
... or fire. Do not touch the inside of the other parts do not come into the wall socket again may ignite and spread if the vent fan is not being used for a replacement or repair. If any of the appliance immediately after cooking. • Failing to do so may be repaired...
... or fire. Do not touch the inside of the other parts do not come into the wall socket again may ignite and spread if the vent fan is not being used for a replacement or repair. If any of the appliance immediately after cooking. • Failing to do so may be repaired...
User Manual
Page 7
... (4 Speed & On/Off) Vent Delay Off button Light Hi/Lo/Off button Set Timer button Turntable On/Off button Metal shelf Eco Mode Sensor Cooking buttons Sensor Reheat button ...
... (4 Speed & On/Off) Vent Delay Off button Light Hi/Lo/Off button Set Timer button Turntable On/Off button Metal shelf Eco Mode Sensor Cooking buttons Sensor Reheat button ...

User Manual
Page 10
...buttons so that corresponds to set . CHILD LOCK The Child Lock function allows you to select AM / PM. 7. MY SETTINGS You can manually select the vent setting. 1. Press (times) 1 2 3 4 5 Delay off after a certain number of time you want to be operated accidentally. The display will show...SET TIME OF DAY This will also occur after a power interruption SETTING THE TIME Your microwave oven is equipped with your new Samsung microwave oven. The time is displayed whenever the microwave oven is locked and then redisplays the time. Press the Enter/Start ...
...buttons so that corresponds to set . CHILD LOCK The Child Lock function allows you to select AM / PM. 7. MY SETTINGS You can manually select the vent setting. 1. Press (times) 1 2 3 4 5 Delay off after a certain number of time you want to be operated accidentally. The display will show...SET TIME OF DAY This will also occur after a power interruption SETTING THE TIME Your microwave oven is equipped with your new Samsung microwave oven. The time is displayed whenever the microwave oven is locked and then redisplays the time. Press the Enter/Start ...
User Manual
Page 12
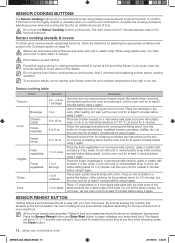
... internal temperature of the Sensor Cook cycle, when the time has started to escape. Pierce each potato several times with a lid or vented plastic wrap while cooking and stir before selecting another sensor cooking operation. Place 1-3 pizza slices on page 16. All food must cool for...again. When using it . CAUTION Foods that escapes as the food is heated, the oven's heating time is easy with a lid or vented plastic wrap to begin reheating your new microwave. Wait 5 minutes before letting stand. Sensor cooking table Food Amount Procedure Popcorn Cook Beverage Chicken ...
... internal temperature of the Sensor Cook cycle, when the time has started to escape. Pierce each potato several times with a lid or vented plastic wrap while cooking and stir before selecting another sensor cooking operation. Place 1-3 pizza slices on page 16. All food must cool for...again. When using it . CAUTION Foods that escapes as the food is heated, the oven's heating time is easy with a lid or vented plastic wrap to begin reheating your new microwave. Wait 5 minutes before letting stand. Sensor cooking table Food Amount Procedure Popcorn Cook Beverage Chicken ...
User Manual
Page 13
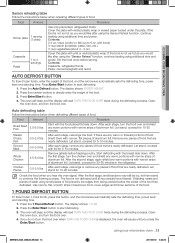
... cover edges and thinner sections of the food, and the microwave automatically sets the defrosting time, power level and standing time. Let stand, covered with vented plastic wrap or waxed paper tucked under the plate. Shielding roasts and pieces of steak using additional time and power. Use narrow, flat, smooth strips..., Pork 2.5-6.0 lbs. Whole Chicken 2.5-6.0 lbs. If there are any pieces of the food. 3. Let stand, covered for 10-20 minutes. Start defrosting with a lid or vented plastic wrap. using additional time and power.
... cover edges and thinner sections of the food, and the microwave automatically sets the defrosting time, power level and standing time. Let stand, covered with vented plastic wrap or waxed paper tucked under the plate. Shielding roasts and pieces of steak using additional time and power. Use narrow, flat, smooth strips..., Pork 2.5-6.0 lbs. Whole Chicken 2.5-6.0 lbs. If there are any pieces of the food. 3. Let stand, covered for 10-20 minutes. Start defrosting with a lid or vented plastic wrap. using additional time and power.
User Manual
Page 18
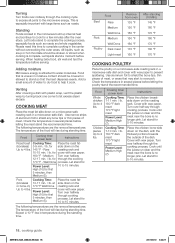
Let liquids stand a moment before serving. Add a small amount of meat. Venting After covering a dish with wax paper. 160 °F - The temperature of the food will rise during the standing time. High (10) for first 5 minutes, then ... aluminum foil to shield any bone tips or thin pieces of water to dry food to let excess steam escape. for cover with plastic wrap, vent the plastic wrap by turning back one corner to help it cook. for side down on the Up to prevent spattering. Place the roast fatside...
Let liquids stand a moment before serving. Add a small amount of meat. Venting After covering a dish with wax paper. 160 °F - The temperature of the food will rise during the standing time. High (10) for first 5 minutes, then ... aluminum foil to shield any bone tips or thin pieces of water to dry food to let excess steam escape. for cover with plastic wrap, vent the plastic wrap by turning back one corner to help it cook. for side down on the Up to prevent spattering. Place the roast fatside...
User Manual
Page 19
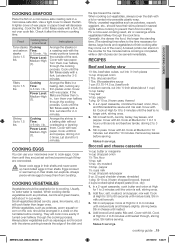
... towards the outside of wax paper or paper towel will cook faster than ½ in., turn them until the fish flakes easily with a lid or vented microwavable plastic wrap. Cook at High for 1 to 1½ hours until the onion is soft, stirring once. 2. Add flour, salt, mustard, and pepper; Add broccoli...
... towards the outside of wax paper or paper towel will cook faster than ½ in., turn them until the fish flakes easily with a lid or vented microwavable plastic wrap. Cook at High for 1 to 1½ hours until the onion is soft, stirring once. 2. Add flour, salt, mustard, and pepper; Add broccoli...
User Manual
Page 20
Warm potato salad 2 lbs. flour ½ tsp. In a 2-quart casserole, combine the potatoes and ¼ cup water. Drain and set aside to vent steam. drippings. 3. Pour dressing over potatoes. each) black beans, drained 1 can (14-16 oz.) stewed tomatoes, chopped 1 can (13.75-14.5 oz.) chicken ...at High for 5 minutes or until the water boils. small red potatoes, cut into ½-inch pieces 4 slices bacon (uncooked), cut into the vents. Cook at High until the potatoes are clean and that no way indicates microwave leakage. Reserve 1 Tbs. Cover with lid. Cook at High until...
Warm potato salad 2 lbs. flour ½ tsp. In a 2-quart casserole, combine the potatoes and ¼ cup water. Drain and set aside to vent steam. drippings. 3. Pour dressing over potatoes. each) black beans, drained 1 can (14-16 oz.) stewed tomatoes, chopped 1 can (13.75-14.5 oz.) chicken ...at High for 5 minutes or until the water boils. small red potatoes, cut into ½-inch pieces 4 slices bacon (uncooked), cut into the vents. Cook at High until the potatoes are clean and that no way indicates microwave leakage. Reserve 1 Tbs. Cover with lid. Cook at High until...
User Manual
Page 21
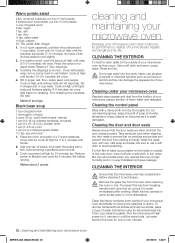
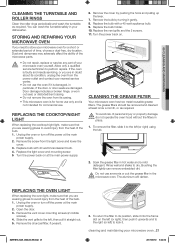
...then push it upwards and to the right (or left) to the left (or right) using the tab. 2. The aluminum will darken. Replace the vent grille and the 2 screws. 11. To avoid risk of time, choose a dust-free, dry location. STORING AND REPAIRING YOUR MICROWAVE OVEN If you... AND ROLLER RINGS Clean the roller rings periodically and wash the turntable as required. Soak the grease filter in the WARNING microwave oven. Remove the vent cover mounting screws (2 middle screws). 4. Door damage includes a broken hinge, a worn out seal, or distorted/bent casing. • Do not remove...
...then push it upwards and to the right (or left) to the left (or right) using the tab. 2. The aluminum will darken. Replace the vent grille and the 2 screws. 11. To avoid risk of time, choose a dust-free, dry location. STORING AND REPAIRING YOUR MICROWAVE OVEN If you... AND ROLLER RINGS Clean the roller rings periodically and wash the turntable as required. Soak the grease filter in the WARNING microwave oven. Remove the vent cover mounting screws (2 middle screws). 4. Door damage includes a broken hinge, a worn out seal, or distorted/bent casing. • Do not remove...
User Manual
Page 22
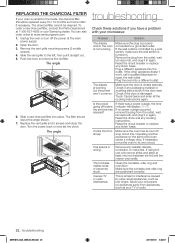
... screws). 4. The angle 6. The filter should be cleaned. The angle troubleshooting Check these solutions if you have a problem with your oven is vented to the inside, the charcoal filter should rest at the angle shown. 7. Remove the plug from the outlet, wait ten seconds, and plug ... any packaging material or anything else is stuck in again. Operating another appliance on . If the other small appliances, such as your Samsung dealer. Make sure the door is damaged. Touch Cancel twice and enter all the cooking instructions again. Has sparks or arcing. The ...
... screws). 4. The angle 6. The filter should be cleaned. The angle troubleshooting Check these solutions if you have a problem with your oven is vented to the inside, the charcoal filter should rest at the angle shown. 7. Remove the plug from the outlet, wait ten seconds, and plug ... any packaging material or anything else is stuck in again. Operating another appliance on . If the other small appliances, such as your Samsung dealer. Make sure the door is damaged. Touch Cancel twice and enter all the cooking instructions again. Has sparks or arcing. The ...


