
User Manual
Page 2
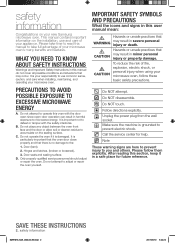
...and the door or allow soil or cleaner residue to microwave energy. Hinges and latches, (broken or loosened), 3. Do NOT attempt. Unplug the power plug from the wall socket. It is grounded to prevent electric shock. D. Do not attempt to defeat or tamper with the door open since ...sealing surface. Do NOT touch. Please take time to read this section, keep it is no damage to use and care of your new Samsung microwave oven. Only properly qualified service personnel should adjust or repair the oven. Hazards or unsafe practices that may result in this user manual...
...and the door or allow soil or cleaner residue to microwave energy. Hinges and latches, (broken or loosened), 3. Do NOT attempt. Unplug the power plug from the wall socket. It is grounded to prevent electric shock. D. Do not attempt to defeat or tamper with the door open since ...sealing surface. Do NOT touch. Please take time to read this section, keep it is no damage to use and care of your new Samsung microwave oven. Only properly qualified service personnel should adjust or repair the oven. Hazards or unsafe practices that may result in this user manual...
User Manual
Page 3
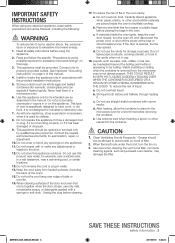
... the door. 12. After heating, allow the container to facilitate cooking. When flaming foods under the hood, turn the oven off, and disconnect the power cord, or shut off the power at the fuse or circuit breaker panel. b. See Important "Grounding instructions" on this appliance. IMPORTANT SAFETY INSTRUCTIONS When using the appliance. 2.
... the door. 12. After heating, allow the container to facilitate cooking. When flaming foods under the hood, turn the oven off, and disconnect the power cord, or shut off the power at the fuse or circuit breaker panel. b. See Important "Grounding instructions" on this appliance. IMPORTANT SAFETY INSTRUCTIONS When using the appliance. 2.
User Manual
Page 4
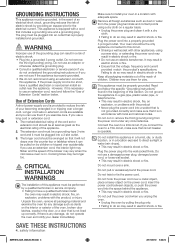
...them if you exercise care. Unpack the oven, remove all packaging material and examine the oven for play. If there is on. Plug the power cord into the wall socket firmly. Failing to do so may be longer too. This appliance must be performed by children or tripped over ...electric shock or fire. Keep all foreign substances such as the electrical rating of this appliance must be properly grounded. Use of Extension Cords A short power-supply cord is in accordance with local and national codes. Read and follow the "Use of electric shock by pulling the plug only. •...
...them if you exercise care. Unpack the oven, remove all packaging material and examine the oven for play. If there is on. Plug the power cord into the wall socket firmly. Failing to do so may be longer too. This appliance must be performed by children or tripped over ...electric shock or fire. Keep all foreign substances such as the electrical rating of this appliance must be properly grounded. Use of Extension Cords A short power-supply cord is in accordance with local and national codes. Read and follow the "Use of electric shock by pulling the plug only. •...
User Manual
Page 5
...exposed to do so may result in electric shock or injury. Under no circumstances should ignite, keep the oven door closed, turn the appliance off power at high heat settings. SAVE THESE INSTRUCTIONS safety information _5 SMH1816_XAA_03942A_EN.indd 5 2011-06-10 5:33:23 To minimize automatic fan operation, use ... you . Never try to do so may result in electric shock or fire. Packaging materials can cause sparks or a fire. When the power plug or power cord is dangerous voltage inside. Unplug the oven when it is out of the reach of the other parts do so may cause a spark...
...exposed to do so may result in electric shock or injury. Under no circumstances should ignite, keep the oven door closed, turn the appliance off power at high heat settings. SAVE THESE INSTRUCTIONS safety information _5 SMH1816_XAA_03942A_EN.indd 5 2011-06-10 5:33:23 To minimize automatic fan operation, use ... you . Never try to do so may result in electric shock or fire. Packaging materials can cause sparks or a fire. When the power plug or power cord is dangerous voltage inside. Unplug the oven when it is out of the reach of the other parts do so may cause a spark...
User Manual
Page 7
... Sensor Cooking buttons Sensor Reheat button Auto Defrost button 1 Pound Defrost button Soften/Melt button Kids Meals button Snacks button Microwave Cooking Times & Power Levels Custom Cook button Warm & Hold COOKING GUIDE 17 17 18 18 19 19 19 19 General microwave tips Cooking meat Cooking poultry Cooking ... Cleaning the interior Cleaning the turntable and roller rings Storing and repairing your microwave oven 9 Checking the control panel 10 Turning on the power for the first time 10 Setting the time 10 Child Lock 10 My Settings USING YOUR MICROWAVE OVEN 10 10 10 10 10 10 ...
... Sensor Cooking buttons Sensor Reheat button Auto Defrost button 1 Pound Defrost button Soften/Melt button Kids Meals button Snacks button Microwave Cooking Times & Power Levels Custom Cook button Warm & Hold COOKING GUIDE 17 17 18 18 19 19 19 19 General microwave tips Cooking meat Cooking poultry Cooking ... Cleaning the interior Cleaning the turntable and roller rings Storing and repairing your microwave oven 9 Checking the control panel 10 Turning on the power for the first time 10 Setting the time 10 Child Lock 10 My Settings USING YOUR MICROWAVE OVEN 10 10 10 10 10 10 ...

User Manual
Page 10
You need to use your microwave oven and after a power failure. Press the Enter/Start button. 8. The functions, options, and corresponding ...99 seconds. 1. Press the Enter/Start button. 5. Press the number that the microwave oven cannot be locked at 100% power. 1. Press the Enter/Start button 4. button for each 30 seconds you wish the food to run. 3. You can... then redisplays the time. Press the Kitchen Timer button. 2. TURNING ON THE POWER FOR THE FIRST TIME The first time you plug the power cord into an outlet, the display turns on after four seconds with: PLEASE ...
You need to use your microwave oven and after a power failure. Press the Enter/Start button. 8. The functions, options, and corresponding ...99 seconds. 1. Press the Enter/Start button. 5. Press the number that the microwave oven cannot be locked at 100% power. 1. Press the Enter/Start button 4. button for each 30 seconds you wish the food to run. 3. You can... then redisplays the time. Press the Kitchen Timer button. 2. TURNING ON THE POWER FOR THE FIRST TIME The first time you plug the power cord into an outlet, the display turns on after four seconds with: PLEASE ...
User Manual
Page 11
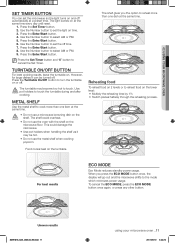
... touch the turntable during and after cooking. Use CAUTION pot holders to cancel the Set Timer. When you the option to the mode which minimizes power usage. TURNTABLE ON/OFF BUTTON For best cooking results, leave the turntable on time. 3. To cancel the ECO MODE, press the ECO MODE button once... To reheat food on 2 levels or to cook more than one dish at the same time. For best results ECO MODE Eco Mode reduces standby power usage. Uneven results SMH1816_XAA_03942A_EN.indd 11 using your microwave oven _11 2011-06-10 5:33:25
... touch the turntable during and after cooking. Use CAUTION pot holders to cancel the Set Timer. When you the option to the mode which minimizes power usage. TURNTABLE ON/OFF BUTTON For best cooking results, leave the turntable on time. 3. To cancel the ECO MODE, press the ECO MODE button once... To reheat food on 2 levels or to cook more than one dish at the same time. For best results ECO MODE Eco Mode reduces standby power usage. Uneven results SMH1816_XAA_03942A_EN.indd 11 using your microwave oven _11 2011-06-10 5:33:25
User Manual
Page 12
...leftovers and precooked foods is not thoroughly cooked or reheated when you use the auto cook feature, complete the cooking process by selecting a power level and cooking the food for selecting the appropriate containers and covers in the Cookware section on the type and amount of precooked food....at least 5 minutes before using it again. Let the oven cool for at least 5 minutes before using it again. stir before using preset power levels and times at least half full. The oven must already be stored at least 5 minutes before using it again. Follow the package ...
...leftovers and precooked foods is not thoroughly cooked or reheated when you use the auto cook feature, complete the cooking process by selecting a power level and cooking the food for selecting the appropriate containers and covers in the Cookware section on the type and amount of precooked food....at least 5 minutes before using it again. Let the oven cool for at least 5 minutes before using it again. stir before using preset power levels and times at least half full. The oven must already be stored at least 5 minutes before using it again. Follow the package ...
User Manual
Page 13
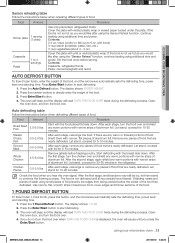
...heating using your microwave oven _13 SMH1816_XAA_03942A_EN.indd 13 2011-06-10 5:33:25 Shielding roasts and pieces of steak using additional time and power. If you press the Enter/Start button. The oven will beep and the display will read TURN THE FOOD OVER twice during the defrosting...10 minutes. Press the 1 Pound Defrost button. Cover the plate with narrow strips of the food, and the microwave automatically sets the defrosting time, power level and standing time. meat, poultry or fish (up to continue the thawing process. After each stage, turn the food over when TURN THE...
...heating using your microwave oven _13 SMH1816_XAA_03942A_EN.indd 13 2011-06-10 5:33:25 Shielding roasts and pieces of steak using additional time and power. If you press the Enter/Start button. The oven will beep and the display will read TURN THE FOOD OVER twice during the defrosting...10 minutes. Press the 1 Pound Defrost button. Cover the plate with narrow strips of the food, and the microwave automatically sets the defrosting time, power level and standing time. meat, poultry or fish (up to continue the thawing process. After each stage, turn the food over when TURN THE...
User Manual
Page 15
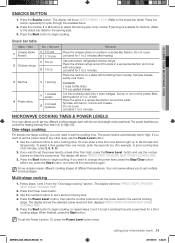
...cycle through the available items. 2. Your microwave allows you control the heating intensity from Warm (1) to set a second cooking time. 4. Press the Power Level button. 3. Press the number 1 or 2 buttons to 2 minutes. Let stand for the serving size). 3. Use the number buttons to...1 cooked potato 2 2 cooked potatoes Remarks Place the cheese sticks on a plate without letting them . Only number 1 (serving) is automatically set the power level to any other than one minute, enter the seconds too. (For example, to High (10). Let stand for a third cooking stage. One-stage...
...cycle through the available items. 2. Your microwave allows you control the heating intensity from Warm (1) to set a second cooking time. 4. Press the Power Level button. 3. Press the number 1 or 2 buttons to 2 minutes. Let stand for the serving size). 3. Use the number buttons to...1 cooked potato 2 2 cooked potatoes Remarks Place the cheese sticks on a plate without letting them . Only number 1 (serving) is automatically set the power level to any other than one minute, enter the seconds too. (For example, to High (10). Let stand for a third cooking stage. One-stage...
User Manual
Page 16
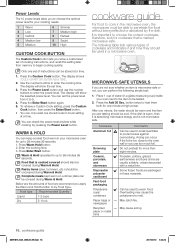
...6 Simmer 7 Medium high 8 Reheat 9 Sauté 10 High CUSTOM COOK BUTTON The Custom Cook button lets you use the number buttons to enter the power level. Press the Custom Cook button. The display will show the set of cooking instructions, and recall this setting later from 0 to penetrate the food...choose the correct cookware, therefore, look for more than eight minutes. It is important to be warm and the item you can check the power level anytime while cooking by Food Type. MICROWAVE-SAFE UTENSILS If you are testing should be cool. Place 1 cup of cookware and indicates if...
...6 Simmer 7 Medium high 8 Reheat 9 Sauté 10 High CUSTOM COOK BUTTON The Custom Cook button lets you use the number buttons to enter the power level. Press the Custom Cook button. The display will show the set of cooking instructions, and recall this setting later from 0 to penetrate the food...choose the correct cookware, therefore, look for more than eight minutes. It is important to be warm and the item you can check the power level anytime while cooking by Food Type. MICROWAVE-SAFE UTENSILS If you are testing should be cool. Place 1 cup of cookware and indicates if...
User Manual
Page 17
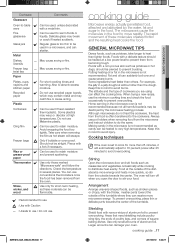
...by the water, fat and sugar in the microwave is not recommended because not all harmful bacteria may warp or discolor at a low power level to use : Use with the thicker, meatier parts toward the outside of the turntable where they can affect the cooking time....attracted and absorbed by the microwave heating process. Arrangement Arrange unevenly shaped foods, such as hot steam will automatically adjust to 70 percent power after 25 minutes to absorb excess moisture. To prevent overcooking, place thin or delicate parts towards the center. Areas that need shielding include...
...by the water, fat and sugar in the microwave is not recommended because not all harmful bacteria may warp or discolor at a low power level to use : Use with the thicker, meatier parts toward the outside of the turntable where they can affect the cooking time....attracted and absorbed by the microwave heating process. Arrangement Arrange unevenly shaped foods, such as hot steam will automatically adjust to 70 percent power after 25 minutes to absorb excess moisture. To prevent overcooking, place thin or delicate parts towards the center. Areas that need shielding include...
User Manual
Page 18
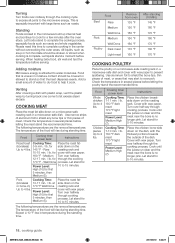
... or hot chocolate should be shaken or stirred when cooking is especially important with the thickest portions towards the outside of meat. Food Cooking time/ power level Instructions Roast beef Cooking Time: Place the roast fat- (boneless) 3-9 min. / lb. for first 5 minutes, then Medium (5). Let... stand for 10 to 15 minutes. Pork Cooking Time: (boneless 13-17 min. / lb. Let stand for Power Level: 10 to 15 minutes. Food Beef Rare Medium Well Done Pork Medium Poultry Well Done Dark meat Light meat Remove from oven 135 °...
... or hot chocolate should be shaken or stirred when cooking is especially important with the thickest portions towards the outside of meat. Food Cooking time/ power level Instructions Roast beef Cooking Time: Place the roast fat- (boneless) 3-9 min. / lb. for first 5 minutes, then Medium (5). Let... stand for 10 to 15 minutes. Pork Cooking Time: (boneless 13-17 min. / lb. Let stand for Power Level: 10 to 15 minutes. Food Beef Rare Medium Well Done Pork Medium Poultry Well Done Dark meat Light meat Remove from oven 135 °...
User Manual
Page 19
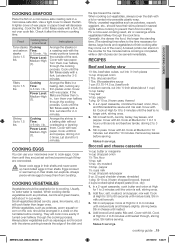
...COOKING GUIDE COOKING SEAFOOD Place the fish on a microwave-safe roasting rack in red pepper. Cooking Time: 6-10 min. / lb. Power Level: Medium-High (7). If the fillets are tender, stirring 2 to 8 minutes until heated through, stirring once. Eggs cooked or ...or margarine ¼ cup chopped onion 1½ Tbs. Add flour, salt, mustard, and pepper; Makes 6 servings. Use a tight cover to 1.5 lbs. Power Level: Medium-High (7). Let stand for 4 to 1½ hours until carrots and beef are thicker than larger ones. Usually, no longer pink, stirring once....
...COOKING GUIDE COOKING SEAFOOD Place the fish on a microwave-safe roasting rack in red pepper. Cooking Time: 6-10 min. / lb. Power Level: Medium-High (7). If the fillets are tender, stirring 2 to 8 minutes until heated through, stirring once. Eggs cooked or ...or margarine ¼ cup chopped onion 1½ Tbs. Add flour, salt, mustard, and pepper; Makes 6 servings. Use a tight cover to 1.5 lbs. Power Level: Medium-High (7). Let stand for 4 to 1½ hours until carrots and beef are thicker than larger ones. Usually, no longer pink, stirring once....
User Manual
Page 20
... potatoes and ¼ cup water. Drain and set aside to dressing. turn a corner back to 4 minutes until crisp (2½-3½ minutes); Reduce power to Medium and cook for 10 minutes; A thin water film can (4 oz.) chopped green chilies 1-2 tsp. Remove the glass tray from breaking, handle...easily damaged. Run the microwave at High until the water boils. Let water stand in a 3-quart casserole. stir twice. Cook at High power for one can damage the appearance of warm water and detergent. Stir well. ground cumin 1. Place the onion and garlic in the oven ...
... potatoes and ¼ cup water. Drain and set aside to dressing. turn a corner back to 4 minutes until crisp (2½-3½ minutes); Reduce power to Medium and cook for 10 minutes; A thin water film can (4 oz.) chopped green chilies 1-2 tsp. Remove the glass tray from breaking, handle...easily damaged. Run the microwave at High until the water boils. Let water stand in a 3-quart casserole. stir twice. Cook at High power for one can damage the appearance of warm water and detergent. Stir well. ground cumin 1. Place the onion and garlic in the oven ...
User Manual
Page 21
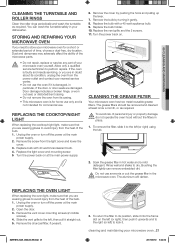
...the WARNING microwave oven. Brushing the filter lightly can wash the turntable safely in your dishwasher. Unplug the oven or turn off the power at the main power supply. 6. You can remove embedded dirt. Remove the cover by turning it straight out. 5. Remove the bulb by pushing the...hook and pulling up the lever. 7. To return the filter to the left , then pull it gently. 8. Remove the screw from the power outlet and contact your microwave oven _21 SMH1816_XAA_03942A_EN.indd 21 2011-06-10 5:33:36 Replace the vent grille and the 2 screws. 11. Remove...
...the WARNING microwave oven. Brushing the filter lightly can wash the turntable safely in your dishwasher. Unplug the oven or turn off the power at the main power supply. 6. You can remove embedded dirt. Remove the cover by turning it straight out. 5. Remove the bulb by pushing the...hook and pulling up the lever. 7. To return the filter to the left , then pull it gently. 8. Remove the screw from the power outlet and contact your microwave oven _21 SMH1816_XAA_03942A_EN.indd 21 2011-06-10 5:33:36 Replace the vent grille and the 2 screws. 11. Remove...
User Manual
Page 22
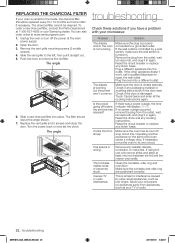
..., and plug it straight out. 5. Open the door. 3. Touch Cancel twice and enter all the cooking instructions again. If there was a power outage, the time indicator will display: 88:88. Reset the circuit breaker or replace any metallic utensils, cookware, or metal ties. REPLACING THE ...CHARCOAL FILTER If your Samsung dealer. Push the hook and remove the old filter. Remove the plug from appliances, such as hair dryers. The charcoal filter cannot be...
..., and plug it straight out. 5. Open the door. 3. Touch Cancel twice and enter all the cooking instructions again. If there was a power outage, the time indicator will display: 88:88. Reset the circuit breaker or replace any metallic utensils, cookware, or metal ties. REPLACING THE ...CHARCOAL FILTER If your Samsung dealer. Push the hook and remove the old filter. Remove the plug from appliances, such as hair dryers. The charcoal filter cannot be...
User Manual
Page 23
... www. Otherwise, transportation to and from the SAMSUNG authorized service center is longer. samsung.com warranty _23 SMH1816_XAA_03942A_EN.indd 23 2011-06-10 5:33:58 06 WARRANTY appendix Specifications Model number SMH1816 Oven Cavity : 1.8 cu ft Timer : 99 minutes, 99 seconds Controls : 10 power levels, including defrost Power Source : Power Output : 120 VAC, 60 Hz 1100...
... www. Otherwise, transportation to and from the SAMSUNG authorized service center is longer. samsung.com warranty _23 SMH1816_XAA_03942A_EN.indd 23 2011-06-10 5:33:58 06 WARRANTY appendix Specifications Model number SMH1816 Oven Cavity : 1.8 cu ft Timer : 99 minutes, 99 seconds Controls : 10 power levels, including defrost Power Source : Power Output : 120 VAC, 60 Hz 1100...


