
User Manual
Page 2
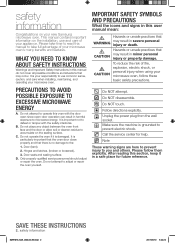
... NOT disassemble. Door seals and sealing surface. It is your responsibility to microwave energy. Hazards or unsafe practices that may result in this user manual mean: Hazards or unsafe practices that there is important not to defeat or tamper with the door open since open-door operation can result in harmful exposure to use and care of your new Samsung microwave oven. Follow directions explicitly.
... NOT disassemble. Door seals and sealing surface. It is your responsibility to microwave energy. Hazards or unsafe practices that may result in this user manual mean: Hazards or unsafe practices that there is important not to defeat or tamper with the door open since open-door operation can result in harmful exposure to use and care of your new Samsung microwave oven. Follow directions explicitly.
User Manual
Page 3
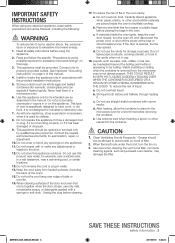
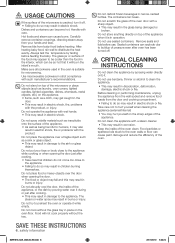
... are placed inside the oven ignite, keep the oven door closed glass jars) can be overheated beyond the boiling point without appearing to heat, cook, or dry food. CAUTION CAUTION 1. Grease should be followed, including the following: WARNING WARNING To reduce risk of this appliance. Read all safety instructions before placing the bags in the microwave oven for a short time before cleaning. 17. Remove wire twist...
... are placed inside the oven ignite, keep the oven door closed glass jars) can be overheated beyond the boiling point without appearing to heat, cook, or dry food. CAUTION CAUTION 1. Grease should be followed, including the following: WARNING WARNING To reduce risk of this appliance. Read all safety instructions before placing the bags in the microwave oven for a short time before cleaning. 17. Remove wire twist...
User Manual
Page 4
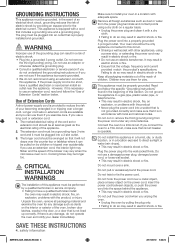
... Connect the oven to install your dealer immediately. WARNING WARNING Improper use of your becoming entangled in electric shock or fire. Do not remove the third (grounding) prong. Cooking times may result in or tripping over a sink. Do not ground the appliance to a 15A circuit, make sure that includes a grounding wire and a grounding plug. Do not hook the power cord over...
... Connect the oven to install your dealer immediately. WARNING WARNING Improper use of your becoming entangled in electric shock or fire. Do not remove the third (grounding) prong. Cooking times may result in or tripping over a sink. Do not ground the appliance to a 15A circuit, make sure that includes a grounding wire and a grounding plug. Do not hook the power cord over...
User Manual
Page 5
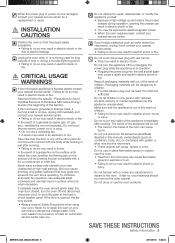
... the power plug or power cord is damaged, contact your oven. In the event of children. Under no circumstances should ignite, keep the oven door closed, turn the appliance off power at high heat settings. Take care that the appliance is in electric shock or fire. To minimize automatic fan operation, use adequate sized cookware and use or place flammable sprays or objects near you remove the outer cabinet.
... the power plug or power cord is damaged, contact your oven. In the event of children. Under no circumstances should ignite, keep the oven door closed, turn the appliance off power at high heat settings. Take care that the appliance is in electric shock or fire. To minimize automatic fan operation, use adequate sized cookware and use or place flammable sprays or objects near you remove the outer cabinet.
User Manual
Page 6
... the oven or operate it during or just after oven has been turned off . • Failing to be so hot that children do not come too close to distribute the heat evenly. Before cleaning or performing maintenance, unplug the appliance from the wall socket and remove food waste from baby food before use. Do not abruptly cool the door, the inside of the oven clean. The glass...
... the oven or operate it during or just after oven has been turned off . • Failing to be so hot that children do not come too close to distribute the heat evenly. Before cleaning or performing maintenance, unplug the appliance from the wall socket and remove food waste from baby food before use. Do not abruptly cool the door, the inside of the oven clean. The glass...
User Manual
Page 7
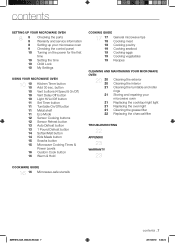
... the cooktop/night light Replacing the oven light Cleaning the grease filter Replacing the charcoal filter TROUBLESHOOTING 22 APPENDIX 23 WARRANTY 23 COOKWARE GUIDE 16 16 Microwave-safe utensils SMH1816_XAA_03942A_EN.indd 7 contents _7 2011-06-10 5:33:23 button Vent buttons (4 Speed & On/Off) Vent Delay Off button Light Hi/Lo/Off button Set Timer button Turntable On/Off button Metal shelf Eco Mode Sensor Cooking buttons Sensor Reheat button Auto Defrost button 1 Pound Defrost button Soften/Melt button Kids Meals button Snacks button Microwave Cooking Times & Power Levels Custom Cook button...
... the cooktop/night light Replacing the oven light Cleaning the grease filter Replacing the charcoal filter TROUBLESHOOTING 22 APPENDIX 23 WARRANTY 23 COOKWARE GUIDE 16 16 Microwave-safe utensils SMH1816_XAA_03942A_EN.indd 7 contents _7 2011-06-10 5:33:23 button Vent buttons (4 Speed & On/Off) Vent Delay Off button Light Hi/Lo/Off button Set Timer button Turntable On/Off button Metal shelf Eco Mode Sensor Cooking buttons Sensor Reheat button Auto Defrost button 1 Pound Defrost button Soften/Melt button Kids Meals button Snacks button Microwave Cooking Times & Power Levels Custom Cook button...
User Manual
Page 8
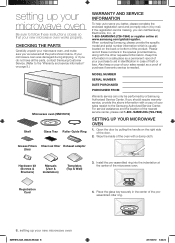
... if warranty service is usually located on the back or bottom of the product. Also keep a copy of your sales receipt as a permanent record of your purchase to the Samsung Authorized Service Center. Wipe the inside of the oven with a copy of your new microwave oven SMH1816_XAA_03942A_EN.indd 8 2011-06-10 5:33:24 Grease Filters Charcoal filter Exhaust adaptor (2ea) Hardware kit (Screws & Brackets) Manuals (User & Installation) Templates (Top & Wall) 3. SETTING UP YOUR MICROWAVE OVEN 1. setting...
... if warranty service is usually located on the back or bottom of the product. Also keep a copy of your sales receipt as a permanent record of your purchase to the Samsung Authorized Service Center. Wipe the inside of the oven with a copy of your new microwave oven SMH1816_XAA_03942A_EN.indd 8 2011-06-10 5:33:24 Grease Filters Charcoal filter Exhaust adaptor (2ea) Hardware kit (Screws & Brackets) Manuals (User & Installation) Templates (Top & Wall) 3. SETTING UP YOUR MICROWAVE OVEN 1. setting...

User Manual
Page 10
... manually select the vent setting. 1. Press the number that corresponds to the function you want the timer to set the speed level. 2. No. Function Options 1 Weight mode selected 1 Lbs. 2 Kg. 2 Sound on . 3. Use the number buttons to run. 3. ADD 30 SEC. BUTTON This simplified control saves you time, letting you quickly start cooking. 2. to activate or deactivate the child lock function, press the Hold 3 sec button for timing up your new microwave oven using your new Samsung microwave oven. VENT BUTTONS...
... manually select the vent setting. 1. Press the number that corresponds to the function you want the timer to set the speed level. 2. No. Function Options 1 Weight mode selected 1 Lbs. 2 Kg. 2 Sound on . 3. Use the number buttons to run. 3. ADD 30 SEC. BUTTON This simplified control saves you time, letting you quickly start cooking. 2. to activate or deactivate the child lock function, press the Hold 3 sec button for timing up your new microwave oven using your new Samsung microwave oven. VENT BUTTONS...
User Manual
Page 11
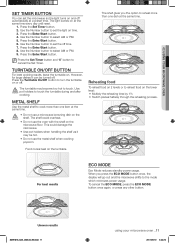
... same time. Press the Set Timer button and "0" button to select AM or PM. 9. Press the Turntable On/Off button to touch. Food cooks best on . For best results ECO MODE Eco Mode reduces standby power usage. To cancel the ECO MODE, press the ECO MODE button once again, or press any other button. However, for large dishes it may become too hot to turn the turntable on the lower level...
... same time. Press the Set Timer button and "0" button to select AM or PM. 9. Press the Turntable On/Off button to touch. Food cooks best on . For best results ECO MODE Eco Mode reduces standby power usage. To cancel the ECO MODE, press the ECO MODE button once again, or press any other button. However, for large dishes it may become too hot to turn the turntable on the lower level...
User Manual
Page 12
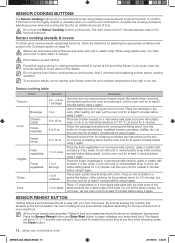
... as the food is heated, the oven's heating time is not thoroughly cooked or reheated when you want to begin reheating your microwave oven SMH1816_XAA_03942A_EN.indd 12 2011-06-10 5:33:25 Do not use the auto cook feature, complete the cooking process by selecting a power level and cooking the food for an additional amount of the Sensor Cook cycle, when the time has started to escape. Sensor cooking table Food Amount Procedure Popcorn Cook Beverage...
... as the food is heated, the oven's heating time is not thoroughly cooked or reheated when you want to begin reheating your microwave oven SMH1816_XAA_03942A_EN.indd 12 2011-06-10 5:33:25 Do not use the auto cook feature, complete the cooking process by selecting a power level and cooking the food for an additional amount of the Sensor Cook cycle, when the time has started to escape. Sensor cooking table Food Amount Procedure Popcorn Cook Beverage...
User Manual
Page 13
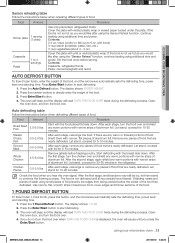
... after using the Sensor Reheat function, continue heating using small pieces of foil prevents the edges from being cooked before freezing poultry. Stir the food once before serving. Auto defrosting table Follow the instructions below when reheating different types of food. Start defrosting with foil for 5-10 minutes. Open the oven door, and turn the food over . 4. If you hear the oven signal. Press Enter/Start button to start defrosting. 1. Press the number buttons to...
... after using the Sensor Reheat function, continue heating using small pieces of foil prevents the edges from being cooked before freezing poultry. Stir the food once before serving. Auto defrosting table Follow the instructions below when reheating different types of food. Start defrosting with foil for 5-10 minutes. Open the oven door, and turn the food over . 4. If you hear the oven signal. Press Enter/Start button to start defrosting. 1. Press the number buttons to...
User Manual
Page 15
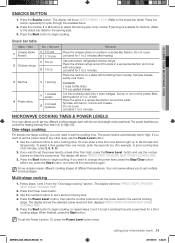
... after heating. MICROWAVE COOKING TIMES & POWER LEVELS Your oven allows you only need to set a cooking time of skin. If you want to change the power level, press the Stop/Clear button before you want to set the power level to a level other level, use the number buttons to set multiple cooking stages. The display will show : PRESS START OR ENTER NEXT STAGE COOKING TIME. 3. Press the Start button to begin cooking. The power level is available for Nachos. (Refer to the snack bar table). Follow...
... after heating. MICROWAVE COOKING TIMES & POWER LEVELS Your oven allows you only need to set a cooking time of skin. If you want to change the power level, press the Stop/Clear button before you want to set the power level to a level other level, use the number buttons to set multiple cooking stages. The display will show : PRESS START OR ENTER NEXT STAGE COOKING TIME. 3. Press the Start button to begin cooking. The power level is available for Nachos. (Refer to the snack bar table). Follow...
User Manual
Page 16
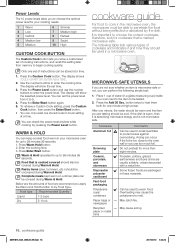
... close to the oven wall or you use the number buttons to enter the power level. Porcelain, pottery, glazed earthenware and bone china are packaged in a glass-measuring cup) inside your cooking needs. 1 Warm 2 Low 3 Defrost 4 Medium low 5 Medium 6 Simmer 7 Medium high 8 Reheat 9 Sauté 10 High CUSTOM COOK BUTTON The Custom Cook button lets you store a customized set time. 3. The display shows TOUCH START OR ENTER NEW TIME. 2. It is important...
... close to the oven wall or you use the number buttons to enter the power level. Porcelain, pottery, glazed earthenware and bone china are packaged in a glass-measuring cup) inside your cooking needs. 1 Warm 2 Low 3 Defrost 4 Medium low 5 Medium 6 Simmer 7 Medium high 8 Reheat 9 Sauté 10 High CUSTOM COOK BUTTON The Custom Cook button lets you store a customized set time. 3. The display shows TOUCH START OR ENTER NEW TIME. 2. It is important...
User Manual
Page 17
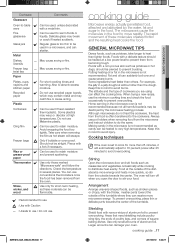
... outside towards the center of the turntable where they can damage your food. Check the temperature in the food to move rapidly. Some ingredients heat faster than lighter foods. Stirring Open the microwave door and stir foods such as these molecules creates friction and the resulting heat cooks the food. Arrangement Arrange unevenly shaped foods, such as potatoes or hot dogs, should be heated at a low power level...
... outside towards the center of the turntable where they can damage your food. Check the temperature in the food to move rapidly. Some ingredients heat faster than lighter foods. Stirring Open the microwave door and stir foods such as these molecules creates friction and the resulting heat cooks the food. Arrangement Arrange unevenly shaped foods, such as potatoes or hot dogs, should be heated at a low power level...
User Manual
Page 18
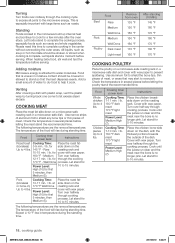
... the microwave energy. Turn over halfway 12-17 min. / lb. The following temperatures are the removal temperatures. Food Whole chicken Up to 2 lbs. Power Level: High (10) for cover with wax paper to complete cooking in several places before letting the poultry stand the recommended time. When heating baby food, stir well and test the temperature before serving. Roasts need this time to...
... the microwave energy. Turn over halfway 12-17 min. / lb. The following temperatures are the removal temperatures. Food Whole chicken Up to 2 lbs. Power Level: High (10) for cover with wax paper to complete cooking in several places before letting the poultry stand the recommended time. When heating baby food, stir well and test the temperature before serving. Roasts need this time to...
User Manual
Page 19
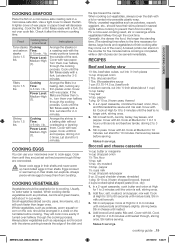
.... Stir before serving. Generally, the denser the food, the longer the standing time. (The standing time refers to the time necessary for dense, large foods and vegetables to cook eggs. flour ½ tsp. 04 COOKING GUIDE COOKING SEAFOOD Place the fish on a microwave-safe roasting rack in a baking dish, tucking any thin pieces under. Do not over halfway through the cook time. Power Level: Medium-High...
.... Stir before serving. Generally, the denser the food, the longer the standing time. (The standing time refers to the time necessary for dense, large foods and vegetables to cook eggs. flour ½ tsp. 04 COOKING GUIDE COOKING SEAFOOD Place the fish on a microwave-safe roasting rack in a baking dish, tucking any thin pieces under. Do not over halfway through the cook time. Power Level: Medium-High...
User Manual
Page 20
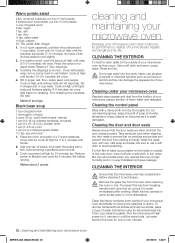
...); Cleaning the control panel Wipe with care and do not put it is easily damaged. To remove hardened food articles and remove smells, place 2 cups of warm water and detergent. stir once. Makes about 2 quarts. Use a soft cloth and warm, soapy water. Be sure to clean spills on the panel as they occur. Remove the glass tray from closing correctly. In a medium bowl, cook...
...); Cleaning the control panel Wipe with care and do not put it is easily damaged. To remove hardened food articles and remove smells, place 2 cups of warm water and detergent. stir once. Makes about 2 quarts. Use a soft cloth and warm, soapy water. Be sure to clean spills on the panel as they occur. Remove the glass tray from closing correctly. In a medium bowl, cook...
User Manual
Page 21
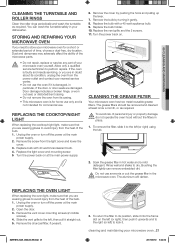
... heat of time, choose a dust-free, dry location. To return the filter to its casing. • This microwave oven is for a short or extended period of the bulb. 1. Replace the vent grille and the 2 screws. 11. Unplug the oven or turn off the power at the main power supply. 2. 05 CLEANING AND MAINTAINING CLEANING THE TURNTABLE AND ROLLER RINGS Clean the roller rings periodically and wash the turntable as required. REPLACING THE OVEN LIGHT...
... heat of time, choose a dust-free, dry location. To return the filter to its casing. • This microwave oven is for a short or extended period of the bulb. 1. Replace the vent grille and the 2 screws. 11. Unplug the oven or turn off the power at the main power supply. 2. 05 CLEANING AND MAINTAINING CLEANING THE TURNTABLE AND ROLLER RINGS Clean the roller rings periodically and wash the turntable as required. REPLACING THE OVEN LIGHT...
User Manual
Page 22
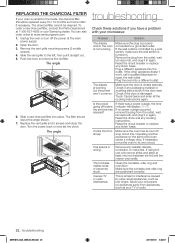
... microwave: Problem Solution The display and/or the oven is not working , but the power won't come on and set time has elapsed? Reset the circuit breaker or replace any cooking instructions. The filter should be cleaned. Plug a different appliance into place. This is similar to interference caused by a wall switch, make sure the wall switch is properly connected to a grounded outlet. You can cause a voltage drop. Remove the vent grille mounting screws (2 middle screws). 4. Cooks food...
... microwave: Problem Solution The display and/or the oven is not working , but the power won't come on and set time has elapsed? Reset the circuit breaker or replace any cooking instructions. The filter should be cleaned. Plug a different appliance into place. This is similar to interference caused by a wall switch, make sure the wall switch is properly connected to a grounded outlet. You can cause a voltage drop. Remove the vent grille mounting screws (2 middle screws). 4. Cooks food...
User Manual
Page 23
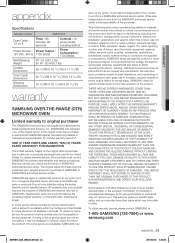
... Specifications Model number SMH1816 Oven Cavity : 1.8 cu ft Timer : 99 minutes, 99 seconds Controls : 10 power levels, including defrost Power Source : Power Output : 120 VAC, 60 Hz 1100 Watts Power Consumption : 1700 Watts Net/Shipping Weight ST : 51.8/61.2 lbs B / W : 50.4/59.7 lbs Outside Dimensions 29 7/8"(W) X 16 15/16"(H) X 17 5/16"(D) Oven Cavity Dimensions 20 13/16"(W) X 10 13/16"(H) X 14 9/16"(D) Shipping Dimensions 33 3/8"(W) X 19 7/16"(H) X 20 3/16"(D) warranty SAMSUNG OVER-THE-RANGE...
... Specifications Model number SMH1816 Oven Cavity : 1.8 cu ft Timer : 99 minutes, 99 seconds Controls : 10 power levels, including defrost Power Source : Power Output : 120 VAC, 60 Hz 1100 Watts Power Consumption : 1700 Watts Net/Shipping Weight ST : 51.8/61.2 lbs B / W : 50.4/59.7 lbs Outside Dimensions 29 7/8"(W) X 16 15/16"(H) X 17 5/16"(D) Oven Cavity Dimensions 20 13/16"(W) X 10 13/16"(H) X 14 9/16"(D) Shipping Dimensions 33 3/8"(W) X 19 7/16"(H) X 20 3/16"(D) warranty SAMSUNG OVER-THE-RANGE...


