
User Manual
Page 8
Table of Contents Getting Started 1 Front View 2 Back View 3 Buttons 4 Wireless Charger Dock 5 Assemble Your Gear 6 Set Up Your Gear 11 Know Your Device 16 Home Screen 17 Status Panel 21 Use the Bezel 24 Navigation 26 Navigate the Screen 29 Enter Text 30 Applications 34 Apps Screen 35 Messages 37 Phone 38 Contacts 41 S Health 42 Samsung Pay 51 Weather 53 Music Player 54 S Voice 56
Table of Contents Getting Started 1 Front View 2 Back View 3 Buttons 4 Wireless Charger Dock 5 Assemble Your Gear 6 Set Up Your Gear 11 Know Your Device 16 Home Screen 17 Status Panel 21 Use the Bezel 24 Navigation 26 Navigate the Screen 29 Enter Text 30 Applications 34 Apps Screen 35 Messages 37 Phone 38 Contacts 41 S Health 42 Samsung Pay 51 Weather 53 Music Player 54 S Voice 56

User Manual
Page 9
Reminders 58 Alti-Barometer 59 Schedule 60 Alarm 61 World Clock 62 News Briefing 63 Gallery 64 Find My Phone 66 Email 67 Settings 68 Style 70 Sounds and Vibration 71 Device 74 Display 75 Call 76 Messages 7 7 Connections 78 Security 83 Accessibility 84 Input 86 Power Saving 88 Gear Info 89 Connect to a Phone 90 Connect to a New Phone 91 Samsung Gear App 92 Introduction 93 Info Tab 95 Settings Tab 97 Table of Contents viii
Reminders 58 Alti-Barometer 59 Schedule 60 Alarm 61 World Clock 62 News Briefing 63 Gallery 64 Find My Phone 66 Email 67 Settings 68 Style 70 Sounds and Vibration 71 Device 74 Display 75 Call 76 Messages 7 7 Connections 78 Security 83 Accessibility 84 Input 86 Power Saving 88 Gear Info 89 Connect to a Phone 90 Connect to a New Phone 91 Samsung Gear App 92 Introduction 93 Info Tab 95 Settings Tab 97 Table of Contents viii

User Manual
Page 13
Getting Started 4 Buttons Back • Press to return to open the Watch screen when you are on any other screen. Buttons Function Home/Power • Press and hold to turn the Gear on or off. • Press to turn on the screen. • Press and hold for more than seven seconds to restart the Gear. • Press to open the Apps screen when you are on the Watch screen. • Press to the previous screen.
Getting Started 4 Buttons Back • Press to return to open the Watch screen when you are on any other screen. Buttons Function Home/Power • Press and hold to turn the Gear on or off. • Press to turn on the screen. • Press and hold for more than seven seconds to restart the Gear. • Press to open the Apps screen when you are on the Watch screen. • Press to the previous screen.

User Manual
Page 15
... to the wireless charger dock. 2. Plug the USB charger head into the wireless charger dock. Place the Gear into an electric socket. 3. Getting Started 6 Assemble Your Gear Samsung accessories are designed for extended periods. Assemble Your Gear Prepare and charge your device before using it for the first time or when it sits unused...
... to the wireless charger dock. 2. Plug the USB charger head into the wireless charger dock. Place the Gear into an electric socket. 3. Getting Started 6 Assemble Your Gear Samsung accessories are designed for extended periods. Assemble Your Gear Prepare and charge your device before using it for the first time or when it sits unused...

User Manual
Page 16
...8226; Red: Charging. • Green: Fully charged • Orange: Connected to indicate the battery level. If the error occurs again, contact a Samsung Service Center for service support. Disconnect the Gear from the wireless charger dock, and then reconnect. Check the Charge Status When you connect the... Gear and the wireless charger dock, the wireless charger dock's LED indicator flashes certain colors to a low-charger head Note:...
...8226; Red: Charging. • Green: Fully charged • Orange: Connected to indicate the battery level. If the error occurs again, contact a Samsung Service Center for service support. Disconnect the Gear from the wireless charger dock, and then reconnect. Check the Charge Status When you connect the... Gear and the wireless charger dock, the wireless charger dock's LED indicator flashes certain colors to a low-charger head Note:...

User Manual
Page 17
... such as a computer, may result in a slower charging speed due to a lower electric current. • If the Gear is being connected to the charger. Getting Started 8 Assemble Your Gear Fit the strap to your wrist. 2. Allow a depleted battery to charge for a few minutes before turning on the... with other devices using a multi-charger, charging may take longer to close it is completely discharged, the Gear cannot be found. If this happens, immediately disconnect the Gear from the wireless charger dock and leave the device aside until another power connection can be used while it ...
... such as a computer, may result in a slower charging speed due to a lower electric current. • If the Gear is being connected to the charger. Getting Started 8 Assemble Your Gear Fit the strap to your wrist. 2. Allow a depleted battery to charge for a few minutes before turning on the... with other devices using a multi-charger, charging may take longer to close it is completely discharged, the Gear cannot be found. If this happens, immediately disconnect the Gear from the wireless charger dock and leave the device aside until another power connection can be used while it ...

User Manual
Page 18
... device and consult a physician. • The Gear and the strap have sensitive skin or fasten the Gear too tightly, you have passed the hazardous materials test and meet international safety standards. Getting Started 9 Assemble Your Gear Strap Tips and Precautions • Some people may... experience discomfort when wearing the Gear for prolonged periods. • If you may feel some discomfort. • Do not ...
... device and consult a physician. • The Gear and the strap have sensitive skin or fasten the Gear too tightly, you have passed the hazardous materials test and meet international safety standards. Getting Started 9 Assemble Your Gear Strap Tips and Precautions • Some people may... experience discomfort when wearing the Gear for prolonged periods. • If you may feel some discomfort. • Do not ...

User Manual
Page 19
Insert one end of the spring bar into the lug, slide the spring bar inwards, and connect the strap. Getting Started 10 Assemble Your Gear 2.
Insert one end of the spring bar into the lug, slide the spring bar inwards, and connect the strap. Getting Started 10 Assemble Your Gear 2.

User Manual
Page 20
Press and hold the Power button for a few seconds to turn on the Gear for the first time or reset it, a pop-up your Gear. 2. Getting Started 11 Set Up Your Gear Follow the prompts set up window is displayed. To turn on the Gear. • When you turn off the Gear, press and hold the Power button, and then tap Power off. Set Up Your Gear Turn the Gear On or Off 1.
Press and hold the Power button for a few seconds to turn on the Gear for the first time or reset it, a pop-up your Gear. 2. Getting Started 11 Set Up Your Gear Follow the prompts set up window is displayed. To turn on the Gear. • When you turn off the Gear, press and hold the Power button, and then tap Power off. Set Up Your Gear Turn the Gear On or Off 1.
User Manual
Page 21
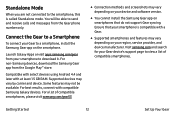
...smartphone. Supported devices may vary depending on smartphones that your region, service provider, and device manufacturer. Ensure that do not support Gear syncing. Visit samsung.com and search for your smartphone to download it. For best results, connect with at least 1.5 GB RAM. You will be... available. Launch Galaxy Apps or visit apps.samsung.com/gear from the Google Play™ store. For non-Samsung devices, download the Samsung Gear app from your Gear device's support page to send and receive calls and messages from the...
...smartphone. Supported devices may vary depending on smartphones that your region, service provider, and device manufacturer. Ensure that do not support Gear syncing. Visit samsung.com and search for your smartphone to download it. For best results, connect with at least 1.5 GB RAM. You will be... available. Launch Galaxy Apps or visit apps.samsung.com/gear from the Google Play™ store. For non-Samsung devices, download the Samsung Gear app from your Gear device's support page to send and receive calls and messages from the...
User Manual
Page 22
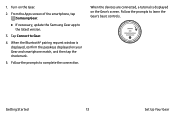
Turn on your Gear and smartphone match, and then tap the checkmark. 5. Tap Connect to the latest version. 3. Getting Started 13 Set Up Your Gear 1. From the Apps screen of the smartphone, tap Samsung Gear. • If necessary, update the Samsung Gear app to Gear. 4. Follow the prompts to learn the Gear's basic controls. When the Bluetooth® pairing request window is displayed on the Gear's screen. Follow the prompts to complete the connection. When the devices are connected, a tutorial is displayed, confirm the passkeys displayed on the Gear. 2.
Turn on your Gear and smartphone match, and then tap the checkmark. 5. Tap Connect to the latest version. 3. Getting Started 13 Set Up Your Gear 1. From the Apps screen of the smartphone, tap Samsung Gear. • If necessary, update the Samsung Gear app to Gear. 4. Follow the prompts to learn the Gear's basic controls. When the Bluetooth® pairing request window is displayed on the Gear's screen. Follow the prompts to complete the connection. When the devices are connected, a tutorial is displayed, confirm the passkeys displayed on the Gear. 2.

User Manual
Page 23
...3. For more information, see "Disconnect the Gear" on : ► From the Apps screen of the smartphone, tap Samsung Gear > Settings tab > About Gear > Backup and restore > Backup data. 2. Connect your Gear and smartphone. Make sure you back up your Gear's data on your Gear. 1. This feature is removed from your ...smartphone as follows: • From the Apps screen of the smartphone, tap Samsung Gear > Settings tab > Gear connection > Remote connection. If this connection, you connect to your smartphone using Bluetooth for the first time....
...3. For more information, see "Disconnect the Gear" on : ► From the Apps screen of the smartphone, tap Samsung Gear > Settings tab > About Gear > Backup and restore > Backup data. 2. Connect your Gear and smartphone. Make sure you back up your Gear's data on your Gear. 1. This feature is removed from your ...smartphone as follows: • From the Apps screen of the smartphone, tap Samsung Gear > Settings tab > Gear connection > Remote connection. If this connection, you connect to your smartphone using Bluetooth for the first time....

User Manual
Page 24
..., rotate the bezel to verify it . Turn the Screen On or Off To turn off if the Gear is not used for a specified period. To turn on the screen: ► Rotate the bezel, press... use a wake-up gesture. Set a Screen Lock Prevent others from accessing your Gear when you set the screen lock feature, the Gear requires an unlock code whenever unlocking it with your palm. • The screen turns... off the screen: ► Cover it . Unlock the Gear ► Turn on page 74. Enter four numbers, and then enter the PIN again to Settings > Security...
..., rotate the bezel to verify it . Turn the Screen On or Off To turn off if the Gear is not used for a specified period. To turn on the screen: ► Rotate the bezel, press... use a wake-up gesture. Set a Screen Lock Prevent others from accessing your Gear when you set the screen lock feature, the Gear requires an unlock code whenever unlocking it with your palm. • The screen turns... off the screen: ► Cover it . Unlock the Gear ► Turn on page 74. Enter four numbers, and then enter the PIN again to Settings > Security...

User Manual
Page 26
... Rotate the bezel to open the Watch screen when you are not on your step count, and more watch faces. 2. You can also change the Gear's watch face on the Watch screen. You can also check the battery life, the date, your smartphone. ► From the Apps screen of the smartphone..., tap Samsung Gear > Settings tab > Watch faces. ► Press the Home button to view items on which screen is the starting point for the Home screen. Change the...
... Rotate the bezel to open the Watch screen when you are not on your step count, and more watch faces. 2. You can also change the Gear's watch face on the Watch screen. You can also check the battery life, the date, your smartphone. ► From the Apps screen of the smartphone..., tap Samsung Gear > Settings tab > Watch faces. ► Press the Home button to view items on which screen is the starting point for the Home screen. Change the...

User Manual
Page 27
... left . 2. Tap the number at the top of the screen and disappears after a few seconds and the Gear vibrates. Tap More options, rotate the bezel to Block app and tap Block app. • The Gear no longer receives notifications from your smartphone. Note: You can block specific app notifications before you receive...
... left . 2. Tap the number at the top of the screen and disappears after a few seconds and the Gear vibrates. Tap More options, rotate the bezel to Block app and tap Block app. • The Gear no longer receives notifications from your smartphone. Note: You can block specific app notifications before you receive...

User Manual
Page 30
... Watch screen, swipe downward from the top edge of the screen. Airplane mode: Disconnect your device from your Gear. 7. Brightness: Adjust the brightness of the screen. 1 1. Status Panel This panel allows you to your Gear. Music player: Play music from all notifications and alerts. 5 4 5. Do not disturb: Block all networks and turn...
... Watch screen, swipe downward from the top edge of the screen. Airplane mode: Disconnect your device from your Gear. 7. Brightness: Adjust the brightness of the screen. 1 1. Status Panel This panel allows you to your Gear. Music player: Play music from all notifications and alerts. 5 4 5. Do not disturb: Block all networks and turn...

User Manual
Page 32
...► On the status panel, tap Music player. Play Music You can adjust the Gear's sound settings. ► On the status panel, tap Sound and adjust the sound ... not disturb icon is displayed at the top of the Watch screen. Do Not Disturb Mode You can adjust the Gear's display brightness to suit the environment. ► On the status panel, tap Brightness and adjust the brightness by...status panel, tap Call forwarding. Know Your Device 23 Status Panel Adjust the Brightness You can set the Gear not to vibrate and turn off connectivity features, such as phone calls and Wi-Fi. ► ...
...► On the status panel, tap Music player. Play Music You can adjust the Gear's sound settings. ► On the status panel, tap Sound and adjust the sound ... not disturb icon is displayed at the top of the Watch screen. Do Not Disturb Mode You can adjust the Gear's display brightness to suit the environment. ► On the status panel, tap Brightness and adjust the brightness by...status panel, tap Call forwarding. Know Your Device 23 Status Panel Adjust the Brightness You can set the Gear not to vibrate and turn off connectivity features, such as phone calls and Wi-Fi. ► ...

User Manual
Page 33
On the Watch screen, rotate the bezel left to view other screens. Know Your Device 24 Use the Bezel Scroll Through Screens Rotate the bezel to view notifications. Select an Item Rotate the bezel to highlight the item you rotate the bezel, the highlight indicator moves in the same direction. When you want to easily control the Gear's various functions. Use the Bezel Rotate the bezel to select and then tap the item.
On the Watch screen, rotate the bezel left to view other screens. Know Your Device 24 Use the Bezel Scroll Through Screens Rotate the bezel to view notifications. Select an Item Rotate the bezel to highlight the item you rotate the bezel, the highlight indicator moves in the same direction. When you want to easily control the Gear's various functions. Use the Bezel Rotate the bezel to select and then tap the item.

User Manual
Page 35
The Gear may damage the tempered glass surface and void the warranty. Know Your Device 26 Navigation Tap Tap to navigate through your finger or a capacitive stylus. ...
The Gear may damage the tempered glass surface and void the warranty. Know Your Device 26 Navigation Tap Tap to navigate through your finger or a capacitive stylus. ...
User Manual
Page 40
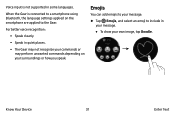
When the Gear is not supported in some languages. Emojis You can add emojis to your message. ► Tap Emojis, and select an emoji to the Gear. For better voice recognition: - Speak clearly. - The Gear may not recognize your commands or may perform unwanted commands depending on the smartphone are applied to include in quiet places. - Speak in your message. • To draw your surroundings or how you speak. Voice input is connected to a smartphone using Bluetooth, the language settings applied on your own image, tap Doodle. Know Your Device 31 Enter Text
When the Gear is not supported in some languages. Emojis You can add emojis to your message. ► Tap Emojis, and select an emoji to the Gear. For better voice recognition: - Speak clearly. - The Gear may not recognize your commands or may perform unwanted commands depending on the smartphone are applied to include in quiet places. - Speak in your message. • To draw your surroundings or how you speak. Voice input is connected to a smartphone using Bluetooth, the language settings applied on your own image, tap Doodle. Know Your Device 31 Enter Text
