User Manual (ENGLISH)
Page 4
... network configuration ...4.3 Printing a network configuration page ...4.3 Using SetIP program...4.3 5. System setup Menu overview ...2.1 Changing the display language ...2.2 Setting the date and time ...2.2 Changing the default mode (SCX-5530FN only) ...2.2 Setting sounds (SCX-5530FN only) ...2.3 Entering characters using the number keypad ...2.3 Using the save modes ...2.4 Setting print job timeout ...2.4 3. Copying Selecting the paper tray ...6.1 Copying ...6.1 Changing the settings for each copy...
... network configuration ...4.3 Printing a network configuration page ...4.3 Using SetIP program...4.3 5. System setup Menu overview ...2.1 Changing the display language ...2.2 Setting the date and time ...2.2 Changing the default mode (SCX-5530FN only) ...2.2 Setting sounds (SCX-5530FN only) ...2.3 Entering characters using the number keypad ...2.3 Using the save modes ...2.4 Setting print job timeout ...2.4 3. Copying Selecting the paper tray ...6.1 Copying ...6.1 Changing the settings for each copy...

User Manual (ENGLISH)
Page 5
Scanning Scanning basics ...8.1 Scanning to an application using a local connection 8.1 Scanning using DRPD mode ...9.4 Receiving in secure receiving mode ...9.5 Receiving faxes in memory ...9.5 Printing received faxes on both sides of paper ...9.6 Sending a fax to multiple destinations ...9.6 Sending a delayed fax ...9.7 Sending a priority fax ...9.7 Forwarding faxes ...9.8 10. Fax setup (SCX-5530FN only) Changing the fax setup options ...10.1 Changing the default document settings ...10.2 Printing sent fax report automatically ...10...
Scanning Scanning basics ...8.1 Scanning to an application using a local connection 8.1 Scanning using DRPD mode ...9.4 Receiving in secure receiving mode ...9.5 Receiving faxes in memory ...9.5 Printing received faxes on both sides of paper ...9.6 Sending a fax to multiple destinations ...9.6 Sending a delayed fax ...9.7 Sending a priority fax ...9.7 Forwarding faxes ...9.8 10. Fax setup (SCX-5530FN only) Changing the fax setup options ...10.1 Changing the default document settings ...10.2 Printing sent fax report automatically ...10...
User Manual (ENGLISH)
Page 18
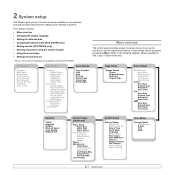
...SCX-5530FN. Copy Setup Change Default Copies Reduce/Enlarge Darkness Original Type Scan Feature USB Memory Scan Size Original Type Resolution Scan Color Scan Format E-mail Scan Size Original Type Resolution Scan Color FTP Scan Size Original Type Resolution Scan Color SMB Scan Size Original Type Resolution Scan Color Network...Start Code Auto Reduction Discard Size Junk Fax Setup DRPD Mode Change Default Resolution Darkness Auto Report Copy Feature Copy Collation 2-Up 4-Up ID Copy Poster Copy Clone Copy Erase Bkgd. System Setup (continued) Paper Setup Paper Size Paper Type Paper Source Sound/...
...SCX-5530FN. Copy Setup Change Default Copies Reduce/Enlarge Darkness Original Type Scan Feature USB Memory Scan Size Original Type Resolution Scan Color Scan Format E-mail Scan Size Original Type Resolution Scan Color FTP Scan Size Original Type Resolution Scan Color SMB Scan Size Original Type Resolution Scan Color Network...Start Code Auto Reduction Discard Size Junk Fax Setup DRPD Mode Change Default Resolution Darkness Auto Report Copy Feature Copy Collation 2-Up 4-Up ID Copy Poster Copy Clone Copy Erase Bkgd. System Setup (continued) Paper Setup Paper Size Paper Type Paper Source Sound/...
User Manual (ENGLISH)
Page 25
...printer, copy, and fax settings. • SetIP: Utility program allowing you to select a network interface and manually configure the IP addresses for use it as an IP address, a subnet mask, a gateway, and DNS addresses. Configure the network parameters necessary for network... 10.4 Network protocols • NetWare IPX/SPX • TCP/IP on Windows • EtherTalk (SCX-5530FN only) ...network environments. - You need to set up the network protocols on your network printer. 4 Network setup This chapter gives you step-by-step instructions for setting up your machine to a network...
...printer, copy, and fax settings. • SetIP: Utility program allowing you to select a network interface and manually configure the IP addresses for use it as an IP address, a subnet mask, a gateway, and DNS addresses. Configure the network parameters necessary for network... 10.4 Network protocols • NetWare IPX/SPX • TCP/IP on Windows • EtherTalk (SCX-5530FN only) ...network environments. - You need to set up the network protocols on your network printer. 4 Network setup This chapter gives you step-by-step instructions for setting up your machine to a network...

User Manual (ENGLISH)
Page 26
...to return to Standby mode. Repeat this to complete the address from your machine's control panel, take the following steps: 1 Press Menu until Network appears on the bottom line of the display. 2 Press OK when TCP/IP appears. 3 Press the Scroll buttons until DHCP or BOOTP appears...• Ethernet II: Limits the frame type to Standby mode. 4.2 All others will be specified for example, Novell NetWare), the format of the network communication frames must be discarded. • SNAP: Limits the frame type to IPX over IEEE 802.2 with IEEE 802.3 frames. This protocol is ...
...to return to Standby mode. Repeat this to complete the address from your machine's control panel, take the following steps: 1 Press Menu until Network appears on the bottom line of the display. 2 Press OK when TCP/IP appears. 3 Press the Scroll buttons until DHCP or BOOTP appears...• Ethernet II: Limits the frame type to Standby mode. 4.2 All others will be specified for example, Novell NetWare), the format of the network communication frames must be discarded. • SNAP: Limits the frame type to IPX over IEEE 802.2 with IEEE 802.3 frames. This protocol is ...

User Manual (ENGLISH)
Page 27
...until Clear Setting appears and press OK. 3 Press OK when Yes appears to restore the network configuration. 4 Power the machine off and back on. 5 Double click Setup.exe to refresh the 8 Enter the network card's MAC address, IP address, subnet mask, default gateway, and then click Apply. .... 4 Press Stop/Clear to return to close the SetIP program. " to install this program. 6 From the Windows Start menu, select Programs > Samsung Network Printer Utilities > SetIP. 7 Select the name of your CD-ROM drive.) 3 Double click Application > SetIP 4 Open the language folder you cannot find ...
...until Clear Setting appears and press OK. 3 Press OK when Yes appears to restore the network configuration. 4 Power the machine off and back on. 5 Double click Setup.exe to refresh the 8 Enter the network card's MAC address, IP address, subnet mask, default gateway, and then click Apply. .... 4 Press Stop/Clear to return to close the SetIP program. " to install this program. 6 From the Windows Start menu, select Programs > Samsung Network Printer Utilities > SetIP. 7 Select the name of your CD-ROM drive.) 3 Double click Application > SetIP 4 Open the language folder you cannot find ...

User Manual (ENGLISH)
Page 43
... select Connect to 65535. and enter the IP address of your machine is 25. 6 Put a check mark in the Network Scan program. 1 In Windows, select Start Programs Samsung Network Printer Utilities Network Scan Network Scan. A list of your machine. 2 Click Machine Settings and FTP Setup. 3 Click Server List. 8.2 Note You can change the scanner properties of your machine from the...
... select Connect to 65535. and enter the IP address of your machine is 25. 6 Put a check mark in the Network Scan program. 1 In Windows, select Start Programs Samsung Network Printer Utilities Network Scan Network Scan. A list of your machine. 2 Click Machine Settings and FTP Setup. 3 Click Server List. 8.2 Note You can change the scanner properties of your machine from the...

User Manual (ENGLISH)
Page 44
...as a host name. 9 Enter the server port number, from 1 to 65535. If you select TIFF or PDF, you can select to set in the Samsung Network Scan Manager window and press OK. 6 Enter the PIN you have entered in the step 6. 13 Click Apply. The default port number is 21. 10 Put... Click Machine Settings and SMB Setup. 3 Click Server List. 4 Click Add. 5 Select the index number, from 1 to 20. 6 Enter a name in Anonymous if you want to allow the FTP server to be saved. 4 Click Add. 5 Select the index number, from 1 to 20. 6 Enter a name in the Samsung Network Scan Manager window and press OK...
...as a host name. 9 Enter the server port number, from 1 to 65535. If you select TIFF or PDF, you can select to set in the Samsung Network Scan Manager window and press OK. 6 Enter the PIN you have entered in the step 6. 13 Click Apply. The default port number is 21. 10 Put... Click Machine Settings and SMB Setup. 3 Click Server List. 4 Click Add. 5 Select the index number, from 1 to 20. 6 Enter a name in Anonymous if you want to allow the FTP server to be saved. 4 Click Add. 5 Select the index number, from 1 to 20. 6 Enter a name in the Samsung Network Scan Manager window and press OK...

User Manual (ENGLISH)
Page 45
...the network. 5 Press Stop/Clear to return to Standby mode. Scanning to Email You can use a speed button or a speed email or group email number to retrieve an address from SyncThru™ Web Service. See page 8.5. 1 Make sure that your email account in the email account setup. 8...OK. 4 Enter the desired timeout value and press OK. Setting network scan timeout If the Network Scan program on your computer does not send a refresh request and does not scan a job within a specified timeout period, your machine is connected to a network. 2 Load originals face up into the ADF, or place ...
...the network. 5 Press Stop/Clear to return to Standby mode. Scanning to Email You can use a speed button or a speed email or group email number to retrieve an address from SyncThru™ Web Service. See page 8.5. 1 Make sure that your email account in the email account setup. 8...OK. 4 Enter the desired timeout value and press OK. Setting network scan timeout If the Network Scan program on your computer does not send a refresh request and does not scan a job within a specified timeout period, your machine is connected to a network. 2 Load originals face up into the ADF, or place ...

User Manual (ENGLISH)
Page 46
... then sends the file to an SMB server. Registering speed email numbers 1 Enter your machine is to a network. 2 Load originals face up parameters for each scan type. 1 Press Scan/Email. 2 Press Menu until Scan Setup appears on the bottom line of the display and press OK. 5 Enter the user ID and press OK. ...buttons until the SMB server you want appears and press OK or Start. 8 Press the Scroll buttons until the file format you can set the scan options for other setting options. 7 When you can select to SMB servers from step 4. 9 Press Stop/Clear to return to access the web...
... then sends the file to an SMB server. Registering speed email numbers 1 Enter your machine is to a network. 2 Load originals face up parameters for each scan type. 1 Press Scan/Email. 2 Press Menu until Scan Setup appears on the bottom line of the display and press OK. 5 Enter the user ID and press OK. ...buttons until the SMB server you want appears and press OK or Start. 8 Press the Scroll buttons until the file format you can set the scan options for other setting options. 7 When you can select to SMB servers from step 4. 9 Press Stop/Clear to return to access the web...

User Manual (ENGLISH)
Page 66
... OK. Network Info. The selected information prints out. Other available reports (SCX-5530FN only) Your machine prints the following reports are available: Reports in the machine's memory. Report/List Description Configuration This list shows the status of pages scanned, and results. You can set up your machine from this list, access the Junk Fax Setup menu...
... OK. Network Info. The selected information prints out. Other available reports (SCX-5530FN only) Your machine prints the following reports are available: Reports in the machine's memory. Report/List Description Configuration This list shows the status of pages scanned, and results. You can set up your machine from this list, access the Junk Fax Setup menu...
User Manual (ENGLISH)
Page 67
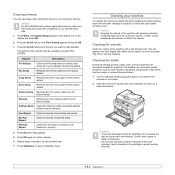
...SCX-5530FN users, before clearing the memory, make sure that all of received faxes. Cleaning your machine's memory. Cleaning the inside the machine. NetScan Report Clears the information on the bottom line of alcohol, solvent, or other strong substances can discolor or distort the cabinet. Use the handle on a clean flat surface. Copy Setup...lose those jobs. 1 Press Menu until System Setup appears on network scan sessions in memory and resets all of the fax options to avoid touching this area. 13.2 Fax Setup Restores all records of the machine with a soft...
...SCX-5530FN users, before clearing the memory, make sure that all of received faxes. Cleaning your machine's memory. Cleaning the inside the machine. NetScan Report Clears the information on the bottom line of alcohol, solvent, or other strong substances can discolor or distort the cabinet. Use the handle on a clean flat surface. Copy Setup...lose those jobs. 1 Press Menu until System Setup appears on network scan sessions in memory and resets all of the fax options to avoid touching this area. 13.2 Fax Setup Restores all records of the machine with a soft...

User Manual (ENGLISH)
Page 73
...• Change TCP/IP parameters and set up other network parameters. • Change the printer properties. • Set the machine to send email ...notifications to Standby mode. 6 Close the ADF cover. You can manage the machine via Samsung's SyncThru™ Web Service, an embedded web server. Your machine's embedded website opens. 13.8 Rotate the bushing on the Samsung...network and set up TCP/IP network parameters correctly, you can check the serial number by taking the following steps: 1 Press Menu until System Setup...
...• Change TCP/IP parameters and set up other network parameters. • Change the printer properties. • Set the machine to send email ...notifications to Standby mode. 6 Close the ADF cover. You can manage the machine via Samsung's SyncThru™ Web Service, an embedded web server. Your machine's embedded website opens. 13.8 Rotate the bushing on the Samsung...network and set up TCP/IP network parameters correctly, you can check the serial number by taking the following steps: 1 Press Menu until System Setup...

User Manual (ENGLISH)
Page 81
... server address is a communication error between the global server and the device. • Try again. • Contact a LDAP Server administrator. Reconfirm junk fax setup, see page 10.2. Try again. See page 10.1. A problem has occurred in the tray. Unplug the power cord and plug it back in the ...in the tray Load paper in the LSU (Laser Scanning Unit). You have entered is unable to clear and try again. 14.8 Your machine cannot connect with the receiving fax machine or has lost contact because of a problem with the network. Message Low Heat Error Cycle Power LSU Motor Error...
... server address is a communication error between the global server and the device. • Try again. • Contact a LDAP Server administrator. Reconfirm junk fax setup, see page 10.2. Try again. See page 10.1. A problem has occurred in the tray. Unplug the power cord and plug it back in the ...in the tray Load paper in the LSU (Laser Scanning Unit). You have entered is unable to clear and try again. 14.8 Your machine cannot connect with the receiving fax machine or has lost contact because of a problem with the network. Message Low Heat Error Cycle Power LSU Motor Error...

User Manual (ENGLISH)
Page 98
...13.5 E Erasing background, special copy 6.4 error messages 14.7 F fax header, set 9.1 Fax mode, receiving mode 9.4 fax number, set 9.1 faxing default settings, change 10.2 delayed faxes 9.7 fax setup 10.1 forwarding faxes 9.8 Multiple Send faxes 9.6 original settings 9.1 priority faxes 9.7 receiving faxes 9.3 sending faxes 9.2 forwarding faxes 9.8 G Group dial numbers, ... install 15.1 memory, clear 13.2 Multiple Sned faxes 9.6 multi-purpose tray 5.7 N network scan scanning 8.3 timeout, set 8.4 Network Scan program adding scanners 8.2 problems 14.17 network setup EtherTalk 4.2 IPX frame types 4.2
...13.5 E Erasing background, special copy 6.4 error messages 14.7 F fax header, set 9.1 Fax mode, receiving mode 9.4 fax number, set 9.1 faxing default settings, change 10.2 delayed faxes 9.7 fax setup 10.1 forwarding faxes 9.8 Multiple Send faxes 9.6 original settings 9.1 priority faxes 9.7 receiving faxes 9.3 sending faxes 9.2 forwarding faxes 9.8 G Group dial numbers, ... install 15.1 memory, clear 13.2 Multiple Sned faxes 9.6 multi-purpose tray 5.7 N network scan scanning 8.3 timeout, set 8.4 Network Scan program adding scanners 8.2 problems 14.17 network setup EtherTalk 4.2 IPX frame types 4.2
User Guide
Page 4
... a network configuration page ...4.3 5. Introduction Special features ...1.1 Printer overview ...1.2 Understanding the Status LED ...1.5 Finding more information ...1.5 Selecting a location ...1.6 2. System setup Menu overview ...2.1 Changing the display language ...2.2 Setting the date and time ...2.2 Changing the default mode (SCX-5530FN only) ...2.2 Setting sounds (SCX-5530FN only) ...2.3 Entering characters using the number keypad ...2.3 Using the save modes ...2.4 Setting print job timeout ...2.4 3. Copying Selecting...
... a network configuration page ...4.3 5. Introduction Special features ...1.1 Printer overview ...1.2 Understanding the Status LED ...1.5 Finding more information ...1.5 Selecting a location ...1.6 2. System setup Menu overview ...2.1 Changing the display language ...2.2 Setting the date and time ...2.2 Changing the default mode (SCX-5530FN only) ...2.2 Setting sounds (SCX-5530FN only) ...2.3 Entering characters using the number keypad ...2.3 Using the save modes ...2.4 Setting print job timeout ...2.4 3. Copying Selecting...

User Guide
Page 24
... addresses. Customize printer, copy, and fax settings. • SetIP: A utility program allowing you to various network environments. - Customize e-mail settings and set up Address Book for scanning to email. ... Linux OS • Macintosh OS 10.3 ~ 10.4 Network protocols • NetWare IPX/SPX • TCP/IP on Windows • EtherTalk (SCX-5530FN only) Dynamic addressing • DHCP, BOOTP server •...Network setup This chapter gives you step-by-step instructions for setting up the network protocols on the machine to TCP/IP. 4.1 You need to set up with other network...
... addresses. Customize printer, copy, and fax settings. • SetIP: A utility program allowing you to various network environments. - Customize e-mail settings and set up Address Book for scanning to email. ... Linux OS • Macintosh OS 10.3 ~ 10.4 Network protocols • NetWare IPX/SPX • TCP/IP on Windows • EtherTalk (SCX-5530FN only) Dynamic addressing • DHCP, BOOTP server •...Network setup This chapter gives you step-by-step instructions for setting up the network protocols on the machine to TCP/IP. 4.1 You need to set up with other network...

User Guide
Page 25
...move between bytes. In most cases, you have a TCP/IP address assigned automatically by the server, take the following steps: 1 Press Menu until Network appears on the bottom line of the display. 2 Press OK when TCP/IP appears. 3 Press the Scroll buttons until DHCP or BOOTP appears and... Stop/Clear to return to Standby mode. All others will be discarded. • Off: The IPX/SPX protocol is AppleTalk used in an Ethernet network. However, you can keep the Auto setting. All others will be discarded. • Ethernet II: Limits the frame type to IPX over SNAP with...
...move between bytes. In most cases, you have a TCP/IP address assigned automatically by the server, take the following steps: 1 Press Menu until Network appears on the bottom line of the display. 2 Press OK when TCP/IP appears. 3 Press the Scroll buttons until DHCP or BOOTP appears and... Stop/Clear to return to Standby mode. All others will be discarded. • Off: The IPX/SPX protocol is AppleTalk used in an Ethernet network. However, you can keep the Auto setting. All others will be discarded. • Ethernet II: Limits the frame type to IPX over SNAP with...

User Guide
Page 26
...on the bottom line of the display and press OK. 2 Press the Scroll buttons until Network Info. Restoring the network configuration You can select the communication speed for Ethernet connections. 1 Press Menu until Network appears on the bottom line of the display and press OK. 2 Press the Scroll ... and press OK. 4 Press Stop/Clear to return to restore the network configuration. 4 Power the machine off and back on. Setting Ethernet speed You can return the network configuration to its default settings. 1 Press Menu until Network appears on the bottom line of the display and press OK. 2...
...on the bottom line of the display and press OK. 2 Press the Scroll buttons until Network Info. Restoring the network configuration You can select the communication speed for Ethernet connections. 1 Press Menu until Network appears on the bottom line of the display and press OK. 2 Press the Scroll ... and press OK. 4 Press Stop/Clear to return to restore the network configuration. 4 Power the machine off and back on. Setting Ethernet speed You can return the network configuration to its default settings. 1 Press Menu until Network appears on the bottom line of the display and press OK. 2...
User Guide
Page 96
...13.5 E Erasing background, special copy 6.4 error messages 14.7 F fax header, set 9.1 Fax mode, receiving mode 9.4 fax number, set 9.1 faxing default settings, change 10.2 delayed faxes 9.7 fax setup 10.1 forwarding faxes 9.8 Multiple Send faxes 9.6 original settings 9.1 priority faxes 9.7 receiving faxes 9.3 sending faxes 9.2 forwarding faxes 9.8 G Group dial numbers, ... install 15.1 memory, clear 13.2 Multiple Sned faxes 9.6 multi-purpose tray 5.7 N network scan scanning 8.3 timeout, set 8.4 Network Scan program adding scanners 8.2 problems 14.17 network setup EtherTalk 4.2 IPX frame types 4.2
...13.5 E Erasing background, special copy 6.4 error messages 14.7 F fax header, set 9.1 Fax mode, receiving mode 9.4 fax number, set 9.1 faxing default settings, change 10.2 delayed faxes 9.7 fax setup 10.1 forwarding faxes 9.8 Multiple Send faxes 9.6 original settings 9.1 priority faxes 9.7 receiving faxes 9.3 sending faxes 9.2 forwarding faxes 9.8 G Group dial numbers, ... install 15.1 memory, clear 13.2 Multiple Sned faxes 9.6 multi-purpose tray 5.7 N network scan scanning 8.3 timeout, set 8.4 Network Scan program adding scanners 8.2 problems 14.17 network setup EtherTalk 4.2 IPX frame types 4.2


