
User Manual (user Manual) (ver.1.0) (English, Spanish)
Page 19
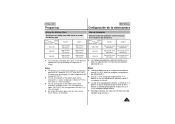
... put the battery pack near any heat source (fire or flames, for example). ENGLISH Preparing ESPAÑOL Configuración de la videocámara Using the Battery Pack Continuous recording time table based ...model and battery type Model Battery Type SB-L110A SB-L160 SB-L320 SCW71 Approximately 150 minutes Approximately 220 minutes Approximately 430 minutes SCW73 Approximately 150 minutes Approximately 220 minutes Approximately 430 minutes 1 The continuous recording times given in a room temperature that is fully recharged. 1 The life and capacity of the battery pack will be charged...
... put the battery pack near any heat source (fire or flames, for example). ENGLISH Preparing ESPAÑOL Configuración de la videocámara Using the Battery Pack Continuous recording time table based ...model and battery type Model Battery Type SB-L110A SB-L160 SB-L320 SCW71 Approximately 150 minutes Approximately 220 minutes Approximately 430 minutes SCW73 Approximately 150 minutes Approximately 220 minutes Approximately 430 minutes 1 The continuous recording times given in a room temperature that is fully recharged. 1 The life and capacity of the battery pack will be charged...
User Manual (user Manual) (ver.1.0) (English, Spanish)
Page 31
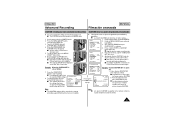
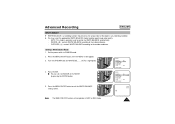
... START/STOP button to CAMERA mode. 2. Note: s The CUSTOM settings will appear. s The CUSTOM function only operates in the camera (providing a good lithium battery has been installed). Set the power switch to start recording. s Set the status of each item to the CUSTOM mode being switched on the EVF at the same time. 1 Usted puede crear sus ajustes de grabacion personalizados y guardarlos. MENU DISPLAY ON WHITE BAL. ......AUTO CUSTOM SET CLOCK SET TITLE SET TITLE...
... START/STOP button to CAMERA mode. 2. Note: s The CUSTOM settings will appear. s The CUSTOM function only operates in the camera (providing a good lithium battery has been installed). Set the power switch to start recording. s Set the status of each item to the CUSTOM mode being switched on the EVF at the same time. 1 Usted puede crear sus ajustes de grabacion personalizados y guardarlos. MENU DISPLAY ON WHITE BAL. ......AUTO CUSTOM SET CLOCK SET TITLE SET TITLE...
User Manual (user Manual) (ver.1.0) (English, Spanish)
Page 41
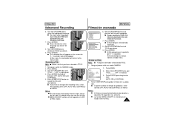
... tras activarlo. Set power switch to select the appropriate language. s El titulo del pais seleccionado aparecera. 8. Grabar un titulo Nota: s Asegurese de haber seleccionado TITLE. 1. Pulse ENTER para elegir entre OFF, AUTO-10S y CONTINUE. 5. s La funcion MENU ON/OFF no funcionara en modos EASY o REC. 41 Turn the UP/DOWN dial to CAMERA mode. 2. Turn UP/DOWN dial to the menu mode. Press ENTER...
... tras activarlo. Set power switch to select the appropriate language. s El titulo del pais seleccionado aparecera. 8. Grabar un titulo Nota: s Asegurese de haber seleccionado TITLE. 1. Pulse ENTER para elegir entre OFF, AUTO-10S y CONTINUE. 5. s La funcion MENU ON/OFF no funcionara en modos EASY o REC. 41 Turn the UP/DOWN dial to CAMERA mode. 2. Turn UP/DOWN dial to the menu mode. Press ENTER...
User Manual (user Manual) (ver.1.0) (English)
Page 2
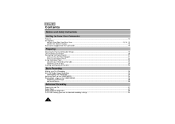
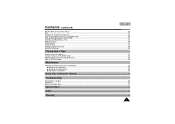
......19 Lithium Battery Installation ...20 Connecting the Power Source ...21 s To use the AC Power Adapter...21 s To use the Battery Pack...22 Using the Battery Pack...23 s Continuous Recording time table...23 s Battery Level Display ...24 Inserting and Ejecting a Cassette ...25 Basic Recording Making your First Recording ...26 Hints for Stable Image Recording ...28 s Recording with Viewfinder ...28 Adjusting Focus of the VIEWFINDER ...28 Playing back a tape on the CAMCORDER ...29 s Viewing a Still Picture ...30 s Picture Search ...30 Advanced Recording Zooming In...
......19 Lithium Battery Installation ...20 Connecting the Power Source ...21 s To use the AC Power Adapter...21 s To use the Battery Pack...22 Using the Battery Pack...23 s Continuous Recording time table...23 s Battery Level Display ...24 Inserting and Ejecting a Cassette ...25 Basic Recording Making your First Recording ...26 Hints for Stable Image Recording ...28 s Recording with Viewfinder ...28 Adjusting Focus of the VIEWFINDER ...28 Playing back a tape on the CAMCORDER ...29 s Viewing a Still Picture ...30 s Picture Search ...30 Advanced Recording Zooming In...
User Manual (user Manual) (ver.1.0) (English)
Page 3
... Setting the Date/Title Color ...49 Lighting Techniques...50 Playing back a Tape To watch with TV monitor ...51 Various Functions in PLAYER mode...53 Multi Playback (Using the PAL60 System)...54 DSE in PLAYER mode ...55 Maintenance Cleaning and Taking care of the Camcorder...55 s Cleaning the Viewfinder ...55 s Cleaning the Video Heads ...56 s Storing the Camcorder...56 Using Your Camcorder Abroad 57 Troubleshooting Self Diagnosis Display ...58 Checking...59 Moisture Condensation ...61 Specifications...
... Setting the Date/Title Color ...49 Lighting Techniques...50 Playing back a Tape To watch with TV monitor ...51 Various Functions in PLAYER mode...53 Multi Playback (Using the PAL60 System)...54 DSE in PLAYER mode ...55 Maintenance Cleaning and Taking care of the Camcorder...55 s Cleaning the Viewfinder ...55 s Cleaning the Video Heads ...56 s Storing the Camcorder...56 Using Your Camcorder Abroad 57 Troubleshooting Self Diagnosis Display ...58 Checking...59 Moisture Condensation ...61 Specifications...

User Manual (user Manual) (ver.1.0) (English)
Page 6
... function, TITLE, CUSTOM function and preset contents memory; even if the battery pack or AC power adapter is fitted firmly into place. Notices regarding the battery pack 1 Make sure that the battery pack is removed. 1 The lithium battery for more than 5 minutes without operation, it will automatically turn off when you are not operating it. 1 When your camcorder is in CAMERA mode, if it . 1 When the battery...
... function, TITLE, CUSTOM function and preset contents memory; even if the battery pack or AC power adapter is fitted firmly into place. Notices regarding the battery pack 1 Make sure that the battery pack is removed. 1 The lithium battery for more than 5 minutes without operation, it will automatically turn off when you are not operating it. 1 When your camcorder is in CAMERA mode, if it . 1 When the battery...
User Manual (user Manual) (ver.1.0) (English)
Page 7
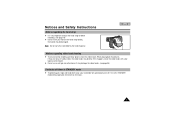
... forcibly, the buckle may be dirty. When playing back the pictures, if they are noisy or hardly visible, the video heads may be damaged. If this happens, clean the video heads with a dry type cassette cleaner. 1 Do not use a wet type cassette cleaner. Notices and Safety Instructions Notices regarding video head cleaning 1 To ensure normal recording and clear picture, clean the video heads. Note: Do not carry the camcorder by the handstrap only.
... forcibly, the buckle may be dirty. When playing back the pictures, if they are noisy or hardly visible, the video heads may be damaged. If this happens, clean the video heads with a dry type cassette cleaner. 1 Do not use a wet type cassette cleaner. Notices and Safety Instructions Notices regarding video head cleaning 1 To ensure normal recording and clear picture, clean the video heads. Note: Do not carry the camcorder by the handstrap only.
User Manual (user Manual) (ver.1.0) (English)
Page 9
... safety purpose of the CAMCORDER and to cords or plugs, convenient receptacles, and the point where they are unable to . 10. POWER-CORD PROTECTION: Power-supply cords should be operated from overheating. See figure below. VENTILATION: Slots and openings in wire to an antenna discharge unit, size of grounding to conductors, location of the National Electrical Code, ANSI/NFPA No. 70...
... safety purpose of the CAMCORDER and to cords or plugs, convenient receptacles, and the point where they are unable to . 10. POWER-CORD PROTECTION: Power-supply cords should be operated from overheating. See figure below. VENTILATION: Slots and openings in wire to an antenna discharge unit, size of grounding to conductors, location of the National Electrical Code, ANSI/NFPA No. 70...

User Manual (user Manual) (ver.1.0) (English)
Page 10
.... This will often require extensive work by a technician before use. 18. DAMAGE REQUIRING SERVICE: Unplug this indicates a need for long periods of time, unplug it checked by a qualified technician to restore the CAMCORDER to qualified service personnel under the following the operating instructions, adjust only those controls that the CAMCORDER is in the vicinity of other electric light or power circuits where it is damaged...
.... This will often require extensive work by a technician before use. 18. DAMAGE REQUIRING SERVICE: Unplug this indicates a need for long periods of time, unplug it checked by a qualified technician to restore the CAMCORDER to qualified service personnel under the following the operating instructions, adjust only those controls that the CAMCORDER is in the vicinity of other electric light or power circuits where it is damaged...
User Manual (user Manual) (ver.1.0) (English)
Page 16
... the use of the recording. 16 Date (see page 36) Indicates manual focus is activated. Auto Focus is displayed in CAMERA mode b. ENGLISH Getting to Know Your Camcorder OSD (On Screen Display) 1 You can be operated even after the OSD is turned off by setting the Display menu on . c. c b SEPIA Hi8 PLAY o 0:00:25 n TAPE! a. e. Zoom position (see page 38) Indicates Program AE mode is on /off. 1 The TITLE, DATE/TIME, EASY and CUSTOM functions can turn...
... the use of the recording. 16 Date (see page 36) Indicates manual focus is activated. Auto Focus is displayed in CAMERA mode b. ENGLISH Getting to Know Your Camcorder OSD (On Screen Display) 1 You can be operated even after the OSD is turned off by setting the Display menu on . c. c b SEPIA Hi8 PLAY o 0:00:25 n TAPE! a. e. Zoom position (see page 38) Indicates Program AE mode is on /off. 1 The TITLE, DATE/TIME, EASY and CUSTOM functions can turn...
User Manual (user Manual) (ver.1.0) (English)
Page 21
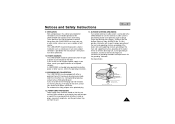
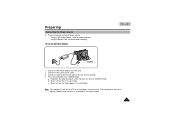
... Battery Pack: used for indoor recording. - Connect the AC Power Adapter to the CAMERA mode. Make sure that the Lens Cap is used for outdoor recording. Using the AC Power Adapter : used next to a TV or the camcorder, it may cause the TV or camcorder to DC jack of the DC cable to emit noise. To set the camcorder to the AC cord. 2. a. Connect the other end of the camcorder. 4. To use the AC Power Adapter ENGLISH 1 2 CAMERA...
... Battery Pack: used for indoor recording. - Connect the AC Power Adapter to the CAMERA mode. Make sure that the Lens Cap is used for outdoor recording. Using the AC Power Adapter : used next to a TV or the camcorder, it may cause the TV or camcorder to DC jack of the DC cable to emit noise. To set the camcorder to the AC cord. 2. a. Connect the other end of the camcorder. 4. To use the AC Power Adapter ENGLISH 1 2 CAMERA...
User Manual (user Manual) (ver.1.0) (English)
Page 23
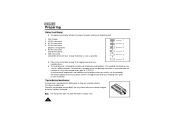
... 104°F(40°C). Preparing Using the Battery Pack Continuous recording time table based on usage. Notes: 1 The battery pack should never be reduced if the battery pack is fully recharged. 1 Do not put the battery pack near any heat source (fire or flames, for example). 23 Actual recording time depends on model and battery type Model Battery Type SCW71 SCW73 SB-L110A Approximately 150 minutes...
... 104°F(40°C). Preparing Using the Battery Pack Continuous recording time table based on usage. Notes: 1 The battery pack should never be reduced if the battery pack is fully recharged. 1 Do not put the battery pack near any heat source (fire or flames, for example). 23 Actual recording time depends on model and battery type Model Battery Type SCW71 SCW73 SB-L110A Approximately 150 minutes...
User Manual (user Manual) (ver.1.0) (English)
Page 24
... be different when you actually use the camcorder, the remaining battery time may choose which indicates discharged. The continuous recording time in the operating instructions is affected by environmental temperature and conditions. Two colors are provided (red and black)-you remember whether it has been charged or not. Note: The charge mark does not affect the battery's charge status. 24 A charge mark is provided on page...
... be different when you actually use the camcorder, the remaining battery time may choose which indicates discharged. The continuous recording time in the operating instructions is affected by environmental temperature and conditions. Two colors are provided (red and black)-you remember whether it has been charged or not. Note: The charge mark does not affect the battery's charge status. 24 A charge mark is provided on page...
User Manual (user Manual) (ver.1.0) (English)
Page 43
... selected date and time will blink. 8. s The month to record the DATE/TIME on your date and time settings are not maintained in EASY or CUSTOM mode. Set the power switch to set the desired month. 9. Press the DATE/TIME button. Press the START/STOP button to be reset will then be turned off in the camcorder, it means the installed LITHIUM BATTERY is discharged. (see page 20) s You cannot conceal the recorded date or time during playback...
... selected date and time will blink. 8. s The month to record the DATE/TIME on your date and time settings are not maintained in EASY or CUSTOM mode. Set the power switch to set the desired month. 9. Press the DATE/TIME button. Press the START/STOP button to be reset will then be turned off in the camcorder, it means the installed LITHIUM BATTERY is discharged. (see page 20) s You cannot conceal the recorded date or time during playback...

User Manual (user Manual) (ver.1.0) (English)
Page 45
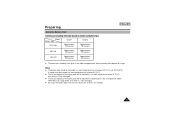
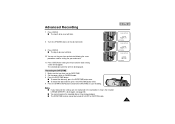
... appear. 8. Press MENU. Advanced Recording 6. MENU DISPLAY ON WHITE BAL ........AUTO CUSTOM SET CLOCK SET TITLE SET TITLE CONTINUE NEXT: MENU 3. s You may select from the right side to change TITLE recording time, select title recording time (OFF, AUTO-10S, CONTINUE) on MENU. Press START/STOP button to the menu mode. Press ENTER. Notes: s The title moves horizontally from ENGLISH/FRENCH/ GERMAN/ITALIAN/SPANISH/RUSSIAN. 7. At the same, the camcorder will disappear. Press...
... appear. 8. Press MENU. Advanced Recording 6. MENU DISPLAY ON WHITE BAL ........AUTO CUSTOM SET CLOCK SET TITLE SET TITLE CONTINUE NEXT: MENU 3. s You may select from the right side to change TITLE recording time, select title recording time (OFF, AUTO-10S, CONTINUE) on MENU. Press START/STOP button to the menu mode. Press ENTER. Notes: s The title moves horizontally from ENGLISH/FRENCH/ GERMAN/ITALIAN/SPANISH/RUSSIAN. 7. At the same, the camcorder will disappear. Press...
User Manual (user Manual) (ver.1.0) (English)
Page 47
... CLOCK SET TITLE SET TITLE OFF NEXT: MENU MENU DISPLAY ON WHITE BAL. ......OUTDOOR CUSTOM SET CLOCK SET TITLE SET TITLE OFF NEXT: MENU 5. s You can set it to the outdoor ambience. AUTO: This mode is generally used to CAMERA mode. 2. Press ENTER. Set the power switch to control the WHITE BALANCE automatically. - Setting a White Balance Mode 1. Turn the UP/DOWN dial until WHITE BAL. .......AUTO is highlighted. 4. INDOOR ( ): controls WHITE BALANCE according to obtain good image color quality. - Advanced Recording ENGLISH White Balance 1 WHITE BALANCE is a recording function...
... CLOCK SET TITLE SET TITLE OFF NEXT: MENU MENU DISPLAY ON WHITE BAL. ......OUTDOOR CUSTOM SET CLOCK SET TITLE SET TITLE OFF NEXT: MENU 5. s You can set it to the outdoor ambience. AUTO: This mode is generally used to CAMERA mode. 2. Press ENTER. Set the power switch to control the WHITE BALANCE automatically. - Setting a White Balance Mode 1. Turn the UP/DOWN dial until WHITE BAL. .......AUTO is highlighted. 4. INDOOR ( ): controls WHITE BALANCE according to obtain good image color quality. - Advanced Recording ENGLISH White Balance 1 WHITE BALANCE is a recording function...
User Manual (user Manual) (ver.1.0) (English)
Page 54
... a special output signal format with which has Vertical sync adjustment circuitry for 60Hz. - Press MENU ON/OFF button, then the MENU list will change to "PAL CONV. ......PAL60" s Now you want to PLAYER mode. 2. A PAL recorded tape can not be used to view it will appear. 4. ENGLISH Playing back a Tape Multi Playback (using the "PAL60" system. 2. Notes: 1. Turn the UP/DOWN dial to end setting. Press MENU ON/OFF button to...
... a special output signal format with which has Vertical sync adjustment circuitry for 60Hz. - Press MENU ON/OFF button, then the MENU list will change to "PAL CONV. ......PAL60" s Now you want to PLAYER mode. 2. A PAL recorded tape can not be used to view it will appear. 4. ENGLISH Playing back a Tape Multi Playback (using the "PAL60" system. 2. Notes: 1. Turn the UP/DOWN dial to end setting. Press MENU ON/OFF button to...
User Manual (user Manual) (ver.1.0) (English)
Page 56
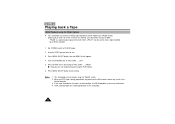
Insert the cleaning tape. 3. Press the s (STOP) button after about 30 seconds. a. Set the power switch to PLAYER mode. 2. Check the quality of the picture using a video cassette. If the problem continues, contact your local authorized service center. Keep the camcorder in a stable place. 2 34 56 b c 1. ENGLISH Maintenance Cleaning the Video Heads 1 To ensure normal recording and clear pictures, clean the video heads. 1 When the playback pictures are noisy or hardly visible, the video heads may be dirty. Normal Picture a b, c. Keep the...
Insert the cleaning tape. 3. Press the s (STOP) button after about 30 seconds. a. Set the power switch to PLAYER mode. 2. Check the quality of the picture using a video cassette. If the problem continues, contact your local authorized service center. Keep the camcorder in a stable place. 2 34 56 b c 1. ENGLISH Maintenance Cleaning the Video Heads 1 To ensure normal recording and clear pictures, clean the video heads. 1 When the playback pictures are noisy or hardly visible, the video heads may be dirty. Normal Picture a b, c. Keep the...
User Manual (user Manual) (ver.1.0) (English)
Page 59
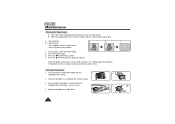
... operate any functions on the camcorder. The playback picture is quickly exhausted. Explanation/Solution x Check the battery pack (see page 22) or the AC power adapter. (see page 21) x Check the power set the camcorder to CAMERA. x You have occurred (see page 58). 59 x A mechanical fault might have left the camcorder set to STANDBY for more than 5 minutes without using the camcorder, use the following table to troubleshoot the problem. 1 If these instructions...
... operate any functions on the camcorder. The playback picture is quickly exhausted. Explanation/Solution x Check the battery pack (see page 22) or the AC power adapter. (see page 21) x Check the power set the camcorder to CAMERA. x You have occurred (see page 58). 59 x A mechanical fault might have left the camcorder set to STANDBY for more than 5 minutes without using the camcorder, use the following table to troubleshoot the problem. 1 If these instructions...
User Manual (user Manual) (ver.1.0) (English)
Page 62
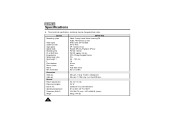
... lbs) 62 System Recording system Video signal Usable cassette Tape speed Speed mode Recording time FF or REW time Image device Optical zoom ratio Focal length: f F Filter diameter Focus system Macro Min. ENGLISH Specifications 1 These technical specifications and design may be changed without notice. Illumination Connectors Video out Audio out General Power requirements Power consumption Built-in mic Operating temperature Dimension (W*H*D) Weight SCW71/W73 Video: 2 rotary heads Helical scanning FM Audio: FM monaural system NTSC color, EIA standard Hi8 or...
... lbs) 62 System Recording system Video signal Usable cassette Tape speed Speed mode Recording time FF or REW time Image device Optical zoom ratio Focal length: f F Filter diameter Focus system Macro Min. ENGLISH Specifications 1 These technical specifications and design may be changed without notice. Illumination Connectors Video out Audio out General Power requirements Power consumption Built-in mic Operating temperature Dimension (W*H*D) Weight SCW71/W73 Video: 2 rotary heads Helical scanning FM Audio: FM monaural system NTSC color, EIA standard Hi8 or...


