
User Manual (user Manual) (ver.1.0) (English)
Page 2
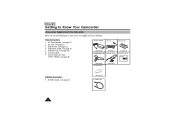
... Instructions Getting to Know Your Camcorder Features ...12 Descriptions s Front View/Side View/Rear View ...13, 14, 15 s OSD (On Screen Display) ...16 Accessories Supplied with the Camcorder...18 Preparing Adjusting the Hand and Shoulder Straps...19 Lithium Battery Installation ...20 Connecting the Power... Source ...21 s To use the AC Power Adapter...21 s To use the Battery Pack...22 Using the Battery Pack...23 s Continuous Recording time table...23 s Battery Level ...
... Instructions Getting to Know Your Camcorder Features ...12 Descriptions s Front View/Side View/Rear View ...13, 14, 15 s OSD (On Screen Display) ...16 Accessories Supplied with the Camcorder...18 Preparing Adjusting the Hand and Shoulder Straps...19 Lithium Battery Installation ...20 Connecting the Power... Source ...21 s To use the AC Power Adapter...21 s To use the Battery Pack...22 Using the Battery Pack...23 s Continuous Recording time table...23 s Battery Level ...

User Manual (user Manual) (ver.1.0) (English)
Page 5
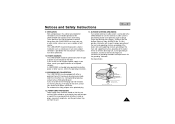
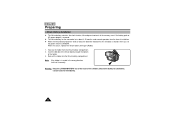
... sure that the viewfinder is activated unexpectedly, and you take the camcorder from cool temperature inside to hot temperature outside to override it, detach, then reinstall the battery pack and lithium battery. Notices and Safety Instructions Notices regarding moisture condensation 1) A sudden ...the cassette compartment opened and the battery removed. 3) If the "DEW ( )" protection feature is pointing towards the sun. 1 2 Direct sunlight can damage the inside of the viewfinder. Notices regarding electronic viewfinder 1) Do not place the camcorder so that the condensation has ...
... sure that the viewfinder is activated unexpectedly, and you take the camcorder from cool temperature inside to hot temperature outside to override it, detach, then reinstall the battery pack and lithium battery. Notices and Safety Instructions Notices regarding moisture condensation 1) A sudden ...the cassette compartment opened and the battery removed. 3) If the "DEW ( )" protection feature is pointing towards the sun. 1 2 Direct sunlight can damage the inside of the viewfinder. Notices regarding electronic viewfinder 1) Do not place the camcorder so that the condensation has ...

User Manual (user Manual) (ver.1.0) (English)
Page 6
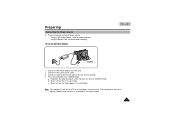
...and Safety Instructions Notices regarding the Lithium battery Warning: Keep the LITHIUM BATTERY out of the reach of its life, please contact your local dealer. even if the battery pack or AC power adapter is removed. 1 The lithium battery for the camcorder lasts about 8~10 months under normal ...operation from time of installation. 1 When the lithium battery becomes weak or dead, the date/time indicator flashes ...
...and Safety Instructions Notices regarding the Lithium battery Warning: Keep the LITHIUM BATTERY out of the reach of its life, please contact your local dealer. even if the battery pack or AC power adapter is removed. 1 The lithium battery for the camcorder lasts about 8~10 months under normal ...operation from time of installation. 1 When the lithium battery becomes weak or dead, the date/time indicator flashes ...
User Manual (user Manual) (ver.1.0) (English)
Page 9
..., and the point where they exit from battery power, or other sources, refer to insert the plug fully into the outlet, try reversing the plug. POWER SOURCES: The CAMCORDER should not be blocked or covered. GROUNDING OR POLARIZATION: This CAMCORDER may be operated only from overheating. GROUND ...(NEC SECTION 810-21) GROUND CLAMPS POWER SERVICE GROUNDING ELECTRODE SYSTEM (NEC ART 250, PART H) NEC NATIONAL ELECTRICAL CODE 12. This CAMCORDER should be equipped with respect to proper grounding of the mast and supporting structure, grounding of the lead-in wire and supporting structure, ...
..., and the point where they exit from battery power, or other sources, refer to insert the plug fully into the outlet, try reversing the plug. POWER SOURCES: The CAMCORDER should not be blocked or covered. GROUNDING OR POLARIZATION: This CAMCORDER may be operated only from overheating. GROUND ...(NEC SECTION 810-21) GROUND CLAMPS POWER SERVICE GROUNDING ELECTRODE SYSTEM (NEC ART 250, PART H) NEC NATIONAL ELECTRICAL CODE 12. This CAMCORDER should be equipped with respect to proper grounding of the mast and supporting structure, grounding of the lead-in wire and supporting structure, ...
User Manual (user Manual) (ver.1.0) (English)
Page 14
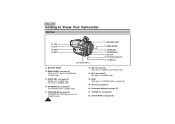
... FADE works in CAMERA mode. (see page 38) PROGRAM AE (Auto Exposure) works in CAMERA mode. 14 16. ENGLISH Getting to Know Your Camcorder Side View 15. P.AE 17. BATTERY EJECT 12. MENU ON/OFF 13. PROGRAM AE (see page 46) 19. S-VIDEO out 11. MF works in CAMERA and PLAYER mode... works in MENU mode. 15. UP/DOWN dial (see page 52) 22. S-VIDEO out (see page 42) UP/DOWN dial works in CAMERA mode. 18. BATTERY EJECT 12. BLC 18. ENTER (MF) (see page 21) 20. UP/DOWN Dial 19. DC Jack (see page 42) ENTER works in CAMERA and PLAYER...
... FADE works in CAMERA mode. (see page 38) PROGRAM AE (Auto Exposure) works in CAMERA mode. 14 16. ENGLISH Getting to Know Your Camcorder Side View 15. P.AE 17. BATTERY EJECT 12. MENU ON/OFF 13. PROGRAM AE (see page 46) 19. S-VIDEO out 11. MF works in CAMERA and PLAYER mode... works in MENU mode. 15. UP/DOWN dial (see page 52) 22. S-VIDEO out (see page 42) UP/DOWN dial works in CAMERA mode. 18. BATTERY EJECT 12. BLC 18. ENTER (MF) (see page 21) 20. UP/DOWN Dial 19. DC Jack (see page 42) ENTER works in CAMERA and PLAYER...

User Manual (user Manual) (ver.1.0) (English)
Page 15
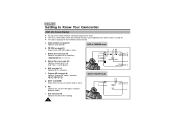
.... LENS cap 23. AUDIO/VIDEO out (see page 32) 24. CAMERA : Select to Know Your Camcorder Rear View 32. ZOOM 24. ZOOM (see page 51) 27. Hand Strap (see page 22) 32. Battery pack compartment (see page 19) 29. Getting to record. - POWER Switch 27. OFF : Select to... play back. 30. START/STOP 31. Battery pack compartment ENGLISH 23. AUDIO/VIDEO out 28. LENS cap 28. POWER Switch (see page 19) 26. Cassette Compartment 26. PLAYER : Select to turn off the camcorder. - Cassette Compartment 25. Hand Strap 29. START/STOP (see page ...
.... LENS cap 23. AUDIO/VIDEO out (see page 32) 24. CAMERA : Select to Know Your Camcorder Rear View 32. ZOOM 24. ZOOM (see page 51) 27. Hand Strap (see page 22) 32. Battery pack compartment (see page 19) 29. Getting to record. - POWER Switch 27. OFF : Select to... play back. 30. START/STOP 31. Battery pack compartment ENGLISH 23. AUDIO/VIDEO out 28. LENS cap 28. POWER Switch (see page 19) 26. Cassette Compartment 26. PLAYER : Select to turn off the camcorder. - Cassette Compartment 25. Hand Strap 29. START/STOP (see page ...
User Manual (user Manual) (ver.1.0) (English)
Page 16
c. Battery level (see page 32) Indicates zoom position. BLC (see page 37) Indicates BLC is active. c b SEPIA Hi8 PLAY o 0:00:25 n TAPE! Date (see page 55) ..., 2002 i f. Manual Focus (see page 38) Indicates Program AE mode is not displayed. Zoom position (see page 24) Indicates the power left in the battery. ( ) d. ENGLISH Getting to Know Your Camcorder OSD (On Screen Display) 1 You can be operated even after the OSD is turned off by setting the Display menu on .
c. Battery level (see page 32) Indicates zoom position. BLC (see page 37) Indicates BLC is active. c b SEPIA Hi8 PLAY o 0:00:25 n TAPE! Date (see page 55) ..., 2002 i f. Manual Focus (see page 38) Indicates Program AE mode is not displayed. Zoom position (see page 24) Indicates the power left in the battery. ( ) d. ENGLISH Getting to Know Your Camcorder OSD (On Screen Display) 1 You can be operated even after the OSD is turned off by setting the Display menu on .
User Manual (user Manual) (ver.1.0) (English)
Page 18
... 20) 1. AUDIO/VIDEO Cable 5. AC cord AD44-00038A AD39-00028A 4. Battery Pack AD43-00065A 6. Lithium Battery AD63-00202A Optional Accessories 8. AC Power Adapter. (see page 51) 5. Audio/Video Cable. (see page 21) 2. ENGLISH Getting to Know Your Camcorder Accessories Supplied with the Camcorder Make sure that the following basic accessories are supplied with your...
... 20) 1. AUDIO/VIDEO Cable 5. AC cord AD44-00038A AD39-00028A 4. Battery Pack AD43-00065A 6. Lithium Battery AD63-00202A Optional Accessories 8. AC Power Adapter. (see page 51) 5. Audio/Video Cable. (see page 21) 2. ENGLISH Getting to Know Your Camcorder Accessories Supplied with the Camcorder Make sure that the following basic accessories are supplied with your...
User Manual (user Manual) (ver.1.0) (English)
Page 20
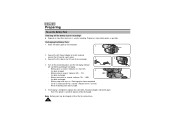
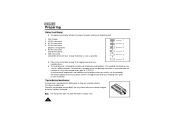
...the reach of the holder. 3. ENGLISH Preparing Lithium Battery Installation 1 The lithium battery maintains the clock function, title and preset contents of installation. 1 When the lithium battery becomes weak or dead, the date/time indicator flashes for the camcorder lasts about 5 seconds when you set the power... switch to CAMERA. Note: If the holder is removed. 1 The lithium battery for about 8~10 months under normal ...
...the reach of the holder. 3. ENGLISH Preparing Lithium Battery Installation 1 The lithium battery maintains the clock function, title and preset contents of installation. 1 When the lithium battery becomes weak or dead, the date/time indicator flashes for the camcorder lasts about 5 seconds when you set the power... switch to CAMERA. Note: If the holder is removed. 1 The lithium battery for about 8~10 months under normal ...
User Manual (user Manual) (ver.1.0) (English)
Page 21
...the Lens Cap is used for indoor recording. - Move the adapter away from the TV, camcorder or the antenna cable. 21 Using the Battery Pack: used next to a TV or the camcorder, it may cause the TV or camcorder to emit noise. Connect the AC cord to the CAMERA mode. b. Make sure that the... image appears in the Viewfinder. c. Preparing Connecting the Power Source 1 There are two ways to DC jack of the camcorder. 4. ...
...the Lens Cap is used for indoor recording. - Move the adapter away from the TV, camcorder or the antenna cable. 21 Using the Battery Pack: used next to a TV or the camcorder, it may cause the TV or camcorder to emit noise. Connect the AC cord to the CAMERA mode. b. Make sure that the... image appears in the Viewfinder. c. Preparing Connecting the Power Source 1 There are two ways to DC jack of the camcorder. 4. ...
User Manual (user Manual) (ver.1.0) (English)
Page 22
...socket. 2 3. Blinking twice a second : Indicates 50% ~ 75% OFF has been recharged. - Even if the power is completed, separate the camcorder, AC power adapter, and battery pack. - Blinking once a second : Indicates less than 50% has been charged. 4 - Connect the DC cable to the DC jack of purchase... a second : Indicates there is an error. Recharging the Battery Pack 1. Blinking stops and stays on how often zoom lens is used in recording. Connect the AC Power Adapter to the AC cord and connect the AC cord to the camcorder. 1 2. Turn off for recording? 1 Depends on ...
...socket. 2 3. Blinking twice a second : Indicates 50% ~ 75% OFF has been recharged. - Even if the power is completed, separate the camcorder, AC power adapter, and battery pack. - Blinking once a second : Indicates less than 50% has been charged. 4 - Connect the DC cable to the DC jack of purchase... a second : Indicates there is an error. Recharging the Battery Pack 1. Blinking stops and stays on how often zoom lens is used in recording. Connect the AC Power Adapter to the AC cord and connect the AC cord to the camcorder. 1 2. Turn off for recording? 1 Depends on ...
User Manual (user Manual) (ver.1.0) (English)
Page 24
... as possible) 6 1 Please refer to the table on the battery pack to help you may choose which one ) 3 5. 90~95% consumed (change the battery) 4 6. 100% consumed 5 (camcorder will turn off soon, change the battery as soon as the approximate continuous recording times given in a cold... environment. Note: The charge mark does not affect the battery's charge status. 24 Two colors are provided (...
... as possible) 6 1 Please refer to the table on the battery pack to help you may choose which one ) 3 5. 90~95% consumed (change the battery) 4 6. 100% consumed 5 (camcorder will turn off soon, change the battery as soon as the approximate continuous recording times given in a cold... environment. Note: The charge mark does not affect the battery's charge status. 24 Two colors are provided (...
User Manual (user Manual) (ver.1.0) (English)
Page 26
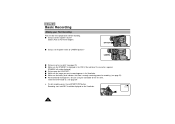
BATTERY CAMERA s Did you open the LENS CAP? Recording starts and REC should be displayed) s Did you insert a cassette? (see page 34) a. REC X:XX:XX 26 ... page 25) s Make sure that STANDBY is displayed in the Viewfinder. s Make sure the battery level indicates that there is enough remaining power for recording. (see page 24) s We recommend that beginners, who are using the camcorder for the first time, switch the EASY mode on the Viewfinder. s Did you connect a power...
BATTERY CAMERA s Did you open the LENS CAP? Recording starts and REC should be displayed) s Did you insert a cassette? (see page 34) a. REC X:XX:XX 26 ... page 25) s Make sure that STANDBY is displayed in the Viewfinder. s Make sure the battery level indicates that there is enough remaining power for recording. (see page 24) s We recommend that beginners, who are using the camcorder for the first time, switch the EASY mode on the Viewfinder. s Did you connect a power...
User Manual (user Manual) (ver.1.0) (English)
Page 27
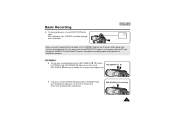
... for 3 seconds and return to the original position automatically. REC SEARCH 1 You can view a recorded picture with the REC SEARCH , function in STANDBY mode, your camcorder will turn off automatically. To use it will play back in STANDBY mode for as long as you keep pressing. 1 If you to forward, for... you press the REC SEARCH button briefly in STANDBY mode. REC SEARCH (Press briefly) 27 ENGLISH STBY Y:YY:YY When a cassette is loaded and the camcorder is designed to save battery power and to CAMERA. To stop recording, press the red START/STOP button again.
... for 3 seconds and return to the original position automatically. REC SEARCH 1 You can view a recorded picture with the REC SEARCH , function in STANDBY mode, your camcorder will turn off automatically. To use it will play back in STANDBY mode for as long as you keep pressing. 1 If you to forward, for... you press the REC SEARCH button briefly in STANDBY mode. REC SEARCH (Press briefly) 27 ENGLISH STBY Y:YY:YY When a cassette is loaded and the camcorder is designed to save battery power and to CAMERA. To stop recording, press the red START/STOP button again.

User Manual (user Manual) (ver.1.0) (English)
Page 29
...button. s You can also monitor the picture on the Viewfinder. 1 Make sure that STOP is in place. 1. Make sure that the battery pack is displayed in the OSD. 4. s Camcorder stops automatically after connecting the camcorder to PLAYER mode. 2. s To stop REWIND, press the (STOP) button. Basic Recording Playing back a tape on the... CAMCORDER 1 You can monitor the playback picture on a TV screen, after rewinding. 5. Insert the tape you recorded in the Viewfinder. Hold down the tab...
...button. s You can also monitor the picture on the Viewfinder. 1 Make sure that STOP is in place. 1. Make sure that the battery pack is displayed in the OSD. 4. s Camcorder stops automatically after connecting the camcorder to PLAYER mode. 2. s To stop REWIND, press the (STOP) button. Basic Recording Playing back a tape on the... CAMCORDER 1 You can monitor the playback picture on a TV screen, after rewinding. 5. Insert the tape you recorded in the Viewfinder. Hold down the tab...

User Manual (user Manual) (ver.1.0) (English)
Page 34
... been installed). 34 However, the Date/Time will be seen if it has been previously set to run. s Battery level, recording mode, counter, date/time will only be displayed as the camcorder starts to off . STBY X:XX:XX EASY JAN.1,2002 Note: The Easy mode settings are stored in CAMERA mode. 1. ENGLISH...
... been installed). 34 However, the Date/Time will be seen if it has been previously set to run. s Battery level, recording mode, counter, date/time will only be displayed as the camcorder starts to off . STBY X:XX:XX EASY JAN.1,2002 Note: The Easy mode settings are stored in CAMERA mode. 1. ENGLISH...
User Manual (user Manual) (ver.1.0) (English)
Page 43
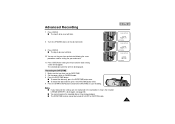
Advanced Recording 7. s The DATE/TIME function cannot be turned off in the camcorder, it means the installed LITHIUM BATTERY is discharged. (see page 20) s You cannot conceal the recorded date or time during playback. Turn the UP/DOWN dial to CAMERA mode. 3. Make sure ...
Advanced Recording 7. s The DATE/TIME function cannot be turned off in the camcorder, it means the installed LITHIUM BATTERY is discharged. (see page 20) s You cannot conceal the recorded date or time during playback. Turn the UP/DOWN dial to CAMERA mode. 3. Make sure ...

User Manual (user Manual) (ver.1.0) (English)
Page 44
... Recording Selecting and Recording a Title 1 Selecting and recording a TITLE is possible in the CAMERA mode only. 1 The TITLE feature allows you have installed the LITHIUM BATTERY or have the AC adapter attached. 2. Turn the UP/DOWN dial until TITLE SET is ENGLISH. Make sure that you to the CAMERA mode. 3. Set... a preset title stored in CAMERA STANDBY mode only. 1 The factory default language is highlighted. 5. Selecting a Language and Setting a Title 1 Selecting a language is possible in the camcorder's memory. 1 You can change the language. 1.
... Recording Selecting and Recording a Title 1 Selecting and recording a TITLE is possible in the CAMERA mode only. 1 The TITLE feature allows you have installed the LITHIUM BATTERY or have the AC adapter attached. 2. Turn the UP/DOWN dial until TITLE SET is ENGLISH. Make sure that you to the CAMERA mode. 3. Set... a preset title stored in CAMERA STANDBY mode only. 1 The factory default language is highlighted. 5. Selecting a Language and Setting a Title 1 Selecting a language is possible in the camcorder's memory. 1 You can change the language. 1.
User Manual (user Manual) (ver.1.0) (English)
Page 50
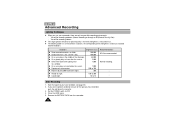
..., the corresponding level of the afternoon. Set the POWER switch to 15 Recommendations ND filter recommended. ENGLISH Advanced Recording Lighting Techniques 1 When you use your camcorder, there are only two possible recording environments. - Brightness (lux) 100,000 100,000 35,000 2,000 1,000 1,000 500 to 700 300 150 to 200... accidental erasure of the tape you have recorded, push the red tab on a hot summer's day. x Room lit by two 30W fluorescent lights. Remove the BATTERY PACK from the camcorder. 50
..., the corresponding level of the afternoon. Set the POWER switch to 15 Recommendations ND filter recommended. ENGLISH Advanced Recording Lighting Techniques 1 When you use your camcorder, there are only two possible recording environments. - Brightness (lux) 100,000 100,000 35,000 2,000 1,000 1,000 500 to 700 300 150 to 200... accidental erasure of the tape you have recorded, push the red tab on a hot summer's day. x Room lit by two 30W fluorescent lights. Remove the BATTERY PACK from the camcorder. 50
User Manual (user Manual) (ver.1.0) (English)
Page 52
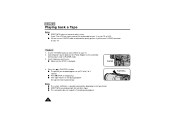
... VCR. s The picture you recorded appears on your TV. s This camcorder does not support LP recording and playback. Connect power source (battery or AC Power Adapter) to PLAYER mode. 3. Set the power switch to the camcorder. s Press s (STOP) to see. s If the tape reaches its... end during playback, the tape will rewind automatically. ENGLISH Playing back a Tape Notes: s SCW71/W73 feature a monaural audio...
... VCR. s The picture you recorded appears on your TV. s This camcorder does not support LP recording and playback. Connect power source (battery or AC Power Adapter) to PLAYER mode. 3. Set the power switch to the camcorder. s Press s (STOP) to see. s If the tape reaches its... end during playback, the tape will rewind automatically. ENGLISH Playing back a Tape Notes: s SCW71/W73 feature a monaural audio...


