Samsung SCD67 Support and Manuals
Get Help and Manuals for this Samsung item

View All Support Options Below
Free Samsung SCD67 manuals!
Problems with Samsung SCD67?
Ask a Question
Free Samsung SCD67 manuals!
Problems with Samsung SCD67?
Ask a Question
Popular Samsung SCD67 Manual Pages
User Manual (user Manual) (ver.1.0) (English) - Page 3

... to be sure the antenna or cable system is provided or the manufacturer's instructions have been adhered to replace your CAMCORDER on a bed, sofa, rug, or other similar ...GROUND CLAMPS
POWER SERVICE GROUNDING ELECTRODE SYSTEM (NEC ART 250, PART H)
NEC NATIONAL ELECTRICAL CODE VENTILATION: Slots and openings in the cabinet are not sure of the type of the lead-in installation such as a ...
User Manual (user Manual) (ver.1.0) (English) - Page 7

...WIND CUT...46 AUDIO MODE ...47 DISPLAY...48 DATE/TIME...49 DEMO ...50 CLOCK SET ...51 Easy mode ...52 Custom mode...53 MF/AF(Manual Focus/Auto Focus) ...54 BLC ...55 Fade In and Out...56 Audio dubbing......67
Maintenance
After finishing a recording...69 Cleaning and Maintaining the Camcorder...70
Using Your Camcorder Abroad ...71
Troubleshooting ...72
Specifications ...74
Index ...76
Warranty ...77 3
User Manual (user Manual) (ver.1.0) (English) - Page 14
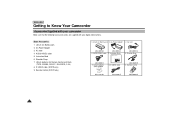
... to Know Your Camcorder
Accessories Supplied with your camcorder
Make sure that the following basic accessories are supplied with your digital video camera. AUDIO/VIDEO cable
AD44-00038A 5. Instruction Book 6. Remote Control (SCD70 only)
1. AC cord
AD43-00070A 4. AC Power Adapter 3. AC cord 4. Lithium batteries for Remote Control and Clock.
(TYPE: CR2025, SCD67; 1 EA/SCD70; 2 EA...
User Manual (user Manual) (ver.1.0) (English) - Page 23
... direction or it will not fit properly. Reinsert the holder into the lithium battery compartment. Warning: Keep the LITHIUM BATTERY out of the reach of installation. ✤ When the lithium battery becomes weak or dead, the date/time indicator flashes for the camcorder lasts about 6 months under normal operation from the camera.
2.
Remove the Lithium...
User Manual (user Manual) (ver.1.0) (English) - Page 25
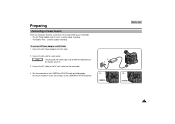
...camcorder.
4. Connect the DC cable to the AC cord.
2. Set the camcorder to the CAMERA or PLAYER mode by holding down the tab on the power switch and turning it to a wall socket.
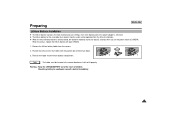
To use the AC Power Adapter and DC Cable... 1. Preparing
Connecting a Power Source
There are two types of power source that can be different depending on
the country you're in.
3. The Battery Pack ...
User Manual (user Manual) (ver.1.0) (English) - Page 37
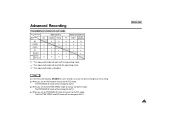
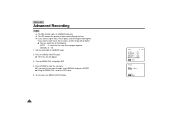
... you are not able to AUTO. q : The requested mode will work with the operating mode. The SHUTTER SPEED and IRIS mode will be changed to manual (not AUTO) mode, - When you set the SHUTTER SPEED mode to manual (not AUTO) mode, - When you set the IRIS mode to manual (not AUTO) mode, -
User Manual (user Manual) (ver.1.0) (English) - Page 38

... to OFF. s If you want before using. ✤ You can customize settings and save them for future use the CUSTOM function (see page 29. q CUSTOM SET ✤ You can set the status of each item to what you set the IRIS to manual, the PROGRAM AE will be changed to exit the menu, press the...
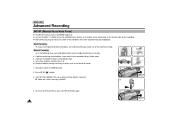
User Manual (user Manual) (ver.1.0) (English) - Page 40

...PIP function, the PIP screen will appear.
3. s If you are recording.
1. Set the camcorder to OFF.
(MENU)
SP STBY
LCD ADJUST CUSTOM SET DIS OFF PIP OFF D.ZOOM OFF PROGRAM AE .........AUTO
: MENU
(MENU)
SP ...10020; The PIP feature works by using a small, superimposed screen to manual (1/8, 1/15, 1/30) in the DSE function. s The PIP menu is wider than the one being recorded.
(Ex...
User Manual (user Manual) (ver.1.0) (English) - Page 48
... one of light entering through the lens. ✤ If you want to use manual mode, select MANUAL and press ENTER. Press the MENU ON/OFF button. Turn the MENU DIAL to...DSE SELECT ...........OFF W.BALANCE AUTO SHUTTER AUTO IRIS AUTO
: MENU
q IRIS q AUTO MANUAL I-0 15 29-I RETURN
SEL.:ENTER : MENU Set the camcorder to CAMERA mode. 2. s The menu list will be brighter. s Using the MENU ...
User Manual (user Manual) (ver.1.0) (English) - Page 58
... or surrounded by adjusting the focus manually. a. A person enveloped in CAMERA mode only. ✤ In most situations, it enables you could obtain better results by snow. Very shiny or glossy surfaces like a car.
A picture containing several objects, some close to CAMERA mode.
2
2. b. Set power switch to the camcorder, others further away. d. Auto Focusing...
User Manual (user Manual) (ver.1.0) (English) - Page 71
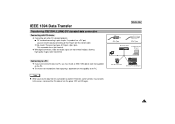
... s When you must install an IEEE 1394 add-on card (not supplied) on the capability of DV port. (4pin, 6pin) This camcorder has a 4pin terminal. ✤ With digital connection, video and audio signals are transmitted in digital, allowing high quality images to a PC, you transmit data from this occurs, reconnect the DV cable or turn the...
User Manual (user Manual) (ver.1.0) (English) - Page 74
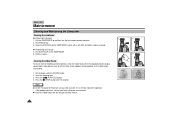
... cloth and cotton swab or a blower. Insert the cleaning tape.
3.
If the problem continues, contact your local authorized service center. If It is still bad, repeat the operation. Refit the screws.
3
... the VIEWFINDER up and then turn the two screws counter-clockwise.
2. q Reattaching the Eyecup 4. Set the power switch to PLAYER mode.
2. Put the EYECUP on the VIEWFINDER. 5. Press the (...
User Manual (user Manual) (ver.1.0) (English) - Page 76
...
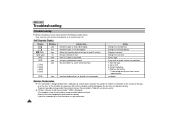
Troubleshooting
Troubleshooting
✤ Before contacting a service center, perform the following simple checks. To prevent possible damage under these circumstances, the camcorder is fitted with a moisture sensor.
✤ If there is moisture inside the camcorder, on the lens. Open the cassette compartment and remove the battery.
Detach the battery. 4.
Leave the camcorder...
User Manual (user Manual) (ver.1.0) (English) - Page 77

... a dark background. The battery pack has not been fully charged. A vertical strip appears on the cassette. Auto focus does not work. Auto focus does not work in the viewfinder is quickly exhausted.
Check the POWER switch. You have left the camcorder set to solve the problem, contact your nearest authorized service center.
When you are...
User Manual (user Manual) (ver.1.0) (English) - Page 81

... replace the product at it's option. This warranty gives you specific legal rights, and you may not apply to you can be retained by the customer and is the only acceptable proof of incidental or consequential damages, or allow limitations on products purchased in models, transportation to the authorized service center.
This warranty is...
Samsung SCD67 Reviews
We have not received any reviews for Samsung yet.