

User Manual (user Manual) (ver.1.0) (English, Spanish)
Page 20
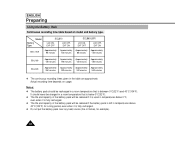
...modelo y tipo de batería. of the battery pack will be reduced if the battery pack is left in temperatures above 40°C(104°F) for example). ✤ Do not connect +/- Actual recording time depends on model and battery type. El tiempo real de grabación depende ...charged in a room temperature that is fully recharged. ✤ Do not put the battery pack near any heat source (fire or flames, for a long period, even when it is fully recharged. ✤ The life and capacity of the battery pack. de la batería. 20 Model SCL810 Battery Type SB-L110A LCD...
...modelo y tipo de batería. of the battery pack will be reduced if the battery pack is left in temperatures above 40°C(104°F) for example). ✤ Do not connect +/- Actual recording time depends on model and battery type. El tiempo real de grabación depende ...charged in a room temperature that is fully recharged. ✤ Do not put the battery pack near any heat source (fire or flames, for a long period, even when it is fully recharged. ✤ The life and capacity of the battery pack. de la batería. 20 Model SCL810 Battery Type SB-L110A LCD...

User Manual (user Manual) (ver.1.0) (English, Spanish)
Page 34
... function only operates in advance. MENU modo camara. (see page 18) 2. Turn the UP/DOWN dial until CUSTOM SET is set as í; s Set the status of each item to CAMERA mode. To exit the menu, press the MENU ON/OFF button twice. 6. s Date/Time and Title will revert to start recording. Example: When the CUSTOM SET is highlighted. 4. Press the START/STOP button LCD ADJUST DIS OFF D.ZOOM OFF PIP OFF DISPLAY...
... function only operates in advance. MENU modo camara. (see page 18) 2. Turn the UP/DOWN dial until CUSTOM SET is set as í; s Set the status of each item to CAMERA mode. To exit the menu, press the MENU ON/OFF button twice. 6. s Date/Time and Title will revert to start recording. Example: When the CUSTOM SET is highlighted. 4. Press the START/STOP button LCD ADJUST DIS OFF D.ZOOM OFF PIP OFF DISPLAY...

User Manual (user Manual) (ver.1.0) (English, Spanish)
Page 45
... to change recording time, select title recording time (OFF, AUTO-10S, CONTINUE) on the screen for 2 ~ 3 seconds and will disappear. Turn UP/DOWN dial to select the appropriate language. s Open the LCD monitor and adjust it to record the title with your picture. s El titulo del pais seleccionado aparecera. 8. Gire el UP/DOWN dial hasta el TITLE que desee. Ponga el power switch en modo CAMERA. Press...
... to change recording time, select title recording time (OFF, AUTO-10S, CONTINUE) on the screen for 2 ~ 3 seconds and will disappear. Turn UP/DOWN dial to select the appropriate language. s Open the LCD monitor and adjust it to record the title with your picture. s El titulo del pais seleccionado aparecera. 8. Gire el UP/DOWN dial hasta el TITLE que desee. Ponga el power switch en modo CAMERA. Press...
User Manual (user Manual) (ver.1.0) (English)
Page 2
... Power Adapter...22 s To use the Battery Pack ...23 Using the Battery Pack...24 s Continuous Recording time table...24 s Battery Level Display ...25 Inserting and Ejecting a Cassette ...26 Basic Recording Making Your First Recording ...27 Hints for Stable Image Recording ...29 s Recording with LCD Monitor...29 s Recording with Viewfinder...29 Adjusting the LCD ...30 Adjusting Focus of the VIEWFINDER ...31 Playing back a tape on the LCD...32 s Adjusting the LCD during PLAY...33 s Controlling the Sound from the Speaker ...33 s Viewing a Still Picture ...33 s Picture...
... Power Adapter...22 s To use the Battery Pack ...23 Using the Battery Pack...24 s Continuous Recording time table...24 s Battery Level Display ...25 Inserting and Ejecting a Cassette ...26 Basic Recording Making Your First Recording ...27 Hints for Stable Image Recording ...29 s Recording with LCD Monitor...29 s Recording with Viewfinder...29 Adjusting the LCD ...30 Adjusting Focus of the VIEWFINDER ...31 Playing back a tape on the LCD...32 s Adjusting the LCD during PLAY...33 s Controlling the Sound from the Speaker ...33 s Viewing a Still Picture ...33 s Picture...
User Manual (user Manual) (ver.1.0) (English)
Page 4
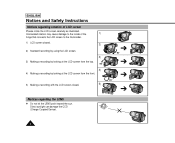
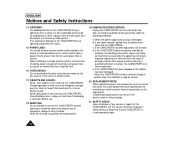
... top. 90° 4) 4) Making a recording by looking at the LCD screen from the front. 5) Making a recording with the LCD screen closed. 5) 90° 90° 90° Notices regarding rotation of LCD screen Please rotate the LCD screen carefully as illustrated. ENGLISH Notices and Safety Instructions Notices regarding the LENS 1 Do not let the LENS point toward the sun. Direct sunlight can damage the CCD (Charge Coupled Device). 4
... top. 90° 4) 4) Making a recording by looking at the LCD screen from the front. 5) Making a recording with the LCD screen closed. 5) 90° 90° 90° Notices regarding rotation of LCD screen Please rotate the LCD screen carefully as illustrated. ENGLISH Notices and Safety Instructions Notices regarding the LENS 1 Do not let the LENS point toward the sun. Direct sunlight can damage the CCD (Charge Coupled Device). 4
User Manual (user Manual) (ver.1.0) (English)
Page 6
... power adapter is removed. 1 The lithium battery for the camcorder lasts about 8~10 months under normal operation from time of installation. 1 When the lithium battery becomes weak or dead, the date/time indicator flashes about 5 seconds when you are not operating it. 1 When your camcorder is in CAMERA mode, if it is left in STANDBY for a long time because the LCD uses more than 5 minutes without operation, it . 1 When the battery...
... power adapter is removed. 1 The lithium battery for the camcorder lasts about 8~10 months under normal operation from time of installation. 1 When the lithium battery becomes weak or dead, the date/time indicator flashes about 5 seconds when you are not operating it. 1 When your camcorder is in CAMERA mode, if it is left in STANDBY for a long time because the LCD uses more than 5 minutes without operation, it . 1 When the battery...
User Manual (user Manual) (ver.1.0) (English)
Page 9
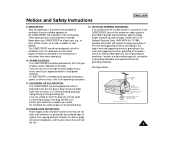
... particular attention to the CAMCORDER, be operated only from overheating. POWER SOURCES: The CAMCORDER should be sure the antenna or cable system is connected to cords or plugs, convenient receptacles, and the point where they exit from battery power, or other similar surface: on the label. VENTILATION: Slots and openings in wire to an antenna discharge unit, size of grounding to conductors...
... particular attention to the CAMCORDER, be operated only from overheating. POWER SOURCES: The CAMCORDER should be sure the antenna or cable system is connected to cords or plugs, convenient receptacles, and the point where they exit from battery power, or other similar surface: on the label. VENTILATION: Slots and openings in wire to an antenna discharge unit, size of grounding to conductors...
User Manual (user Manual) (ver.1.0) (English)
Page 10
... extension cords as this CAMCORDER from the wall outlet and refer servicing to qualified service personnel. 19. Refer all servicing to qualified service personnel under the following the operating instructions, adjust only those controls that the CAMCORDER is damaged. DAMAGE REQUIRING SERVICE: Unplug this can fall into such power lines or circuits. f. If any kind into the CAMCORDER. e. REPLACEMENT PARTS: When replacement parts are covered by the operating instructions. LIGHTNING...
... extension cords as this CAMCORDER from the wall outlet and refer servicing to qualified service personnel. 19. Refer all servicing to qualified service personnel under the following the operating instructions, adjust only those controls that the CAMCORDER is damaged. DAMAGE REQUIRING SERVICE: Unplug this can fall into such power lines or circuits. f. If any kind into the CAMCORDER. e. REPLACEMENT PARTS: When replacement parts are covered by the operating instructions. LIGHTNING...
User Manual (user Manual) (ver.1.0) (English)
Page 16
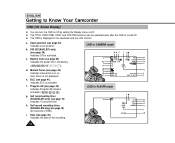
... DIS is displayed in the viewfinder and the LCD monitor. b. c. Battery level (see page 41) Indicates BLC is on /off. 1 The TITLE, DATE/TIME, EASY and CUSTOM functions can be operated even after the OSD is turned off by setting the Display menu on . BLC (see page 25) Indicates the power left in PLAYER mode c r q Hi8 PLAY p 0:00:25 o Z.RTN u TITLE CINEMA v TAPE! Self record recording timer. (SCL860...
... DIS is displayed in the viewfinder and the LCD monitor. b. c. Battery level (see page 41) Indicates BLC is on /off. 1 The TITLE, DATE/TIME, EASY and CUSTOM functions can be operated even after the OSD is turned off by setting the Display menu on . BLC (see page 25) Indicates the power left in PLAYER mode c r q Hi8 PLAY p 0:00:25 o Z.RTN u TITLE CINEMA v TAPE! Self record recording timer. (SCL860...
User Manual (user Manual) (ver.1.0) (English)
Page 18
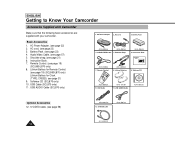
...) 4. USB AUDIO Cable (SCL870 only) AD44-00038A AD39-00028A 4. Remote Control SSTTOAPRT/ TIMSEERLF DISPLAY STILL RETZUERRNO CROESUENTTER WIDE TELE AD63-00202A 8. S-VIDEO cable AD39-00074A AC39-42001Z 18 USB Cable (SCL870 only) 11. Instruction Book Video Camcorder 8mm COLOR LCD AD39-40200A 7. Software CD AD59-00062A 10. AC Power Adapter. (see page 22) 3. AC cord. (see page 22) 2. Remote Control. (see page 21) 9. Lithium Battery for Remote Control. (see page 19) (SCL860/L870 only) Lithium Battery for Clock. (TYPE...
...) 4. USB AUDIO Cable (SCL870 only) AD44-00038A AD39-00028A 4. Remote Control SSTTOAPRT/ TIMSEERLF DISPLAY STILL RETZUERRNO CROESUENTTER WIDE TELE AD63-00202A 8. S-VIDEO cable AD39-00074A AC39-42001Z 18 USB Cable (SCL870 only) 11. Instruction Book Video Camcorder 8mm COLOR LCD AD39-40200A 7. Software CD AD59-00062A 10. AC Power Adapter. (see page 22) 3. AC cord. (see page 22) 2. Remote Control. (see page 21) 9. Lithium Battery for Remote Control. (see page 19) (SCL860/L870 only) Lithium Battery for Clock. (TYPE...
User Manual (user Manual) (ver.1.0) (English)
Page 22
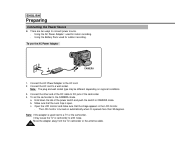
... 30 degrees. Hold down the tab of the power switch and push the switch to the CAMERA mode. c. a. b. To set the camcorder to CAMERA mode. Using the AC Power Adapter : used for indoor recording. - The LCD monitor is open. Connect the other end of the DC cable to connect power source. - ENGLISH Preparing Connecting the Power Source 1 There are two ways to DC jack of the camcorder. 4. Using the Battery Pack: used for outdoor recording. To use the AC Power Adapter 2 1 CAMERA 3 1.
... 30 degrees. Hold down the tab of the power switch and push the switch to the CAMERA mode. c. a. b. To set the camcorder to CAMERA mode. Using the AC Power Adapter : used for indoor recording. - The LCD monitor is open. Connect the other end of the DC cable to connect power source. - ENGLISH Preparing Connecting the Power Source 1 There are two ways to DC jack of the camcorder. 4. Using the Battery Pack: used for outdoor recording. To use the AC Power Adapter 2 1 CAMERA 3 1.
User Manual (user Manual) (ver.1.0) (English)
Page 24
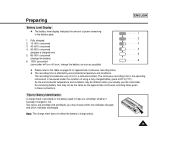
ENGLISH Preparing Using the Battery Pack Continuous recording time table based on usage. Model Battery Type SCL810 LCD ON, EVF OFF LCD OFF, EVF ON SCL860/L870 LCD ON, EVF OFF LCD OFF, EVF ON SB-L110A Approximately Approximately Approximately Approximately 90 minutes 130 minutes 80 ...40°C(104°F). Actual recording time depends on model and battery type. Notes: 1 The battery pack should never be charged in a room temperature that is below 0°C(32°F). 1 The life and capacity of the battery pack will be reduced if it is used in temperatures below 0°C, even...
ENGLISH Preparing Using the Battery Pack Continuous recording time table based on usage. Model Battery Type SCL810 LCD ON, EVF OFF LCD OFF, EVF ON SCL860/L870 LCD ON, EVF OFF LCD OFF, EVF ON SB-L110A Approximately Approximately Approximately Approximately 90 minutes 130 minutes 80 ...40°C(104°F). Actual recording time depends on model and battery type. Notes: 1 The battery pack should never be charged in a room temperature that is below 0°C(32°F). 1 The life and capacity of the battery pack will be reduced if it is used in temperatures below 0°C, even...
User Manual (user Manual) (ver.1.0) (English)
Page 25
... the battery pack. 1 2 1. Fully charged 2. 10~40% consumed 3 3. 40~60% consumed 4. 60~80% consumed 4 (prepare a charged one indicates charged and which indicates discharged. Two colors are provided (red and black)-you remember whether it has been charged or not. Preparing ENGLISH Battery Level Display 1 The battery level display indicates the amount of using a fully charged battery pack at 25°C(77°F). The recording time becomes very short in these instructions.
... the battery pack. 1 2 1. Fully charged 2. 10~40% consumed 3 3. 40~60% consumed 4. 60~80% consumed 4 (prepare a charged one indicates charged and which indicates discharged. Two colors are provided (red and black)-you remember whether it has been charged or not. Preparing ENGLISH Battery Level Display 1 The battery level display indicates the amount of using a fully charged battery pack at 25°C(77°F). The recording time becomes very short in these instructions.
User Manual (user Manual) (ver.1.0) (English)
Page 33
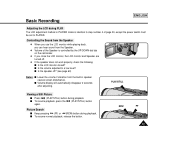
... (REW) button during playback. Basic Recording ENGLISH Adjusting the LCD during PLAY The LCD adjustment method in PLAYER mode is controlled by the UP/DOWN dial tab on the camcorder. 1 If you can hear sound from the built-in speaker causes screen disturbance. Controlling the Sound from the Speaker 1 When you use the LCD monitor while playing back, you close the LCD monitor, the LCD monitor and Speaker are turned off ? (see...
... (REW) button during playback. Basic Recording ENGLISH Adjusting the LCD during PLAY The LCD adjustment method in PLAYER mode is controlled by the UP/DOWN dial tab on the camcorder. 1 If you can hear sound from the built-in speaker causes screen disturbance. Controlling the Sound from the Speaker 1 When you use the LCD monitor while playing back, you close the LCD monitor, the LCD monitor and Speaker are turned off ? (see...

User Manual (user Manual) (ver.1.0) (English)
Page 47
... to CAMERA mode. (see page 22) s Open the LCD monitor and adjust it means the installed LITHIUM BATTERY is discharged. (see comfortably. 3. The selected date and time will then be reset will blink. 10. Make sure that you have set the day, hour and minute following the same procedure used for setting the year and month. 11. s The DATE/TIME function cannot be reset will disappear. ENGLISH CLOCK SETTING 12...
... to CAMERA mode. (see page 22) s Open the LCD monitor and adjust it means the installed LITHIUM BATTERY is discharged. (see comfortably. 3. The selected date and time will then be reset will blink. 10. Make sure that you have set the day, hour and minute following the same procedure used for setting the year and month. 11. s The DATE/TIME function cannot be reset will disappear. ENGLISH CLOCK SETTING 12...
User Manual (user Manual) (ver.1.0) (English)
Page 49
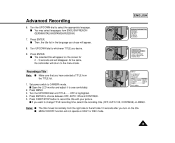
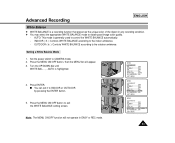
... your picture. s Open the LCD monitor and adjust it to choose between OFF, AUTO-10S and CONTINUE. 5. CUSTOM SET CLOCK SET TITLE SET TITLE CONTINUE D/TITLE COLOR ..WHITE C.RESET 0:00:00 DEMO OFF EXIT: MENU 2. Turn the UP/DOWN dial until TITLE........OFF is highlighted. 4. s Then, the title list in EASY or REC mode. 49 Advanced Recording 6. Press ENTER. Press ENTER to see comfortably. s MENU ON/OFF function will...
... your picture. s Open the LCD monitor and adjust it to choose between OFF, AUTO-10S and CONTINUE. 5. CUSTOM SET CLOCK SET TITLE SET TITLE CONTINUE D/TITLE COLOR ..WHITE C.RESET 0:00:00 DEMO OFF EXIT: MENU 2. Turn the UP/DOWN dial until TITLE........OFF is highlighted. 4. s Then, the title list in EASY or REC mode. 49 Advanced Recording 6. Press ENTER. Press ENTER to see comfortably. s MENU ON/OFF function will...
User Manual (user Manual) (ver.1.0) (English)
Page 53
... ....ON EXIT: MENU MENU LCD ADJUST DIS OFF D.ZOOM OFF PIP OFF DISPLAY ON WHITE BAL ..........OUTDOOR WL REMOCON ....ON EXIT: MENU 53 Advanced Recording ENGLISH White Balance 1 WHITE BALANCE is a recording function that preserves the unique color of the object in EASY or REC mode. Setting a White Balance Mode 1. AUTO: This mode is highlighted. 4. Note: The MENU ON/OFF function will appear. 3. Turn the UP/DOWN dial until WHITE BAL. .......AUTO is generally used to CAMERA mode. 2. Set the power switch to control the WHITE BALANCE automatically. - Press...
... ....ON EXIT: MENU MENU LCD ADJUST DIS OFF D.ZOOM OFF PIP OFF DISPLAY ON WHITE BAL ..........OUTDOOR WL REMOCON ....ON EXIT: MENU 53 Advanced Recording ENGLISH White Balance 1 WHITE BALANCE is a recording function that preserves the unique color of the object in EASY or REC mode. Setting a White Balance Mode 1. AUTO: This mode is highlighted. 4. Note: The MENU ON/OFF function will appear. 3. Turn the UP/DOWN dial until WHITE BAL. .......AUTO is generally used to CAMERA mode. 2. Set the power switch to control the WHITE BALANCE automatically. - Press...
User Manual (user Manual) (ver.1.0) (English)
Page 62
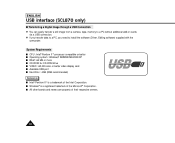
... s CD-ROM: 4x CD-ROM drive s VIDEO : 65,000-color or better video display card s Available USB port s Hard Disc : 4GB (8GB recommended) Reference s Intel® Pentium IITM is a registered trademark of their respective owners. 62 ENGLISH USB interface (SCL870 only) q Transferring a Digital Image through a USB Connection 1 You can easily transfer a still image from a camera, tape, memory to a PC without additional add-on cards via a USB connection. 1 If you transfer data to a PC, you need to install the software (Driver, Editing software) supplied with the camcorder...
... s CD-ROM: 4x CD-ROM drive s VIDEO : 65,000-color or better video display card s Available USB port s Hard Disc : 4GB (8GB recommended) Reference s Intel® Pentium IITM is a registered trademark of their respective owners. 62 ENGLISH USB interface (SCL870 only) q Transferring a Digital Image through a USB Connection 1 You can easily transfer a still image from a camera, tape, memory to a PC without additional add-on cards via a USB connection. 1 If you transfer data to a PC, you need to install the software (Driver, Editing software) supplied with the camcorder...
User Manual (user Manual) (ver.1.0) (English)
Page 69
... the camcorder. The DATE/TIME indicator flashes more than 2 times when you to CAMERA. The battery pack is fully used up . (see page 68) x The lithium battery is not installed or is quickly exhausted. x A mechanical fault might be recharged. Troubleshooting ENGLISH Checking 1 If you run into any functions on the camcorder. You cannot operate any problem using it to CAMERA. Explanation/Solution x Check the battery pack (see page 23) or the AC power adapter...
... the camcorder. The DATE/TIME indicator flashes more than 2 times when you to CAMERA. The battery pack is fully used up . (see page 68) x The lithium battery is not installed or is quickly exhausted. x A mechanical fault might be recharged. Troubleshooting ENGLISH Checking 1 If you run into any functions on the camcorder. You cannot operate any problem using it to CAMERA. Explanation/Solution x Check the battery pack (see page 23) or the AC power adapter...
User Manual (user Manual) (ver.1.0) (English)
Page 72
...: approx. 6.5 min. ENGLISH Specifications 1 These technical specifications and design may be changed without notice. Illumination LCD monitor Size/Pic. System Recording system Video signal Usable cassette Tape speed Speed mode Recording time FF or REW time Image device Optical zoom ratio Focal length: f F Filter diameter Focus system Macro Min. CCD (Charge Coupled Device) 22x 3.6~79.2 mm 1.6 46 mm Inner Auto wide macro 0.3 lux (visible) 2.5 inch/112k TFT Mini jack, 1 Vp-p, 75 ohms, Unbalanced Mini jack, 7.7 dBs...
...: approx. 6.5 min. ENGLISH Specifications 1 These technical specifications and design may be changed without notice. Illumination LCD monitor Size/Pic. System Recording system Video signal Usable cassette Tape speed Speed mode Recording time FF or REW time Image device Optical zoom ratio Focal length: f F Filter diameter Focus system Macro Min. CCD (Charge Coupled Device) 22x 3.6~79.2 mm 1.6 46 mm Inner Auto wide macro 0.3 lux (visible) 2.5 inch/112k TFT Mini jack, 1 Vp-p, 75 ohms, Unbalanced Mini jack, 7.7 dBs...


