

User Manual (user Manual) (ver.1.0) (English)
Page 1
ENGLISH Video Camcorder 8mm COLOR LCD SCL700/L710/L750/L770 Hi SCL700/L710/L750/L770 SSTTOAPRT/ TIMSEELRF STIDLLISPRLEATZYUERRON CROESUENTTER WIDE TELE Owner's Instruction Book Before operating the unit, please read this instruction book thoroughly, and retain it for future reference. ELECTRONICS US
ENGLISH Video Camcorder 8mm COLOR LCD SCL700/L710/L750/L770 Hi SCL700/L710/L750/L770 SSTTOAPRT/ TIMSEELRF STIDLLISPRLEATZYUERRON CROESUENTTER WIDE TELE Owner's Instruction Book Before operating the unit, please read this instruction book thoroughly, and retain it for future reference. ELECTRONICS US

User Manual (user Manual) (ver.1.0) (English)
Page 3
... (SCL770 only)...62 Installing USB Media 2.0 Program ...63 Maintenance Cleaning and Taking care of the Camcorder...66 s Cleaning the Viewfinder ...66 s Cleaning the LCD Panel ...66 s Cleaning the Video Heads ...66 s Storing the Camcorder ...66 Using Your Camcorder Abroad...67 Troubleshooting Self Diagnosis Display ...68 Checking...69 Moisture Condensation ...71 Specifications ...72 Index ...73...
... (SCL770 only)...62 Installing USB Media 2.0 Program ...63 Maintenance Cleaning and Taking care of the Camcorder...66 s Cleaning the Viewfinder ...66 s Cleaning the LCD Panel ...66 s Cleaning the Video Heads ...66 s Storing the Camcorder ...66 Using Your Camcorder Abroad...67 Troubleshooting Self Diagnosis Display ...68 Checking...69 Moisture Condensation ...71 Specifications ...72 Index ...73...
User Manual (user Manual) (ver.1.0) (English)
Page 7
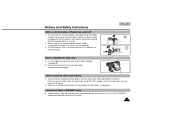
... green in STANDBY mode without operation for better recording. (see page 66) 5 minutes off if it may damage the video heads. (see page 20) 1 Do not insert your camcorder will automatically turn off timer in STANDBY mode 1 To protect against tape and head-drum wear, your hand in the ...forward direction. These specks are noisy or hardly visible, the video heads may be dirty. Notices and Safety Instructions Notices with a...
... green in STANDBY mode without operation for better recording. (see page 66) 5 minutes off if it may damage the video heads. (see page 20) 1 Do not insert your camcorder will automatically turn off timer in STANDBY mode 1 To protect against tape and head-drum wear, your hand in the ...forward direction. These specks are noisy or hardly visible, the video heads may be dirty. Notices and Safety Instructions Notices with a...
User Manual (user Manual) (ver.1.0) (English)
Page 13
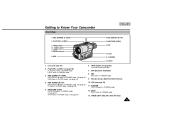
VIDEO LIGHT 1. CUSTOM 12. PLAY/STILL (LIGHT) (see page 58) PLAY/STILL works in PLAYER mode. (see page 59) 5. REC SEARCH (FF) REC SEARCH works in .... 12. CUSTOM CUSTOM works in CAMERA mode. 9. EASY EASY works in PLAYER mode. (see page 28) FF works in PLAYER mode. VIDEO LIGHT (SCL700/L750/L770 only) 13 Getting to Know Your Camcorder Front View ENGLISH 3. LENS 9. MIC 4. REC SEARCH (FF) 5. EASY 1. TAPE EJECT (see page 29) 11. Remote Sensor 8. DATE/TIME (STOP...
VIDEO LIGHT 1. CUSTOM 12. PLAY/STILL (LIGHT) (see page 58) PLAY/STILL works in PLAYER mode. (see page 59) 5. REC SEARCH (FF) REC SEARCH works in .... 12. CUSTOM CUSTOM works in CAMERA mode. 9. EASY EASY works in PLAYER mode. (see page 28) FF works in PLAYER mode. VIDEO LIGHT (SCL700/L750/L770 only) 13 Getting to Know Your Camcorder Front View ENGLISH 3. LENS 9. MIC 4. REC SEARCH (FF) 5. EASY 1. TAPE EJECT (see page 29) 11. Remote Sensor 8. DATE/TIME (STOP...
User Manual (user Manual) (ver.1.0) (English)
Page 14
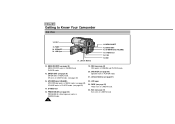
... works in MENU mode. (see page 30) VOLUME works in CAMERA and PLAYER mode. 20. S-VIDEO out 18. DSE (see page 44) DSE works in PLAYER mode. (see page 40) 16. ENGLISH Getting to Know Your Camcorder Side View 24. LCD Open 21. P.AE 19. MENU ON/OFF (see page 30) MENU.... ENTER (MF) (see page 41) BLC works in MENU mode. Lithium Battery 14. PROGRAM AE (see page 60) Speaker works in CAMERA mode. 14 19. S-VIDEO out 18. DSE 14. SPEAKER (see page 42) PROGRAM AE (Auto Exposure) works in PLAYER mode. 21. ENTER (MF) 16. FADE (see page 21) 22...
... works in MENU mode. (see page 30) VOLUME works in CAMERA and PLAYER mode. 20. S-VIDEO out 18. DSE (see page 44) DSE works in PLAYER mode. (see page 40) 16. ENGLISH Getting to Know Your Camcorder Side View 24. LCD Open 21. P.AE 19. MENU ON/OFF (see page 30) MENU.... ENTER (MF) (see page 41) BLC works in MENU mode. Lithium Battery 14. PROGRAM AE (see page 60) Speaker works in CAMERA mode. 14 19. S-VIDEO out 18. DSE 14. SPEAKER (see page 42) PROGRAM AE (Auto Exposure) works in PLAYER mode. 21. ENTER (MF) 16. FADE (see page 21) 22...

User Manual (user Manual) (ver.1.0) (English)
Page 15
...) 29. Getting to playback. 32. AUDIO/VIDEO Out 32. AUDIO/VIDEO out (see page 22) 35. POWER Switch (see page 23) 36. PLAYER : Select to Know Your Camcorder Rear View ENGLISH 36. START/STOP (see page 28) START/STOP works in CAMERA mode. (SCL700/L710 only, see page 21) 28. Battery...) 29. BATTERY EJECT 37. BATTERY EJECT 27. Hand Strap (see page 34) 26. ZOOM (see page 20) 31. CAMERA : Select to turn off the camcorder. - Hooks for shoulder strap 25. Recharging Indicator (see page 65) 15 OFF : Select to record. - USB Jack (SCL770 only) (see page 23) 39...
...) 29. Getting to playback. 32. AUDIO/VIDEO Out 32. AUDIO/VIDEO out (see page 22) 35. POWER Switch (see page 23) 36. PLAYER : Select to Know Your Camcorder Rear View ENGLISH 36. START/STOP (see page 28) START/STOP works in CAMERA mode. (SCL700/L710 only, see page 21) 28. Battery...) 29. BATTERY EJECT 37. BATTERY EJECT 27. Hand Strap (see page 34) 26. ZOOM (see page 20) 31. CAMERA : Select to turn off the camcorder. - Hooks for shoulder strap 25. Recharging Indicator (see page 65) 15 OFF : Select to record. - USB Jack (SCL770 only) (see page 23) 39...

User Manual (user Manual) (ver.1.0) (English)
Page 18
... Book. 7. Remote Control SSTTOAPRT/ TIMSEERLF DISPLAY STILL RETZUERRNO CROESUENTTER WIDE TELE AD63-00202A 8. Software CD AD59-00062A 10. USB Cable AD43-10130H 11. AUDIO/VIDEO Cable 5. Instruction Book Video Camcorder 8mm COLOR LCD AD39-40200A 7. USB AUDIO Cable AD46-00033B Optional Accessories 12. AC Power Adapter. (see page 19) (SCL710/L750/L770 only...
... Book. 7. Remote Control SSTTOAPRT/ TIMSEERLF DISPLAY STILL RETZUERRNO CROESUENTTER WIDE TELE AD63-00202A 8. Software CD AD59-00062A 10. USB Cable AD43-10130H 11. AUDIO/VIDEO Cable 5. Instruction Book Video Camcorder 8mm COLOR LCD AD39-40200A 7. USB AUDIO Cable AD46-00033B Optional Accessories 12. AC Power Adapter. (see page 19) (SCL710/L750/L770 only...
User Manual (user Manual) (ver.1.0) (English)
Page 32
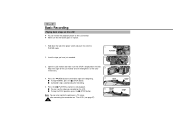
... the angle of the power switch and push the switch to a TV or VCR. (see the video you have just recorded. 1 PLAYER 2 PUSH 3. s To stop REWIND, press the (STOP) button. s Camcorder stops automatically after connecting the camcorder to PLAYER mode. 2. Insert the tape you recorded on the LCD. s You can see page 57...
... the angle of the power switch and push the switch to a TV or VCR. (see the video you have just recorded. 1 PLAYER 2 PUSH 3. s To stop REWIND, press the (STOP) button. s Camcorder stops automatically after connecting the camcorder to PLAYER mode. 2. Insert the tape you recorded on the LCD. s You can see page 57...

User Manual (user Manual) (ver.1.0) (English)
Page 56
...500 to 700 300 150 to 200 10 to a window. If you want to OFF. 4. Remove the BATTERY PACK from the camcorder. 56 ENGLISH Advanced Recording Lighting Techniques 1 When you have recorded. (see page 26) 2. You will be recording outdoors (Normal recording... Situations x Snow-covered mountains or fields. x Candle light. x Department store counter. x Room lit by two 30W fluorescent lights. sette. 3. Video light required. ² After Recording 1. x Office with fluorescent lighting near to 15 Recommendations ND filter recommended. ² Normal recording. ² ² ...
...500 to 700 300 150 to 200 10 to a window. If you want to OFF. 4. Remove the BATTERY PACK from the camcorder. 56 ENGLISH Advanced Recording Lighting Techniques 1 When you have recorded. (see page 26) 2. You will be recording outdoors (Normal recording... Situations x Snow-covered mountains or fields. x Candle light. x Department store counter. x Room lit by two 30W fluorescent lights. sette. 3. Video light required. ² After Recording 1. x Office with fluorescent lighting near to 15 Recommendations ND filter recommended. ² Normal recording. ² ² ...

User Manual (user Manual) (ver.1.0) (English)
Page 57
...white plug: Audio(L) Connecting to a TV which has an Audio and Video input jack 1 Use the Audio/Video cable supplied with your camcorder. s Set the input selector on the television. (Refer to your camcorder to a TV through a VCR. s The yellow plug: Video s The white plug: Audio(L) Note: To view the cassette on .... 1 Playback function works in PLAYER mode only. 1 There are two ways to see page 67) Connecting to a TV which has no Audio and Video input jack 1 You can connect your VCR or television instruction book) ENGLISH 57 To watch with LCD 1 To view a tape using the LCD monitor....
...white plug: Audio(L) Connecting to a TV which has an Audio and Video input jack 1 Use the Audio/Video cable supplied with your camcorder. s Set the input selector on the television. (Refer to your camcorder to a TV through a VCR. s The yellow plug: Video s The white plug: Audio(L) Note: To view the cassette on .... 1 Playback function works in PLAYER mode only. 1 There are two ways to see page 67) Connecting to a TV which has no Audio and Video input jack 1 You can connect your VCR or television instruction book) ENGLISH 57 To watch with LCD 1 To view a tape using the LCD monitor....

User Manual (user Manual) (ver.1.0) (English)
Page 58
...picture distortion may occur. s Make sure that STOP is selected automatically, depending on your TV or VCR. ENGLISH Playing back a Tape Notes: s SCL700/L710/L750/L770 feature a monaural audio system. Connect power source (battery or AC Power Adapter) to stop playing. s The picture you want to... tape reaches its end during playback, the tape will rewind automatically. If your camcorder is connected to select VIDEO on a TV screen, close the LCD panel. s You can cause picture distortion. Use the TV/VIDEO button to the TV. PLAY/STILL Notes: s Vibration from the built-in ...
...picture distortion may occur. s Make sure that STOP is selected automatically, depending on your TV or VCR. ENGLISH Playing back a Tape Notes: s SCL700/L710/L750/L770 feature a monaural audio system. Connect power source (battery or AC Power Adapter) to stop playing. s The picture you want to... tape reaches its end during playback, the tape will rewind automatically. If your camcorder is connected to select VIDEO on a TV screen, close the LCD panel. s You can cause picture distortion. Use the TV/VIDEO button to the TV. PLAY/STILL Notes: s Vibration from the built-in ...
User Manual (user Manual) (ver.1.0) (English)
Page 62
... or better s Operating system : Windows® 98/98SE/ME/2000/XP s RAM : 64 MB or more s CD-ROM: 4x CD-ROM drive s VIDEO : 65,000-color or better video display card s Available USB port s Hard Disc : 4GB (8GB recommended) Reference s Intel® Pentium IITM is a registered trademark of their respective owners. 62... additional add-on cards via a USB connection. 1 If you transfer data to a PC, you need to install the software (Driver, Editing software) supplied with the camcorder.
... or better s Operating system : Windows® 98/98SE/ME/2000/XP s RAM : 64 MB or more s CD-ROM: 4x CD-ROM drive s VIDEO : 65,000-color or better video display card s Available USB port s Hard Disc : 4GB (8GB recommended) Reference s Intel® Pentium IITM is a registered trademark of their respective owners. 62... additional add-on cards via a USB connection. 1 If you transfer data to a PC, you need to install the software (Driver, Editing software) supplied with the camcorder.

User Manual (user Manual) (ver.1.0) (English)
Page 66
... playback pictures are noisy or hardly visible, the video heads may be dirty. Noisy Picture a b c If this happens, clean the video heads with a soft cloth. Press the (PLAY/STILL) button. 4. Storing the Camcorder 1. Keep the camcorder in a stable place. 66 Cleaning the LCD ... it gently with a dry type cassette cleaner. 1. a. Check the quality of the Camcorder Cleaning the Viewfinder x Releasing the Eyecap 1. ENGLISH Maintenance Cleaning and Taking care of the picture using a video cassette. Clean the EYECAP and the VIEWFINDER screen with a soft cloth and cotton swab ...
... playback pictures are noisy or hardly visible, the video heads may be dirty. Noisy Picture a b c If this happens, clean the video heads with a soft cloth. Press the (PLAY/STILL) button. 4. Storing the Camcorder 1. Keep the camcorder in a stable place. 66 Cleaning the LCD ... it gently with a dry type cassette cleaner. 1. a. Check the quality of the Camcorder Cleaning the Viewfinder x Releasing the Eyecap 1. ENGLISH Maintenance Cleaning and Taking care of the picture using a video cassette. Clean the EYECAP and the VIEWFINDER screen with a soft cloth and cotton swab ...

User Manual (user Manual) (ver.1.0) (English)
Page 67
... recorder, the television or VCR must be NTSC or PAL60(Player mode only) compatible and have the appropriate audio/video jacks. ( PAL-compatible area Australia, Austria, Belgium, Bulgaria, China, CIS, Czech Republic, Denmark, Egypt, Finland, France, Germany, Greece, Great Britain, Holland, Hong Kong, Hungary, India..., depending on the LCD or viewfinder. However, to view a recording on a television or to 240V, 50/60 Hz. Color system s You can view your camcorder anywhere in any country or area that uses 100V to make recordings with your recording on the power used. Using Your...
... recorder, the television or VCR must be NTSC or PAL60(Player mode only) compatible and have the appropriate audio/video jacks. ( PAL-compatible area Australia, Austria, Belgium, Bulgaria, China, CIS, Czech Republic, Denmark, Egypt, Finland, France, Germany, Greece, Great Britain, Holland, Hong Kong, Hungary, India..., depending on the LCD or viewfinder. However, to view a recording on a television or to 240V, 50/60 Hz. Color system s You can view your camcorder anywhere in any country or area that uses 100V to make recordings with your recording on the power used. Using Your...

User Manual (user Manual) (ver.1.0) (English)
Page 69
... (see page 23) or the AC power adapter. (see page 23) x The battery pack is fully used up . (see page 21) x The video heads might be recharged. The DATE/TIME indicator flashes more than 2 times when you to CAMERA. x Check the record protection tab on the bottom of... the cassette. Symptom You cannot switch the camcorder on the camcorder. x A mechanical fault might have occurred. (see page 68) x The lithium battery is not installed or is completely dead, and cannot be dirty....
... (see page 23) or the AC power adapter. (see page 23) x The battery pack is fully used up . (see page 21) x The video heads might be recharged. The DATE/TIME indicator flashes more than 2 times when you to CAMERA. x Check the record protection tab on the bottom of... the cassette. Symptom You cannot switch the camcorder on the camcorder. x A mechanical fault might have occurred. (see page 68) x The lithium battery is not installed or is completely dead, and cannot be dirty....


