
Instruction Booklet
Page 2
... Power Adapter...22 s To use the Battery Pack ...23 Using the Battery Pack...24 s Continuous Recording time table...24 s Battery Level Display...25 Inserting and Ejecting a Cassette ...26 Basic Recording Making Your First Recording...27 Hints for Stable Image Recording ...29 s Recording with LCD Monitor...29 s Recording with Viewfinder...29 Adjusting the LCD...30 Adjusting Focus of the VIEWFINDER...31 Playing back a tape on the LCD...32 s Adjusting the LCD during PLAY...33 s Controlling the Sound from the Speaker...33 s Viewing a Still Picture...33 s Picture...
... Power Adapter...22 s To use the Battery Pack ...23 Using the Battery Pack...24 s Continuous Recording time table...24 s Battery Level Display...25 Inserting and Ejecting a Cassette ...26 Basic Recording Making Your First Recording...27 Hints for Stable Image Recording ...29 s Recording with LCD Monitor...29 s Recording with Viewfinder...29 Adjusting the LCD...30 Adjusting Focus of the VIEWFINDER...31 Playing back a tape on the LCD...32 s Adjusting the LCD during PLAY...33 s Controlling the Sound from the Speaker...33 s Viewing a Still Picture...33 s Picture...
Instruction Booklet
Page 3
... CAMERAmode...42 Setting and Recording DATE/TIME...44 Selecting and Recording a Title...46 Fade In and Out...48 PIP...49 Snap Shot...50 White Balance...51 Setting the Viewfindwr( EVF or CVF)...52 Setting the Remote Control...52 Demonstration...53 Lighting Techniques...54 Playing back a Tape To watch with LCD ...55 To watch with TV monitor...55 Various Functions in PLAYER mode...57 Adjusting the LCD...58 Setting the EVF...
... CAMERAmode...42 Setting and Recording DATE/TIME...44 Selecting and Recording a Title...46 Fade In and Out...48 PIP...49 Snap Shot...50 White Balance...51 Setting the Viewfindwr( EVF or CVF)...52 Setting the Remote Control...52 Demonstration...53 Lighting Techniques...54 Playing back a Tape To watch with LCD ...55 To watch with TV monitor...55 Various Functions in PLAYER mode...57 Adjusting the LCD...58 Setting the EVF...
Instruction Booklet
Page 4
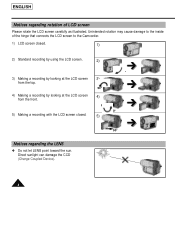
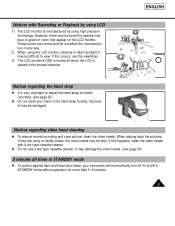
... the top. 90° 4) Making a recording by looking at the LCD screen 4) from the front. 90° 5) Making a recording with the LCD screen closed. 5) 90° Notices regarding the LENS 1 Do not let LENS point toward the sun. Unintended rotation may cause damage to the inside of LCD screen Please rotate the LCD screen carefully as illustrated. Direct sunlight can damage the CCD (Charge Coupled Device). 4
... the top. 90° 4) Making a recording by looking at the LCD screen 4) from the front. 90° 5) Making a recording with the LCD screen closed. 5) 90° Notices regarding the LENS 1 Do not let LENS point toward the sun. Unintended rotation may cause damage to the inside of LCD screen Please rotate the LCD screen carefully as illustrated. Direct sunlight can damage the CCD (Charge Coupled Device). 4
Instruction Booklet
Page 6
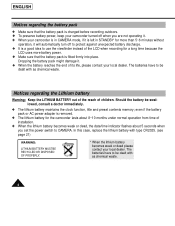
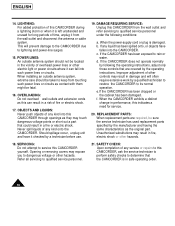
..., the date/time indicator flashes about 5 seconds when you set the power switch to be dealt with type CR2025. (see page 21) WARNING: LITHIUM BATTERY MUSTBE RECYCLED OR DISPOSED OF PROPERLY. * When the lithium battery becomes weak or dead please contact your camcorder is in CAMERA mode, if it is left in STANDBY for a long time because the LCD uses more than 5~6 minutes without operation, it...
..., the date/time indicator flashes about 5 seconds when you set the power switch to be dealt with type CR2025. (see page 21) WARNING: LITHIUM BATTERY MUSTBE RECYCLED OR DISPOSED OF PROPERLY. * When the lithium battery becomes weak or dead please contact your camcorder is in CAMERA mode, if it is left in STANDBY for a long time because the LCD uses more than 5~6 minutes without operation, it...
Instruction Booklet
Page 7
... type cassette cleaner. 1 Do not use the viewfinder. 3) The LCD monitor's OSD is turned off if it may be difficult to adjust the hand strap for more than 5~6 minutes. 7 However, there may be some tiny specks (red, blue or green in STANDBY mode 1 To protect against tape and head-drum wear, your camcorder will automatically turn off when the LCD is very important to view...
... type cassette cleaner. 1 Do not use the viewfinder. 3) The LCD monitor's OSD is turned off if it may be difficult to adjust the hand strap for more than 5~6 minutes. 7 However, there may be some tiny specks (red, blue or green in STANDBY mode 1 To protect against tape and head-drum wear, your camcorder will automatically turn off when the LCD is very important to view...
Instruction Booklet
Page 10
... CAMCORDER. When the power-supply cord or plug is in a risk of other electric light or power circuits where it checked by the manufacturer and having the same characteristics as contact with them might be sure the service technician has used replacement parts specified by a technician before use. 19. f. Should spillage occur, unplug unit and have fallen into this CAMCORDER through openings as this CAMCORDER...
... CAMCORDER. When the power-supply cord or plug is in a risk of other electric light or power circuits where it checked by the manufacturer and having the same characteristics as contact with them might be sure the service technician has used replacement parts specified by a technician before use. 19. f. Should spillage occur, unplug unit and have fallen into this CAMCORDER through openings as this CAMCORDER...

Instruction Booklet
Page 13
.... MF (see page 38) MF works in CAMERA mode (see page 56) 6. MIC 14. POWER 13. FADE FADE works in CAMERAmode. 15. CAMERA : Select to turn off the camcorder. - Remote Sensor (see page 66) 2. Lens 16. TAPE EJECT 7. PLAY/STILL PLAY/STILL works in CAMERAmode. 14. OFF : Select to record. - PLAYER : Select to play back. 13. ENGLISH Front View 4. EVF(Electronic Viewfinder, see page 56) 4. LCD (see page 26) 7. MF dial...
.... MF (see page 38) MF works in CAMERA mode (see page 56) 6. MIC 14. POWER 13. FADE FADE works in CAMERAmode. 15. CAMERA : Select to turn off the camcorder. - Remote Sensor (see page 66) 2. Lens 16. TAPE EJECT 7. PLAY/STILL PLAY/STILL works in CAMERAmode. 14. OFF : Select to record. - PLAYER : Select to play back. 13. ENGLISH Front View 4. EVF(Electronic Viewfinder, see page 56) 4. LCD (see page 26) 7. MF dial...
Instruction Booklet
Page 16
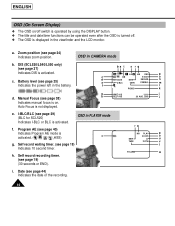
... using the DISPLAY button. 1 The title and date/time functions can be operated even after the OSD is turned off. 1 The OSD is displayed in PLAYER mode f. h. a. I -BLC/BLC TAPE CINEMA m f l PICNIC k g WAIT-10S h SELF-30S 13:10 j 29. r q Hi8 PLA Y p 0:00:25 o DEW LP u TAPE Z.RTN v l VOLUME w i. Program AE (see page 38) Indicates manual focus is activated. OSD in the viewfinder and the LCD monitor. Manual Focus...
... using the DISPLAY button. 1 The title and date/time functions can be operated even after the OSD is turned off. 1 The OSD is displayed in PLAYER mode f. h. a. I -BLC/BLC TAPE CINEMA m f l PICNIC k g WAIT-10S h SELF-30S 13:10 j 29. r q Hi8 PLA Y p 0:00:25 o DEW LP u TAPE Z.RTN v l VOLUME w i. Program AE (see page 38) Indicates manual focus is activated. OSD in the viewfinder and the LCD monitor. Manual Focus...
Instruction Booklet
Page 22
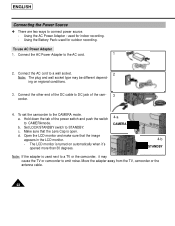
... CAMERA mode. c. Connect the AC cord to a wall socket. 2 Note: The plug and wall socket type may cause the TV or camcorder to a TV or the camcorder, it 's opened more than 30 degrees. 4-a CAMERA 4-b STANDBY Note: If the adapter is open. Set LOCK/STANDBY switch to DC jack of the DC cable to STANDBY. d. Using the Battery Pack: used next to emit noise. Connect the other end of the cam...
... CAMERA mode. c. Connect the AC cord to a wall socket. 2 Note: The plug and wall socket type may cause the TV or camcorder to a TV or the camcorder, it 's opened more than 30 degrees. 4-a CAMERA 4-b STANDBY Note: If the adapter is open. Set LOCK/STANDBY switch to DC jack of the DC cable to STANDBY. d. Using the Battery Pack: used next to emit noise. Connect the other end of the cam...
Instruction Booklet
Page 24
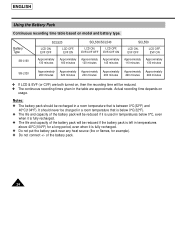
... be reduced. 1 The continuous recording times given in the table are both turned on, then the recording time will be charged in a room temperature that is fully recharged. 1 Do not put the battery pack near any heat source (...recording time depends on model and battery type. It should be recharged in a room temperature that is below 0°C(32°F). 1 The life and capacity of the battery pack will be reduced if it is used in temperatures above 40°C(104°F) for example). 1 Do not connect +/- Battery Type SB-L160 SCL520 LCD ON, EVF OFF LCD OFF, EVF ON SCL530/SCL540 LCD...
... be reduced. 1 The continuous recording times given in the table are both turned on, then the recording time will be charged in a room temperature that is fully recharged. 1 Do not put the battery pack near any heat source (...recording time depends on model and battery type. It should be recharged in a room temperature that is below 0°C(32°F). 1 The life and capacity of the battery pack will be reduced if it is used in temperatures above 40°C(104°F) for example). 1 Do not connect +/- Battery Type SB-L160 SCL520 LCD ON, EVF OFF LCD OFF, EVF ON SCL530/SCL540 LCD...
Instruction Booklet
Page 25
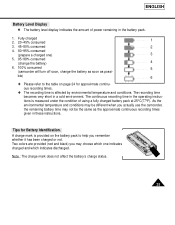
... colors are provided (red and black)-you actually use the camcorder, the remaining battery time may choose which one ) 3 5. 95~98% consumed (change the battery) 4 6. 100% consumed 5 (camcorder will turn off soon, change the battery as soon as the approximate continuous recording times given in these instructions. Tips for approximate continuous recording times. 1 The recording time is provided on page 24 for Battery Identification. ENGLISH Battery Level Display 1 The battery level display indicates the amount of using a fully charged battery pack...
... colors are provided (red and black)-you actually use the camcorder, the remaining battery time may choose which one ) 3 5. 95~98% consumed (change the battery) 4 6. 100% consumed 5 (camcorder will turn off soon, change the battery as soon as the approximate continuous recording times given in these instructions. Tips for approximate continuous recording times. 1 The recording time is provided on page 24 for Battery Identification. ENGLISH Battery Level Display 1 The battery level display indicates the amount of using a fully charged battery pack...
Instruction Booklet
Page 27
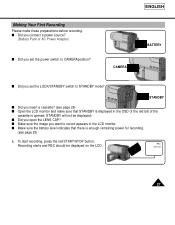
... REC should be displayed) s Did you open the LENS CAP? STANDBY s Did you set the LOCK/STANDBY switch to CAMERAposition? To start recording, press the red START/STOP button. s Make sure the image you set the power switch to STANDBY mode? Making Your First Recording Please make sure that there is opened, STANDBY will not be displayed on the LCD. s Did you connect a power source? (Battery Pack or AC Power Adapter) s Did you insert a cassette...
... REC should be displayed) s Did you open the LENS CAP? STANDBY s Did you set the LOCK/STANDBY switch to CAMERAposition? To start recording, press the red START/STOP button. s Make sure the image you set the power switch to STANDBY mode? Making Your First Recording Please make sure that there is opened, STANDBY will not be displayed on the LCD. s Did you connect a power source? (Battery Pack or AC Power Adapter) s Did you insert a cassette...
Instruction Booklet
Page 33
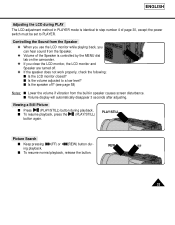
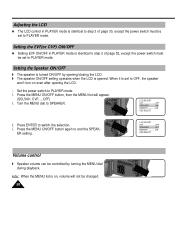
... are turned off ? (see page 58) Notes: s Lower the volume if vibration from the built-in PLAYER mode is controlled by the MENU dial tab on the camcorder. 1 If you can hear sound from the Speaker. 1 Volume of the Speaker is identical to step number 4 of page 30, except the power switch must be set to a low level? ENGLISH Adjusting the LCD during playback. s Is the volume adjusted to...
... are turned off ? (see page 58) Notes: s Lower the volume if vibration from the built-in PLAYER mode is controlled by the MENU dial tab on the camcorder. 1 If you can hear sound from the Speaker. 1 Volume of the Speaker is identical to step number 4 of page 30, except the power switch must be set to a low level? ENGLISH Adjusting the LCD during playback. s Is the volume adjusted to...
Instruction Booklet
Page 35
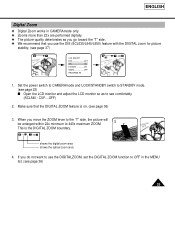
... OFF in CAMERAmode only. 1 Zooms more than 22x are performed digitally. 1 The picture quality deteriorates as to see page 36) 35 Make sure that you use the DIGITALZOOM, set the DIGITAL ZOOM function to 440x maximum ZOOM. 3 T This is on. (see page 37) W T LCD ADJUST EVF OFF DIS ON D.ZOOM ON DEMO OFF PROGRAM AE W T 440 x 1. ENGLISH Digital Zoom 1 Digital Zoom works in the MENU list. (see comfortably. (SCL540 : CVF....OFF) 2.
... OFF in CAMERAmode only. 1 Zooms more than 22x are performed digitally. 1 The picture quality deteriorates as to see page 36) 35 Make sure that you use the DIGITALZOOM, set the DIGITAL ZOOM function to 440x maximum ZOOM. 3 T This is on. (see page 37) W T LCD ADJUST EVF OFF DIS ON D.ZOOM ON DEMO OFF PROGRAM AE W T 440 x 1. ENGLISH Digital Zoom 1 Digital Zoom works in the MENU list. (see comfortably. (SCL540 : CVF....OFF) 2.

Instruction Booklet
Page 36
... the MENU ON/OFF button. Turn the MENUdial to STANDBY mode. ZOOM ON/OFF button. s The DIGITALZOOM indicators disappear from the screen. s The MENU list will change. 5. s Power switch will be displayed on page 35. 1. Set the power switch to CAMERAmode and LOCK/STANDBY switch to D. To deactivate the DIGITALZOOM function, press the D.ZOOM button again. Set the power switch to CAMERAmode and LOCK/STANDBY switch to end setting. s The DIGITAL ZOOM setting will appear. (SCL540 : CVF....OFF) LCD ADJUST...
... the MENU ON/OFF button. Turn the MENUdial to STANDBY mode. ZOOM ON/OFF button. s The DIGITALZOOM indicators disappear from the screen. s The MENU list will change. 5. s Power switch will be displayed on page 35. 1. Set the power switch to CAMERAmode and LOCK/STANDBY switch to D. To deactivate the DIGITALZOOM function, press the D.ZOOM button again. Set the power switch to CAMERAmode and LOCK/STANDBY switch to end setting. s The DIGITAL ZOOM setting will appear. (SCL540 : CVF....OFF) LCD ADJUST...
Instruction Booklet
Page 45
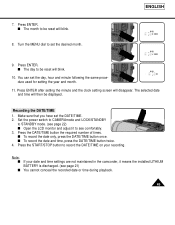
... DATE/TIME button twice. 4. Recording the DATE/TIME 1. Set the power switch to CAMERAmode and LOCK/STANDBY to STANDBY mode. (see page 22) s Open the LCD monitor and adjust it means the installed LITHIUM BATTERY is discharged. (see comfortably. 3. Press ENTER. The selected date and time will then be reset will disappear. Press ENTER. Make sure that you have set the day, hour and minute following the same procedure used...
... DATE/TIME button twice. 4. Recording the DATE/TIME 1. Set the power switch to CAMERAmode and LOCK/STANDBY to STANDBY mode. (see page 22) s Open the LCD monitor and adjust it means the installed LITHIUM BATTERY is discharged. (see comfortably. 3. Press ENTER. The selected date and time will then be reset will disappear. Press ENTER. Make sure that you have set the day, hour and minute following the same procedure used...
Instruction Booklet
Page 52
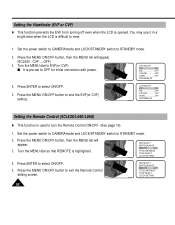
... the LCD is highlighted. LCD ADJUST EVF ON DIS OFF D.ZOOM OFF DEMO OFF PROGRAM AE Setting the Remote Control (SCL530/L540/L550) 1 This function is pre-set to STANDBY mode. 2. Turn the MENU dial so that REMOTE is opened. Press the MENU ON/OFF button, then the MENU list will appear. (SCL540 : CVF.....OFF) 3. Press ENTER to select ON/OFF. 5. Press ENTER to select ON/OFF. 5. Set the power switch to...
... the LCD is highlighted. LCD ADJUST EVF ON DIS OFF D.ZOOM OFF DEMO OFF PROGRAM AE Setting the Remote Control (SCL530/L540/L550) 1 This function is pre-set to STANDBY mode. 2. Turn the MENU dial so that REMOTE is opened. Press the MENU ON/OFF button, then the MENU list will appear. (SCL540 : CVF.....OFF) 3. Press ENTER to select ON/OFF. 5. Press ENTER to select ON/OFF. 5. Set the power switch to...
Instruction Booklet
Page 58
... turning the MENU dial during playback. LCD ADJUST EVF OFF SPEAKER............OFF REMOTE ON DSE SELECT Volume control 1 Speaker volume can be changed. 58 Setting the EVF(or CVF) ON/OFF 1 Setting EVF ON/OFF in PLAYER mode is identical to step 3 of page 52, except the power switch must be set to PLAYER mode. Press the MENU ON/OFF button, then the MENU list will not be controlled by opening the LCD. 1. Set...
... turning the MENU dial during playback. LCD ADJUST EVF OFF SPEAKER............OFF REMOTE ON DSE SELECT Volume control 1 Speaker volume can be changed. 58 Setting the EVF(or CVF) ON/OFF 1 Setting EVF ON/OFF in PLAYER mode is identical to step 3 of page 52, except the power switch must be set to PLAYER mode. Press the MENU ON/OFF button, then the MENU list will not be controlled by opening the LCD. 1. Set...
Instruction Booklet
Page 63
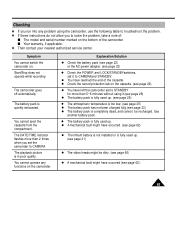
... installed or is fully used up . The DATE/TIME indicator flashes more than 2 times when you set the camcorder to CAMERA The playback picture is completely dead, and cannot be dirty. (see page 60) x A mechanical fault might have reached the end of the cassette. Explanation/Solution x Check the battery pack (see page 23) or the AC power adapter. (see page 21) x The video heads might have left the camcorder set...
... installed or is fully used up . The DATE/TIME indicator flashes more than 2 times when you set the camcorder to CAMERA The playback picture is completely dead, and cannot be dirty. (see page 60) x A mechanical fault might have reached the end of the cassette. Explanation/Solution x Check the battery pack (see page 23) or the AC power adapter. (see page 21) x The video heads might have left the camcorder set...
Instruction Booklet
Page 66
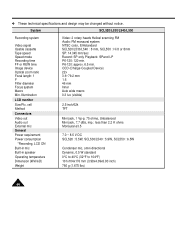
System SCL520/L530/L540/L550 Recording system Video signal Usable cassette Tape speed Speed mode Recording time FF or REW time Image device Optical zoom ratio Focal length: f F Filter diameter Focus system Macro Min. Illumination LCD monitor Size/Pic. cell Method Connectors Video out Audio out External mic General Power requirement Power consumption *Recording, LCD ON Built-in mic Built-in speaker Operating temperature Dimension (WxHxD) Weight Video: 2 rotary heads Helical scanning FM Audio: FM monaural system NTSC color, EIAstandard SCL520/L530...
System SCL520/L530/L540/L550 Recording system Video signal Usable cassette Tape speed Speed mode Recording time FF or REW time Image device Optical zoom ratio Focal length: f F Filter diameter Focus system Macro Min. Illumination LCD monitor Size/Pic. cell Method Connectors Video out Audio out External mic General Power requirement Power consumption *Recording, LCD ON Built-in mic Built-in speaker Operating temperature Dimension (WxHxD) Weight Video: 2 rotary heads Helical scanning FM Audio: FM monaural system NTSC color, EIAstandard SCL520/L530...


