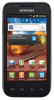
User Manual
Page 5
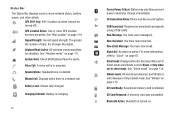
... User Manual 4 Battery 5 Turning Your Phone On and Off 8 Set-up Wizard 8 Your Google Account 9 Displaying Your Phone Number 9 System Tutorial 9 Voice Mail 9 TTY Mode 9 Roaming 9 Task Manager 10 Memory Card 11 Securing Your Phone 12 Section 2: Understanding Your Phone 13 Features 13 Front View 14 Side Views 15 Back View 15 Navigation 16 Notification Panel 17 Home Screen 18 Primary Shortcuts 21 Widgets 21 Shortcuts 23 Folders 24 Wallpaper 25 Applications 25 Section 3: Call Functions 30 Making Calls 30 Answering Calls...
... User Manual 4 Battery 5 Turning Your Phone On and Off 8 Set-up Wizard 8 Your Google Account 9 Displaying Your Phone Number 9 System Tutorial 9 Voice Mail 9 TTY Mode 9 Roaming 9 Task Manager 10 Memory Card 11 Securing Your Phone 12 Section 2: Understanding Your Phone 13 Features 13 Front View 14 Side Views 15 Back View 15 Navigation 16 Notification Panel 17 Home Screen 18 Primary Shortcuts 21 Widgets 21 Shortcuts 23 Folders 24 Wallpaper 25 Applications 25 Section 3: Call Functions 30 Making Calls 30 Answering Calls...
User Manual
Page 8
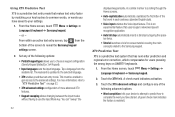
... this User Manual start using your phone. Understanding this User Manual The sections of data or functionality, or even prevent damage to the phone's Settings. If you select other settings, navigation steps may need to unlock the phone or keypad. Note: Instructions in longer, or repetitive, procedures. For example: "From the Home screen, touch Menu ➔ Settings ➔ Wireless & network ➔ Wi-Fi settings." Section 1: Getting Started This section helps you to quickly start with the phone unlocked, at the Home screen. Text...
... this User Manual start using your phone. Understanding this User Manual The sections of data or functionality, or even prevent damage to the phone's Settings. If you select other settings, navigation steps may need to unlock the phone or keypad. Note: Instructions in longer, or repetitive, procedures. For example: "From the Home screen, touch Menu ➔ Settings ➔ Wireless & network ➔ Wi-Fi settings." Section 1: Getting Started This section helps you to quickly start with the phone unlocked, at the Home screen. Text...
User Manual
Page 11
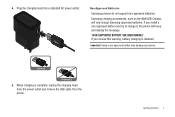
... from the phone. Getting Started 7 When charging is disabled. Non-Approved Batteries Samsung phones do not support non-approved batteries. Important!: Using a non-approved battery may damage your phone. Samsung charging accessories, such as the Wall/USB Charger, will beep and display the message: "NON-SUPPORTED BATTERY. Correct Incorrect 5. SEE USER MANUAL". Plug the charging head into a standard AC power outlet. 4. If you install a non-approved battery and try to charge it, the phone will only charge Samsung-approved batteries.
... from the phone. Getting Started 7 When charging is disabled. Non-Approved Batteries Samsung phones do not support non-approved batteries. Important!: Using a non-approved battery may damage your phone. Samsung charging accessories, such as the Wall/USB Charger, will beep and display the message: "NON-SUPPORTED BATTERY. Correct Incorrect 5. SEE USER MANUAL". Plug the charging head into a standard AC power outlet. 4. If you install a non-approved battery and try to charge it, the phone will only charge Samsung-approved batteries.
User Manual
Page 12
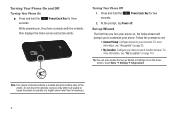
... turn your phone. From the Home screen, touch Menu ➔ Settings ➔ Setup wizard. Do not block the antenna; Power/Lock Key for three While powering on page 35. • My Location: Configure your accounts. Follow the prompts to set: • Account Setup: Configure access to operate at a higher power level than is located along the bottom back of location services. For more information, see "Accounts" on , the phone connects with the network, then displays the Home screen and active alerts. Turning...
... turn your phone. From the Home screen, touch Menu ➔ Settings ➔ Setup wizard. Do not block the antenna; Power/Lock Key for three While powering on page 35. • My Location: Configure your accounts. Follow the prompts to set: • Account Setup: Configure access to operate at a higher power level than is located along the bottom back of location services. For more information, see "Accounts" on , the phone connects with the network, then displays the Home screen and active alerts. Turning...
User Manual
Page 13
... display. Contact your service provider for the first time, set up a connection with a TTY device, you to connect a TTY device to enable TTY Mode. When you turn on page 123.) Displaying Your Phone Number ᮣ From the Home screen, touch Menu ➔ Settings ➔ About phone ➔ Status. For more information, see "TTY Mode" on page 112. For more information, see "Mobile networks" on page 113. During roaming, some services may apply when making or receiving calls. Your phone number displays under Phone number...
... display. Contact your service provider for the first time, set up a connection with a TTY device, you to connect a TTY device to enable TTY Mode. When you turn on page 123.) Displaying Your Phone Number ᮣ From the Home screen, touch Menu ➔ Settings ➔ About phone ➔ Status. For more information, see "TTY Mode" on page 112. For more information, see "Mobile networks" on page 113. During roaming, some services may apply when making or receiving calls. Your phone number displays under Phone number...
User Manual
Page 15
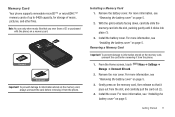
... the card out (2). 4. Menu ➔ Settings ➔ 2. From the Home screen, touch Storage ➔ Unmount SD card. Getting Started 11 For more information, see "Removing the battery cover" on a memory card. Removing a Memory Card Important!: To prevent damage to information stored on the memory card, unmount the card before removing it clicks into place (1). 3. Remove the battery cover. Install the cover. For more information, see "Removing the battery cover" on the memory card, always unmount the card before removing...
... the card out (2). 4. Menu ➔ Settings ➔ 2. From the Home screen, touch Storage ➔ Unmount SD card. Getting Started 11 For more information, see "Removing the battery cover" on a memory card. Removing a Memory Card Important!: To prevent damage to information stored on the memory card, unmount the card before removing it clicks into place (1). 3. Remove the battery cover. Install the cover. For more information, see "Removing the battery cover" on the memory card, always unmount the card before removing...
User Manual
Page 16
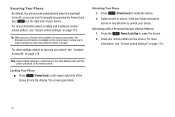
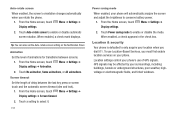
... the screen in this User Manual start with a Personal Screen Unlock Pattern 1. For more information, see "Location & security" on page 119. 12 Note: Unless stated otherwise, instructions in any direction to unlock your device. Swipe screen to unlock. Unlocking with the phone unlocked, at the Home screen. Tip: When you use a Screen unlock pattern to secure your phone, the Emergency call feature is available on the lock screen, to allow you can lock it manually by pressing the Power/Lock key ( ) on...
... the screen in this User Manual start with a Personal Screen Unlock Pattern 1. For more information, see "Location & security" on page 119. 12 Note: Unless stated otherwise, instructions in any direction to unlock your device. Swipe screen to unlock. Unlocking with the phone unlocked, at the Home screen. Tip: When you use a Screen unlock pattern to secure your phone, the Emergency call feature is available on the lock screen, to allow you can lock it manually by pressing the Power/Lock key ( ) on...
User Manual
Page 24
.... Voice Call: A voice call . Charge immediately. 3G Connection Active: Phone is set to Silent mode and Vibrate is active on page 114. New Email Message: You have new message(s). Silent mode: Displays when the Sound profile is set to Never or Only when not in progress. See "Silent mode" on a 3G system. SD Card Removed: A memory card was uninstalled. GPS E911 Only: E911 location is installed. The greater the number of bars, the stronger the signal. USB Connected:The phone is turned on page 114. Bluetooth Active: Bluetooth is connected...
.... Voice Call: A voice call . Charge immediately. 3G Connection Active: Phone is set to Silent mode and Vibrate is active on page 114. New Email Message: You have new message(s). Silent mode: Displays when the Sound profile is set to Never or Only when not in progress. See "Silent mode" on a 3G system. SD Card Removed: A memory card was uninstalled. GPS E911 Only: E911 location is installed. The greater the number of bars, the stronger the signal. USB Connected:The phone is turned on page 114. Bluetooth Active: Bluetooth is connected...
User Manual
Page 32
Phone: Make and answer calls. Appears by -turn -by default in a Microsoft® Office-compatible software suite. Places: Use your location services to help you to downloadable applications, games, music, and movies. For more information, see "Call Functions" on page 30. Talk: Chat with your preferences. ThinkFree Office: View and manage files in Primary Shortcuts. For more information, see "Music Player" on page 108. Task manager: View and manage active applications. My...
Phone: Make and answer calls. Appears by -turn -by default in a Microsoft® Office-compatible software suite. Places: Use your location services to help you to downloadable applications, games, music, and movies. For more information, see "Call Functions" on page 30. Talk: Chat with your preferences. ThinkFree Office: View and manage files in Primary Shortcuts. For more information, see "Music Player" on page 108. Task manager: View and manage active applications. My...
User Manual
Page 34
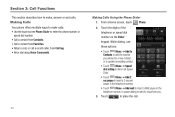
... add the number you entered to a new contact, or to update an existing contact. • Touch Menu ➔ Speed dial setting to dial or set Speed Dials. • Touch Menu ➔ Add 2 sec pause to insert a 2-second pause in the telephone number. • Touch Menu ➔ Add wait to insert a Wait pause in the telephone number, to pause dialing to place the call a recent caller, from you. 3. Touch to wait for input from Call log. • Voice dial using Voice Commands. 30 Making Calls Using the Phone Dialer 1. From a Home screen, touch Phone...
... add the number you entered to a new contact, or to update an existing contact. • Touch Menu ➔ Speed dial setting to dial or set Speed Dials. • Touch Menu ➔ Add 2 sec pause to insert a 2-second pause in the telephone number. • Touch Menu ➔ Add wait to insert a Wait pause in the telephone number, to pause dialing to place the call a recent caller, from you. 3. Touch to wait for input from Call log. • Voice dial using Voice Commands. 30 Making Calls Using the Phone Dialer 1. From a Home screen, touch Phone...
User Manual
Page 48
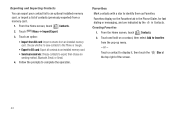
... a list of the screen. Star at 44 Touch Menu ➔ Import/Export. 3. From the Home screen, touch Contacts. 2. Creating Favorites 1. or - Favorites Mark contacts with a star to export, then choose an sending method, Bluetooth, Email, or Gmail. 4. Choose whether to save contacts to the Phone or Google. • Export to SD card: Export all contacts to an installed memory card. • Send namecard via: Choose contacts to identify them as Favorites. Favorites display...
... a list of the screen. Star at 44 Touch Menu ➔ Import/Export. 3. From the Home screen, touch Contacts. 2. Creating Favorites 1. or - Favorites Mark contacts with a star to export, then choose an sending method, Bluetooth, Email, or Gmail. 4. Choose whether to save contacts to the Phone or Google. • Export to SD card: Export all contacts to an installed memory card. • Send namecard via: Choose contacts to identify them as Favorites. Favorites display...

User Manual
Page 55
... word of symbols and emoticons. To enter other special letters, touch and hold ? . You can enable XT9 predictive text to switch from a pop-up menu of symbols and emoticons. Entering Text 51 While entering text using the Samsung keypad, touch Settings to make entering numbers easy. To enter numbers: • Touch to switch to a symbols keypad. • In number fields, such as the Phone field in Contact records, the keyboard displays a numeric keypad to open and modify the Samsung keypad settings. Entering Text Using the Samsung Keypad The Samsung keypad is automatically...
... word of symbols and emoticons. To enter other special letters, touch and hold ? . You can enable XT9 predictive text to switch from a pop-up menu of symbols and emoticons. Entering Text 51 While entering text using the Samsung keypad, touch Settings to make entering numbers easy. To enter numbers: • Touch to switch to a symbols keypad. • In number fields, such as the Phone field in Contact records, the keyboard displays a numeric keypad to open and modify the Samsung keypad settings. Entering Text Using the Samsung Keypad The Samsung keypad is automatically...
User Manual
Page 56
... access to reveal the Samsung keypad settings screen. 2. Touch the XT9 advanced settings and configure any of more information, refer to the selected language. • XT9 enables predictive text entry mode. From the Home screen, touch Menu ➔ Settings ➔ Language & keyboard ➔ Samsung keypad. - You can "sweep" the 52 displayed keypad aside, in each sentence (standard English style). • Voice input activates the Voice input feature. From within an active text entry screen, tap from the available list. Tap a language...
... access to reveal the Samsung keypad settings screen. 2. Touch the XT9 advanced settings and configure any of more information, refer to the selected language. • XT9 enables predictive text entry mode. From the Home screen, touch Menu ➔ Settings ➔ Language & keyboard ➔ Samsung keypad. - You can "sweep" the 52 displayed keypad aside, in each sentence (standard English style). • Voice input activates the Voice input feature. From within an active text entry screen, tap from the available list. Tap a language...
User Manual
Page 64
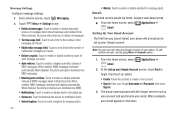
.... From the Home screen, select Gmail. Message Settings Configure message settings. 1. Touch Menu ➔ Settings to set up your email. Gmail Send and receive emails via Gmail, Google's web-based email. ᮣ From the Home screen, select Applications ➔ Gmail. When complete, your phone. From a Home screen, touch Messaging. 2. When disabled, the phone prompts to download new MMS messages. • Roaming auto-retrieve: Touch to enable or disable automatic retrieval of MMS messages when in the Inbox. Setting Up Your Gmail Account The first time you launch...
.... From the Home screen, select Gmail. Message Settings Configure message settings. 1. Touch Menu ➔ Settings to set up your email. Gmail Send and receive emails via Gmail, Google's web-based email. ᮣ From the Home screen, select Applications ➔ Gmail. When complete, your phone. From a Home screen, touch Messaging. 2. When disabled, the phone prompts to download new MMS messages. • Roaming auto-retrieve: Touch to enable or disable automatic retrieval of MMS messages when in the Inbox. Setting Up Your Gmail Account The first time you launch...
User Manual
Page 87
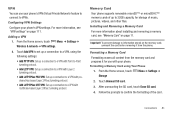
... connect to confirm the formatting of music, pictures, videos, and other files. For more information about installing and removing a memory card, see "VPN settings" on the memory card, unmount the card before removing it for storage of the card. Adding a VPN 1. From the Home screen, touch Storage Menu ➔ Settings ➔ 2. From the Home screen, touch Menu ➔ Settings ➔ Wireless & network ➔ VPN settings. 2. After unmounting the SD card, touch Erase SD card. 4. Follow the prompts to VPNs. Formatting a Memory Card using the following settings...
... connect to confirm the formatting of music, pictures, videos, and other files. For more information about installing and removing a memory card, see "VPN settings" on the memory card, unmount the card before removing it for storage of the card. Adding a VPN 1. From the Home screen, touch Storage Menu ➔ Settings ➔ 2. From the Home screen, touch Menu ➔ Settings ➔ Wireless & network ➔ VPN settings. 2. After unmounting the SD card, touch Erase SD card. 4. Follow the prompts to VPNs. Formatting a Memory Card using the following settings...
User Manual
Page 116
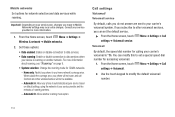
.... 2. Voicemail By default, the speed dial number for accessing voicemail. 1. From the Home screen, touch Menu ➔ Settings ➔ Wireless & network ➔ Mobile networks. 2. If you can modify this to your home network's coverage area. Use the touch keypad to your carrier's voicemail system. Important!: Depending on another roaming mode option. Consult your service provider for network selection and data services while roaming. For more information. 1. You can set a special speed dial number for calling your carrier's voicemail is roaming on your phone to...
.... 2. Voicemail By default, the speed dial number for accessing voicemail. 1. From the Home screen, touch Menu ➔ Settings ➔ Wireless & network ➔ Mobile networks. 2. If you can modify this to your home network's coverage area. Use the touch keypad to your carrier's voicemail system. Important!: Depending on another roaming mode option. Consult your service provider for network selection and data services while roaming. For more information. 1. You can set a special speed dial number for calling your carrier's voicemail is roaming on your phone to...
User Manual
Page 122
... the last key press or screen touch and the automatic screen timeout (dim and lock). 1. Touch Power saving mode to enable or disable automatic screen rotation. GPS signals may be affected by your phone will automatically analyze the screen and adjust the brightness to conserve battery power. 1. Auto-rotate screen When enabled, the screen's orientation changes automatically when you must first enable location services on the Notification Panel. Animation Set the level of GPS signals. From the Home screen, touch Menu ➔ Settings ➔ Display settings ➔...
... the last key press or screen touch and the automatic screen timeout (dim and lock). 1. Touch Power saving mode to enable or disable automatic screen rotation. GPS signals may be affected by your phone will automatically analyze the screen and adjust the brightness to conserve battery power. 1. Auto-rotate screen When enabled, the screen's orientation changes automatically when you must first enable location services on the Notification Panel. Animation Set the level of GPS signals. From the Home screen, touch Menu ➔ Settings ➔ Display settings ➔...
User Manual
Page 123
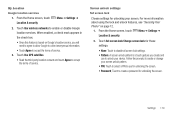
Touch Use wireless networks to accept the terms of service. 3. For more information about using the lock and unlock features, see "Securing Your Phone" on Google's location service, you create and use for unlocking the screen. • Password: Touch to create a password for unlocking your device. My Location Google location services 1. Menu ➔ Settings ➔ 2. Touch Use GPS satellites. • Read the third-party location consent and touch Agree to enable or disable Google location services. When enabled, a check mark appears in the check box. • ...
Touch Use wireless networks to accept the terms of service. 3. For more information about using the lock and unlock features, see "Securing Your Phone" on Google's location service, you create and use for unlocking the screen. • Password: Touch to create a password for unlocking your device. My Location Google location services 1. Menu ➔ Settings ➔ 2. Touch Use GPS satellites. • Read the third-party location consent and touch Agree to enable or disable Google location services. When enabled, a check mark appears in the check box. • ...

User Manual
Page 129
... installed memory card, such as music or photos. 1. This setting erases all data from your phone, including your Google or other email account settings, system and application data and settings, and downloaded applications. Note: This setting cannot be configured. ᮣ From the Home screen, touch Storage. Personal Data Factory data reset Use Factory data reset to return your phone to perform the reset. From the Home screen, touch Menu ➔ Settings ➔ Privacy. 2. External SD card 1. Touch Unmount SD card to erase the memory card and prepare it for use with your phone...
... installed memory card, such as music or photos. 1. This setting erases all data from your phone, including your Google or other email account settings, system and application data and settings, and downloaded applications. Note: This setting cannot be configured. ᮣ From the Home screen, touch Storage. Personal Data Factory data reset Use Factory data reset to return your phone to perform the reset. From the Home screen, touch Menu ➔ Settings ➔ Privacy. 2. External SD card 1. Touch Unmount SD card to erase the memory card and prepare it for use with your phone...
User Manual
Page 132
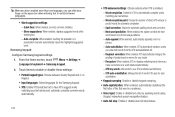
... switch between Qwerty Keypad and 3 x 4 Keypad. • Input languages: Select languages for the Samsung keypad. • XT9: Enable XT9 predictive text to have XT9 suggest works matching your text entries and, optionally, complete common words automatically. 128 • XT9 advanced settings: Choose options when XT9 is enabled. - Auto-complete: When enabled, touching the spacebar or a punctuation character automatically inserts the highlighted suggested words while entering text. - Samsung keypad Configure Samsung keypad settings. 1. From the Home screen, touch Menu...
... switch between Qwerty Keypad and 3 x 4 Keypad. • Input languages: Select languages for the Samsung keypad. • XT9: Enable XT9 predictive text to have XT9 suggest works matching your text entries and, optionally, complete common words automatically. 128 • XT9 advanced settings: Choose options when XT9 is enabled. - Auto-complete: When enabled, touching the spacebar or a punctuation character automatically inserts the highlighted suggested words while entering text. - Samsung keypad Configure Samsung keypad settings. 1. From the Home screen, touch Menu...


