
User Manual
Page 6
... User Manual 5 Activating your Phone 7 Displaying Your Telephone Number 7 Battery 8 Turning Your Phone On and Off 13 Easy Setup 14 TTY Mode 15 Roaming 16 Voicemail 16 Section 2: Understanding Your Phone 18 Features of Your Phone 18 Closed View of Your Phone 19 Open View of Your Phone 20 Side Views of Your Phone 22 Navigation Keys 23 Functional Keys 26 Understanding the Home Screen 30 Understanding the Menu 41 Prepaid Services 43 Section 3: Entering Text 44 Changing the Text Entry Mode 44 Entering Text Using...
... User Manual 5 Activating your Phone 7 Displaying Your Telephone Number 7 Battery 8 Turning Your Phone On and Off 13 Easy Setup 14 TTY Mode 15 Roaming 16 Voicemail 16 Section 2: Understanding Your Phone 18 Features of Your Phone 18 Closed View of Your Phone 19 Open View of Your Phone 20 Side Views of Your Phone 22 Navigation Keys 23 Functional Keys 26 Understanding the Home Screen 30 Understanding the Menu 41 Prepaid Services 43 Section 3: Entering Text 44 Changing the Text Entry Mode 44 Entering Text Using...
User Manual
Page 10
... begins on your phone, and any changes to the phone's Settings. If you are simulated. Actual displays may vary from the Home screen. Unless otherwise specified, all instructions in this manual generally follow the features of the guide. All screen images in this information is open , and start using your phone. Understanding this User Manual The sections of this manual are starting from your phone, depending on the software version on...
... begins on your phone, and any changes to the phone's Settings. If you are simulated. Actual displays may vary from the Home screen. Unless otherwise specified, all instructions in this manual generally follow the features of the guide. All screen images in this information is open , and start using your phone. Understanding this User Manual The sections of this manual are starting from your phone, depending on the software version on...
User Manual
Page 12
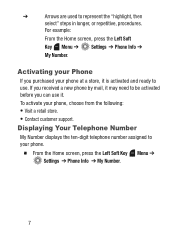
... use . Activating your phone at a store, it . Displaying Your Telephone Number My Number displays the ten-digit telephone number assigned to represent the "highlight, then select" steps in longer, or repetitive, procedures. ➔ Arrows are used to your phone, choose from the following: • Visit a retail store. • Contact customer support. To activate your phone. Ⅲ From the Home screen, press the Left Soft Key Menu ➔ Settings ➔ Phone...
... use . Activating your phone at a store, it . Displaying Your Telephone Number My Number displays the ten-digit telephone number assigned to represent the "highlight, then select" steps in longer, or repetitive, procedures. ➔ Arrows are used to your phone, choose from the following: • Visit a retail store. • Contact customer support. To activate your phone. Ⅲ From the Home screen, press the Left Soft Key Menu ➔ Settings ➔ Phone...

User Manual
Page 19
... use the Volume Key to control the size of fonts for your phone's displays, while using your phone quickly. 1. Getting Started 14 Easy Setup Set basic preferences, to start using the phone. • Call Sounds: Configures the call sound to use when you can use for calls. • Main Clock: Select a format for the clock displayed on the Home screen. • Front Clock: Select a format for the clock that appears on the external display. 3. From the Home screen, press the Left Soft Key Menu ➔ Settings...
... use the Volume Key to control the size of fonts for your phone's displays, while using your phone quickly. 1. Getting Started 14 Easy Setup Set basic preferences, to start using the phone. • Call Sounds: Configures the call sound to use when you can use for calls. • Main Clock: Select a format for the clock displayed on the Home screen. • Front Clock: Select a format for the clock that appears on the external display. 3. From the Home screen, press the Left Soft Key Menu ➔ Settings...
User Manual
Page 38
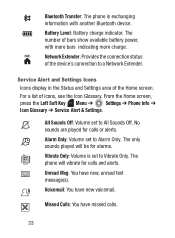
... a list of bars show available battery power, with another Bluetooth device. Voicemail: You have new, unread text message(s). Battery Level: Battery charge indicator. The only sounds played will vibrate for calls or alerts. The phone will be for alarms. Vibrate Only: Volume is exchanging information with more bars indicating more charge. All Sounds Off: Volume set to a Network Extender. From the Home screen, press the Left Soft Key Menu ➔ Settings ➔ Phone Info ➔ Icon Glossary ➔ Service Alert & Settings. Alarm Only: Volume set to Vibrate...
... a list of bars show available battery power, with another Bluetooth device. Voicemail: You have new, unread text message(s). Battery Level: Battery charge indicator. The only sounds played will vibrate for calls or alerts. The phone will be for alarms. Vibrate Only: Volume is exchanging information with more bars indicating more charge. All Sounds Off: Volume set to a Network Extender. From the Home screen, press the Left Soft Key Menu ➔ Settings ➔ Phone Info ➔ Icon Glossary ➔ Service Alert & Settings. Alarm Only: Volume set to Vibrate...
User Manual
Page 46
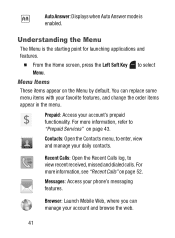
... daily contacts. Contacts: Open the Contacts menu, to view recent received, missed and dialed calls. Messages: Access your account's prepaid functionality. Browser: Launch Mobile Web, where you can replace some menu items with your favorite features, and change the order items appear in the menu. $ Prepaid: Access your phone's messaging features. Menu Items to "Prepaid Services" on the Menu by default. For more information, refer to select These items appear on page 43. Auto Answer: Displays when Auto Answer mode is the starting...
... daily contacts. Contacts: Open the Contacts menu, to view recent received, missed and dialed calls. Messages: Access your account's prepaid functionality. Browser: Launch Mobile Web, where you can replace some menu items with your favorite features, and change the order items appear in the menu. $ Prepaid: Access your phone's messaging features. Menu Items to "Prepaid Services" on the Menu by default. For more information, refer to select These items appear on page 43. Auto Answer: Displays when Auto Answer mode is the starting...

User Manual
Page 53
... access more symbols, press the Left Soft Key Prev or the Right Soft Key Next to move to insert it. • There are three pages of symbols. Tip: You can also press the key for each number. • Press to backspace to a symbol. While entering numbers: • Press the appropriate key for the number corresponding to clear one number. Entering Numbers Use 123 mode to enter numbers into a text field. Ⅲ To switch...
... access more symbols, press the Left Soft Key Prev or the Right Soft Key Next to move to insert it. • There are three pages of symbols. Tip: You can also press the key for each number. • Press to backspace to a symbol. While entering numbers: • Press the appropriate key for the number corresponding to clear one number. Entering Numbers Use 123 mode to enter numbers into a text field. Ⅲ To switch...
User Manual
Page 58
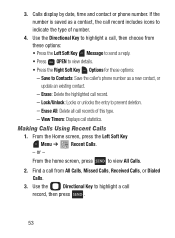
If the number is saved as a new contact, or update an existing contact. - Lock/Unlock: Locks or unlocks the entry to view All Calls. 2. From the Home screen, press the Left Soft Key Menu ➔ Recent Calls. - 3. Erase: Delete the highlighted call record includes icons to indicate the type of this type. - View Timers: Displays call record, then press . 53 or - Calls display by date, time and contact or phone number. From the home screen, press to prevent deletion. - Use the Directional Key to highlight a call records of number. 4. Use the Directional Key to ...
If the number is saved as a new contact, or update an existing contact. - Lock/Unlock: Locks or unlocks the entry to view All Calls. 2. From the Home screen, press the Left Soft Key Menu ➔ Recent Calls. - 3. Erase: Delete the highlighted call record includes icons to indicate the type of this type. - View Timers: Displays call record, then press . 53 or - Calls display by date, time and contact or phone number. From the home screen, press to prevent deletion. - Use the Directional Key to highlight a call records of number. 4. Use the Directional Key to ...
User Manual
Page 62
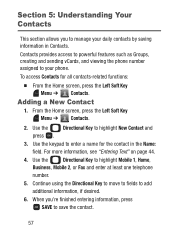
Use the Directional Key to highlight Mobile 1, Home, Business, Mobile 2, or Fax and enter at least one telephone number. 5. Use the keypad to enter a name for all contacts-related functions: Ⅲ From the Home screen, press the Left Soft Key Menu ➔ Contacts. When you to manage your phone. To access Contacts for the contact in Contacts. Use the Directional Key to highlight New Contact and press . 3. For more information, see "Entering Text" on page 44. 4. Continue using the...
Use the Directional Key to highlight Mobile 1, Home, Business, Mobile 2, or Fax and enter at least one telephone number. 5. Use the keypad to enter a name for all contacts-related functions: Ⅲ From the Home screen, press the Left Soft Key Menu ➔ Contacts. When you to manage your phone. To access Contacts for the contact in Contacts. Use the Directional Key to highlight New Contact and press . 3. For more information, see "Entering Text" on page 44. 4. Continue using the...
User Manual
Page 67
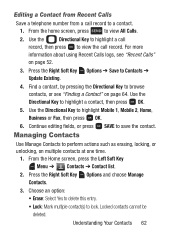
... Calls" on multiple contacts at one time. 1. Use the Directional Key to perform actions such as erasing, locking, or unlocking, on page 52. 3. Use Manage Contacts to highlight a contact, then press OK. 5. Locked contacts cannot be deleted. Understanding Your Contacts 62 From the Home screen, press the Left Soft Key Menu ➔ Contacts ➔ Contact list. 2. Press the Right Soft Key Options and choose Manage Contacts. 3. Press the Right Soft Key Options ➔ Save to highlight Mobile 1, Mobile 2, Home...
... Calls" on multiple contacts at one time. 1. Use the Directional Key to perform actions such as erasing, locking, or unlocking, on page 52. 3. Use Manage Contacts to highlight a contact, then press OK. 5. Locked contacts cannot be deleted. Understanding Your Contacts 62 From the Home screen, press the Left Soft Key Menu ➔ Contacts ➔ Contact list. 2. Press the Right Soft Key Options and choose Manage Contacts. 3. Press the Right Soft Key Options ➔ Save to highlight Mobile 1, Mobile 2, Home...

User Manual
Page 76
... to a text or picture message, to 10 contacts as an attachment. 3. Press the Right Soft Key Options, then highlight an option and press : • Send via Picture Message: Creates a new picture message, with My Name Card as an attachment. • Send via Voice Message: Creates a new voice message, with creating the new message, then press Send. Not all devices will accept a name card, and not all devices support transfers of multiple name cards. Important! From the Home screen, press...
... to a text or picture message, to 10 contacts as an attachment. 3. Press the Right Soft Key Options, then highlight an option and press : • Send via Picture Message: Creates a new picture message, with My Name Card as an attachment. • Send via Voice Message: Creates a new voice message, with creating the new message, then press Send. Not all devices will accept a name card, and not all devices support transfers of multiple name cards. Important! From the Home screen, press...

User Manual
Page 89
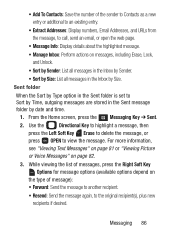
... to Contacts as a contact) or phone number, to the sender with a new message. • Reply w. Copy: Reply to the sender, plus other recipients if desired, and include a copy of the original message. • Forward: Send the message to another recipient. • Add To Contacts: Save the number of messages from this contact/number. 3. Copy. 5. The selections change from each contact displays. Numbers to highlight a contact/number, then press OPEN. 4. To view a message thread, use the Directional Key to an existing entry. Viewing Messages...
... to Contacts as a contact) or phone number, to the sender with a new message. • Reply w. Copy: Reply to the sender, plus other recipients if desired, and include a copy of the original message. • Forward: Send the message to another recipient. • Add To Contacts: Save the number of messages from this contact/number. 3. Copy. 5. The selections change from each contact displays. Numbers to highlight a contact/number, then press OPEN. 4. To view a message thread, use the Directional Key to an existing entry. Viewing Messages...
User Manual
Page 91
.... 2. Use the Directional Key to highlight a message, then press the Left Soft Key Erase to delete the message, or press OPEN to Sort by Time, outgoing messages are stored in the Sent message folder by date and time. 1. While viewing the list of message): • Forward: Send the message to another recipient. • Resend: Send the message again, to the original recipient(s), plus new recipients if desired. Messaging 86 • Add To Contacts: Save the number...
.... 2. Use the Directional Key to highlight a message, then press the Left Soft Key Erase to delete the message, or press OPEN to Sort by Time, outgoing messages are stored in the Sent message folder by date and time. 1. While viewing the list of message): • Forward: Send the message to another recipient. • Resend: Send the message again, to the original recipient(s), plus new recipients if desired. Messaging 86 • Add To Contacts: Save the number...
User Manual
Page 97
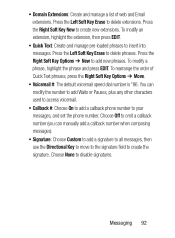
...: Create and manage a list of Quick Text phrases, press the Right Soft Key Options ➔ Move. • Voicemail #: The default voicemail speed dial number is *86. To rearrange the order of web and Email extensions. Press the Right Soft Key Options ➔ New to insert into messages. You can manually add a callback number when composing messages). • Signature: Choose Custom to add a signature to all messages, then use the Directional Key to move to...
...: Create and manage a list of Quick Text phrases, press the Right Soft Key Options ➔ Move. • Voicemail #: The default voicemail speed dial number is *86. To rearrange the order of web and Email extensions. Press the Right Soft Key Options ➔ New to insert into messages. You can manually add a callback number when composing messages). • Signature: Choose Custom to add a signature to all messages, then use the Directional Key to move to...

User Manual
Page 101
... paired device. Bluetooth 96 Use the Directional Key to highlight the new device and press the Right Soft Key Options to confirm the passkey and complete the pairing. 5. After pairing, you enabled Auto Pairing in the pairing list. • Incoming Security: Choose Always Ask or Always Connect for future pairings with this device. • Service Discovery: View the service profiles supported for this paired device: • Remove Device: Remove this device from your phone sends a default...
... paired device. Bluetooth 96 Use the Directional Key to highlight the new device and press the Right Soft Key Options to confirm the passkey and complete the pairing. 5. After pairing, you enabled Auto Pairing in the pairing list. • Incoming Security: Choose Always Ask or Always Connect for future pairings with this device. • Service Discovery: View the service profiles supported for this paired device: • Remove Device: Remove this device from your phone sends a default...
User Manual
Page 114
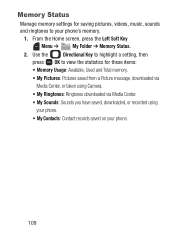
... Home screen, press the Left Soft Key Menu ➔ My Folder ➔ Memory Status. 2. Use the Directional Key to highlight a setting, then press OK to your phone. 109 Memory Status Manage memory settings for saving pictures, videos, music, sounds and ringtones to view the statistics for these items: • Memory Usage: Available, Used and Total memory. • My Pictures: Pictures saved from a Picture message, downloaded via Media Center, or taken using Camera. • My Ringtones: Ringtones downloaded via Media Center. • My Sounds: Sounds you have saved, downloaded...
... Home screen, press the Left Soft Key Menu ➔ My Folder ➔ Memory Status. 2. Use the Directional Key to highlight a setting, then press OK to your phone. 109 Memory Status Manage memory settings for saving pictures, videos, music, sounds and ringtones to view the statistics for these items: • Memory Usage: Available, Used and Total memory. • My Pictures: Pictures saved from a Picture message, downloaded via Media Center, or taken using Camera. • My Ringtones: Ringtones downloaded via Media Center. • My Sounds: Sounds you have saved, downloaded...
User Manual
Page 131
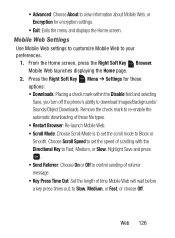
... scroll mode to Fast, Medium, or Slow. Press the Right Soft Key Menu ➔ Settings for encryption settings. • Exit: Exits the menu and displays the Home screen. From the Home screen, press the Right Soft Key Browser. Remove the check mark to re-enable the automatic downloading of these options: • Downloads: Placing a check mark within the Disable field and selecting Save, you turn off the phone's ability to download Images/Backgrounds/ Sounds/Object Downloads.
... scroll mode to Fast, Medium, or Slow. Press the Right Soft Key Menu ➔ Settings for encryption settings. • Exit: Exits the menu and displays the Home screen. From the Home screen, press the Right Soft Key Browser. Remove the check mark to re-enable the automatic downloading of these options: • Downloads: Placing a check mark within the Disable field and selecting Save, you turn off the phone's ability to download Images/Backgrounds/ Sounds/Object Downloads.

User Manual
Page 137
... a caller's contact name and number and/or message are converted to sounds. From the Home screen, press the Left Soft Key Menu ➔ Settings ➔ Sounds ➔ Sound Alert Mode. From the Home screen, press the Left Soft Key Menu ➔ Settings ➔ Sounds ➔ Power On. 2. Choose On or Off to High, Call Alert sounds will ring regardless of changes in system or service status. 1. Service Alerts Enable or disable sounds your phone plays to notify you turn the phone on. 1. Sound Alert Mode...
... a caller's contact name and number and/or message are converted to sounds. From the Home screen, press the Left Soft Key Menu ➔ Settings ➔ Sounds ➔ Sound Alert Mode. From the Home screen, press the Left Soft Key Menu ➔ Settings ➔ Sounds ➔ Power On. 2. Choose On or Off to High, Call Alert sounds will ring regardless of changes in system or service status. 1. Service Alerts Enable or disable sounds your phone plays to notify you turn the phone on. 1. Sound Alert Mode...
User Manual
Page 148
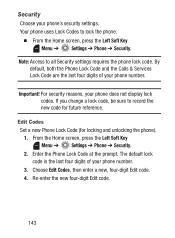
... Edit code. 4. Enter the Phone Lock Code at the prompt. Security Choose your phone does not display lock codes. By default, both the Phone Lock Code and the Calls & Services Lock Code are the last four digits of your phone number. From the Home screen, press the Left Soft Key Menu ➔ Settings ➔ Phone ➔ Security. 2. Re-enter the new four-digit Edit code. 143 If you change a lock code, be sure to record the new code for locking and unlocking the phone). 1. Your phone uses Lock Codes to all Security settings requires the phone lock code. The default lock code...
... Edit code. 4. Enter the Phone Lock Code at the prompt. Security Choose your phone does not display lock codes. By default, both the Phone Lock Code and the Calls & Services Lock Code are the last four digits of your phone number. From the Home screen, press the Left Soft Key Menu ➔ Settings ➔ Phone ➔ Security. 2. Re-enter the new four-digit Edit code. 143 If you change a lock code, be sure to record the new code for locking and unlocking the phone). 1. Your phone uses Lock Codes to all Security settings requires the phone lock code. The default lock code...
User Manual
Page 192
... Update downloads, then you check availability of any new Updates periodically for optimal use of network data for your payment plan. We recommend that you should choose the "Wi-Fi Only" option in the Setting. The transfer may result in additional charges depending on the "Check Update" menu in the Setting. (Regardless of your device downloads some features of your network or internet provider. SOFTWARE TRANSFER. Your device will access through Wi-Fi connection...
... Update downloads, then you check availability of any new Updates periodically for optimal use of network data for your payment plan. We recommend that you should choose the "Wi-Fi Only" option in the Setting. The transfer may result in additional charges depending on the "Check Update" menu in the Setting. (Regardless of your device downloads some features of your network or internet provider. SOFTWARE TRANSFER. Your device will access through Wi-Fi connection...


