User Manual (English)
Page 1
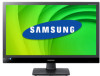
S24B240BL/S24B240KL/S27B240B/S27B240K Monitor User Manual The color and the appearance may differ depending on the product, and the specifications are subject to change without prior notice to improve the performance.
S24B240BL/S24B240KL/S27B240B/S27B240K Monitor User Manual The color and the appearance may differ depending on the product, and the specifications are subject to change without prior notice to improve the performance.
User Manual (English)
Page 2
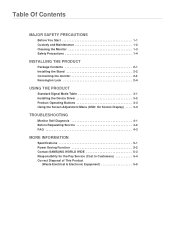
...SAFETY PRECAUTIONS Before You Start 1-1 Custody and Maintenance 1-2 Cleaning the Monitor 1-3 Safety Precautions 1-4 INSTALLING THE PRODUCT Package Contents 2-1 Installing the Stand 2-2 Connecting the monitor 2-3 Kensington Lock 2-4 USING THE PRODUCT Standard Signal Mode Table ... Adjustment Menu (OSD: On Screen Display) . . . . 3-4 TROUBLESHOOTING Monitor Self-Diagnosis 4-1 Before Requesting Service 4-2 FAQ 4-3 MORE INFORMATION Specifications 5-1 Power Saving Function 5-2 Contact SAMSUNG WORLD WIDE 5-3 Responsibility for the Pay Service (Cost to Customers 5-4 Correct Disposal...
...SAFETY PRECAUTIONS Before You Start 1-1 Custody and Maintenance 1-2 Cleaning the Monitor 1-3 Safety Precautions 1-4 INSTALLING THE PRODUCT Package Contents 2-1 Installing the Stand 2-2 Connecting the monitor 2-3 Kensington Lock 2-4 USING THE PRODUCT Standard Signal Mode Table ... Adjustment Menu (OSD: On Screen Display) . . . . 3-4 TROUBLESHOOTING Monitor Self-Diagnosis 4-1 Before Requesting Service 4-2 FAQ 4-3 MORE INFORMATION Specifications 5-1 Power Saving Function 5-2 Contact SAMSUNG WORLD WIDE 5-3 Responsibility for the Pay Service (Cost to Customers 5-4 Correct Disposal...
User Manual (English)
Page 5
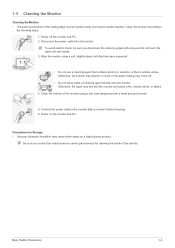
...for Storage • Using an ultrasonic humidifier may come off the monitor and PC. 2. Precautions for cleaning the inside of the cutting-edge monitor scratch easily and require careful attention. Clean the monitor according to the monitor after you disconnect the cable by gripping the plug and do ...cloth that has been squeezed . • Do not use a cleaning agent that contains alcohol or solvents, or that is surface active. Wipe the monitor using a soft cloth dampened with wet hands. 3. Clean the exterior of water. 5. Major Safety Precautions 1-3 To avoid electric shock, be sure...
...for Storage • Using an ultrasonic humidifier may come off the monitor and PC. 2. Precautions for cleaning the inside of the cutting-edge monitor scratch easily and require careful attention. Clean the monitor according to the monitor after you disconnect the cable by gripping the plug and do ...cloth that has been squeezed . • Do not use a cleaning agent that contains alcohol or solvents, or that is surface active. Wipe the monitor using a soft cloth dampened with wet hands. 3. Clean the exterior of water. 5. Major Safety Precautions 1-3 To avoid electric shock, be sure...
User Manual (English)
Page 12
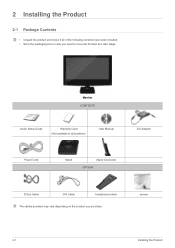
screws 2-1 Installing the Product 2 Installing the Product 2-1 Package Contents • Unpack the product and check if all of the following contents have been included. • Store the packaging box in all locations) User Manual DC-Adapter Power Cord Stand Stand Connector OPTION D-Sub Cable DVI Cable headphone holder The cables provided may vary depending on the product you need to move the Product at a later stage. Monitor CONTENTS Quick Setup Guide Warranty Card (Not available in case you purchase.
screws 2-1 Installing the Product 2 Installing the Product 2-1 Package Contents • Unpack the product and check if all of the following contents have been included. • Store the packaging box in all locations) User Manual DC-Adapter Power Cord Stand Stand Connector OPTION D-Sub Cable DVI Cable headphone holder The cables provided may vary depending on the product you need to move the Product at a later stage. Monitor CONTENTS Quick Setup Guide Warranty Card (Not available in case you purchase.
User Manual (English)
Page 15
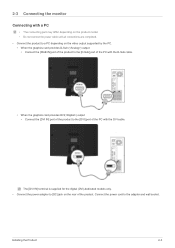
... provides D-Sub () output • Connect the [RGB IN] port of the product to the [D-Sub] port of the PC with the DVI cable. 2-3 Connecting the monitor Connecting with a PC • The connecting part may differ depending on the product model. • Do not connect the power cable until all connections are...
... provides D-Sub () output • Connect the [RGB IN] port of the product to the [D-Sub] port of the PC with the DVI cable. 2-3 Connecting the monitor Connecting with a PC • The connecting part may differ depending on the product model. • Do not connect the power cable until all connections are...

User Manual (English)
Page 17
... service center. Slide the end of the cable with the lock attached through the looped end of the locking device may differ depending on the Monitor( ). 4.
... service center. Slide the end of the cable with the lock attached through the looped end of the locking device may differ depending on the Monitor( ). 4.
User Manual (English)
Page 21
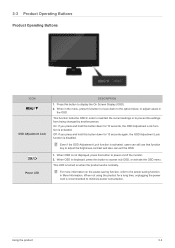
... the On Screen Display (OSD). 2. When OSD is disabled. When OSD is activated, users can still use that function key to power on/off the monitor. 2. When not using the product for a long time, unplugging the power cord is turned on the power-saving function, refer to prevent the settings from...
... the On Screen Display (OSD). 2. When OSD is disabled. When OSD is activated, users can still use that function key to power on/off the monitor. 2. When not using the product for a long time, unplugging the power cord is turned on the power-saving function, refer to prevent the settings from...
User Manual (English)
Page 22
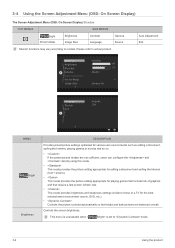
... Display) The Screen Adjustment Menu (OSD: On Screen Display) Structure TOP MENUS Bright PC/AV Mode Brightness Image Size SUB MENUS Contrast Language Gamma Source Monitor functions may vary according to mode. 3-4 Using the product This menu is unavailable when < Bright> is set to models. Controls the screen brightness. Auto Adjustment...
... Display) The Screen Adjustment Menu (OSD: On Screen Display) Structure TOP MENUS Bright PC/AV Mode Brightness Image Size SUB MENUS Contrast Language Gamma Source Monitor functions may vary according to mode. 3-4 Using the product This menu is unavailable when < Bright> is set to models. Controls the screen brightness. Auto Adjustment...
User Manual (English)
Page 24
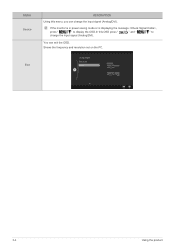
Shows the frequency and resolution set on the PC. If the monitor is in power saving mode or is displaying the message , press " " to display the OSD.In this menu, you can exit the OSD. Exit 3-4 Using the product You can change the input signal (Analog/DVI). MENU Source DESCRIPTION Using this OSD press " " and " " to change the input signal (Analog/DVI).
Shows the frequency and resolution set on the PC. If the monitor is in power saving mode or is displaying the message , press " " to display the OSD.In this menu, you can exit the OSD. Exit 3-4 Using the product You can change the input signal (Analog/DVI). MENU Source DESCRIPTION Using this OSD press " " and " " to change the input signal (Analog/DVI).
User Manual (English)
Page 25
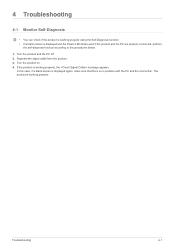
4 Troubleshooting 4-1 Monitor Self-Diagnosis • You can check if the product is working properly using the Self-Diagnosis function. • If a blank screen is working properly. Turn ...
4 Troubleshooting 4-1 Monitor Self-Diagnosis • You can check if the product is working properly using the Self-Diagnosis function. • If a blank screen is working properly. Turn ...
User Manual (English)
Page 26
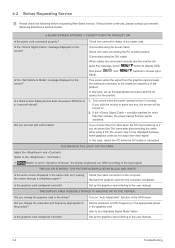
If the problem continues, please contact your nearest Samsung Electronics Service Center. plays this case, set to , the display brightness can differ according to the , ) If < Bright> is connected. In this message, press" "button ... will be activated. Did you reconnect the DVI cable after disconnecting the cable while using the DVI cable) When cables are connected correctly and the monitor dis- "and " "buttons to display OSD, then press" signal. This occurs when the signal from the graphics card exceeds the maximum resolution or the maximum...
If the problem continues, please contact your nearest Samsung Electronics Service Center. plays this case, set to , the display brightness can differ according to the , ) If < Bright> is connected. In this message, press" "button ... will be activated. Did you reconnect the DVI cable after disconnecting the cable while using the DVI cable) When cables are connected correctly and the monitor dis- "and " "buttons to display OSD, then press" signal. This occurs when the signal from the graphics card exceeds the maximum resolution or the maximum...
User Manual (English)
Page 27
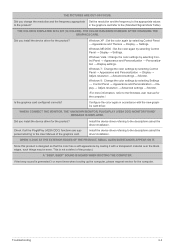
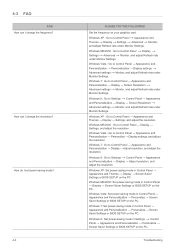
... the color again by selecting Control Panel → Appearance and Personalization → Display → Adjust resolution → Advanced settings → Monitor. Windows 7 : Change the color settings by selecting Control Panel → Appearance and Themes → Display → Settings. Did you change... and the frequency to the appropriate values to the descriptions about the driver installation. WHEN I CONNECT THE MONITOR, THE 'UNKNOWN MONITOR, PLUG&PLAY (VESA DDC) MONITOR FOUND' MESSAGE IS DISPLAYED. If the beep sound is not a defect of the graphics card. in ...
... the color again by selecting Control Panel → Appearance and Personalization → Display → Adjust resolution → Advanced settings → Monitor. Windows 7 : Change the color settings by selecting Control Panel → Appearance and Themes → Display → Settings. Did you change... and the frequency to the appropriate values to the descriptions about the driver installation. WHEN I CONNECT THE MONITOR, THE 'UNKNOWN MONITOR, PLUG&PLAY (VESA DDC) MONITOR FOUND' MESSAGE IS DISPLAYED. If the beep sound is not a defect of the graphics card. in ...
User Manual (English)
Page 28
...Panel → Appearance and Personalization → Personalization → Display settings → Advanced settings → Monitor, and adjust Refresh rate under Monitor Settings. Windows 7 : Go to Settings → Control Panel → Appearance and Personalization → Display &#...8594; Appearance and Personalization → Display → Screen Resolution → Advanced settings → Monitor, and adjust Refresh rate under Monitor Settings. Windows 7: Set power-saving mode in Control Panel → Appearance and Personalization → Personalize ...
...Panel → Appearance and Personalization → Personalization → Display settings → Advanced settings → Monitor, and adjust Refresh rate under Monitor Settings. Windows 7 : Go to Settings → Control Panel → Appearance and Personalization → Display &#...8594; Appearance and Personalization → Display → Screen Resolution → Advanced settings → Monitor, and adjust Refresh rate under Monitor Settings. Windows 7: Set power-saving mode in Control Panel → Appearance and Personalization → Personalize ...
User Manual (English)
Page 31
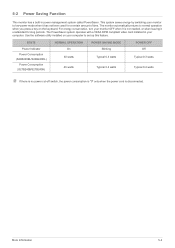
...installed in power management system called PowerSaver. More Information 5-2 5-2 Power Saving Function This monitor has a built-in your computer to set up this feature. STATE Power Indicator Power Consumption (S24B240BL/S24B240KL) Power Consumption (S27B240B/S27B240K) NORMAL OPERATION On 30 watts 40 watts POWER ... needed, or when leaving it unattended for a certain amount of time. The monitor automatically returns to low-power mode when it is disconnected. For energy conservation, turn your monitor to normal operation when you press a key on your computer. Use the software...
...installed in power management system called PowerSaver. More Information 5-2 5-2 Power Saving Function This monitor has a built-in your computer to set up this feature. STATE Power Indicator Power Consumption (S24B240BL/S24B240KL) Power Consumption (S27B240B/S27B240K) NORMAL OPERATION On 30 watts 40 watts POWER ... needed, or when leaving it unattended for a certain amount of time. The monitor automatically returns to low-power mode when it is disconnected. For energy conservation, turn your monitor to normal operation when you press a key on your computer. Use the software...


