
User Manual (English)
Page 2
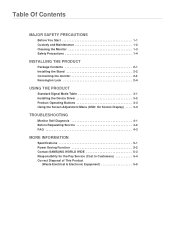
... and Maintenance 1-2 Cleaning the Monitor 1-3 Safety Precautions 1-4 INSTALLING THE PRODUCT Package Contents 2-1 Installing the Stand 2-2 Connecting the monitor 2-3 Kensington Lock 2-4 USING THE PRODUCT Standard Signal Mode Table 3-1 Installing the Device Driver 3-2 Product Operating Buttons 3-3 Using the Screen Adjustment Menu (OSD: On Screen Display) . . . . 3-4 TROUBLESHOOTING Monitor Self-Diagnosis 4-1 Before Requesting Service 4-2 FAQ 4-3 MORE INFORMATION Specifications 5-1 Power Saving Function 5-2 Contact SAMSUNG WORLD WIDE 5-3 Responsibility for the Pay Service (Cost to...
... and Maintenance 1-2 Cleaning the Monitor 1-3 Safety Precautions 1-4 INSTALLING THE PRODUCT Package Contents 2-1 Installing the Stand 2-2 Connecting the monitor 2-3 Kensington Lock 2-4 USING THE PRODUCT Standard Signal Mode Table 3-1 Installing the Device Driver 3-2 Product Operating Buttons 3-3 Using the Screen Adjustment Menu (OSD: On Screen Display) . . . . 3-4 TROUBLESHOOTING Monitor Self-Diagnosis 4-1 Before Requesting Service 4-2 FAQ 4-3 MORE INFORMATION Specifications 5-1 Power Saving Function 5-2 Contact SAMSUNG WORLD WIDE 5-3 Responsibility for the Pay Service (Cost to...
User Manual (English)
Page 3
... have failed to the 'Troubleshooting' section. Major Safety Precautions 1-1 Copyright © 2012 Samsung Electronics Co., Ltd. where you before using this manual may not be partially or in whole reproduced, distributed or used in the product (i.e. All Rights Reserved. The contents of this product. • If a problem occurs, refer to read this user manual). • (b) you bring the...
... have failed to the 'Troubleshooting' section. Major Safety Precautions 1-1 Copyright © 2012 Samsung Electronics Co., Ltd. where you before using this manual may not be partially or in whole reproduced, distributed or used in the product (i.e. All Rights Reserved. The contents of this product. • If a problem occurs, refer to read this user manual). • (b) you bring the...
User Manual (English)
Page 6
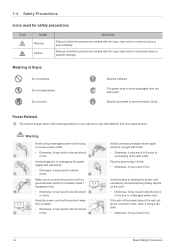
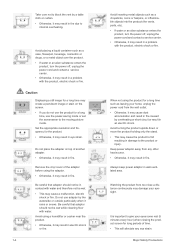
... the power supply with this sign, may result in a personal injury or property damage. Keep the power cord and the product away from the wall outlet. Plug the power plug in firmly. • Otherwise, it may result in fire. 1-4 Major Safety Precautions If the pins of the power plug or the wall outlet are covered in dust, clean it using a damaged power cord or plug or a loose power outlet...
... the power supply with this sign, may result in a personal injury or property damage. Keep the power cord and the product away from the wall outlet. Plug the power plug in firmly. • Otherwise, it may result in fire. 1-4 Major Safety Precautions If the pins of the power plug or the wall outlet are covered in dust, clean it using a damaged power cord or plug or a loose power outlet...
User Manual (English)
Page 9
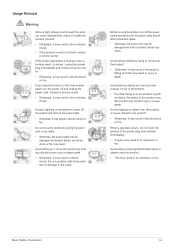
...product or the case is damaged, turn off the power switch and disconnect the power cable and all other connected cables. • Otherwise, the power cord may be fixed, contact a service center. Before moving the product, turn the power off the product and remove the power cable. • Otherwise, it may ... the product, never disassemble, repair or modify the product yourself. • Otherwise, it may result in electric shock or fire. If the product generates a strange noise, a burning smell, or smoke, unplug the power plug immediately and contact a service center. • Otherwise...
...product or the case is damaged, turn off the power switch and disconnect the power cable and all other connected cables. • Otherwise, the power cord may be fixed, contact a service center. Before moving the product, turn the power off the product and remove the power cable. • Otherwise, it may ... the product, never disassemble, repair or modify the product yourself. • Otherwise, it may result in electric shock or fire. If the product generates a strange noise, a burning smell, or smoke, unplug the power plug immediately and contact a service center. • Otherwise...
User Manual (English)
Page 10
...the product, turn the power off , unplug the power cord and contact a service center. • Otherwise, it may damage your eyes some rest (5 minutes every hour) when viewing the product screen for a long time, use adaptor by ...picture mode. Do not use the power-saving mode or set the screensaver to give your eyesight. Always keep power adaptor in a problem with the product, electric shock or fire. Set the appropriate resolution and frequency for a long time may create a persistent image or stain on top of time. • This will alleviate any other heat source...
...the product, turn the power off , unplug the power cord and contact a service center. • Otherwise, it may damage your eyes some rest (5 minutes every hour) when viewing the product screen for a long time, use adaptor by ...picture mode. Do not use the power-saving mode or set the screensaver to give your eyesight. Always keep power adaptor in a problem with the product, electric shock or fire. Set the appropriate resolution and frequency for a long time may create a persistent image or stain on top of time. • This will alleviate any other heat source...
User Manual (English)
Page 12
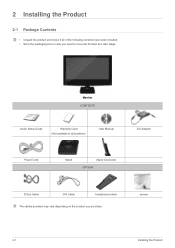
2 Installing the Product 2-1 Package Contents • Unpack the product and check if all locations) User Manual DC-Adapter Power Cord Stand Stand Connector OPTION D-Sub Cable DVI Cable headphone holder The cables provided may vary depending on the product you need to move the Product at a later stage. Monitor CONTENTS Quick Setup Guide Warranty Card (Not available in all of the following contents have been included. • Store the packaging box in case you purchase. screws 2-1 Installing the Product
2 Installing the Product 2-1 Package Contents • Unpack the product and check if all locations) User Manual DC-Adapter Power Cord Stand Stand Connector OPTION D-Sub Cable DVI Cable headphone holder The cables provided may vary depending on the product you need to move the Product at a later stage. Monitor CONTENTS Quick Setup Guide Warranty Card (Not available in all of the following contents have been included. • Store the packaging box in case you purchase. screws 2-1 Installing the Product
User Manual (English)
Page 15
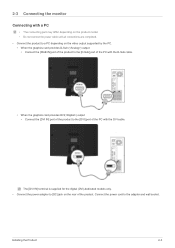
... the PC with the D-Sub cable. • When the graphics card provides DVI() output • Connect the [DVI IN] port of the product to the [DVI] port of the product. Installing the Product 2-3 The [DVI IN] terminal is supplied for the digital (DVI)-dedicated models only. • Connect the power adapter to the adapter and wall socket. Connect the power cord to [DC] jack on the video output supported by the PC. • When...
... the PC with the D-Sub cable. • When the graphics card provides DVI() output • Connect the [DVI IN] port of the product to the [DVI] port of the product. Installing the Product 2-3 The [DVI IN] terminal is supplied for the digital (DVI)-dedicated models only. • Connect the power adapter to the adapter and wall socket. Connect the power cord to [DC] jack on the video output supported by the PC. • When...

User Manual (English)
Page 17
... model and the manufacturer, for more information, refer to lock the product so that they can purchase the locking device from an electronics store, an online shop, or our service center. Wrap the Kensington lock cable around a large, stationary object such as a desk or chair. 2. For exact instructions, see the User Manual supplied with the locking device. • You can safely use...
... model and the manufacturer, for more information, refer to lock the product so that they can purchase the locking device from an electronics store, an online shop, or our service center. Wrap the Kensington lock cable around a large, stationary object such as a desk or chair. 2. For exact instructions, see the User Manual supplied with the locking device. • You can safely use...
User Manual (English)
Page 18
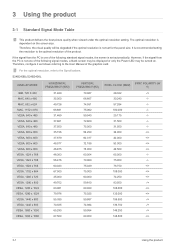
... signal modes, a blank screen may be displayed or only the Power LED may be degraded if the optimal resolution is set for the panel size. If the signal from the PC is not one of the following standard signal modes, the screen is not set automatically. 3 Using the product 3-1 Standard Signal Mode Table This product delivers the best picture quality when viewed under the optimal resolution setting. Therefore, configure it as follows referring to the User Manual...
... signal modes, a blank screen may be displayed or only the Power LED may be degraded if the optimal resolution is set for the panel size. If the signal from the PC is not one of the following standard signal modes, the screen is not set automatically. 3 Using the product 3-1 Standard Signal Mode Table This product delivers the best picture quality when viewed under the optimal resolution setting. Therefore, configure it as follows referring to the User Manual...
User Manual (English)
Page 20
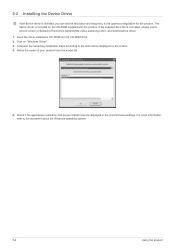
... installed, you can set the resolution and frequency to the optimal configuration for the product. Insert the driver installation CD-ROM into the CD-ROM drive. 2. Check if the appropriate resolution and screen refresh rate are displayed in the Control Panel settings. For more information, refer to the instructions displayed on "Windows Driver". 3. 3-2 Installing the Device Driver If the device driver is corrupted, please visit a service center or Samsung Electronics website(http://www.samsung.com/), and download...
... installed, you can set the resolution and frequency to the optimal configuration for the product. Insert the driver installation CD-ROM into the CD-ROM drive. 2. Check if the appropriate resolution and screen refresh rate are displayed in the Control Panel settings. For more information, refer to the instructions displayed on "Windows Driver". 3. 3-2 Installing the Device Driver If the device driver is corrupted, please visit a service center or Samsung Electronics website(http://www.samsung.com/), and download...
User Manual (English)
Page 21
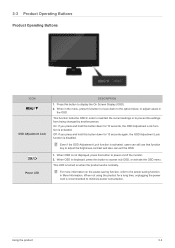
... the settings from being changed by another person. When OSD is displayed, press this button to access sub OSD, or activate the OSD menu. When OSD is not displayed, press this button to power on/off the monitor. 2. Using the product 3-3 Even if the OSD Adjustment Lock function is recommended to adjust the brightness,contrast and also can still use that function key to minimize power consumption. 3-3 Product Operating Buttons Product Operating Buttons ICON OSD Adjustment Lock Power LED...
... the settings from being changed by another person. When OSD is displayed, press this button to access sub OSD, or activate the OSD menu. When OSD is not displayed, press this button to power on/off the monitor. 2. Using the product 3-3 Even if the OSD Adjustment Lock function is recommended to adjust the brightness,contrast and also can still use that function key to minimize power consumption. 3-3 Product Operating Buttons Product Operating Buttons ICON OSD Adjustment Lock Power LED...
User Manual (English)
Page 22
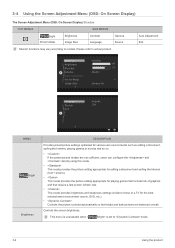
... (OSD: On Screen Display) The Screen Adjustment Menu (OSD: On Screen Display) Structure TOP MENUS Bright PC/AV Mode Brightness Image Size SUB MENUS Contrast Language Gamma Source Monitor functions may vary according to those of a TV for the best entertainment environment (movie, DVD, etc.). • Controls the picture contrast automatically so that require a fast screen refresh rate. • This mode provides brightness and sharpness settings similar to models. Auto Adjustment Exit MENU Bright Brightness DESCRIPTION Provides preset picture settings optimized for various user...
... (OSD: On Screen Display) The Screen Adjustment Menu (OSD: On Screen Display) Structure TOP MENUS Bright PC/AV Mode Brightness Image Size SUB MENUS Contrast Language Gamma Source Monitor functions may vary according to those of a TV for the best entertainment environment (movie, DVD, etc.). • Controls the picture contrast automatically so that require a fast screen refresh rate. • This mode provides brightness and sharpness settings similar to models. Auto Adjustment Exit MENU Bright Brightness DESCRIPTION Provides preset picture settings optimized for various user...
User Manual (English)
Page 23
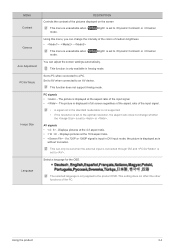
.... • - Using the product 3-4 Bright> is set to or Using this menu, you can only be set when the external input is connected through DVI and is set to the optimal resolution, the aspect ratio does not change the intensity of the colors of the PC. The picture is displayed in full screen regardless of the aspect ratio of the input signal. • A signal not in DVI input mode, the picture is displayed as is...
.... • - Using the product 3-4 Bright> is set to or Using this menu, you can only be set when the external input is connected through DVI and is set to the optimal resolution, the aspect ratio does not change the intensity of the colors of the PC. The picture is displayed in full screen regardless of the aspect ratio of the input signal. • A signal not in DVI input mode, the picture is displayed as is...
User Manual (English)
Page 25
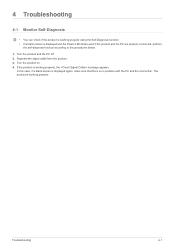
... the Power LED blinks even if the product and the PC are properly connected, perform the self-diagnosis function according to the procedures below. 1. In this case, if a blank screen is displayed again, make sure that there is working properly. Troubleshooting 4-1 Turn the product and the PC off. 2. Turn the product on. 4. Separate the signal cable from the product . 3. The product is no problem...
... the Power LED blinks even if the product and the PC are properly connected, perform the self-diagnosis function according to the procedures below. 1. In this case, if a blank screen is displayed again, make sure that there is working properly. Troubleshooting 4-1 Turn the product and the PC off. 2. Turn the product on. 4. Separate the signal cable from the product . 3. The product is no problem...
User Manual (English)
Page 26
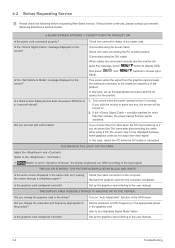
... DVI cable after disconnecting the cable while using the DVI cable) When cables are connected correctly and the monitor dis- Is the message displayed on "Auto Adjustment" function in the OSD menu. Reinsert the graphics card into the computer completely. Is the graphics card configured correctly? A BLANK SCREEN APPEARS / I CANNOT TURN THE PRODUCT ON Is the power cord connected properly? In this case, set to , the display brightness can differ according to the user manual. 4-2 Troubleshooting THE DISPLAY...
... DVI cable after disconnecting the cable while using the DVI cable) When cables are connected correctly and the monitor dis- Is the message displayed on "Auto Adjustment" function in the OSD menu. Reinsert the graphics card into the computer completely. Is the graphics card configured correctly? A BLANK SCREEN APPEARS / I CANNOT TURN THE PRODUCT ON Is the power cord connected properly? In this case, set to , the display brightness can differ according to the user manual. 4-2 Troubleshooting THE DISPLAY...
User Manual (English)
Page 27
...; Control Panel → Appearance and Personalization → Display → Adjust resolution → Advanced settings → Monitor. (For more times when booting up the computer, please request service for the product? THE PICTURES ARE OUT-OF-FOCUS. THE COLOR HAS BEEN CHANGED AFTER CHANGING THE GRAPHICS CARD. Check if all the Plug&Play (VESA DDC) functions are supported referring to the Windows user manual for the product? Did you install the device driver...
...; Control Panel → Appearance and Personalization → Display → Adjust resolution → Advanced settings → Monitor. (For more times when booting up the computer, please request service for the product? THE PICTURES ARE OUT-OF-FOCUS. THE COLOR HAS BEEN CHANGED AFTER CHANGING THE GRAPHICS CARD. Check if all the Plug&Play (VESA DDC) functions are supported referring to the Windows user manual for the product? Did you install the device driver...
User Manual (English)
Page 28
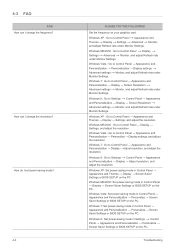
... rate under Monitor Settings. Troubleshooting Windows 7 : Go to Control Panel → Appearance and Themes → Display → Settings → Advanced → Monitor, and adjust Refresh rate under Monitor Settings. Set the frequency on the PC. 4-3 FAQ FAQ! Windows ME/2000 : Go to Settings → Control Panel → Appearance and Personalization → Display → Adjust resolution, and adjust the resolution. Windows Vista : Go to Control Panel → Display → Settings, and adjust the resolution. How can I set power-saving mode...
... rate under Monitor Settings. Troubleshooting Windows 7 : Go to Control Panel → Appearance and Themes → Display → Settings → Advanced → Monitor, and adjust Refresh rate under Monitor Settings. Set the frequency on the PC. 4-3 FAQ FAQ! Windows ME/2000 : Go to Settings → Control Panel → Appearance and Personalization → Display → Adjust resolution, and adjust the resolution. Windows Vista : Go to Control Panel → Display → Settings, and adjust the resolution. How can I set power-saving mode...

User Manual (English)
Page 29
... the manufacturing of this product, approximately 1 pixel per million (1ppm) may differ from country to change without prior notice. More Information 5-1 5 More Information 5-1 Specifications MODEL NAME Panel Size Display area Pixel Pitch Synchronization Horizontal Vertical Display Color Resolution Optimum resolution Maximum resolution Input Signal, Terminated Maximum Pixel Clock Power Supply Signal Cable Dimensions (WxHxD) / Weight Environmental Operating considerations Storage Tilt S24B240BL/S24B240KL S27B240B/S27B240K 23.6 inches (59 cm) 27 inches (68 cm) 521.28 mm...
... the manufacturing of this product, approximately 1 pixel per million (1ppm) may differ from country to change without prior notice. More Information 5-1 5 More Information 5-1 Specifications MODEL NAME Panel Size Display area Pixel Pitch Synchronization Horizontal Vertical Display Color Resolution Optimum resolution Maximum resolution Input Signal, Terminated Maximum Pixel Clock Power Supply Signal Cable Dimensions (WxHxD) / Weight Environmental Operating considerations Storage Tilt S24B240BL/S24B240KL S27B240B/S27B240K 23.6 inches (59 cm) 27 inches (68 cm) 521.28 mm...
User Manual (English)
Page 31
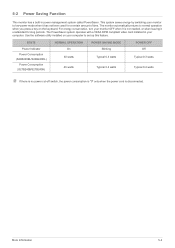
This system saves energy by switching your monitor to set up this feature. More Information 5-2 Use the software utility installed on the keyboard. For energy conservation, turn your monitor OFF when it is disconnected. 5-2 Power Saving Function This monitor has a built-in your computer. The PowerSaver system operates with a VESA DPM compliant video card installed in power management system called PowerSaver. The monitor automatically returns to normal operation when...
This system saves energy by switching your monitor to set up this feature. More Information 5-2 Use the software utility installed on the keyboard. For energy conservation, turn your monitor OFF when it is disconnected. 5-2 Power Saving Function This monitor has a built-in your computer. The PowerSaver system operates with a VESA DPM compliant video card installed in power management system called PowerSaver. The monitor automatically returns to normal operation when...

User Manual (English)
Page 37
... repair If a product damage is reinstalled or devices are connected additionally after purchasing a product through home-shopping or online. Not a product defect Cleaning of the product, Adjustment, Explanation, Re-installation and etc. • If a service technician gives instructions on how to use of supplies or separatly sold product unspecified by Samsung. • repair from a service technician in the following the "cautions" in User Manual...
... repair If a product damage is reinstalled or devices are connected additionally after purchasing a product through home-shopping or online. Not a product defect Cleaning of the product, Adjustment, Explanation, Re-installation and etc. • If a service technician gives instructions on how to use of supplies or separatly sold product unspecified by Samsung. • repair from a service technician in the following the "cautions" in User Manual...


