

User Manual (English)
Page 2
... monitor 2-3 Kensington Lock 2-4 USING THE PRODUCT Standard Signal Mode Table 3-1 Installing the Device Driver 3-2 Product Operating Buttons 3-3 Using the Screen Adjustment Menu (OSD: On Screen Display) . . . . 3-4 TROUBLESHOOTING Monitor Self-Diagnosis 4-1 Before Requesting Service 4-2 FAQ 4-3 MORE INFORMATION Specifications 5-1 Power Saving Function 5-2 Contact SAMSUNG WORLD WIDE 5-3 Responsibility for the Pay Service (Cost to Customers...
... monitor 2-3 Kensington Lock 2-4 USING THE PRODUCT Standard Signal Mode Table 3-1 Installing the Device Driver 3-2 Product Operating Buttons 3-3 Using the Screen Adjustment Menu (OSD: On Screen Display) . . . . 3-4 TROUBLESHOOTING Monitor Self-Diagnosis 4-1 Before Requesting Service 4-2 FAQ 4-3 MORE INFORMATION Specifications 5-1 Power Saving Function 5-2 Contact SAMSUNG WORLD WIDE 5-3 Responsibility for the Pay Service (Cost to Customers...
User Manual (English)
Page 4
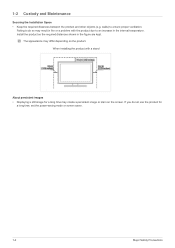
... • Keep the required distances between the product and other objects (e.g. Install the product so the required distances shown in the internal temperature. If you do so may result in fire or a problem with a stand About persistent ...images • Displaying a still image for a long time, set the power-saving mode or screen saver. 1-2 Major Safety Precautions When installing the product with the product due to an increase in the figure are kept. The appearance may create a persistent image or stain on the product...
... • Keep the required distances between the product and other objects (e.g. Install the product so the required distances shown in the internal temperature. If you do so may result in fire or a problem with a stand About persistent ...images • Displaying a still image for a long time, set the power-saving mode or screen saver. 1-2 Major Safety Precautions When installing the product with the product due to an increase in the figure are kept. The appearance may create a persistent image or stain on the product...
User Manual (English)
Page 7
...Precautions 1-4 Keep a distance of another electric appliance. • Otherwise, it may result in a badly-ventilated location such as on the product. Avoid installing the product in a location that can be easily reached. • When a problem occurs with the product or fire. Make sure to use only the... by our company. Keep the plastic bags used to pack the product away from the wall outlet, make sure to electric shock. Avoid installing the product in fire. Connect the power plug to a wall outlet that is operating. • Otherwise, it may result in electric shock...
...Precautions 1-4 Keep a distance of another electric appliance. • Otherwise, it may result in a badly-ventilated location such as on the product. Avoid installing the product in a location that can be easily reached. • When a problem occurs with the product or fire. Make sure to use only the... by our company. Keep the plastic bags used to pack the product away from the wall outlet, make sure to electric shock. Avoid installing the product in fire. Connect the power plug to a wall outlet that is operating. • Otherwise, it may result in electric shock...

User Manual (English)
Page 8
.... • This may shorten the product life cycle or cause fire. Edible oil, such as airports or stations where the product is heavier, install the product on the floor. • This may result in electric shock or fire. When putting the product down on a flat and stable ...a malfunction or injury. • Make sure to use a cabinet or shelf suitable to dust, moisture (sauna), oil, smoke or water (rain drops) and installing it . • If a child touches the product, the product may result in a location where the operating conditions vary considerably, a serious quality problem may ...
.... • This may shorten the product life cycle or cause fire. Edible oil, such as airports or stations where the product is heavier, install the product on the floor. • This may result in electric shock or fire. When putting the product down on a flat and stable ...a malfunction or injury. • Make sure to use a cabinet or shelf suitable to dust, moisture (sauna), oil, smoke or water (rain drops) and installing it . • If a child touches the product, the product may result in a location where the operating conditions vary considerably, a serious quality problem may ...
User Manual (English)
Page 12
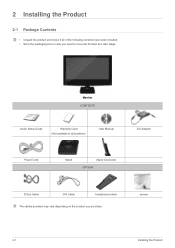
Monitor CONTENTS Quick Setup Guide Warranty Card (Not available in case you purchase. 2 Installing the Product 2-1 Package Contents • Unpack the product and check if all of the following contents have been included. • Store the packaging box in all locations) User Manual DC-Adapter Power Cord Stand Stand Connector OPTION D-Sub Cable DVI Cable headphone holder The cables provided may vary depending on the product you need to move the Product at a later stage. screws 2-1 Installing the Product
Monitor CONTENTS Quick Setup Guide Warranty Card (Not available in case you purchase. 2 Installing the Product 2-1 Package Contents • Unpack the product and check if all of the following contents have been included. • Store the packaging box in all locations) User Manual DC-Adapter Power Cord Stand Stand Connector OPTION D-Sub Cable DVI Cable headphone holder The cables provided may vary depending on the product you need to move the Product at a later stage. screws 2-1 Installing the Product

User Manual (English)
Page 13
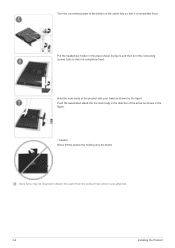
Insert the Stand Connector into the Stand by rotating as shown in the direction shown by the figure. Install the Stand Connector into the Stand in the figure. Check if the Stand Connector is firmly connected. Next, place the product with the screen facing down onto the blanket. Lay a soft blanket on a flat and stable surface (table, etc.) with the screen facing down . Installing the Product 2-2 2-2 Installing the Stand Before assembling the product, put the product down on the table for protection.
Insert the Stand Connector into the Stand by rotating as shown in the direction shown by the figure. Install the Stand Connector into the Stand in the figure. Check if the Stand Connector is firmly connected. Next, place the product with the screen facing down onto the blanket. Lay a soft blanket on a flat and stable surface (table, etc.) with the screen facing down . Installing the Product 2-2 2-2 Installing the Stand Before assembling the product, put the product down on the table for protection.
User Manual (English)
Page 14
More force may be required to detach the stand from the product than when it is completely fixed. Push the assembled stand into the main body in the direction of the arrow as shown by holding only the stand. Put the headphone holder in the figure. - Caution Never lift the product by the figure. Turn the connecting screw at the bottom of the stand fully so that it was attached. 2-2 Installing the Product Hold the main body of the product with your hand as shown in the place shown by figure and then turn the connecting screws fully so that it is completely fixed.
More force may be required to detach the stand from the product than when it is completely fixed. Push the assembled stand into the main body in the direction of the arrow as shown by holding only the stand. Put the headphone holder in the figure. - Caution Never lift the product by the figure. Turn the connecting screw at the bottom of the stand fully so that it was attached. 2-2 Installing the Product Hold the main body of the product with your hand as shown in the place shown by figure and then turn the connecting screws fully so that it is completely fixed.
User Manual (English)
Page 15
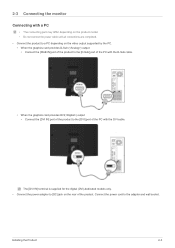
... the power cable until all connections are completed. • Connect the product to a PC depending on the rear of the PC with the DVI cable. Installing the Product 2-3 The [DVI IN] terminal is supplied for the digital (DVI)-dedicated models only. • Connect the power adapter to the [DVI] port of...
... the power cable until all connections are completed. • Connect the product to a PC depending on the rear of the PC with the DVI cable. Installing the Product 2-3 The [DVI IN] terminal is supplied for the digital (DVI)-dedicated models only. • Connect the power adapter to the [DVI] port of...

User Manual (English)
Page 16
(The input voltage is switched automatically.) When the product is connected to a PC, you can turn the product on and use it. • Cables can be fixed as shown. 2-3 Installing the Product
(The input voltage is switched automatically.) When the product is connected to a PC, you can turn the product on and use it. • Cables can be fixed as shown. 2-3 Installing the Product

User Manual (English)
Page 17
... information, refer to lock the product so that they can purchase the locking device from an electronics store, an online shop, or our service center. Installing the Product 2-4 To lock the product, follow these steps: 1. Lock the lock( ). • These are general instructions. Since the shape and usage of the Kensington...
... information, refer to lock the product so that they can purchase the locking device from an electronics store, an online shop, or our service center. Installing the Product 2-4 To lock the product, follow these steps: 1. Lock the lock( ). • These are general instructions. Since the shape and usage of the Kensington...
User Manual (English)
Page 20
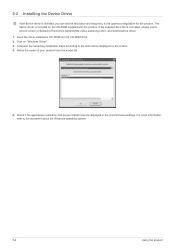
...-ROM into the CD-ROM drive. 2. For more information, refer to the optimal configuration for the product. The device driver is installed, you can set the resolution and frequency to the document about the Windows operating system. 3-2 Using the product Select the model of your ...product from the model list. 5. Check if the appropriate resolution and screen refresh rate are displayed in the Control Panel settings. 3-2 Installing the Device Driver If the device driver is included on the CD-ROM supplied with the product. If the supplied drive file is corrupted, please...
...-ROM into the CD-ROM drive. 2. For more information, refer to the optimal configuration for the product. The device driver is installed, you can set the resolution and frequency to the document about the Windows operating system. 3-2 Using the product Select the model of your ...product from the model list. 5. Check if the appropriate resolution and screen refresh rate are displayed in the Control Panel settings. 3-2 Installing the Device Driver If the device driver is included on the CD-ROM supplied with the product. If the supplied drive file is corrupted, please...
User Manual (English)
Page 27
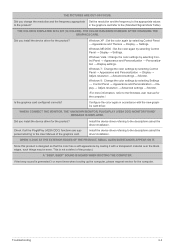
... Monitor. THE PICTURES ARE OUT-OF-FOCUS. Windows XP : Set the color again by selecting Control Panel → Display → Settings. Install the device driver referring to the (Standard Signal Mode Table) THE COLOR IS DISPLAYED IN 16 BIT (16 COLORS). Is the graphics card configured... → Appearance and Themes → Display → Settings. If the beep sound is not a defect of the graphics card. Did you install the device driver for the product? A "BEEP, BEEP" SOUND IS HEARD WHEN BOOTING THE COMPUTER. in accordance with a transparent material over the...
... Monitor. THE PICTURES ARE OUT-OF-FOCUS. Windows XP : Set the color again by selecting Control Panel → Display → Settings. Install the device driver referring to the (Standard Signal Mode Table) THE COLOR IS DISPLAYED IN 16 BIT (16 COLORS). Is the graphics card configured... → Appearance and Themes → Display → Settings. If the beep sound is not a defect of the graphics card. Did you install the device driver for the product? A "BEEP, BEEP" SOUND IS HEARD WHEN BOOTING THE COMPUTER. in accordance with a transparent material over the...
User Manual (English)
Page 31
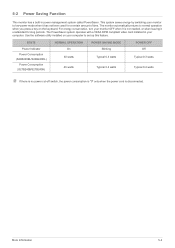
... energy by switching your monitor OFF when it is disconnected. Use the software utility installed on the keyboard. The PowerSaver system operates with a VESA DPM compliant video card installed in power management system called PowerSaver. 5-2 Power Saving Function This monitor has a ...built-in your computer to set up this feature. STATE Power Indicator Power Consumption (S24B240BL/S24B240KL) Power Consumption (S27B240B/S27B240K) NORMAL...
... energy by switching your monitor OFF when it is disconnected. Use the software utility installed on the keyboard. The PowerSaver system operates with a VESA DPM compliant video card installed in power management system called PowerSaver. 5-2 Power Saving Function This monitor has a ...built-in your computer to set up this feature. STATE Power Indicator Power Consumption (S24B240BL/S24B240KL) Power Consumption (S27B240B/S27B240K) NORMAL...

User Manual (English)
Page 37
...or drop. • use of supplies or separatly sold product unspecified by Samsung. • repair from a person besides an engineer of outsourcing service company or partner of the product, Adjustment, Explanation, Re-installation and etc. • If a service technician gives instructions on how to.... • If a service technician removes/cleans dusts or foreign materials inside of the product. • If customer requests an installation additionally after installing the purchased product for the first time. • If a product is reinstalled or devices are all used up (Battery, Toner...
...or drop. • use of supplies or separatly sold product unspecified by Samsung. • repair from a person besides an engineer of outsourcing service company or partner of the product, Adjustment, Explanation, Re-installation and etc. • If a service technician gives instructions on how to.... • If a service technician removes/cleans dusts or foreign materials inside of the product. • If customer requests an installation additionally after installing the purchased product for the first time. • If a product is reinstalled or devices are all used up (Battery, Toner...


