

User Manual Ver.1.0 (English)
Page 1
SyncMaster S19B150N/S22B150N/S24B150NL Monitor User Manual The color and the appearance may differ depending on the product, and the specifications are subject to change without prior notice to improve the performance.
SyncMaster S19B150N/S22B150N/S24B150NL Monitor User Manual The color and the appearance may differ depending on the product, and the specifications are subject to change without prior notice to improve the performance.

User Manual Ver.1.0 (English)
Page 2
Table Of Contents MAJOR SAFETY PRECAUTIONS Before You Start 1-1 Custody and Maintenance 1-2 Cleaning the Monitor 1-3 Safety Precautions 1-4 INSTALLING THE PRODUCT Package Contents 2-1 Installing the Stand 2-2 Connecting ...: On Screen Display) . . . . 3-5 INSTALLING THE SOFTWARE Natural Color 4-1 MagicTune 4-2 MultiScreen 4-3 TROUBLESHOOTING Monitor Self-Diagnosis 5-1 Before Requesting Service 5-2 FAQ 5-3 MORE INFORMATION Specifications 6-1 Power Saving Function 6-2 Contact SAMSUNG WORLDWIDE 6-3 Correct Disposal of This Product (Waste Electrical & Electronic Equipment 6-4
Table Of Contents MAJOR SAFETY PRECAUTIONS Before You Start 1-1 Custody and Maintenance 1-2 Cleaning the Monitor 1-3 Safety Precautions 1-4 INSTALLING THE PRODUCT Package Contents 2-1 Installing the Stand 2-2 Connecting ...: On Screen Display) . . . . 3-5 INSTALLING THE SOFTWARE Natural Color 4-1 MagicTune 4-2 MultiScreen 4-3 TROUBLESHOOTING Monitor Self-Diagnosis 5-1 Before Requesting Service 5-2 FAQ 5-3 MORE INFORMATION Specifications 6-1 Power Saving Function 6-2 Contact SAMSUNG WORLDWIDE 6-3 Correct Disposal of This Product (Waste Electrical & Electronic Equipment 6-4

User Manual Ver.1.0 (English)
Page 5
... shock, or failure. 4. Power off . • Do not spray water or cleaning agent directly onto the monitor. Otherwise, the liquid may cause white stains on the monitor and PC. Wipe the monitor using a soft cloth dampened with wet hands. 3. Connect the power cable to the following steps. 1. Power on... a highly glossy product. Precautions for cleaning the inside of water. 5. Clean the monitor according to the monitor after you disconnect the cable by gripping the plug and do not touch the cable with a small amount of the...
... shock, or failure. 4. Power off . • Do not spray water or cleaning agent directly onto the monitor. Otherwise, the liquid may cause white stains on the monitor and PC. Wipe the monitor using a soft cloth dampened with wet hands. 3. Connect the power cable to the following steps. 1. Power on... a highly glossy product. Precautions for cleaning the inside of water. 5. Clean the monitor according to the monitor after you disconnect the cable by gripping the plug and do not touch the cable with a small amount of the...
User Manual Ver.1.0 (English)
Page 9
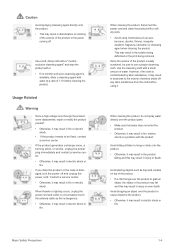
When thunder or lighting occurs, unplug the power cord and under no monitor-exclusive cleansing agent is available, dilute a cleansing agent with the product. Since the exterior of the product is dangerous. • Otherwise, it may result in ...
When thunder or lighting occurs, unplug the power cord and under no monitor-exclusive cleansing agent is available, dilute a cleansing agent with the product. Since the exterior of the product is dangerous. • Otherwise, it may result in ...
User Manual Ver.1.0 (English)
Page 12
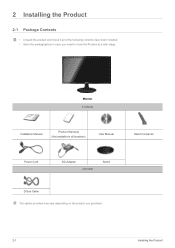
2 Installing the Product 2-1 Package Contents • Unpack the product and check if all locations) User Manual Stand Connector Power Cord DC-Adapter OPTION Stand D-Sub Cable The cables provided may vary depending on the product you need to move the Product at a later stage. Monitor Contents Installation Manual Product Warranty (Not available in all of the following contents have been included. • Store the packaging box in case you purchase. 2-1 Installing the Product
2 Installing the Product 2-1 Package Contents • Unpack the product and check if all locations) User Manual Stand Connector Power Cord DC-Adapter OPTION Stand D-Sub Cable The cables provided may vary depending on the product you need to move the Product at a later stage. Monitor Contents Installation Manual Product Warranty (Not available in all of the following contents have been included. • Store the packaging box in case you purchase. 2-1 Installing the Product
User Manual Ver.1.0 (English)
Page 16
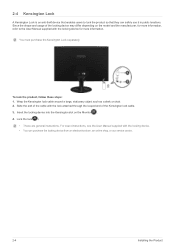
Since the shape and usage of the locking device may differ depending on the Monitor( ). 4. You must purchase the Kensington Lock separately. Insert the locking device into the Kensington slot on the model and the manufacturer, for more information, refer ...
Since the shape and usage of the locking device may differ depending on the Monitor( ). 4. You must purchase the Kensington Lock separately. Insert the locking device into the Kensington slot on the model and the manufacturer, for more information, refer ...

User Manual Ver.1.0 (English)
Page 22
... contrast and can set up the adjustment function assigned to the [ ]. Use this button to the menu, press the button on the front of the monitor again. • When pressing a button, please press the bottom of the following functions. If the user presses the Customized Key [ ] after setting it, the ...hold the MENU button down for the pressed button appears. • To go to control the brightness of the buttons on the front of the monitor, an OSD Guide will display showing the function of the button before the menu for 10 seconds, the OSD Adjustment Lock function is activated. Users...
... contrast and can set up the adjustment function assigned to the [ ]. Use this button to the menu, press the button on the front of the monitor again. • When pressing a button, please press the bottom of the following functions. If the user presses the Customized Key [ ] after setting it, the ...hold the MENU button down for the pressed button appears. • To go to control the brightness of the buttons on the front of the monitor, an OSD Guide will display showing the function of the button before the menu for 10 seconds, the OSD Adjustment Lock function is activated. Users...
User Manual Ver.1.0 (English)
Page 24
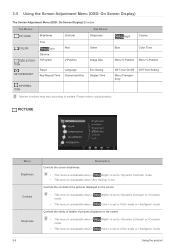
... Image Size Eco Saving Display Time Bright Coarse Blue Color Tone Menu H-Position Menu V-Position Off Timer On/Off Menu Transparency Off Timer Setting INFORMATION Monitor functions may vary according to mode or mode. Please refer to actual product.
... Image Size Eco Saving Display Time Bright Coarse Blue Color Tone Menu H-Position Menu V-Position Off Timer On/Off Menu Transparency Off Timer Setting INFORMATION Monitor functions may vary according to mode or mode. Please refer to actual product.

User Manual Ver.1.0 (English)
Page 29
You can download it from the website below and install; 4 Installing the Software 4-1 Natural Color What is provided online. This software works only for Samsung products and enables adjusting the displayed colors on the product and matches the colors on the product with the colors of the software (F1). The Natural Color is Natural Color ? For more information, refer to the online help of the printed pictures. http://www.samsung.com/us/consumer/learningresources/monitor/naturalcolorexpert/pop_download.html Installing the Software 4-1
You can download it from the website below and install; 4 Installing the Software 4-1 Natural Color What is provided online. This software works only for Samsung products and enables adjusting the displayed colors on the product and matches the colors on the product with the colors of the software (F1). The Natural Color is Natural Color ? For more information, refer to the online help of the printed pictures. http://www.samsung.com/us/consumer/learningresources/monitor/naturalcolorexpert/pop_download.html Installing the Software 4-1

User Manual Ver.1.0 (English)
Page 30
...the hard disk drive For more information, refer to the website. Restrictions and Problems with the Installation (MagicTune™) The installation of monitor functions and easy-to the instructions displayed on the screen. • The software may not work properly if you do not restart ... keyboard without using the operating buttons of free space on the CD-ROM. 3. Removing the Software You can adjust the product with monitor adjustments by providing comprehensive descriptions of MagicTune™may not appear depending on the computer system and the product specifications. • If ...
...the hard disk drive For more information, refer to the website. Restrictions and Problems with the Installation (MagicTune™) The installation of monitor functions and easy-to the instructions displayed on the screen. • The software may not work properly if you do not restart ... keyboard without using the operating buttons of free space on the CD-ROM. 3. Removing the Software You can adjust the product with monitor adjustments by providing comprehensive descriptions of MagicTune™may not appear depending on the computer system and the product specifications. • If ...

User Manual Ver.1.0 (English)
Page 32
... click the [Add/Delete] button. 4-3 Installing the Software When the Installation Wizard appears, click [Next]. 4. Complete the remaining software installation steps according to use the monitor by the graphics card, motherboard and the networking environment. Insert the installation CD into the CD-ROM drive. 2. Hardware •At least 32MB of memory...
... click the [Add/Delete] button. 4-3 Installing the Software When the Installation Wizard appears, click [Next]. 4. Complete the remaining software installation steps according to use the monitor by the graphics card, motherboard and the networking environment. Insert the installation CD into the CD-ROM drive. 2. Hardware •At least 32MB of memory...
User Manual Ver.1.0 (English)
Page 33
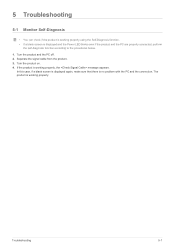
... properly connected, perform the self-diagnosis function according to the procedures below. 1. Turn the product and the PC off. 2. The product is working properly. 5 Troubleshooting 5-1 Monitor Self-Diagnosis • You can check if the product is working properly using the Self-Diagnosis function. • If a blank screen is no problem with...
... properly connected, perform the self-diagnosis function according to the procedures below. 1. Turn the product and the PC off. 2. The product is working properly. 5 Troubleshooting 5-1 Monitor Self-Diagnosis • You can check if the product is working properly using the Self-Diagnosis function. • If a blank screen is no problem with...

User Manual Ver.1.0 (English)
Page 35
Did you install the device driver for the product? When I connect the monitor, the 'Unknown monitor, Plug&Play (VESA DDC) monitor found' message is not a defect of the product. A "beep, beep" sound is designed so that the color has a soft appearance by... : Change the color settings by selecting Control Panel → Appearance and Personalization → Display → Adjust resolution → Advanced settings → Monitor. (For more times when booting up the computer, please request service for the computer. The color is generated 3 or more information, refer to the...
Did you install the device driver for the product? When I connect the monitor, the 'Unknown monitor, Plug&Play (VESA DDC) monitor found' message is not a defect of the product. A "beep, beep" sound is designed so that the color has a soft appearance by... : Change the color settings by selecting Control Panel → Appearance and Personalization → Display → Adjust resolution → Advanced settings → Monitor. (For more times when booting up the computer, please request service for the computer. The color is generated 3 or more information, refer to the...

User Manual Ver.1.0 (English)
Page 36
...Saver. You can I use the BIOS SETUP menu on the PC. (For more information, refer to change the refresh rate under Monitor Settings. PLEASE TRY THE FOLLOWING! Windows 7 : Change the resolution by selecting Control Panel → Appearance and Personalization → ...Control Panel → Appearance and Personalization → Personalization → Display settings → Advanced settings → Monitor, and then change the refresh rate under Monitor Settings. Windows Vista : Change the frequency by selecting Control Panel → Display → Settings. 5-3 FAQ...
...Saver. You can I use the BIOS SETUP menu on the PC. (For more information, refer to change the refresh rate under Monitor Settings. PLEASE TRY THE FOLLOWING! Windows 7 : Change the resolution by selecting Control Panel → Appearance and Personalization → ...Control Panel → Appearance and Personalization → Personalization → Display settings → Advanced settings → Monitor, and then change the refresh rate under Monitor Settings. Windows Vista : Change the frequency by selecting Control Panel → Display → Settings. 5-3 FAQ...
User Manual Ver.1.0 (English)
Page 40
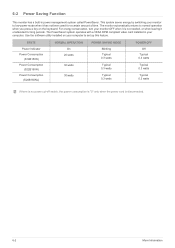
... a built-in your computer. This system saves energy by switching your monitor to normal operation when you press a key on your monitor OFF when it unattended for a certain amount of time. The monitor automatically returns to low-power mode when it has not been used for ...long periods. For energy conservation, turn your computer to set up this feature. Use the software utility installed on the keyboard. STATE Power Indicator Power Consumption (S19B150N) Power Consumption (S22B150N...
... a built-in your computer. This system saves energy by switching your monitor to normal operation when you press a key on your monitor OFF when it unattended for a certain amount of time. The monitor automatically returns to low-power mode when it has not been used for ...long periods. For energy conservation, turn your computer to set up this feature. Use the software utility installed on the keyboard. STATE Power Indicator Power Consumption (S19B150N) Power Consumption (S22B150N...


