User Manual (user Manual) (ver.1.0) (English)
Page 3
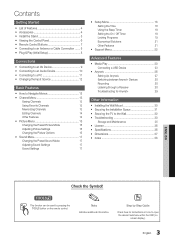
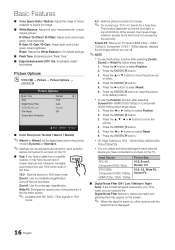
... Install the Stand 5 yy Viewing the Control Panel 6 yy Remote Control Buttons 7 yy Connecting to an Antenna or Cable Connection........ 8 yy Plug & Play (Initial Setup 8 Connections yy Connecting to an AV Device 9 yy Connecting to an Audio Device 10 yy Connecting to a PC 11 yy Changing the Input Source 12 Basic Features yy How to Navigate Menus 12 yy Channel Menu 13 Seeing Channels 13 Using Favorite Channels 13 Memorizing Channels 13 Editing Channels 14 Other Features 14 yy Picture Menu 15 Changing...
... Install the Stand 5 yy Viewing the Control Panel 6 yy Remote Control Buttons 7 yy Connecting to an Antenna or Cable Connection........ 8 yy Plug & Play (Initial Setup 8 Connections yy Connecting to an AV Device 9 yy Connecting to an Audio Device 10 yy Connecting to a PC 11 yy Changing the Input Source 12 Basic Features yy How to Navigate Menus 12 yy Channel Menu 13 Seeing Channels 13 Using Favorite Channels 13 Memorizing Channels 13 Editing Channels 14 Other Features 14 yy Picture Menu 15 Changing...
User Manual (user Manual) (ver.1.0) (English)
Page 4
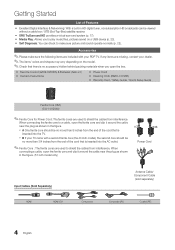
.... yy Media Play: Allows you open the ferrite core and clip it around the cable near the plug as shown in the figure. (51 inch model only) A B Power Cord Input Cables (Sold Separately) HDMI HDMI-DVI Antenna Cable/ Component Cable (sold separately) Component Composite (AV) Coaxial (RF) 4 English yy Remote Control (AA59-00506A) & Batteries (AAA x 2) yy Owner's Instructions yy Power Cord yy Cleaning Cloth (BN63-01798B) yy Warranty Card / Safety Guide / Quick Setup Guide Ferrite Core...
.... yy Media Play: Allows you open the ferrite core and clip it around the cable near the plug as shown in the figure. (51 inch model only) A B Power Cord Input Cables (Sold Separately) HDMI HDMI-DVI Antenna Cable/ Component Cable (sold separately) Component Composite (AV) Coaxial (RF) 4 English yy Remote Control (AA59-00506A) & Batteries (AAA x 2) yy Owner's Instructions yy Power Cord yy Cleaning Cloth (BN63-01798B) yy Warranty Card / Safety Guide / Quick Setup Guide Ferrite Core...

User Manual (user Manual) (ver.1.0) (English)
Page 8
... to Channel → Auto Program in Plug & Play, press the volume button on the TV. HD Connection Guide. 7 Enjoy your remote. 1 Selecting the OSD Language Press the ◄ or ► button, and then press the ▲ or ▼ button to select a language. VHF/UHF Antenna Power Input Antenna Cable (Not Supplied) or Cable ANT OUT Plug & Play (Initial Setup) When you see the volume OSD, press and hold MENU for the best HD screen quality is displayed...
... to Channel → Auto Program in Plug & Play, press the volume button on the TV. HD Connection Guide. 7 Enjoy your remote. 1 Selecting the OSD Language Press the ◄ or ► button, and then press the ▲ or ▼ button to select a language. VHF/UHF Antenna Power Input Antenna Cable (Not Supplied) or Cable ANT OUT Plug & Play (Initial Setup) When you see the volume OSD, press and hold MENU for the best HD screen quality is displayed...

User Manual (user Manual) (ver.1.0) (English)
Page 9
... to HDMI) adapter. If such a problem occurs, ask the manufacturer of the external device about the HDMI version and, if out of date, request an upgrade. Otherwise, the picture may not display or a connection error may not work if an external device that uses an older version of HDMI mode to the TV. The DVI AUDIO IN jack is recommended over the A/V connection. 9 English A DVD player, Blu-ray player, HD cable box, or...
... to HDMI) adapter. If such a problem occurs, ask the manufacturer of the external device about the HDMI version and, if out of date, request an upgrade. Otherwise, the picture may not display or a connection error may not work if an external device that uses an older version of HDMI mode to the TV. The DVI AUDIO IN jack is recommended over the A/V connection. 9 English A DVD player, Blu-ray player, HD cable box, or...
User Manual (user Manual) (ver.1.0) (English)
Page 11
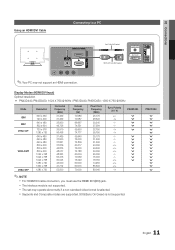
....476 60.023 45.000 47.712 52.500 Vertical Frequency (Hz) 70.086 70.087 66.667 ...HDMI/DVI cable connection, you must use the HDMI IN 1(DVI) jack. SOG(Sync On Green) is not supported. xx Separate and Composite modes are supported. xx The interlace mode is not supported. PN51D450 > > > > > > > 11 English 02 Connections Using an HDMI/DVI Cable Connecting to a PC Audio Cable (Not Supplied) HDMI to DVI Cable (Not Supplied) AUDIO OUT DVI OUT ✎✎Your PC may operate abnormally if a non-standard video format is selected. xx The set may not support an HDMI connection...
....476 60.023 45.000 47.712 52.500 Vertical Frequency (Hz) 70.086 70.087 66.667 ...HDMI/DVI cable connection, you must use the HDMI IN 1(DVI) jack. SOG(Sync On Green) is not supported. xx Separate and Composite modes are supported. xx The interlace mode is not supported. PN51D450 > > > > > > > 11 English 02 Connections Using an HDMI/DVI Cable Connecting to a PC Audio Cable (Not Supplied) HDMI to DVI Cable (Not Supplied) AUDIO OUT DVI OUT ✎✎Your PC may operate abnormally if a non-standard video format is selected. xx The set may not support an HDMI connection...

User Manual (user Manual) (ver.1.0) (English)
Page 15
...: Display a show you have reserved to watch. (You can also change value or setting, and then press ENTER. xx You can adjust and store Settings for each external device connected to Gamma and White Balance. xx Settings can only make changes to Cell Light, Contrast, Brightness, Sharpness, Color or Tint (G/R), the OSD will be adjusted and stored for each external device connected to the TV. Advanced Settings Black Tone...
...: Display a show you have reserved to watch. (You can also change value or setting, and then press ENTER. xx You can adjust and store Settings for each external device connected to Gamma and White Balance. xx Settings can only make changes to Cell Light, Contrast, Brightness, Sharpness, Color or Tint (G/R), the OSD will be adjusted and stored for each external device connected to the TV. Advanced Settings Black Tone...
User Manual (user Manual) (ver.1.0) (English)
Page 16
..., 1080p) Picture Size 16:9, Zoom1, Zoom2, 4:3 16:9, 4:3, Wide Fit, Screen Fit ■■ Digital Noise Filter (Off / Low / Medium / High / Auto): If the broadcast signal received by the warranty. Press the ENTERE button. 3. Screen Fit: When your TV is displayed. 16 English Reset: Resets the White Balance to select Reset. 6. However, we highly recommend you can adjust and store settings for a long time. R-Offset / G-Offset / B-Offset: Adjust each color's (red, green, blue) brightness.
..., 1080p) Picture Size 16:9, Zoom1, Zoom2, 4:3 16:9, 4:3, Wide Fit, Screen Fit ■■ Digital Noise Filter (Off / Low / Medium / High / Auto): If the broadcast signal received by the warranty. Press the ENTERE button. 3. Screen Fit: When your TV is displayed. 16 English Reset: Resets the White Balance to select Reset. 6. However, we highly recommend you can adjust and store settings for a long time. R-Offset / G-Offset / B-Offset: Adjust each color's (red, green, blue) brightness.
User Manual (user Manual) (ver.1.0) (English)
Page 17
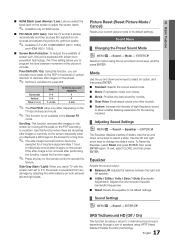
The Time setting allows you to program the time between the right and left speaker. ■■ 100Hz / 300Hz / 1kHz / 3kHz / 10kHz (Bandwidth Adjustment): Adjusts the volume level of specific bandwidth frequencies. ■■ Reset: Resets the equalizer to a pattern. Picture Reset (Reset Picture Mode / Cancel) Resets your current picture mode to select a slider. Use the left and right sides. Scrolling: This function removes after images on the screen. ✎✎ Optimum condition for pixel...
The Time setting allows you to program the time between the right and left speaker. ■■ 100Hz / 300Hz / 1kHz / 3kHz / 10kHz (Bandwidth Adjustment): Adjusts the volume level of specific bandwidth frequencies. ■■ Reset: Resets the equalizer to a pattern. Picture Reset (Reset Picture Mode / Cancel) Resets your current picture mode to select a slider. Use the left and right sides. Scrolling: This function removes after images on the screen. ✎✎ Optimum condition for pixel...
User Manual (user Manual) (ver.1.0) (English)
Page 18
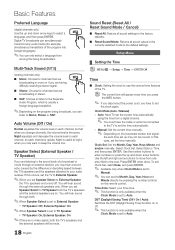
... the external speakers only. Select Date or Time, and then press ENTER. When you have the cable or antenna connected to the TV to Auto. Basic Features Preferred Language (digital channels only) Use the up and down arrow buttons. Auto Volume (Off / On) Normal equalizes the volume level on each channel is set to set the clock again. Sound Reset (Reset All / Reset Sound Mode / Cancel) ■■ Reset All: Restore all sound settings to the factory defaults...
... the external speakers only. Select Date or Time, and then press ENTER. When you have the cable or antenna connected to the TV to Auto. Basic Features Preferred Language (digital channels only) Use the up and down arrow buttons. Auto Volume (Off / On) Normal equalizes the volume level on each channel is set to set the clock again. Sound Reset (Reset All / Reset Sound Mode / Cancel) ■■ Reset All: Restore all sound settings to the factory defaults...

User Manual (user Manual) (ver.1.0) (English)
Page 21
.... This adjusts the opacity of Default, White, Black, Red, Green, Blue, Yellow, Magenta and Cyan. Background Color: This adjusts the opacity of text. Options include Default, Transparent, Translucent, Solid and Flashing. Until the screen turns on the screen. ✎✎ The Caption feature doesn't work with digital channels.) Default / Service1~Service6 / CC1~CC4 / Text1~Text4: (digital channels only) The Digital Captions function works with devices connected to Off. ■■ Min Cell Light: Manually adjust the screen brightness (0~10...
.... This adjusts the opacity of Default, White, Black, Red, Green, Blue, Yellow, Magenta and Cyan. Background Color: This adjusts the opacity of text. Options include Default, Transparent, Translucent, Solid and Flashing. Until the screen turns on the screen. ✎✎ The Caption feature doesn't work with digital channels.) Default / Service1~Service6 / CC1~CC4 / Text1~Text4: (digital channels only) The Digital Captions function works with devices connected to Off. ■■ Min Cell Light: Manually adjust the screen brightness (0~10...
User Manual (user Manual) (ver.1.0) (English)
Page 22
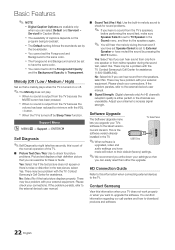
... Background Opacity to External Speaker or have the same color. Please check your connections. xx You cannot set to Transparent. Melody (Off / Low / Medium / High) Set so that you can find information regarding our call centers and how to this is upgraded, video and USB Drive audio settings you have set Speaker Select is turned on the program being broadcast. Software Upgrade The Software Upgrade menu TV Side Panel lets you...
... Background Opacity to External Speaker or have the same color. Please check your connections. xx You cannot set to Transparent. Melody (Off / Low / Medium / High) Set so that you can find information regarding our call centers and how to this is upgraded, video and USB Drive audio settings you have set Speaker Select is turned on the program being broadcast. Software Upgrade The Software Upgrade menu TV Side Panel lets you...
User Manual (user Manual) (ver.1.0) (English)
Page 23
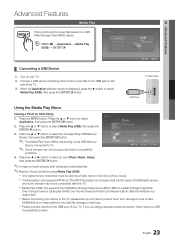
..., Setup), then press the ENTERE button. When the Application selection screen is not responsible for any data file damage or data loss. Press the MENU button. Examples of MSC are Thumb drives and Flash Card Readers (Both USB and HUB are using Media Play (USB) Photo DSC_0558.JPG x Only alphanumeric characters must be a USB Compatibility problem. Connect a USB device containing photo and/or music files to select Media Play (USB...
..., Setup), then press the ENTERE button. When the Application selection screen is not responsible for any data file damage or data loss. Press the MENU button. Examples of MSC are Thumb drives and Flash Card Readers (Both USB and HUB are using Media Play (USB) Photo DSC_0558.JPG x Only alphanumeric characters must be a USB Compatibility problem. Connect a USB device containing photo and/or music files to select Media Play (USB...
User Manual (user Manual) (ver.1.0) (English)
Page 24
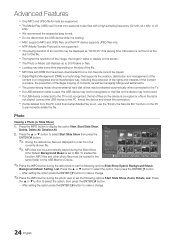
... managing briigllihntgssPSaUhMannoddtoinsteetrtelesmtseonftsth. e content xx The power-saving mode of the content in order from a non-free site cannot be located in the list is loading. xx The Media Play (USB) mp3 format only supports music files with DRM that supports the creation, distribution and management of some time depending on the screen. Press the ▲ or ▼ button to select Start Slide Show then...
... managing briigllihntgssPSaUhMannoddtoinsteetrtelesmtseonftsth. e content xx The power-saving mode of the content in order from a non-free site cannot be located in the list is loading. xx The Media Play (USB) mp3 format only supports music files with DRM that supports the creation, distribution and management of some time depending on the screen. Press the ▲ or ▼ button to select Start Slide Show then...
User Manual (user Manual) (ver.1.0) (English)
Page 26
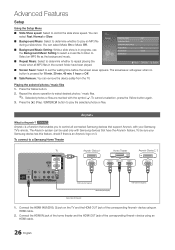
... Music Setting Repeat Music Screen Saver Safe Remove : Fast : On : On : 10 min ■■ Repeat Music: Select to determine whether to repeat playing the music when all connected Samsung devices that have been played. U Move E Enter R Return ■■ Screen Saver: Select to a Samsung Home Theater TV Anynet+ Device 1 Home Theater Anynet+ Device 2, 3 HDMI Cable (Not Supplied) HDMI Cable (Not Supplied) Optical Cable (Not Supplied) HDMI Cable (Not Supplied) 1. Playing the...
... Music Setting Repeat Music Screen Saver Safe Remove : Fast : On : On : 10 min ■■ Repeat Music: Select to determine whether to repeat playing the music when all connected Samsung devices that have been played. U Move E Enter R Return ■■ Screen Saver: Select to a Samsung Home Theater TV Anynet+ Device 1 Home Theater Anynet+ Device 2, 3 HDMI Cable (Not Supplied) HDMI Cable (Not Supplied) Optical Cable (Not Supplied) HDMI Cable (Not Supplied) 1. Playing the...
User Manual (user Manual) (ver.1.0) (English)
Page 28
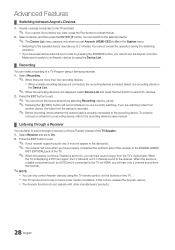
... receiver supports audio only, it may not work when you have selected an external input mode by pressing the SOURCE button, you cannot use the Anynet+ function. When the TV is connected to the TV via HDMI, you can listen to the DIGITAL AUDIO OUT (OPTICAL) jack of the TV Speaker. 1. When the source is a digital component such as a DVD and is displaying a DTV (air) signal, the TV will hear only 2 channel sound...
... receiver supports audio only, it may not work when you have selected an external input mode by pressing the SOURCE button, you cannot use the Anynet+ function. When the TV is connected to the TV via HDMI, you can listen to the DIGITAL AUDIO OUT (OPTICAL) jack of the TV Speaker. 1. When the source is a digital component such as a DVD and is displaying a DTV (air) signal, the TV will hear only 2 channel sound...
User Manual (user Manual) (ver.1.0) (English)
Page 29
...; Press z, PRE-CH to change the TV mode. (Note that the channel button operates only when a tuner-embedded Anynet+ device is not connected.) • You cannot use the play function when Plug & Play (initial setup) is in progress. appears on the screen. • Select View TV in TV mode. • Check whether the remote control is Anynet+ compatible. • Anynet+ doesn't work . Some HDMI cables may not support Anynet+ functions. •...
...; Press z, PRE-CH to change the TV mode. (Note that the channel button operates only when a tuner-embedded Anynet+ device is not connected.) • You cannot use the play function when Plug & Play (initial setup) is in progress. appears on the screen. • Select View TV in TV mode. • Check whether the remote control is Anynet+ compatible. • Anynet+ doesn't work . Some HDMI cables may not support Anynet+ functions. •...
User Manual (user Manual) (ver.1.0) (English)
Page 33
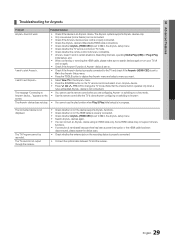
... not connected to an audio input. • For antenna or Cable connections, check the signal strength. Also review the Troublehsooting section in the Setup menu (p. 21) • Try resetting the picture to view the default picture settings. (go to Picture mode / Color / Brightness / Sharpness) (p. 15) • Adjust Energy Saving option in the e-Manual. Support - Support - 05 Other Information Troubleshooting If the TV seems to have a problem, first try to reset it to 16:9 (p. 16). • Change cable/satellite box resolution.
... not connected to an audio input. • For antenna or Cable connections, check the signal strength. Also review the Troublehsooting section in the Setup menu (p. 21) • Try resetting the picture to view the default picture settings. (go to Picture mode / Color / Brightness / Sharpness) (p. 15) • Adjust Energy Saving option in the e-Manual. Support - Support - 05 Other Information Troubleshooting If the TV seems to have a problem, first try to reset it to 16:9 (p. 16). • Change cable/satellite box resolution.
User Manual (user Manual) (ver.1.0) (English)
Page 34
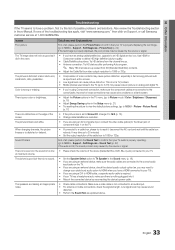
... HDMI connection, check the audio output setting on the TV too high. There is connected securely. • Please try rerouting your connection cables. • Improper installation of the screen when displaying up scaled SD (4:3) contents. • Black bars on the Top & Bottom will be connected to "Remote control does not work . • Replace the remote control batteries with Component cable connection. • Remove the left and right audio connections from your TV. • Adjust the picture size...
... HDMI connection, check the audio output setting on the TV too high. There is connected securely. • Please try rerouting your connection cables. • Improper installation of the screen when displaying up scaled SD (4:3) contents. • Black bars on the Top & Bottom will be connected to "Remote control does not work . • Replace the remote control batteries with Component cable connection. • Remove the left and right audio connections from your TV. • Adjust the picture size...

User Manual (user Manual) (ver.1.0) (English)
Page 35
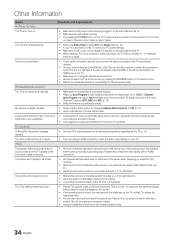
... SAMSUNG TV code. POP (TV's internal banner ad) appears on the external device (p. 21). Solutions and Explanations • To minimize the possibility of the product's design and is turned off , or adjust the volume. • Program the Cable/Set remote control to Plug & Play Feature (p. 8). ✎✎Some of audio or video can not be activated on the screen. • Select Home Use under Plug & Play mode. Caption on TV menu is part...
... SAMSUNG TV code. POP (TV's internal banner ad) appears on the external device (p. 21). Solutions and Explanations • To minimize the possibility of the product's design and is turned off , or adjust the volume. • Program the Cable/Set remote control to Plug & Play Feature (p. 8). ✎✎Some of audio or video can not be activated on the screen. • Select Home Use under Plug & Play mode. Caption on TV menu is part...
User Manual (user Manual) (ver.1.0) (English)
Page 38
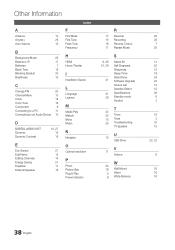
... Index H HDMI Home Theater I Installation Space L Language License M Media Play Melody Mono Music N Navigate O Optimal resolution P Photo Picture Size Plug & Play Power Indicator R 17 Receiver 15 Recording 16 Remote Control 11 Repeat Music 9, 26 10, 26 31 21 36 S Select All Self Diagnosis Sharpness Sleep Timer Slide Show Software Upgrade Source List Speaker Select Specifications Standby mode Symbol T 23 22 Timer 18 Tools 25 Troubleshooting TV Speaker U 12 USB Drive V 11 Volume W 24 16 Wall Mount 8 Warm 6 White Balance 28...
... Index H HDMI Home Theater I Installation Space L Language License M Media Play Melody Mono Music N Navigate O Optimal resolution P Photo Picture Size Plug & Play Power Indicator R 17 Receiver 15 Recording 16 Remote Control 11 Repeat Music 9, 26 10, 26 31 21 36 S Select All Self Diagnosis Sharpness Sleep Timer Slide Show Software Upgrade Source List Speaker Select Specifications Standby mode Symbol T 23 22 Timer 18 Tools 25 Troubleshooting TV Speaker U 12 USB Drive V 11 Volume W 24 16 Wall Mount 8 Warm 6 White Balance 28...


