
User Manual (ENGLISH)
Page 2
... Kensington Lock 2-13 USING THE PRODUCT Plug & Play Feature 3-1 Viewing the Control panel 3-2 Remote Control 3-3 Using the Screen Adjustment Menu (OSD: On Screen Display) . . . . 3-4 Installing the Device Driver 3-5 Standard Signal Mode Table 3-6 INSTALLING THE SOFTWARE Natural Color 4-1 MultiScreen 4-2 TROUBLESHOOTING Monitor Self-Diagnosis 5-1 Before Requesting Service 5-2 FAQ 5-3 MORE INFORMATION Specifications 6-1 Power Saving Function 6-2 Contact SAMSUNG WORLDWIDE 6-3
... Kensington Lock 2-13 USING THE PRODUCT Plug & Play Feature 3-1 Viewing the Control panel 3-2 Remote Control 3-3 Using the Screen Adjustment Menu (OSD: On Screen Display) . . . . 3-4 Installing the Device Driver 3-5 Standard Signal Mode Table 3-6 INSTALLING THE SOFTWARE Natural Color 4-1 MultiScreen 4-2 TROUBLESHOOTING Monitor Self-Diagnosis 5-1 Before Requesting Service 5-2 FAQ 5-3 MORE INFORMATION Specifications 6-1 Power Saving Function 6-2 Contact SAMSUNG WORLDWIDE 6-3
User Manual (ENGLISH)
Page 10
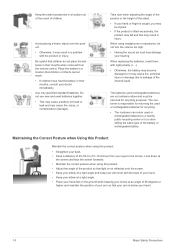
... the screen forwards. • Maintain the correct posture when using this product. • Adjust the angle of 45~50 cm (15~19 inches) from the remote control. Take care when adjusting the angle of the product or the height of the stand. • If your hearing. Be careful that children do not...
... the screen forwards. • Maintain the correct posture when using this product. • Adjust the angle of 45~50 cm (15~19 inches) from the remote control. Take care when adjusting the angle of the product or the height of the stand. • If your hearing. Be careful that children do not...

User Manual (ENGLISH)
Page 11
... product at a later stage. Installing the Product 2-1 2 Installing the Product 2-1 Package Contents • Unpack the product and check if all locations) Stand Connector Stand Base Remote Control Cleaning Cloth SOLD SEPARATELY D-Sub Cable HDMI Cable Stereo Cable The cleaning cloth is supplied with black high-glossy models only.
... product at a later stage. Installing the Product 2-1 2 Installing the Product 2-1 Package Contents • Unpack the product and check if all locations) Stand Connector Stand Base Remote Control Cleaning Cloth SOLD SEPARATELY D-Sub Cable HDMI Cable Stereo Cable The cleaning cloth is supplied with black high-glossy models only.
User Manual (ENGLISH)
Page 20
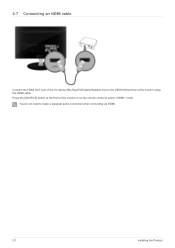
2-7 Connecting an HDMI cable Connect the HDMI OUT port of the AV device (Blu-Ray/DVD/Cable/Satellite box) to the [HDMI IN] terminal of the monitor or on the remote control to make a separate audio connection when connecting via HDMI. 2-7 Installing the Product Press the [SOURCE] button at the front of the monitor using the HDMI cable. You do not need to select mode.
2-7 Connecting an HDMI cable Connect the HDMI OUT port of the AV device (Blu-Ray/DVD/Cable/Satellite box) to the [HDMI IN] terminal of the monitor or on the remote control to make a separate audio connection when connecting via HDMI. 2-7 Installing the Product Press the [SOURCE] button at the front of the monitor using the HDMI cable. You do not need to select mode.
User Manual (ENGLISH)
Page 21
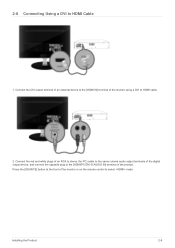
Connect the DVI output terminal of an external device to HDMI cable. 2. Installing the Product 2-8 Connect the red and white plugs of an RCA to stereo (for PC) cable to the same colored audio output terminals of the digital output device, and connect the opposite plug to the [HDMI/PC/DVI-D AUDIO IN] terminal of the monitor using a DVI to the [HDMI IN] terminal of the product. Press the [SOURCE] button at the front of the monitor or on the remote control to HDMI Cable 1. 2-8 Connecting Using a DVI to select mode.
Connect the DVI output terminal of an external device to HDMI cable. 2. Installing the Product 2-8 Connect the red and white plugs of an RCA to stereo (for PC) cable to the same colored audio output terminals of the digital output device, and connect the opposite plug to the [HDMI/PC/DVI-D AUDIO IN] terminal of the monitor using a DVI to the [HDMI IN] terminal of the product. Press the [SOURCE] button at the front of the monitor or on the remote control to HDMI Cable 1. 2-8 Connecting Using a DVI to select mode.
User Manual (ENGLISH)
Page 22
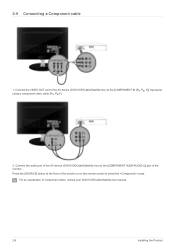
Connect the audio port of the monitor. Press the [SOURCE] button at the front of the monitor or on the remote control to the [COMPONENT IN [[R-AUDIO-L]] port of the AV device (DVD/VCR/Cable/Satellite box) to select the mode. Connect the VIDEO OUT port of Component video, consult your DVD/VCR/Cable/Satellite box manual. 2-9 Installing the Product 2-9 Connecting a Component cable 1. For an explanation of the AV device (DVD/VCR/Cable/Satellite box) to the [COMPONENT IN [PR, PB, Y]] input ports using a component video cable [PR, PB,Y]. 2.
Connect the audio port of the monitor. Press the [SOURCE] button at the front of the monitor or on the remote control to the [COMPONENT IN [[R-AUDIO-L]] port of the AV device (DVD/VCR/Cable/Satellite box) to select the mode. Connect the VIDEO OUT port of Component video, consult your DVD/VCR/Cable/Satellite box manual. 2-9 Installing the Product 2-9 Connecting a Component cable 1. For an explanation of the AV device (DVD/VCR/Cable/Satellite box) to the [COMPONENT IN [PR, PB, Y]] input ports using a component video cable [PR, PB,Y]. 2.
User Manual (ENGLISH)
Page 27
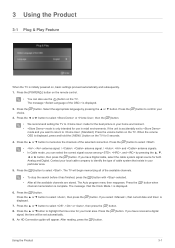
... program menu then reappears. Press the [ channel memorization is 7. Press the [ ] button. If the unit is displayed, press and hold the [ MENU ] button on the remote control. • You can select the correct signal source among , , and by pressing the ▲ or ▼ button. Press the [ ] button to select . • : antenna signal...
... program menu then reappears. Press the [ channel memorization is 7. Press the [ ] button. If the unit is displayed, press and hold the [ MENU ] button on the remote control. • You can select the correct signal source among , , and by pressing the ▲ or ▼ button. Press the [ ] button to select . • : antenna signal...
User Manual (ENGLISH)
Page 30
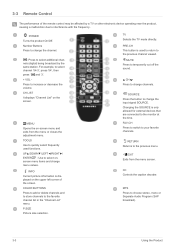
TOOLS Use to quickly select frequently used to return to the monitor at the time. P.SIZE Picture size selection. MUTE Press to choose stereo, mono or Separate Audio Program (SAP broadcast). 3-3 Using the Product MTS Press to .... : Press to select additional channels (digital) being broadcast by a TV or other electronic device operating near the product, causing a malfunction due to change menu values. 3-3 Remote Control The performance of the screen. Number Buttons Press to interference with the frequency. MENU Opens the on the screen. POWER Turns the product On/Off.
TOOLS Use to quickly select frequently used to return to the monitor at the time. P.SIZE Picture size selection. MUTE Press to choose stereo, mono or Separate Audio Program (SAP broadcast). 3-3 Using the Product MTS Press to .... : Press to select additional channels (digital) being broadcast by a TV or other electronic device operating near the product, causing a malfunction due to change menu values. 3-3 Remote Control The performance of the screen. Number Buttons Press to interference with the frequency. MENU Opens the on the screen. POWER Turns the product On/Off.

User Manual (ENGLISH)
Page 31
...size batteries. Remove the batteries and store them in the Remote Control 1. Make sure to match the +and - If the remote control doesn't work, check the following : • Is the TV power on? • Are the plus and minus ends of the remote control upward as shown in the figure. 2. Using the ...Product 3-3 Close the cover. Installing Batteries in a cool, dry place if you won't be using the remote control for a long time. Lift the cover at the back of the batteries reversed? • Are the batteries drained? • Is there a power...
...size batteries. Remove the batteries and store them in the Remote Control 1. Make sure to match the +and - If the remote control doesn't work, check the following : • Is the TV power on? • Are the plus and minus ends of the remote control upward as shown in the figure. 2. Using the ...Product 3-3 Close the cover. Installing Batteries in a cool, dry place if you won't be using the remote control for a long time. Lift the cover at the back of the batteries reversed? • Are the batteries drained? • Is there a power...

User Manual (ENGLISH)
Page 36
...You can directly select the black level on the screen to select , then press the [ ] button. Magnifies the size of the picture on the remote control is [P.SIZE] button. • - Picture parameters are replaced with all external devices. • - • The feature offers you a theater-quality... external device you have connected to an input of the TV. • , (480i,480p) - , , , • (1080i), (1080i, 1080p) ,(720p,1080i,1080p) - , , , • Digital Noise Reduction. The direct button on the screen. • - MENU Picture Options Picture Reset DESCRIPTION •...
...You can directly select the black level on the screen to select , then press the [ ] button. Magnifies the size of the picture on the remote control is [P.SIZE] button. • - Picture parameters are replaced with all external devices. • - • The feature offers you a theater-quality... external device you have connected to an input of the TV. • , (480i,480p) - , , , • (1080i), (1080i, 1080p) ,(720p,1080i,1080p) - , , , • Digital Noise Reduction. The direct button on the screen. • - MENU Picture Options Picture Reset DESCRIPTION •...
User Manual (ENGLISH)
Page 37
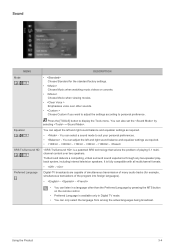
... You can only select the language from among the actual languages being broadcast. You can also set the by pressing the MTS button on the remote control. • Preferred Language is fully compatible with all multichannel formats. • - You can adjust the left and right sound balance and equalizer settings as required...
... You can only select the language from among the actual languages being broadcast. You can also set the by pressing the MTS button on the remote control. • Preferred Language is fully compatible with all multichannel formats. • - You can adjust the left and right sound balance and equalizer settings as required...
User Manual (ENGLISH)
Page 40
...or ). Only Analog TV channels can also set as a Favorite. • : A channel selected by simply pressing the [CH LIST] button on the remote control • - You can be fine tuned. 3-4 Using the Product Then you can add / delete or set up, press the [FAV.CH] button on the... remote control. • - You can select these options by pressing the yellow button. • : A Program currently being broadcast. • : A reserved program. Shows all added ...
...or ). Only Analog TV channels can also set as a Favorite. • : A channel selected by simply pressing the [CH LIST] button on the remote control • - You can be fine tuned. 3-4 Using the Product Then you can add / delete or set up, press the [FAV.CH] button on the... remote control. • - You can select these options by pressing the yellow button. • : A Program currently being broadcast. • : A reserved program. Shows all added ...

User Manual (ENGLISH)
Page 41
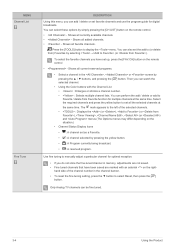
... manually. • This function is only available when is set the month, day, year, hour and minute directly by pressing the number buttons on the remote control. • Select your time zone. This function is only available when is set to . • (Daylight Saving Time) Switches the Daylight Saving Time function on...
... manually. • This function is only available when is set the month, day, year, hour and minute directly by pressing the number buttons on the remote control. • Select your time zone. This function is only available when is set to . • (Daylight Saving Time) Switches the Daylight Saving Time function on...

User Manual (ENGLISH)
Page 42
... another external device, set to in the setup menu.If you 've chosen, set the timer On, the television will eventually turn off if no controls are operated for too long time. When connecting to Activate.) • Set the , , , and . (To activate the timer with the setting you display... is only available in regular and mode. • If the picture is poor when external device is connected to TV, check if is on the remote control. • Auto Power Off When you can set the sleep timer by selecting →. • Select the desired channel. • Select , , , , or . •...
... another external device, set to in the setup menu.If you 've chosen, set the timer On, the television will eventually turn off if no controls are operated for too long time. When connecting to Activate.) • Set the , , , and . (To activate the timer with the setting you display... is only available in regular and mode. • If the picture is poor when external device is connected to TV, check if is on the remote control. • Auto Power Off When you can set the sleep timer by selecting →. • Select the desired channel. • Select , , , , or . •...
User Manual (ENGLISH)
Page 43
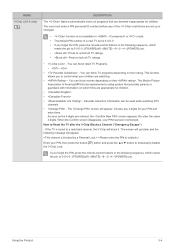
...temporarily disable the V-Chip Lock. Parental restriction information can block rated TV Programs. • - • - If you forget the PIN, press the remote-control buttons in the following sequence, which resets the pin to 0-0-0-0 : [POWER](off )→[MUTE]→8→2→4→[POWER] (on). • ... How to a restricted channel, the V-Chip will appear. If the TV is 0-0-0-0 • If you forget the PIN, press the remote-control buttons in , or mode. • The default PIN number of the restrictions are appropriate for your PIN has been memorized. You can ...
...temporarily disable the V-Chip Lock. Parental restriction information can block rated TV Programs. • - • - If you forget the PIN, press the remote-control buttons in the following sequence, which resets the pin to 0-0-0-0 : [POWER](off )→[MUTE]→8→2→4→[POWER] (on). • ... How to a restricted channel, the V-Chip will appear. If the TV is 0-0-0-0 • If you forget the PIN, press the remote-control buttons in , or mode. • The default PIN number of the restrictions are appropriate for your PIN has been memorized. You can ...

User Manual (ENGLISH)
Page 45
... the [MUTE] button has been pressed. • When no sound is output from the TV because the volume has been reduced to come on the remote control. • - - - - - Name the input device connected to the input jacks to select the screen of the TV in order to reduce power consumption...night, set to minimum with the scenes. MENU Source List Edit Name DESCRIPTION Use to select , or an external input source connected to the Monitor.Use to make your choice. Using the Product 3-4 MENU Melody Energy Saving Input DESCRIPTION A melody sound can use the [SOURCE] button on when...
... the [MUTE] button has been pressed. • When no sound is output from the TV because the volume has been reduced to come on the remote control. • - - - - - Name the input device connected to the input jacks to select the screen of the TV in order to reduce power consumption...night, set to minimum with the scenes. MENU Source List Edit Name DESCRIPTION Use to select , or an external input source connected to the Monitor.Use to make your choice. Using the Product 3-4 MENU Melody Energy Saving Input DESCRIPTION A melody sound can use the [SOURCE] button on when...
User Manual (ENGLISH)
Page 56
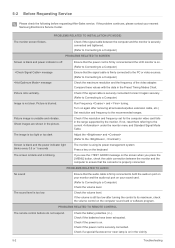
...control on in the vicinity 5-2 Troubleshooting PROBLEMS RELATED TO INSTALLATION (PC MODE) The monitor screen flickers. Check if the signal cable is securely connected. Adjust the and (Refer to a Computer) Ensure that the power cord is firmly connected and the LCD monitor...RELATED TO REMOTE CONTROL The remote control buttons do not respond. Ensure that the signal cable is off. Check if the signal cable between the monitor and ...Compare these values with the data in port on your nearest Samsung Electronics Service Center. 5-2 Before Requesting Service Please check the ...
...control on in the vicinity 5-2 Troubleshooting PROBLEMS RELATED TO INSTALLATION (PC MODE) The monitor screen flickers. Check if the signal cable is securely connected. Adjust the and (Refer to a Computer) Ensure that the power cord is firmly connected and the LCD monitor...RELATED TO REMOTE CONTROL The remote control buttons do not respond. Ensure that the signal cable is off. Check if the signal cable between the monitor and ...Compare these values with the data in port on your nearest Samsung Electronics Service Center. 5-2 Before Requesting Service Please check the ...
User Manual (user Manual) (ver.1.0) (English, Spanish)
Page 3
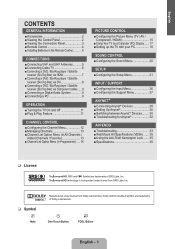
.... English Contents General Information ■■Accessories 2 ■■Viewing the Control Panel 2 ■■Viewing the Connection Panel 3 ■■Remote Control 4 ■■Installing Batteries in the Remote Control........... 4 Connections ■■Connecting VHF and UHF Antennas........... 5 ■■...a PC 9 Operation ■■Turning the TV On and Off 11 ■■Plug & Play Feature 11 CHANNEL CONTROL ■■Configuring the Channel Menu 12 ■■Managing Channels 13 ■■Channel List Option Menu (in All...
.... English Contents General Information ■■Accessories 2 ■■Viewing the Control Panel 2 ■■Viewing the Connection Panel 3 ■■Remote Control 4 ■■Installing Batteries in the Remote Control........... 4 Connections ■■Connecting VHF and UHF Antennas........... 5 ■■...a PC 9 Operation ■■Turning the TV On and Off 11 ■■Plug & Play Feature 11 CHANNEL CONTROL ■■Configuring the Channel Menu 12 ■■Managing Channels 13 ■■Channel List Option Menu (in All...
User Manual (user Manual) (ver.1.0) (English, Spanish)
Page 4
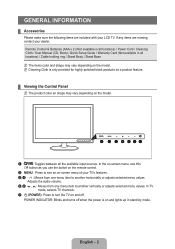
... and off when the power is only provided for highly polished black products as you use the button on the remote control. 2 MENU : Press to another vertically or adjusts selected menu values. Remote Control & Batteries (AAA x 2) (Not available in all locations) / Power Cord / Cleaning Cloth / User Manual (CD...in all the available input sources. English - 2 POWER INDICATOR: Blinks and turns off . If any items are included with your LCD TV. NN Cleaning Cloth is on the model. General Information ¦¦ Accessories Please make sure the following items are missing, contact...
... and off when the power is only provided for highly polished black products as you use the button on the remote control. 2 MENU : Press to another vertically or adjusts selected menu values. Remote Control & Batteries (AAA x 2) (Not available in all locations) / Power Cord / Cleaning Cloth / User Manual (CD...in all the available input sources. English - 2 POWER INDICATOR: Blinks and turns off . If any items are included with your LCD TV. NN Cleaning Cloth is on the model. General Information ¦¦ Accessories Please make sure the following items are missing, contact...

User Manual (user Manual) (ver.1.0) (English, Spanish)
Page 6
.... 6 19 RIGHT►/E: Use to select on- * MENU : Displays the screen menu items and change 3 13 volume. NN The performance of the remote control upward as shown in a cool, dry place if you won't be affected by bright light. It is used to return to the 3 : The "-"...BUTTONS: Press to exit the 9 9 COLOR BUTTONS: Use these menu. 10 21 buttons in the Remote Control 1. ¦¦ Remote Control NN You can use the remote control up to a distance of about one year.) NN If the remote control doesn't work, check the following: ●● Is the TV power on? ●● ...
.... 6 19 RIGHT►/E: Use to select on- * MENU : Displays the screen menu items and change 3 13 volume. NN The performance of the remote control upward as shown in a cool, dry place if you won't be affected by bright light. It is used to return to the 3 : The "-"...BUTTONS: Press to exit the 9 9 COLOR BUTTONS: Use these menu. 10 21 buttons in the Remote Control 1. ¦¦ Remote Control NN You can use the remote control up to a distance of about one year.) NN If the remote control doesn't work, check the following: ●● Is the TV power on? ●● ...


