Samsung P2370HD - Full 1080p HDTV LCD Monitor Research

Related Manual Pages


Related Videos

Samsung SyncMaster P2370HD 23" LCD HDTV Monitor Review
Duration: 10:04
Total Views: 160,433
Duration: 10:04
Total Views: 160,433
Samsung SyncMaster P2370HD 23" 1080P Monitor Unboxing and Review
Duration: 7:35
Total Views: 28,578
Duration: 7:35
Total Views: 28,578
P2370HD room setup
Duration: 2:58
Total Views: 12,749
Duration: 2:58
Total Views: 12,749
Unboxing: Samsung P2370HD TV Monitor
Duration: 4:17
Total Views: 3,021
Duration: 4:17
Total Views: 3,021
LCD Samsung P2370HD angulos de vision grabados con LG GM730
Duration: 1:36
Total Views: 4,060
Duration: 1:36
Total Views: 4,060
Similar Questions


How Do I Navigate The Tools Menu On My Samsung P2370hd Tv With A Universal Remot
(Posted by Isaacone223 10 years ago)

Setting Problem
plz send the detail setting we have to set in our system.we are unable to set the setting.so pz send...
plz send the detail setting we have to set in our system.we are unable to set the setting.so pz send...
(Posted by soumyajeetrath 10 years ago)

Need Owners Manual And Downloads Samsung Syncmaster E2420 24' Lcd Monitor Please
I purchased a Refurbished Samsung SyncMaster E2420 24" LCD Monitor thru bestbuy.com Marketplace. Aft...
I purchased a Refurbished Samsung SyncMaster E2420 24" LCD Monitor thru bestbuy.com Marketplace. Aft...
(Posted by MzLady 10 years ago)

Service Connection On Back Of Monitor
How is the service connection on back of P2370HD monitor used? I wanted to see if there were any upd...
How is the service connection on back of P2370HD monitor used? I wanted to see if there were any upd...
(Posted by mpatmore 12 years ago)
Related Terms
The following terms were also used when searching for Samsung P2370HD - Full 1080p HDTV LCD Monitor Research:- samsung p2370hd
- syncmaster p2370hd
- samsung p2370hd 23
- p2370hd samsung
- p2370hd 23
- p2370hd tv
- samsung p2370hd tv
- samsung p2370hd monitor
- p2370hd price
- samsung p2370hd price
- p2370hd firmware
- p2370hd review
- samsung p2370hd review
- p2370hd monitor
- p2370hd manual
- p2370hd driver
- samsung p2370hd firmware
- p2370hd mac
- p2370hd lcd tv
- samsung p2370hd driver
- p2370hd 23 lcd tv
- samsung p2370hd 23 lcd tv
- samsung p2370hd lcd tv
- samsung p2370hd manual
- p2370hd calibration
- p2370hd tilt
- samsung p2370hd best price
- p2370hd specifications
- p2370hd specs
- p2370hd uk
- p2370hd-1 review
- p2370hd best price
- p2370hd pip
- p2370hd refresh rate
- p2370hd mount
- p2370hd vga
- samsung p2370hd-1 review
- buy p2370hd
- model p2370hd
- p2370hd
- p2370hd 1 review
- p2370hd 23 review
- p2370hd 23-inch
- p2370hd 3d
- p2370hd channel button on tv
- p2370hd ci+
- p2370hd download
- p2370hd drivers
- p2370hd firmware update
- p2370hd firmware upgrade
- p2370hd hdcp
- p2370hd hdmi
- p2370hd hdmi pc
- p2370hd hdmi problem
- p2370hd hdtv monitor
- p2370hd lcd
- p2370hd manual pdf
- p2370hd monitor extension cable
- p2370hd no power
- p2370hd not turning on
- p2370hd or fx2490hd
- p2370hd parts
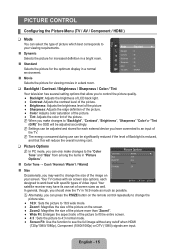
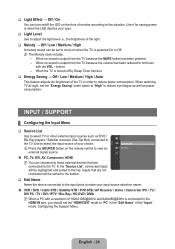
- p2370hd picture control settings
- p2370hd picture settings
- p2370hd power button
- p2370hd power cord
- p2370hd power on problems
- p2370hd power supply
- p2370hd power supply board
- p2370hd price in india
- p2370hd problems
- p2370hd remote
- p2370hd remote code
- p2370hd remote control
- p2370hd remove stand
- p2370hd replacement screen
- p2370hd replacement stand
- p2370hd resolution
- p2370hd reviews
- p2370hd samsung manual
- p2370hd samsung review
- p2370hd samsung specs
- p2370hd samsung turns on and off by itself
- p2370hd series
- p2370hd service manual
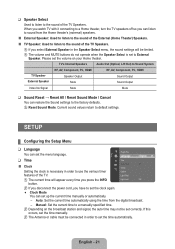
- p2370hd settings
- p2370hd software upgrade
- p2370hd stand
- p2370hd stand removal
- p2370hd syncmaster
- p2370hd tech
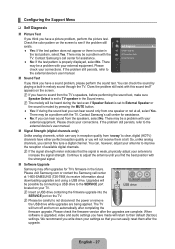
- p2370hd troubleshooting
- p2370hd turns on and off
- p2370hd tv base
- p2370hd tv manual
- p2370hd universal remote code
- p2370hd update
- p2370hd usb port
- p2370hd user manual
- p2370hd vesa
- p2370hd wall mount
- p2370hd windows tv control
- p2370hd-1 23-inch
- p2370hd-1 manual
- p2370hd-1 problems
- p2370hd-1 reviews
- p2370hd-1 specs
- samsung p2370hd 23 review
- samsung p2370hd 23-inch
- samsung p2370hd 3d
- samsung p2370hd channel button on tv
- samsung p2370hd download
- samsung p2370hd drivers
- samsung p2370hd firmware update
- samsung p2370hd hdcp
- samsung p2370hd hdmi pc
- samsung p2370hd hdmi problem
- samsung p2370hd hdtv monitor
- samsung p2370hd manual pdf
- samsung p2370hd monitor extension cable
- samsung p2370hd no power
- samsung p2370hd not turning on
- samsung p2370hd parts
- samsung p2370hd picture control settings
- samsung p2370hd pip
- samsung p2370hd power button
- samsung p2370hd power cord
- samsung p2370hd power on problems
- samsung p2370hd power supply
- samsung p2370hd price in india
- samsung p2370hd problems
- samsung p2370hd refresh rate
- samsung p2370hd remote
- samsung p2370hd remote code
- samsung p2370hd remote control
- samsung p2370hd remove stand
- samsung p2370hd replacement stand
- samsung p2370hd resolution
- samsung p2370hd reviews
- samsung p2370hd settings
- samsung p2370hd software upgrade
- samsung p2370hd specifications
- samsung p2370hd specs
- samsung p2370hd stand
- samsung p2370hd stand removal
- samsung p2370hd troubleshooting
- samsung p2370hd turns on and off
- samsung p2370hd tv base
- samsung p2370hd tv manual
- samsung p2370hd update
- samsung p2370hd user manual
- samsung p2370hd vesa
- samsung p2370hd vga
- samsung p2370hd wall mount
- samsung p2370hd windows tv control
- samsung p2370hd-1 23-inch
- samsung p2370hd-1 manual
- samsung p2370hd-1 problems
- samsung p2370hd-1 reviews
- samsung p2370hd-1 specs
- syncmaster p2370hd manual