

Open Source Guide (ENGLISH)
Page 2
... SUCH HOLDER OR OTHER PARTY HAS BEEN ADVISED OF THE POSSIBILITY OF SUCH DAMAGES. It is found. How to Apply These Terms to where the full notice is safest to attach them to the start of each file should have at least the "copyright" line and a pointer to Your New Libraries...
... SUCH HOLDER OR OTHER PARTY HAS BEEN ADVISED OF THE POSSIBILITY OF SUCH DAMAGES. It is found. How to Apply These Terms to where the full notice is safest to attach them to the start of each file should have at least the "copyright" line and a pointer to Your New Libraries...
User Manual (ENGLISH)
Page 2
... Control 3-3 Using the Screen Adjustment Menu (OSD: On Screen Display) . . . . 3-4 Installing the Device Driver 3-5 Standard Signal Mode Table 3-6 INSTALLING THE SOFTWARE Natural Color 4-1 MultiScreen 4-2 TROUBLESHOOTING Monitor Self-Diagnosis 5-1 Before Requesting Service 5-2 FAQ 5-3 MORE INFORMATION Specifications 6-1 Power Saving Function 6-2 Contact SAMSUNG WORLDWIDE 6-3
... Control 3-3 Using the Screen Adjustment Menu (OSD: On Screen Display) . . . . 3-4 Installing the Device Driver 3-5 Standard Signal Mode Table 3-6 INSTALLING THE SOFTWARE Natural Color 4-1 MultiScreen 4-2 TROUBLESHOOTING Monitor Self-Diagnosis 5-1 Before Requesting Service 5-2 FAQ 5-3 MORE INFORMATION Specifications 6-1 Power Saving Function 6-2 Contact SAMSUNG WORLDWIDE 6-3
User Manual (ENGLISH)
Page 4
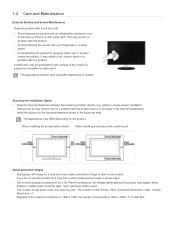
...Max. When installing the product with a stand When installing the product with a wet cloth. A white stain may be generated on the surface of an LCD panel by spraying water onto it . 1-2 Care and Maintenance External Surface and Screen Maintenance Clean the product with a soft dry cloth. • Avoid ... substance such as benzene or thinner or with a wall-mount About persistent images • Displaying a still image for a long time, set the power-saving mode or screen saver. • Due to ensure proper ventilation. This may result in the figure are kept. The number of sub-pixels ...
...Max. When installing the product with a stand When installing the product with a wet cloth. A white stain may be generated on the surface of an LCD panel by spraying water onto it . 1-2 Care and Maintenance External Surface and Screen Maintenance Clean the product with a soft dry cloth. • Avoid ... substance such as benzene or thinner or with a wall-mount About persistent images • Displaying a still image for a long time, set the power-saving mode or screen saver. • Due to ensure proper ventilation. This may result in the figure are kept. The number of sub-pixels ...
User Manual (ENGLISH)
Page 5
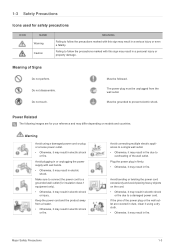
.... • Otherwise, it may differ depending on the cord. • Otherwise, it may result in electric shock or injury. Plug the power plug in firmly. • Otherwise, it may result in electric shock. Avoid connecting multiple electric appliances to a single wall outlet. •...the precautions marked with wet hands. • Otherwise, it may result in a serious injury or even a fatality. If the pins of the power plug or the wall outlet are for your reference and may result in electric shock or fire. Do not touch. Major Safety Precautions 1-3 1-3 ...
.... • Otherwise, it may differ depending on the cord. • Otherwise, it may result in electric shock or injury. Plug the power plug in firmly. • Otherwise, it may result in electric shock. Avoid connecting multiple electric appliances to a single wall outlet. •...the precautions marked with wet hands. • Otherwise, it may result in a serious injury or even a fatality. If the pins of the power plug or the wall outlet are for your reference and may result in electric shock or fire. Do not touch. Major Safety Precautions 1-3 1-3 ...
User Manual (ENGLISH)
Page 6
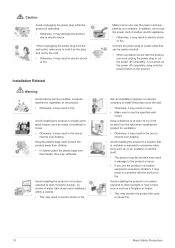
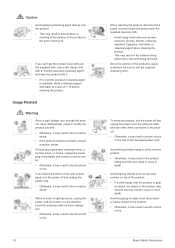
...electric shock or fire. Keep a distance of another electric appliance. • Otherwise, it may result in fire. Caution Avoid unplugging the power plug while the product is unstable or exposed to excessive vibrations such as on an unstable or slanted shelf. • The product may ...fall and this may suffocate. Installation Related Warning Avoid placing burning candles, mosquitorepellent or cigarettes on the product. Connect the power plug to use the power cord of at least 10 cm (3.93 inches) from the wall when installing the product for ventilation. • Otherwise, it...
...electric shock or fire. Keep a distance of another electric appliance. • Otherwise, it may result in fire. Caution Avoid unplugging the power plug while the product is unstable or exposed to excessive vibrations such as on an unstable or slanted shelf. • The product may ...fall and this may suffocate. Installation Related Warning Avoid placing burning candles, mosquitorepellent or cigarettes on the product. Connect the power plug to use the power cord of at least 10 cm (3.93 inches) from the wall when installing the product for ventilation. • Otherwise, it...
User Manual (ENGLISH)
Page 7
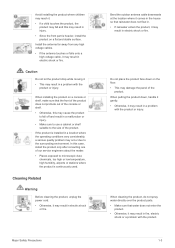
... one of the console or shelf. • Otherwise, this may result in electric shock or fire. Cleaning Related Warning Before cleaning the product, unplug the power cord. • Otherwise, it may result in electric shock or fire. Major Safety Precautions Bend the outdoor antenna cable downwards at the location where it...
... one of the console or shelf. • Otherwise, this may result in electric shock or fire. Cleaning Related Warning Before cleaning the product, unplug the power cord. • Otherwise, it may result in electric shock or fire. Major Safety Precautions Bend the outdoor antenna cable downwards at the location where it...
User Manual (ENGLISH)
Page 8
... contact a service center. Since the exterior of the product is damaged, turn the power off and unplug the power cord, the antenna cable and any other wires connected to use a soft, damp cloth with a "monitor-exclusive cleansing agent" and wipe the product with it. • If no circumstance ...• Avoid using chemicals such as this may result in injury or even death. When thunder or lighting occurs, unplug the power cord and under no monitor-exclusive cleansing agent is dangerous. • Otherwise, it may result in electric shock or fire. This may result in the exterior...
... contact a service center. Since the exterior of the product is damaged, turn the power off and unplug the power cord, the antenna cable and any other wires connected to use a soft, damp cloth with a "monitor-exclusive cleansing agent" and wipe the product with it. • If no circumstance ...• Avoid using chemicals such as this may result in injury or even death. When thunder or lighting occurs, unplug the power cord and under no monitor-exclusive cleansing agent is dangerous. • Otherwise, it may result in electric shock or fire. This may result in the exterior...
User Manual (ENGLISH)
Page 9
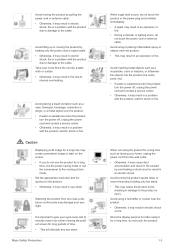
...your eyesight. Avoid lifting up or moving picture mode. Watching the product from too close a distance continuously may damage your home, unplug the power cord from the wall outlet. • Otherwise, it may result in a problem with the product, electric shock or fire. Major Safety ... hairpins, or inflammable objects into the product (the vents, ports, etc). • If water or substances enter the product, turn the power off , unplug the power cord and contact a service center. • Otherwise, it may result in a problem with the product, electric shock or fire. Since the...
...your eyesight. Avoid lifting up or moving picture mode. Watching the product from too close a distance continuously may damage your home, unplug the power cord from the wall outlet. • Otherwise, it may result in a problem with the product, electric shock or fire. Major Safety ... hairpins, or inflammable objects into the product (the vents, ports, etc). • If water or substances enter the product, turn the power off , unplug the power cord and contact a service center. • Otherwise, it may result in a problem with the product, electric shock or fire. Since the...

User Manual (ENGLISH)
Page 11
Installing the Product 2-1 CONTENTS Installation Manual Product Warranty (Not available in all locations) User Manual Power Cord Cable Holder Batteries (AAA X 2) (Not available in all of the following contents have been included. • Store the packaging box in case you need ...
Installing the Product 2-1 CONTENTS Installation Manual Product Warranty (Not available in all locations) User Manual Power Cord Cable Holder Batteries (AAA X 2) (Not available in all of the following contents have been included. • Store the packaging box in case you need ...
User Manual (ENGLISH)
Page 15
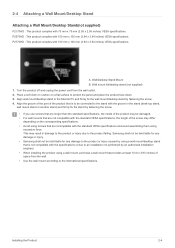
... a Wall Mount/Desktop Stand(not supplied) P2370HD : This product complies with 100 mm x 100 mm (3.94 x 3.94 inches) VESA specifications. Turn the product off and unplug the power cord from the wall. • Use the...connected to the stand with the groove in damage to the product or injury due to the Monitor/TV and firmly fix the wall mount/desktop stand by an authorized installation engineer. •...to an installation not performed by fastening the screw. 4. Samsung shall not be held liable for any damage or injury. • Samsung shall not be held liable for any damage to the product...
... a Wall Mount/Desktop Stand(not supplied) P2370HD : This product complies with 100 mm x 100 mm (3.94 x 3.94 inches) VESA specifications. Turn the product off and unplug the power cord from the wall. • Use the...connected to the stand with the groove in damage to the product or injury due to the Monitor/TV and firmly fix the wall mount/desktop stand by an authorized installation engineer. •...to an installation not performed by fastening the screw. 4. Samsung shall not be held liable for any damage or injury. • Samsung shall not be held liable for any damage to the product...
User Manual (ENGLISH)
Page 17
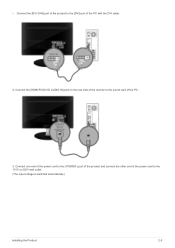
Connect one end of the power cord to the [ POWER ] port of the product and connect the other end of the power cord to the sound card of the PC. 3. Connect the [HDMI/PC/DVI-D AUDIO IN] port on the rear side of the PC with the DVI cable. 2. • Connect the [DVI-D IN] port of the product to the [DVI] port of the monitor to the 110V or 220V wall outlet. (The input voltage is switched automatically.) Installing the Product 2-5
Connect one end of the power cord to the [ POWER ] port of the product and connect the other end of the power cord to the sound card of the PC. 3. Connect the [HDMI/PC/DVI-D AUDIO IN] port on the rear side of the PC with the DVI cable. 2. • Connect the [DVI-D IN] port of the product to the [DVI] port of the monitor to the 110V or 220V wall outlet. (The input voltage is switched automatically.) Installing the Product 2-5
User Manual (ENGLISH)
Page 19
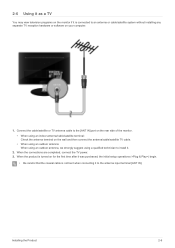
2-6 Using it as a TV You may view television programs on the monitor if it is not bent when connecting it to an antenna or cable/satellite system without installing any separate TV reception hardware or software on ... for the first time after it . 2. Connect the cable/satellite or TV antenna cable to the [ANT IN] port on the rear side of the monitor. • When using a qualified technician to install it was purchased, the initial setup operations () begin. • Be careful that the coaxial cable is connected to...
2-6 Using it as a TV You may view television programs on the monitor if it is not bent when connecting it to an antenna or cable/satellite system without installing any separate TV reception hardware or software on ... for the first time after it . 2. Connect the cable/satellite or TV antenna cable to the [ANT IN] port on the rear side of the monitor. • When using a qualified technician to install it was purchased, the initial setup operations () begin. • Be careful that the coaxial cable is connected to...
User Manual (ENGLISH)
Page 27
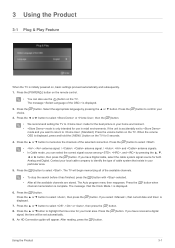
...; or ▼ button to select . Press the ▲ or ▼button to mode and you select , is displayed. 2. After reading, press the [ ] button. Press the [POWER ] button on the TV for use the [ ] button on the TV. If you have received a digital signal, the time will be set to highlight the... company to (Standard): Press the volume button on , basic settings proceed automatically and subsequently. 1. 3 Using the Product 3-1 Plug & Play Feature When the TV is initially powered on the TV. If you want to return to identify the type of the selected connection.
...; or ▼ button to select . Press the ▲ or ▼button to mode and you select , is displayed. 2. After reading, press the [ ] button. Press the [POWER ] button on the TV for use the [ ] button on the TV. If you have received a digital signal, the time will be set to highlight the... company to (Standard): Press the volume button on , basic settings proceed automatically and subsequently. 1. 3 Using the Product 3-1 Plug & Play Feature When the TV is initially powered on the TV. If you want to return to identify the type of the selected connection.
User Manual (ENGLISH)
Page 29
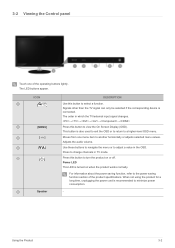
... →→→→→ Press this button to select a function. Press this button to view the On Screen Display (OSD). Power LED This LED is also used to exit the OSD or to return to turn the product on when the product works normally. 3-2 ...] [MENU Speaker DESCRIPTION Use this button to a higher-level OSD menu. The order in the OSD. For information about the power saving function, refer to minimize power consumption. - Adjusts the audio volume. Press to another horizontally or adjusts selected menu values. The LED buttons appear. Signals other than...
... →→→→→ Press this button to select a function. Press this button to view the On Screen Display (OSD). Power LED This LED is also used to exit the OSD or to return to turn the product on when the product works normally. 3-2 ...] [MENU Speaker DESCRIPTION Use this button to a higher-level OSD menu. The order in the OSD. For information about the power saving function, refer to minimize power consumption. - Adjusts the audio volume. Press to another horizontally or adjusts selected menu values. The LED buttons appear. Signals other than...
User Manual (ENGLISH)
Page 30
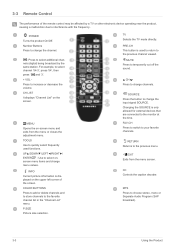
... BUTTONS Press to add or delete channels and to store channels to the previous menu. EXIT Exits from the menu or closes the adjustment menu. POWER Turns the product On/Off. P.SIZE Picture size selection. RETURN Returns to the favorite channel list in the "Channel List" menu. MTS Press to...left corner of the remote control may be affected by the same station. TOOLS Use to increase or decrease the volume. CH Press to the monitor at the time. Changing the SOURCE is used functions. PRE-CH This button is only allowed for external devices that are connected to change ...
... BUTTONS Press to add or delete channels and to store channels to the previous menu. EXIT Exits from the menu or closes the adjustment menu. POWER Turns the product On/Off. P.SIZE Picture size selection. RETURN Returns to the favorite channel list in the "Channel List" menu. MTS Press to...left corner of the remote control may be affected by the same station. TOOLS Use to increase or decrease the volume. CH Press to the monitor at the time. Changing the SOURCE is used functions. PRE-CH This button is only allowed for external devices that are connected to change ...

User Manual (ENGLISH)
Page 31
... Batteries in the figure. 2. Install two AAA size batteries. If the remote control doesn't work, check the following : • Is the TV power on? • Are the plus and minus ends of the batteries with the diagram inside the compartment. 3. Using the Product 3-3 Make sure to ...match the +and - ends of the batteries reversed? • Are the batteries drained? • Is there a power outage or is the power cord unplugged? • Is there a special fluorescent light or neon sign nearby? Close the cover. Lift the cover at the back of the...
... Batteries in the figure. 2. Install two AAA size batteries. If the remote control doesn't work, check the following : • Is the TV power on? • Are the plus and minus ends of the batteries with the diagram inside the compartment. 3. Using the Product 3-3 Make sure to ...match the +and - ends of the batteries reversed? • Are the batteries drained? • Is there a power outage or is the power cord unplugged? • Is there a special fluorescent light or neon sign nearby? Close the cover. Lift the cover at the back of the...

User Manual (ENGLISH)
Page 41
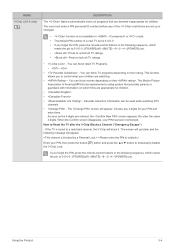
... the various timer features of the TV. • The current time will appear every time you press the [INFO] button. • If you disconnect the power cord, you first plugged in order to set the time automatically. • You can set to . This function is only available when is set to...
... the various timer features of the TV. • The current time will appear every time you press the [INFO] button. • If you disconnect the power cord, you first plugged in order to set the time automatically. • You can set to . This function is only available when is set to...

User Manual (ENGLISH)
Page 42
... picture is poor when external device is connected to TV, check if is on by pressing the number buttons on the remote control. • Auto Power Off When you can enjoy a more realistic gaming experience by selecting game menu. • - • Restrictions on / off the TV after the TV was turned...
... picture is poor when external device is connected to TV, check if is on by pressing the number buttons on the remote control. • Auto Power Off When you can enjoy a more realistic gaming experience by selecting game menu. • - • Restrictions on / off the TV after the TV was turned...
User Manual (ENGLISH)
Page 43
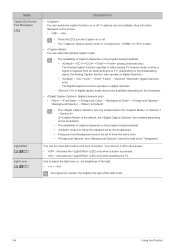
... If you forget the PIN, press the remote-control buttons in the following sequence, which resets the pin to 0-0-0-0 : [POWER](off )→[MUTE]→8→2→4→[POWER] (on). • : Press to unlock all TV ratings. • : Press to a restricted channel, the V-Chip.... • • • - You can be used while watching DTV channels • - How to 0-0-0-0 : [POWER](off )→[MUTE]→8→2→4→[POWER] (on). Re enter the same 4 digits. MENU V-Chip (U.S.A only) DESCRIPTION The feature automatically locks out programs that provides parents...
... If you forget the PIN, press the remote-control buttons in the following sequence, which resets the pin to 0-0-0-0 : [POWER](off )→[MUTE]→8→2→4→[POWER] (on). • : Press to unlock all TV ratings. • : Press to a restricted channel, the V-Chip.... • • • - You can be used while watching DTV channels • - How to 0-0-0-0 : [POWER](off )→[MUTE]→8→2→4→[POWER] (on). Re enter the same 4 digits. MENU V-Chip (U.S.A only) DESCRIPTION The feature automatically locks out programs that provides parents...
User Manual (ENGLISH)
Page 44
You can turn the LED on/off on the front of monitor. Use to adjust the light level i.e., the brightness of the light. • ~ The higher the number, the brighter the light of captions depends on or off to save power. • : Activates the (LED) only when a button is pressed. • : Activates the...
You can turn the LED on/off on the front of monitor. Use to adjust the light level i.e., the brightness of the light. • ~ The higher the number, the brighter the light of captions depends on or off to save power. • : Activates the (LED) only when a button is pressed. • : Activates the...


