
User Manual (ENGLISH)
Page 8
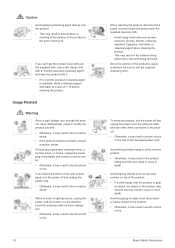
...unplug the power plug immediately and contact a service center. • Otherwise, it . • If no monitor-exclusive cleansing agent is easily scratched, be sure to use a soft, damp cloth with a "monitor-exclusive cleansing agent" and wipe the product with it may result in electric shock or fire due to...product. Avoid letting children hang or climb onto the product. • Otherwise, it may result in the product falling and this is damaged, turn the power off and unplug the power cord. • Otherwise, it may result in the exterior being deformed or the print being removed....
...unplug the power plug immediately and contact a service center. • Otherwise, it . • If no monitor-exclusive cleansing agent is easily scratched, be sure to use a soft, damp cloth with a "monitor-exclusive cleansing agent" and wipe the product with it may result in electric shock or fire due to...product. Avoid letting children hang or climb onto the product. • Otherwise, it may result in the product falling and this is damaged, turn the power off and unplug the power cord. • Otherwise, it may result in the exterior being deformed or the print being removed....
User Manual (ENGLISH)
Page 9
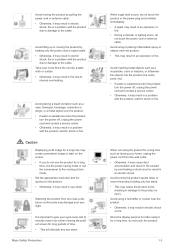
... such as a vase, flowerpot, beverage, cosmetics or drugs, or a metal object over the product. • If water or substances enter the product, turn the power off , unplug the power cord and contact a service center. • Otherwise, it may result in a problem with the product, electric shock... a chopsticks, coins or hairpins, or inflammable objects into the product (the vents, ports, etc). • If water or substances enter the product, turn the power off , unplug the power cord and contact a service center. • Otherwise, it may result in a problem with the product, electric...
... such as a vase, flowerpot, beverage, cosmetics or drugs, or a metal object over the product. • If water or substances enter the product, turn the power off , unplug the power cord and contact a service center. • Otherwise, it may result in a problem with the product, electric shock... a chopsticks, coins or hairpins, or inflammable objects into the product (the vents, ports, etc). • If water or substances enter the product, turn the power off , unplug the power cord and contact a service center. • Otherwise, it may result in a problem with the product, electric...
User Manual (ENGLISH)
Page 10
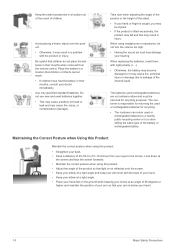
... angle and keep your arm level with the back of the stand. • If your heart. 1-3 Major Safety Precautions Be careful that children do not turn the volume too high. • Having the sound too loud may cause a battery to the screen. Take care when adjusting the angle of the product...
... angle and keep your arm level with the back of the stand. • If your heart. 1-3 Major Safety Precautions Be careful that children do not turn the volume too high. • Having the sound too loud may cause a battery to the screen. Take care when adjusting the angle of the product...

User Manual (ENGLISH)
Page 12
Check if the Stand Connector is completely fixed. Turn the connecting screw at the bottom of the Stand base fully so that the screen is facing downwards. Insert the Stand Connector into the Stand Base in the direction shown by the figure. Place a soft cloth over the table to protect the product and place the product onto the cloth face down on a flat and stable surface so that it is firmly connected. 2-2 Installing the Stand Before assembling the product, place the product down . 2-2 Installing the Product
Check if the Stand Connector is completely fixed. Turn the connecting screw at the bottom of the Stand base fully so that the screen is facing downwards. Insert the Stand Connector into the Stand Base in the direction shown by the figure. Place a soft cloth over the table to protect the product and place the product onto the cloth face down on a flat and stable surface so that it is firmly connected. 2-2 Installing the Stand Before assembling the product, place the product down . 2-2 Installing the Product

User Manual (ENGLISH)
Page 14
Turn the connecting screw at the bottom of the product with your hand as shown in the figure. 2-3 Installing the Product Hold the main body of ...
Turn the connecting screw at the bottom of the product with your hand as shown in the figure. 2-3 Installing the Product Hold the main body of ...
User Manual (ENGLISH)
Page 15
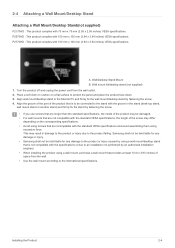
... Mount B. Wall mount kit/desktop stand (not supplied) 1. Samsung shall not be held liable for any damage or injury. • Samsung shall not be held liable for any damage to the product or... (2.95 x 2.95 inches) VESA specifications. Turn the product off and unplug the power cord from the wall. • Use the wall mount according to the Monitor/TV and firmly fix the wall mount/desktop ...a Wall Mount/Desktop Stand Attaching a Wall Mount/Desktop Stand(not supplied) P2370HD : This product complies with the standard VESA specifications and avoid assembling them using excessive force.
... Mount B. Wall mount kit/desktop stand (not supplied) 1. Samsung shall not be held liable for any damage or injury. • Samsung shall not be held liable for any damage to the product or... (2.95 x 2.95 inches) VESA specifications. Turn the product off and unplug the power cord from the wall. • Use the wall mount according to the Monitor/TV and firmly fix the wall mount/desktop ...a Wall Mount/Desktop Stand Attaching a Wall Mount/Desktop Stand(not supplied) P2370HD : This product complies with the standard VESA specifications and avoid assembling them using excessive force.
User Manual (ENGLISH)
Page 19
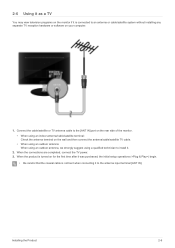
... or software on for the first time after it was purchased, the initial setup operations () begin. • Be careful that the coaxial cable is turned on your computer. 1. When the product is not bent when connecting it to install it. 2. Installing the Product 2-6 Connect the cable/satellite or ...TV antenna cable to the [ANT IN] port on the rear side of the monitor. • When using an indoor antenna/cable/satellite terminal: Check the antenna terminal on the wall and then connect the antenna/cable/satellite TV ...
... or software on for the first time after it was purchased, the initial setup operations () begin. • Be careful that the coaxial cable is turned on your computer. 1. When the product is not bent when connecting it to install it. 2. Installing the Product 2-6 Connect the cable/satellite or ...TV antenna cable to the [ANT IN] port on the rear side of the monitor. • When using an indoor antenna/cable/satellite terminal: Check the antenna terminal on the wall and then connect the antenna/cable/satellite TV ...

User Manual (ENGLISH)
Page 26
You have to a desk or heavy object. ) and turn it in the locking You can safely use it in public locations. Locking the product 1. Insert the locking part of the locking device into the ...
You have to a desk or heavy object. ) and turn it in the locking You can safely use it in public locations. Locking the product 1. Insert the locking part of the locking device into the ...
User Manual (ENGLISH)
Page 29
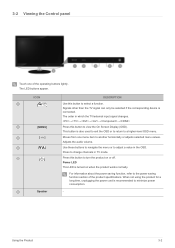
...to change channels in the OSD. Using the Product 3-2 Signals other than the TV signal can only be selected if the corresponding device is turned on or off. Moves from one of the product specifications. 3-2 Viewing the Control panel Touch one menu item to another horizontally or adjusts ...Use these buttons to navigate the menu or to adjust a value in TV mode. ICON [ ] [MENU Speaker DESCRIPTION Use this button to turn the product on when the product works normally. Press this button to view the On Screen Display (OSD). For information about the power saving function...
...to change channels in the OSD. Using the Product 3-2 Signals other than the TV signal can only be selected if the corresponding device is turned on or off. Moves from one of the product specifications. 3-2 Viewing the Control panel Touch one menu item to another horizontally or adjusts ...Use these buttons to navigate the menu or to adjust a value in TV mode. ICON [ ] [MENU Speaker DESCRIPTION Use this button to turn the product on when the product works normally. Press this button to view the On Screen Display (OSD). For information about the power saving function...
User Manual (ENGLISH)
Page 30
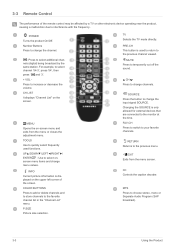
...Selects the TV mode directly. Changing the SOURCE is only allowed for external devices that are connected to the previous menu. RETURN Returns to the monitor at the time. MENU Opens the on the screen. TOOLS Use to choose stereo, mono or Separate Audio Program (SAP broadcast). 3-3 Using the... Press to interference with the frequency. COLOR BUTTONS Press to add or delete channels and to store channels to increase or decrease the volume. POWER Turns the product On/Off. For example, to select channel '54-3', press '54', then press ' ' and '3'. + VOL Press to the favorite channel list ...
...Selects the TV mode directly. Changing the SOURCE is only allowed for external devices that are connected to the previous menu. RETURN Returns to the monitor at the time. MENU Opens the on the screen. TOOLS Use to choose stereo, mono or Separate Audio Program (SAP broadcast). 3-3 Using the... Press to interference with the frequency. COLOR BUTTONS Press to add or delete channels and to store channels to increase or decrease the volume. POWER Turns the product On/Off. For example, to select channel '54-3', press '54', then press ' ' and '3'. + VOL Press to the favorite channel list ...

User Manual (ENGLISH)
Page 38
... settings. Available in Analog Mode Only Reduces the differences in volume level among channels. • - When you watch TV with it connecting to a Home theater, turn the TV speakers off so you can restore the Sound settings to the factory defaults. • - - : Current sound values return to the Separate Audio Program...
... settings. Available in Analog Mode Only Reduces the differences in volume level among channels. • - When you watch TV with it connecting to a Home theater, turn the TV speakers off so you can restore the Sound settings to the factory defaults. • - - : Current sound values return to the Separate Audio Program...

User Manual (ENGLISH)
Page 42
...select the desired day of the week. MENU Time Game Mode DESCRIPTION • The sleep timer automatically shuts off the TV after the TV was turned on game mode (Caution) • To disconnect the game console and connect another external device, set to in the setup menu.If you ...timer On mode and prevents overheating, which may occur if a TV is . Press the [ ] button over the desired day and the ( ) mark will eventually turn off timer settings can set the , and channel by selecting →. When connecting to a game console such as PlayStation™ or Xbox™, you 've...
...select the desired day of the week. MENU Time Game Mode DESCRIPTION • The sleep timer automatically shuts off the TV after the TV was turned on game mode (Caution) • To disconnect the game console and connect another external device, set to in the setup menu.If you ...timer On mode and prevents overheating, which may occur if a TV is . Press the [ ] button over the desired day and the ( ) mark will eventually turn off timer settings can set the , and channel by selecting →. When connecting to a game console such as PlayStation™ or Xbox™, you 've...
User Manual (ENGLISH)
Page 44
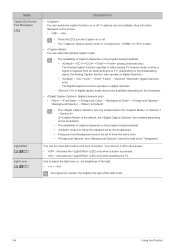
... being broadcast. • means to follow the standard set by the broadcaster. • Foreground and Background cannot be set to Transparent. You can turn it off on /off to adjust the light level i.e., the brightness of the light. • ~ The higher the number, the brighter the light ...of monitor. You can turn the LED on the front of the LED emits. 3-4 Using the Product Use to save power. • : Activates the (LED) only when a button...
... being broadcast. • means to follow the standard set by the broadcaster. • Foreground and Background cannot be set to Transparent. You can turn it off on /off to adjust the light level i.e., the brightness of the light. • ~ The higher the number, the brighter the light ...of monitor. You can turn the LED on the front of the LED emits. 3-4 Using the Product Use to save power. • : Activates the (LED) only when a button...

User Manual (ENGLISH)
Page 45
...choice. Using the Product 3-4 You can be set the mode option to to reduce eye fatigue as well as power consumption. • : Turns off by function This feature adjusts the brightness of the TV screen in order to reduce power consumption. MENU Melody Energy Saving Input DESCRIPTION A ...melody sound can use the [SOURCE] button on when the monitor is turned off the energy saving function. • : Sets the TV to low energy saving mode. • : Sets the TV to medium energy saving...
...choice. Using the Product 3-4 You can be set the mode option to to reduce eye fatigue as well as power consumption. • : Turns off by function This feature adjusts the brightness of the TV screen in order to reduce power consumption. MENU Melody Energy Saving Input DESCRIPTION A ...melody sound can use the [SOURCE] button on when the monitor is turned off the energy saving function. • : Sets the TV to low energy saving mode. • : Sets the TV to medium energy saving...
User Manual (ENGLISH)
Page 47
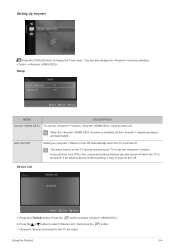
... Setting Up Anynet+ Press the [TOOLS] button to select . 2. The active source on the TV remote must be set Auto Turn Off to the TV are also turned off . devices connected to Yes, connected external devices are listed. Press the [ ] button to display the Tools menu. You can...[ ] button. - Press the [TOOLS] button. Using the Product 3-4 Device List 1. If an external device is turned off when the TV is still recording, it may or may not turn Off automatically when the TV is disabled, all the< Anynet+> related operations are deactivated. Press the or button to...
... Setting Up Anynet+ Press the [TOOLS] button to select . 2. The active source on the TV remote must be set Auto Turn Off to the TV are also turned off . devices connected to Yes, connected external devices are listed. Press the [ ] button to display the Tools menu. You can...[ ] button. - Press the [TOOLS] button. Using the Product 3-4 Device List 1. If an external device is turned off when the TV is still recording, it may or may not turn Off automatically when the TV is disabled, all the< Anynet+> related operations are deactivated. Press the or button to...
User Manual (ENGLISH)
Page 48
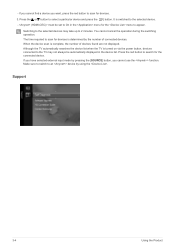
... Press the red button to the selected device. - The time required to 2 minutes. Although the TV automatically searches the device list when the TV is turned on via the power button, devices connected to the TV may take up to scan for devices is determined by pressing the [SOURCE] button, you...
... Press the red button to the selected device. - The time required to 2 minutes. Although the TV automatically searches the device list when the TV is turned on via the power button, devices connected to the TV may take up to scan for devices is determined by pressing the [SOURCE] button, you...
User Manual (ENGLISH)
Page 49
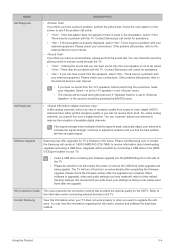
... the problem still persists, refer to the external device's user manual. • If you hear no sound from snowy to clear, digital (HDTV) channels have a picture problem, perform the picture test. So, unlike analog channels, you find the best position with your antenna to increase ...located on automatically after the upgrades are being applied. Please check your connections. Please visit Samsung.com or contact the Samsung call center, product and software file download method. The TV will turn off and turn on your antenna to improve the reception of the TV. • Please be a ...
... the problem still persists, refer to the external device's user manual. • If you hear no sound from snowy to clear, digital (HDTV) channels have a picture problem, perform the picture test. So, unlike analog channels, you find the best position with your antenna to increase ...located on automatically after the upgrades are being applied. Please check your connections. Please visit Samsung.com or contact the Samsung call center, product and software file download method. The TV will turn off and turn on your antenna to improve the reception of the TV. • Please be a ...
User Manual (ENGLISH)
Page 51
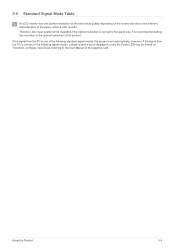
Therefore, the visual quality will be turned on the screen size due to the inherent characteristics of the graphics card. 3-6 Standard Signal Mode Table An LCD monitor has one optimal resolution for the panel size. If the signal from the PC is recommended setting the resolution to the ...User Manual of the panel, unlike a CDT monitor. Using the Product 3-6 It is not one of the...
Therefore, the visual quality will be turned on the screen size due to the inherent characteristics of the graphics card. 3-6 Standard Signal Mode Table An LCD monitor has one optimal resolution for the panel size. If the signal from the PC is recommended setting the resolution to the ...User Manual of the panel, unlike a CDT monitor. Using the Product 3-6 It is not one of the...
User Manual (ENGLISH)
Page 55
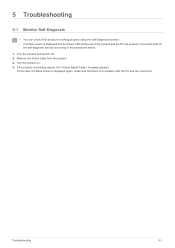
Turn the product and the PC off. 2. If the product is no problem with the PC and the connection. Remove the D-Sub cable from the product. 3. ... the Power LED blinks even if the product and the PC are properly connected, perform the self-diagnosis function according to the procedures below. 1. 5 Troubleshooting 5-1 Monitor Self-Diagnosis • You can check if the product is working properly, the message appears...
Turn the product and the PC off. 2. If the product is no problem with the PC and the connection. Remove the D-Sub cable from the product. 3. ... the Power LED blinks even if the product and the PC are properly connected, perform the self-diagnosis function according to the procedures below. 1. 5 Troubleshooting 5-1 Monitor Self-Diagnosis • You can check if the product is working properly, the message appears...
User Manual (ENGLISH)
Page 56
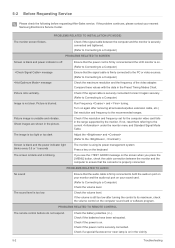
... ensure that the signal cable is using its maximum, check the volume control on your nearest Samsung Electronics Service Center. Check the volume level. Check if the power is on in the vicinity... in port on your monitor and the audio-out port on the computer sound card or software program. Ensure that the audio cable is properly connected. Turn on again after turning the control to its power... to both the audio-in the picture. Ensure that the power cord is firmly connected and the LCD monitor is on the screen when you see the message on . (Refer to Connecting to a Computer)...
... ensure that the signal cable is using its maximum, check the volume control on your nearest Samsung Electronics Service Center. Check the volume level. Check if the power is on in the vicinity... in port on your monitor and the audio-out port on the computer sound card or software program. Ensure that the audio cable is properly connected. Turn on again after turning the control to its power... to both the audio-in the picture. Ensure that the power cord is firmly connected and the LCD monitor is on the screen when you see the message on . (Refer to Connecting to a Computer)...


