User Manual (user Manual) (ver.1.0) (English)
Page 1
1_E150MP170MPcov.fm Page 1 Monday, September 17, 2001 5:05 PM SyncMaster150MP SyncMaster170MP (For PAL systems) TFT-LCD Monitor Owner's Instructions
1_E150MP170MPcov.fm Page 1 Monday, September 17, 2001 5:05 PM SyncMaster150MP SyncMaster170MP (For PAL systems) TFT-LCD Monitor Owner's Instructions

User Manual (user Manual) (ver.1.0) (English)
Page 2
...of picture in the screen if the best quality of cleaner by using soft and dry cloth and polish it. When you clean the monitor and the panel outside, please apply the recommended small amount of picture is not provided in TFT-LCD. • Resolution: 15" 1024...computer as window termination button is subject to enjoy the best quality of Samsung Electronics Co., Ltd. Information in any manner whatsoever without the written permission of picture. The Samsung logo and SyncMaster are registered trademarks of Samsung Electronics Co., Ltd.; Microsoft, Windows® and Windows® NT...
...of picture in the screen if the best quality of cleaner by using soft and dry cloth and polish it. When you clean the monitor and the panel outside, please apply the recommended small amount of picture is not provided in TFT-LCD. • Resolution: 15" 1024...computer as window termination button is subject to enjoy the best quality of Samsung Electronics Co., Ltd. Information in any manner whatsoever without the written permission of picture. The Samsung logo and SyncMaster are registered trademarks of Samsung Electronics Co., Ltd.; Microsoft, Windows® and Windows® NT...
User Manual (user Manual) (ver.1.0) (English)
Page 3
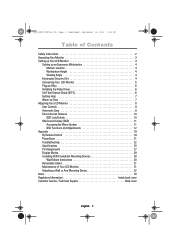
... 19, 2001 3:55 PM Table of Contents Safety Instructions 2 Unpacking Your Monitor 3 Setting up Your LCD Monitor 4 Setting up an Ergonomic Workstation 4 Monitor Location 4 Workstation Height 4 Viewing Angle 4 Kensington Security Slot 4 Connecting Your LCD Monitor 5 Plug and Play 6 Installing the Video Driver 6 Self-Test Feature... Installing VESA Compliant Mounting Devices 30 Wall Mount Instructions 30 Retractable Stand 31 Maintenance of Your LCD Monitor 31 Attaching a Wall or Arm Mounting Device 32 Index 33 Regulatory Information Inside back cover Customer Service / Technical ...
... 19, 2001 3:55 PM Table of Contents Safety Instructions 2 Unpacking Your Monitor 3 Setting up Your LCD Monitor 4 Setting up an Ergonomic Workstation 4 Monitor Location 4 Workstation Height 4 Viewing Angle 4 Kensington Security Slot 4 Connecting Your LCD Monitor 5 Plug and Play 6 Installing the Video Driver 6 Self-Test Feature... Installing VESA Compliant Mounting Devices 30 Wall Mount Instructions 30 Retractable Stand 31 Maintenance of Your LCD Monitor 31 Attaching a Wall or Arm Mounting Device 32 Index 33 Regulatory Information Inside back cover Customer Service / Technical ...
User Manual (user Manual) (ver.1.0) (English)
Page 4
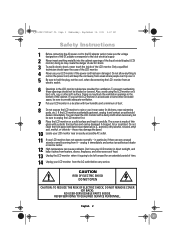
... anything to rest on the power cord, and keep it away from heaters, stoves, fireplaces, and other sources of heat. 13 Unplug the LCD monitor when it is made of thin glass with a plastic front surface and can be sure to provide adequate ventilation. 7 Put your LCD... a bookcase or some other soft surface. Do not allow anything metallic into the cabinet openings of the liquid cristal display (LCD) monitor; Also, avoid using the LCD monitor on a bed, sofa, rug, or other enclosed space, be damaged if dropped, hit or scratched. doing so may create the danger of electric shock...
... anything to rest on the power cord, and keep it away from heaters, stoves, fireplaces, and other sources of heat. 13 Unplug the LCD monitor when it is made of thin glass with a plastic front surface and can be sure to provide adequate ventilation. 7 Put your LCD... a bookcase or some other soft surface. Do not allow anything metallic into the cabinet openings of the liquid cristal display (LCD) monitor; Also, avoid using the LCD monitor on a bed, sofa, rug, or other enclosed space, be damaged if dropped, hit or scratched. doing so may create the danger of electric shock...

User Manual (user Manual) (ver.1.0) (English)
Page 5
... locations) Power Cord 15-pin D-Sub Signal Cable Warranty Card (Not available in all locations) Manual PC V1 V2 TV Source PIP Exit Menu SyncMaster 150MP CH VOL Monitor DC Adapter Stereo-RCA Cable (option) Scart Jack 1 2 3 4 5 6 7 8 9 Display 0 Pre.CH Stereo-Stereo Cable Batteries (AAA x 2)... Remote Controller PAL-NTSC Connector (option) English 3 4_E150MP170MPbody.fm Page 3 Wednesday, September 19, 2001 2:54 PM Unpacking Your Monitor Please make sure the following items are missing, contact your monitor. If any items are included with your dealer.
... locations) Power Cord 15-pin D-Sub Signal Cable Warranty Card (Not available in all locations) Manual PC V1 V2 TV Source PIP Exit Menu SyncMaster 150MP CH VOL Monitor DC Adapter Stereo-RCA Cable (option) Scart Jack 1 2 3 4 5 6 7 8 9 Display 0 Pre.CH Stereo-Stereo Cable Batteries (AAA x 2)... Remote Controller PAL-NTSC Connector (option) English 3 4_E150MP170MPbody.fm Page 3 Wednesday, September 19, 2001 2:54 PM Unpacking Your Monitor Please make sure the following items are missing, contact your monitor. If any items are included with your dealer.
User Manual (user Manual) (ver.1.0) (English)
Page 6
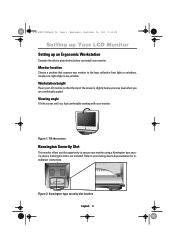
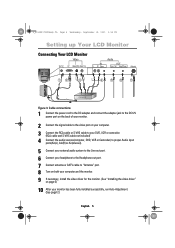
... least reflection from lights or windows, usually at a right angle to secure your eye level when you install your monitor. Figure 2. Kensington-type security slot location English 4 Workstation height Place your LCD monitor so that exposes your locking device documentation for installation instructions. Kensington lock is slightly below before you are comfortably...
... least reflection from lights or windows, usually at a right angle to secure your eye level when you install your monitor. Figure 2. Kensington-type security slot location English 4 Workstation height Place your LCD monitor so that exposes your locking device documentation for installation instructions. Kensington lock is slightly below before you are comfortably...
User Manual (user Manual) (ver.1.0) (English)
Page 7
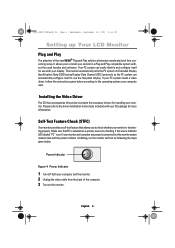
Cable connections 1 Connect the power cord to the DC adapter and connect the adapter jack to the DC12V power port on the back of your monitor. 2 Connect the signal cable to the video port on your computer. 3 Connect the RCA cable or S-VHS cable to your DVD, VCR or...7 Connect antenna or CATV cable to "Antenna" port. 8 Turn on both your computer and the monitor. 9 If necessary, install the video driver for the monitor. (See "Installing the video driver" on page 6) 10 After your monitor has been fully installed successfully, run Auto-Adjustment. (See page12) English 5 4_E150MP170MPbody.fm Page 5 ...
Cable connections 1 Connect the power cord to the DC adapter and connect the adapter jack to the DC12V power port on the back of your monitor. 2 Connect the signal cable to the video port on your computer. 3 Connect the RCA cable or S-VHS cable to your DVD, VCR or...7 Connect antenna or CATV cable to "Antenna" port. 8 Turn on both your computer and the monitor. 9 If necessary, install the video driver for the monitor. (See "Installing the video driver" on page 6) 10 After your monitor has been fully installed successfully, run Auto-Adjustment. (See page12) English 5 4_E150MP170MPbody.fm Page 5 ...
User Manual (user Manual) (ver.1.0) (English)
Page 8
... Data (EDID) using Display Data Channel (DDC) protocols so the PC system can easily identify and configure itself to use with your monitor in a Plug and Play compatible system without the usual hassles and confusion. Installing the Video Driver The CD that PC is selected as...to install your CD package for more information. English 6 Self-Test Feature Check (STFC) Your monitor provides a self-test feature that allows you to the operating system your monitor. Your PC system can automatically configure itself for installing your computer uses. Make sure that accompanies this...
... Data (EDID) using Display Data Channel (DDC) protocols so the PC system can easily identify and configure itself to use with your monitor in a Plug and Play compatible system without the usual hassles and confusion. Installing the Video Driver The CD that PC is selected as...to install your CD package for more information. English 6 Self-Test Feature Check (STFC) Your monitor provides a self-test feature that allows you to the operating system your monitor. Your PC system can automatically configure itself for installing your computer uses. Make sure that accompanies this...
User Manual (user Manual) (ver.1.0) (English)
Page 9
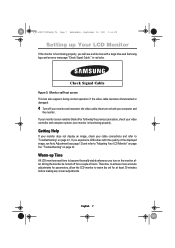
... off for at least 20 minutes before making any screen adjustments. If you experience difficulties with a large blue oval Samsung logo and an error messsage "Check Signal Cable." Getting Help If your monitor does not display an image, check your cable connections and refer to "Troubleshooting" on page 22. English 7 4_E150MP170MPbody.fm...
... off for at least 20 minutes before making any screen adjustments. If you experience difficulties with a large blue oval Samsung logo and an error messsage "Check Signal Cable." Getting Help If your monitor does not display an image, check your cable connections and refer to "Troubleshooting" on page 22. English 7 4_E150MP170MPbody.fm...
User Manual (user Manual) (ver.1.0) (English)
Page 10
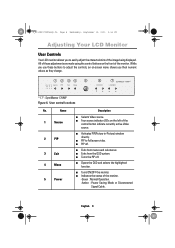
...I Indicates the status of the control button indicate currently active Video source. I PIP to adjust the controls, an on the left of the monitor. -Green : Normal Operation. -Amber : Power Saving Mode or Disconnected Signal Cable. I Turns the PIP off . PC V1 V2 TV ...Source PIP Exit Menu CH VOL * 17" : SyncMaster 170MP Figure 6. I Activates PIP(Picture-in-Picture) window directly. I PIP off . 4_E150MP170MPbody.fm Page 8 Wednesday, September 19, 2001 2:54 PM Adjusting Your LCD Monitor User Controls Your LCD monitor allows you their numeric values as they change. English ...
...I Indicates the status of the control button indicate currently active Video source. I PIP to adjust the controls, an on the left of the monitor. -Green : Normal Operation. -Amber : Power Saving Mode or Disconnected Signal Cable. I Turns the PIP off . PC V1 V2 TV ...Source PIP Exit Menu CH VOL * 17" : SyncMaster 170MP Figure 6. I Activates PIP(Picture-in-Picture) window directly. I PIP off . 4_E150MP170MPbody.fm Page 8 Wednesday, September 19, 2001 2:54 PM Adjusting Your LCD Monitor User Controls Your LCD monitor allows you their numeric values as they change. English ...

User Manual (user Manual) (ver.1.0) (English)
Page 11
... for about 3 seconds without pressing other buttons, the monitor automatically saves any adjustment you open the on -screen menu disappears and the monitor does not save adjustments for each signal frequency as listed in the monitor. I Increases or decreases the level of the 7 ...an adjustment window to 5 user modes. I Increases or decreases the channel number. The monitor can save anything. 4_E150MP170MPbody.fm Page 9 Wednesday, September 19, 2001 2:54 PM Adjusting Your LCD Monitor No. Automatic Save Whenever you have made. English 9 VOL + I Moves the selector ...
... for about 3 seconds without pressing other buttons, the monitor automatically saves any adjustment you open the on -screen menu disappears and the monitor does not save adjustments for each signal frequency as listed in the monitor. I Increases or decreases the level of the 7 ...an adjustment window to 5 user modes. I Increases or decreases the channel number. The monitor can save anything. 4_E150MP170MPbody.fm Page 9 Wednesday, September 19, 2001 2:54 PM Adjusting Your LCD Monitor No. Automatic Save Whenever you have made. English 9 VOL + I Moves the selector ...
User Manual (user Manual) (ver.1.0) (English)
Page 12
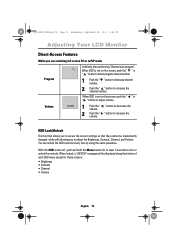
... at least 5 seconds to lock or unlock the controls. When locked, a 'LOCKED!' 4_E150MP170MPbody.fm Page 10 Wednesday, September 19, 2001 2:54 PM Adjusting Your LCD Monitor Direct-Access Features While you to secure the current settings so that they cannot be displayed along the bottom of each OSD menu except for...
... at least 5 seconds to lock or unlock the controls. When locked, a 'LOCKED!' 4_E150MP170MPbody.fm Page 10 Wednesday, September 19, 2001 2:54 PM Adjusting Your LCD Monitor Direct-Access Features While you to secure the current settings so that they cannot be displayed along the bottom of each OSD menu except for...
User Manual (user Manual) (ver.1.0) (English)
Page 13
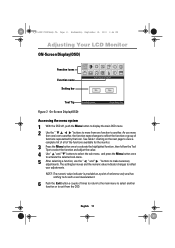
... as a point of reference only and has nothing to do with a real measurement. 6 Push the Exit button a couple of the functions available for the monitor. 3 Press the Menu button once to activate the highlighted function, then follow the Tool Tips to select the function and adjust the value. 4 Use " ... function or to exit from one icon to another . 4_E150MP170MPbody.fm Page 11 Wednesday, September 19, 2001 2:54 PM Adjusting Your LCD Monitor ON-Screen Display(OSD) Function icons Function name Setting bar AUTO AUTO ADJUSTMENT Tool Tip Auto Adjustment Press Menu Key Figure 7. English 11
... as a point of reference only and has nothing to do with a real measurement. 6 Push the Exit button a couple of the functions available for the monitor. 3 Press the Menu button once to activate the highlighted function, then follow the Tool Tips to select the function and adjust the value. 4 Use " ... function or to exit from one icon to another . 4_E150MP170MPbody.fm Page 11 Wednesday, September 19, 2001 2:54 PM Adjusting Your LCD Monitor ON-Screen Display(OSD) Function icons Function name Setting bar AUTO AUTO ADJUSTMENT Tool Tip Auto Adjustment Press Menu Key Figure 7. English 11

User Manual (user Manual) (ver.1.0) (English)
Page 14
... 12 Wednesday, September 19, 2001 2:54 PM Adjusting Your LCD Monitor OSD functions and adjustments Table 1. Brightness PC V1 V2 TV Source PIP Exit Menu SyncMaster 150MP CH VOL PC V1 V2 TV Source PIP Exit Menu SyncMaster 150MP CH VOL Image Lock PC V1 V2 TV Source PIP Exit... PC V1 V2 TV Source PIP Exit Menu SyncMaster 150MP CH VOL Image Lock is used to the incoming video signal. English 12 Screen controls Icon Menus and Sub-menus Function Descriptions Auto Adjustment AUTO Contrast "Auto adjustment" allows the monitor to self-adjust to fine tune and...
... 12 Wednesday, September 19, 2001 2:54 PM Adjusting Your LCD Monitor OSD functions and adjustments Table 1. Brightness PC V1 V2 TV Source PIP Exit Menu SyncMaster 150MP CH VOL PC V1 V2 TV Source PIP Exit Menu SyncMaster 150MP CH VOL Image Lock PC V1 V2 TV Source PIP Exit... PC V1 V2 TV Source PIP Exit Menu SyncMaster 150MP CH VOL Image Lock is used to the incoming video signal. English 12 Screen controls Icon Menus and Sub-menus Function Descriptions Auto Adjustment AUTO Contrast "Auto adjustment" allows the monitor to self-adjust to fine tune and...

User Manual (user Manual) (ver.1.0) (English)
Page 15
...Use the " " and " " buttons to center the image on the screen. 4_E150MP170MPbody.fm Page 13 Wednesday, September 19, 2001 2:54 PM Adjusting Your LCD Monitor Table 1. When Fine value is wrong. Image lock and position parameters are not obtained using the Fine adjustment, use the Coarse adjustment and then use... Fine again. V-Position PC V1 V2 TV Source PIP Exit Menu SyncMaster 150MP CH VOL PC V1 V2 TV Source PIP Exit Menu SyncMaster 150MP CH VOL PC V1 V2 TV Source PIP Exit Menu SyncMaster 150MP CH VOL PC V1 V2 TV Source PIP Exit Menu...
...Use the " " and " " buttons to center the image on the screen. 4_E150MP170MPbody.fm Page 13 Wednesday, September 19, 2001 2:54 PM Adjusting Your LCD Monitor Table 1. When Fine value is wrong. Image lock and position parameters are not obtained using the Fine adjustment, use the Coarse adjustment and then use... Fine again. V-Position PC V1 V2 TV Source PIP Exit Menu SyncMaster 150MP CH VOL PC V1 V2 TV Source PIP Exit Menu SyncMaster 150MP CH VOL PC V1 V2 TV Source PIP Exit Menu SyncMaster 150MP CH VOL PC V1 V2 TV Source PIP Exit Menu...
User Manual (user Manual) (ver.1.0) (English)
Page 16
I User Mode User customizable. I Mode1 Redish white. I Mode2 Plain white. I Reset Color parameters are connected to the monitor, PIP allows you want to bluish white. I *Channel system Select a channel system that is being used in your region. (See "PAL...DVD or RF(TV)cable are replaced with the factory default values. 4_E150MP170MPbody.fm Page 14 Wednesday, September 19, 2001 2:54 PM Adjusting Your LCD Monitor Table 1. The individual color components are also user customizable. I Position Change PIP window position. utes to our R&D Lab test result, "Channel auto...
I User Mode User customizable. I Mode1 Redish white. I Mode2 Plain white. I Reset Color parameters are connected to the monitor, PIP allows you want to bluish white. I *Channel system Select a channel system that is being used in your region. (See "PAL...DVD or RF(TV)cable are replaced with the factory default values. 4_E150MP170MPbody.fm Page 14 Wednesday, September 19, 2001 2:54 PM Adjusting Your LCD Monitor Table 1. The individual color components are also user customizable. I Position Change PIP window position. utes to our R&D Lab test result, "Channel auto...
User Manual (user Manual) (ver.1.0) (English)
Page 17
... this menu to the CCIR or Australia standard channel table. • Save - 4_E150MP170MPbody.fm Page 15 Wednesday, September 19, 2001 2:54 PM Adjusting Your LCD Monitor Table 1. Use buttons to select a stereo system. B/G A2 B/G NICAM I Stereo System Due to save the fine tuned channel. • Add - But, in a sequential manner...
... this menu to the CCIR or Australia standard channel table. • Save - 4_E150MP170MPbody.fm Page 15 Wednesday, September 19, 2001 2:54 PM Adjusting Your LCD Monitor Table 1. Use buttons to select a stereo system. B/G A2 B/G NICAM I Stereo System Due to save the fine tuned channel. • Add - But, in a sequential manner...

User Manual (user Manual) (ver.1.0) (English)
Page 18
... selected channel. English 16 Change the richness of video or TV image. 4_E150MP170MPbody.fm Page 16 Wednesday, September 19, 2001 2:54 PM Adjusting Your LCD Monitor Table 1. Screen controls (Continued) Icon Menus and Sub-menus Function Descriptions I Color New: [ P1 P5 P2 P3 P4 ] P1 P2 P3 P4 P5 Select "store...
... selected channel. English 16 Change the richness of video or TV image. 4_E150MP170MPbody.fm Page 16 Wednesday, September 19, 2001 2:54 PM Adjusting Your LCD Monitor Table 1. Screen controls (Continued) Icon Menus and Sub-menus Function Descriptions I Color New: [ P1 P5 P2 P3 P4 ] P1 P2 P3 P4 P5 Select "store...

User Manual (user Manual) (ver.1.0) (English)
Page 19
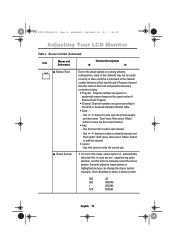
... input sources such as it is released when you change channel, adjust volume, activate PIP or access MTS menu via either the monitor or the remote controller. Mutes the sound temporarily. The enlarged image can be magnified up to both PC RGB and video... : 170MP) Display the incoming image as DVD, VCR, TV or PC. 4_E150MP170MPbody.fm Page 17 Wednesday, September 19, 2001 2:54 PM Adjusting Your LCD Monitor Table 1. Screen controls (Continued) Icon Menus and Sub-menus Function Descriptions Audio Control I Source Select I Bass I Treble I Speaker mute Image Size I Expand1 ...
... input sources such as it is released when you change channel, adjust volume, activate PIP or access MTS menu via either the monitor or the remote controller. Mutes the sound temporarily. The enlarged image can be magnified up to both PC RGB and video... : 170MP) Display the incoming image as DVD, VCR, TV or PC. 4_E150MP170MPbody.fm Page 17 Wednesday, September 19, 2001 2:54 PM Adjusting Your LCD Monitor Table 1. Screen controls (Continued) Icon Menus and Sub-menus Function Descriptions Audio Control I Source Select I Bass I Treble I Speaker mute Image Size I Expand1 ...

User Manual (user Manual) (ver.1.0) (English)
Page 20
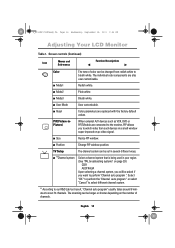
... I Halftone I Duration I Beep Image being displayed can be made softer or sharper. • Sharpen more • Sharpen • Medium • Soften • Soften more The monitor system will remain visible before disappearing. Change the opaqueness of the background of three time intervals is selected. 30 min. 60 min. 120 min. English... Italiano Svenska Move the OSD Window to the vertical and horizontal direction. 4_E150MP170MPbody.fm Page 18 Wednesday, September 19, 2001 2:54 PM Adjusting Your LCD Monitor Table 1.
... I Halftone I Duration I Beep Image being displayed can be made softer or sharper. • Sharpen more • Sharpen • Medium • Soften • Soften more The monitor system will remain visible before disappearing. Change the opaqueness of the background of three time intervals is selected. 30 min. 60 min. 120 min. English... Italiano Svenska Move the OSD Window to the vertical and horizontal direction. 4_E150MP170MPbody.fm Page 18 Wednesday, September 19, 2001 2:54 PM Adjusting Your LCD Monitor Table 1.


