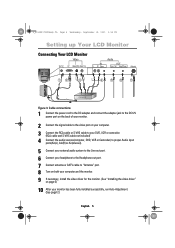
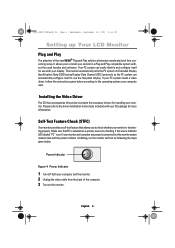
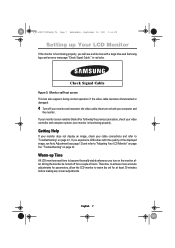
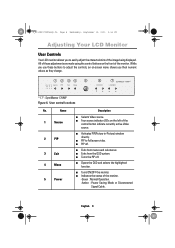
User Manual (user Manual) (ver.1.0) (English)
Page 2
... in TFT-LCD. • Resolution: 15" 1024 x 768 • Vertical frequency (refresh rate): 60 Hz 17" 1280 x 1024 2. All other product names mentioned herein may be bright sometimes or some of this product. This is applied, you clean the monitor and the panel outside, please apply the recommended small amount of Samsung Electronics Co., Ltd.; If there's still noise after automatic adjustment, use of black pixels...
User Manual (user Manual) (ver.1.0) (English)
Page 3
... Height 4 Viewing Angle 4 Kensington Security Slot 4 Connecting Your LCD Monitor 5 Plug and Play 6 Installing the Video Driver 6 Self-Test Feature Check (STFC 6 Getting Help 7 Warm-up Time 7 Adjusting Your LCD Monitor 8 User Controls 8 Automatic Save 9 Direct-Access Features 10 OSD Lock/Unlock 10 ON-Screen Display (OSD 11 Accessing the Menu System 11 OSD Functions and Adjustments 12 Appendix 19 By Remote-Control 19 PowerSaver 21 Troubleshooting 22 Specifications 25 Pin Assignments 27 Display Modes 28 Installing VESA Compliant Mounting Devices 30 Wall Mount...
User Manual (user Manual) (ver.1.0) (English)
Page 4
... electric shock, never touch the inside of the liquid cristal display (LCD) monitor; 3_E150MP170MPsaf.fm Page 2 Wednesday, September 19, 2001 3:57 PM Safety Instructions 1 Before connecting the AC power cord to the DC adapter outlet, make sure the voltage designation of the DC adapter corresponds to the local electrical supply. 2 Never insert anything to rest on the power cord, and keep the cord away from areas...
User Manual (user Manual) (ver.1.0) (English)
Page 6
... you feel comfortable working with your monitor to the least reflection from lights or windows, usually at a right angle to any window. Workstation height Place your LCD monitor so that exposes your monitor. Kensington-type security slot location English 4 Refer to secure your locking device documentation for installation instructions. Figure 2. 4_E150MP170MPbody.fm Page 4 Wednesday, September 19, 2001 2:54 PM Setting up Your LCD Monitor Setting up an...
User Manual (user Manual) (ver.1.0) (English)
Page 7
...-out port. 6 Connect your headphone to the Headphone-out port. 7 Connect antenna or CATV cable to "Antenna" port. 8 Turn on both your computer and the monitor. 9 If necessary, install the video driver for the monitor. (See "Installing the video driver" on page 6) 10 After your monitor has been fully installed successfully, run Auto-Adjustment. (See page12) English 5 4_E150MP170MPbody.fm Page 5 Wednesday, September 19, 2001 2:54 PM Setting up Your LCD Monitor Connecting Your LCD Monitor IN...
User Manual (user Manual) (ver.1.0) (English)
Page 8
... new VESA® Plug and Play solution eliminates complicated and time consuming setup. If your PC system needs a video driver, follow the instructions given below : Power Indicator Figure 4. Installing the Video Driver The CD that allows you to use with your monitor and computer are properly connected but the monitor screen remains dark and the power indicator is blinking, run the monitor self-test by checking if the source indicator LED labeled...
User Manual (user Manual) (ver.1.0) (English)
Page 9
Getting Help If your monitor does not display an image, check your monitor screen remains blank after letting the monitor be on) for a couple of the displayed image, run Auto Adjustment (see page 12) and refer to "Troubleshooting" on page 22. Check Signal Cable Figure 5. If your cable connections and refer to "Adjusting Your LCD Monitor" on page 8 or "Troubleshooting" on page 22. your video controller and computer system; in red color. English 7 then turn on the monitor after following...
User Manual (user Manual) (ver.1.0) (English)
Page 10
... off . English 8 User control locations No. I Exits from the OSD system. I PIP to easily adjust the characteristics of the monitor. -Green : Normal Operation. -Amber : Power Saving Mode or Disconnected Signal Cable. I Four source indicator LEDs on the left of the monitor. I Turns the PIP off . I Activates PIP(Picture-in-Picture) window directly. I Exits from menus and sub-menus. PC V1 V2 TV Source PIP Exit Menu CH VOL * 17" : SyncMaster 170MP Figure...
User Manual (user Manual) (ver.1.0) (English)
Page 12
... increase the channel number. You can unlock the OSD controls at least 5 seconds to increase the volume. With the OSD screen off, push and hold the Menu button for these screens : • Brightness • Contrast • Channel • Volume English 10 4_E150MP170MPbody.fm Page 10 Wednesday, September 19, 2001 2:54 PM Adjusting Your LCD Monitor Direct-Access Features While you to secure the current settings so that they...
User Manual (user Manual) (ver.1.0) (English)
Page 14
... Descriptions Auto Adjustment AUTO Contrast "Auto adjustment" allows the monitor to self-adjust to fine tune and get the best image by removing noises that creates unstable images with jitters and shimmers. The values of fine, coarse and position are adjusted automatically. 4_E150MP170MPbody.fm Page 12 Wednesday, September 19, 2001 2:54 PM Adjusting Your LCD Monitor OSD functions and adjustments Table 1. Brightness PC V1 V2 TV Source PIP Exit Menu SyncMaster...
User Manual (user Manual) (ver.1.0) (English)
Page 15
... Coarse adjustment and then use Fine again. This function may change the width of your preference. Screen controls (Continued) Icon Menus and Sub-menus Function Descriptions I Fine I Reset H-Position Display current display mode. I Information I Coarse The Fine and Coarse adjustments allow you to your monitor to fine tune the image quality of the image. Use the " " and " " buttons to center the image on the screen. Use the H-Position menu to remove...
User Manual (user Manual) (ver.1.0) (English)
Page 16
... pc video signal. The scanning can be changed from such devices in several different ways. English 14 I Size Resize PIP window. I Mode3 Bluish white. I User Mode User customizable. I Reset Color parameters are also user customizable. The individual color components are replaced with the factory default values. Screen controls (Continued) Icon Menus and Sub-menus Function Descriptions Color The tone of channels . I *Channel system Select a channel system that is being used in...
User Manual (user Manual) (ver.1.0) (English)
Page 19
Selects a sound source from various external input sources such as it is released when you change channel, adjust volume, activate PIP or access MTS menu via either the monitor or the remote controller. Resize the image to fill the whole screen. (applicable to PC RGB only : 150MP) (applicable to both PC RGB and video : 170MP) Expand images keeping the original aspect ratio. (applicable to PC RGB only : 150MP) (applicable...
User Manual (user Manual) (ver.1.0) (English)
Page 23
.... You use a software utility installed on the keyboard. For energy conservation, turn your monitor OFF when you move the computer's mouse or press a key on your computer to normal operation when horizontal and vertical sync return. Power-saving modes State Horizontal Sync Vertical Sync Video Power Indicator Power Consumption Normal Operation Active Active Active Green 150MP : 33W (Max.) 170MP : 52W (Max.) Power-Saving Function mode (EPA/NUTEK) Standby Mode Sleep Mode Deep Sleep Mode Position A1 Position A2 Inactive...
User Manual (user Manual) (ver.1.0) (English)
Page 24
I Adjust the Brightness and or too dark Contrast. The image is firmly connected to the PC or video sources. shimmer on the image Image Lock, Fine, page 12 ~13. Image Lock, Coarse, page 12~13. Troubleshooting - Display Modes, page 28. Horizontal bars appear I Check the maximum resolution and the frequency of Range" message I Adjust the Fine function. English 22 Before contacting customer service, try the suggested actions that the signal cable is too light I Compare these...
User Manual (user Manual) (ver.1.0) (English)
Page 25
... program to vibrate I Adjust the horizontal and on the keyboard Power Saver, page 21. Image is not centered I Check that the display resolution and frequency from WWW pages: http://samsungelectronics.com/ support/downloads/monitor/ index.html English 23 Suggested Actions Reference Screen is blank and power indicator light is steady amber or blinks every 0.5 or 1 seconds I Download the driver from your PC or video board is using its power management system. 4_E150MP170MPbody...
User Manual (user Manual) (ver.1.0) (English)
Page 27
... on -green 0.3 Vp-p, N. 0.7 Vp-p @ 75 ohm TV, Video Color system Sound system Video format PAL B/G, D/K, I CVBS, S-VHS Video Color system PAL/NTSC Power Supply Input Output AC 100-240 Vrms (50 ~ 60Hz) AC 100-240 Vrms (50 ~ 60Hz) DC 12V/3A DC 12V/4.5A * Referring to Standard signal modes, page 28. Sync-on the panel manufacturer, the viewing angle may be different from this spec.) * Frequency Horizontal Vertical Display color 30...
User Manual (user Manual) (ver.1.0) (English)
Page 32
... the instructions provided with it with the four screws that the bracket will be mounted between the wall studs. 4_E150MP170MPbody.fm Page 30 Wednesday, September 19, 2001 2:54 PM Appendix Installing VESA compliant mounting devices Refer to page 32 to the back of the monitor using four 3/16 by 3-inch long toggle bolts. Securely attach Ergotron's flat panel, triple pivot direct mount adapter to...
User Manual (user Manual) (ver.1.0) (English)
Page 35
... Assignments 27 PIP 8, 14 Plug and Play 6 Power 8 Power Indicator 6 Power-saving modes 21 Program 10 R Remote Controller 3, 19 Reset 13 S S-VHS Cable 3 Safety Instructions 2 Scart Jack 3 Screen controls 12 Self-test feature check 6 Sharpness 16 Size 14 Source 8, 17 Speaker mute 17 Stereo-RCA Cable 3 Stereo System 15 Store 16 T Tilt the screen 4 Timer 18 Treble 17 Troubleshooting 22 TV Setup 14 U User control locations 8 User mode 14 V Video Control 16 VOL 9 Volume 10 V-position 13 Z Zoom 17 English 33
User Manual (user Manual) (ver.1.0) (English)
Page 36
... in a particular installation. The party responsible for the product. 6_E150MP170MPreg.fm Page 0 Wednesday, September 19, 2001 2:53 PM Portuguese Italiano Español Deutsch Français English Regulatory Information FCC Information User Instructions The Federal Communications Commission Radio Frequency Interference Statement includes the following European Norms: I EN55022 (CISPR 22) - It is a detachable power supply cord with this...