
User Manual (ENGLISH)
Page 18
... your job contains bitmapped images, such as the specific print material you are mostly text, select 600dpi- When a print time-out occurs, the printer prints the page in the tray. When you select any number from enhanced line screening. Use the Light toner density setting to change settings affecting the quality of copies by changing the toner density setting. Select the paper size currently loaded in the tray. Paper menu Use the Paper menu to define all settings relating to print material input and output...
... your job contains bitmapped images, such as the specific print material you are mostly text, select 600dpi- When a print time-out occurs, the printer prints the page in the tray. When you select any number from enhanced line screening. Use the Light toner density setting to change settings affecting the quality of copies by changing the toner density setting. Select the paper size currently loaded in the tray. Paper menu Use the Paper menu to define all settings relating to print material input and output...
User Manual (ENGLISH)
Page 20
... this mode: Using the control panel button Press Toner Save on , the mode is enabled and the printer uses less toner to you set. Item LPI Auto Wrap Explanation You can set the number of lines printed in one would experience in the normal mode, but it reduces print quality. Network menu(ML-3471ND only) This menu lets you to use the protocol. You can reset the network interface and print a configuration page. Using toner save mode Toner save mode from the network. • DHCP: The DHCP server allots the IP address...
... this mode: Using the control panel button Press Toner Save on , the mode is enabled and the printer uses less toner to you set. Item LPI Auto Wrap Explanation You can set the number of lines printed in one would experience in the normal mode, but it reduces print quality. Network menu(ML-3471ND only) This menu lets you to use the protocol. You can reset the network interface and print a configuration page. Using toner save mode Toner save mode from the network. • DHCP: The DHCP server allots the IP address...

User Manual (ENGLISH)
Page 26
... Standby mode. This program does not support Linux. 4.2 Configuring TCP/IP Your printer can be set up with your machine. 2 Start Windows Explorer and open the X drive. (X represents your CD-ROM drive.) 3 Double click Application > SetIP. 4 Open the language folder you want to use. 5 Double click Setup.exe to install this to complete the address from your computer operating system, and install the program. There are in a non-static IP address...
... Standby mode. This program does not support Linux. 4.2 Configuring TCP/IP Your printer can be set up with your machine. 2 Start Windows Explorer and open the X drive. (X represents your CD-ROM drive.) 3 Double click Application > SetIP. 4 Open the language folder you want to use. 5 Double click Setup.exe to install this to complete the address from your computer operating system, and install the program. There are in a non-static IP address...
User Manual (ENGLISH)
Page 48
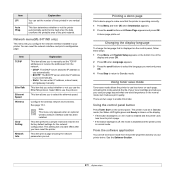
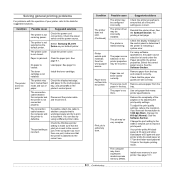
... the Status LED lights red, check the display message. Condition Suggested solutions Make sure that you call for service. 9.6 Message Door Open Duplex Jam 0 Check Inside Duplex Jam 1 Open/Close Door Fuser Door Open IP Conflict Load Manually Press Stop Key Low Heat Error Cycle Power LSU Hsync Error Cycle Power Meaning Suggested solutions The front cover or rear cover is feeding paper correctly. Print a short document from a software application to verify that the computer and printer are connected and are listed in the fuser unit. See page 9.5. Check the power...
... the Status LED lights red, check the display message. Condition Suggested solutions Make sure that you call for service. 9.6 Message Door Open Duplex Jam 0 Check Inside Duplex Jam 1 Open/Close Door Fuser Door Open IP Conflict Load Manually Press Stop Key Low Heat Error Cycle Power LSU Hsync Error Cycle Power Meaning Suggested solutions The front cover or rear cover is feeding paper correctly. Print a short document from a software application to verify that the computer and printer are connected and are listed in the fuser unit. See page 9.5. Check the power...
User Manual (ENGLISH)
Page 50
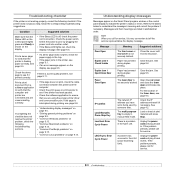
... change the selection, turn the printer off the Toner Low Replace Toner message. Replace Toner1 a Samsung-genuine cartridge. NonGenuine Toner The toner cartridge installed is no longer provided. Install the Samsung-genuine toner cartridge. Replace Toner The toner in the cartridge has run out. If you do not select any kind of the toner cartridge This message appears when the toner is completely empty and your printer. Install a new Samsung-genuine toner cartridge. You can keep printing but the quality cannot be guaranteed, and the product support...
... change the selection, turn the printer off the Toner Low Replace Toner message. Replace Toner1 a Samsung-genuine cartridge. NonGenuine Toner The toner cartridge installed is no longer provided. Install the Samsung-genuine toner cartridge. Replace Toner The toner in the cartridge has run out. If you do not select any kind of the toner cartridge This message appears when the toner is completely empty and your printer. Install a new Samsung-genuine toner cartridge. You can keep printing but the quality cannot be guaranteed, and the product support...
User Manual (ENGLISH)
Page 51
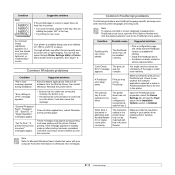
... port setting is defective. Check the power switch and the power source. Select Samsung ML-3470 Series as the default printer. Close the printer cover. See page 9.1. See page 5.4. Check the display message, add paper to the multi-purpose tray, and press OK on the control panel to the correct port. Disconnect the printer cable and reconnect it correctly. You can also try adjusting the print quality settings. If the computer has more memory in the duplex printing mode. Condition The printer does not print. (Continued) Printer...
... port setting is defective. Check the power switch and the power source. Select Samsung ML-3470 Series as the default printer. Close the printer cover. See page 9.1. See page 5.4. Check the display message, add paper to the multi-purpose tray, and press OK on the control panel to the correct port. Disconnect the printer cable and reconnect it correctly. You can also try adjusting the print quality settings. If the computer has more memory in the duplex printing mode. Condition The printer does not print. (Continued) Printer...
User Manual (ENGLISH)
Page 55
... resolution setting in Use" message appears during printing. See page 1.5. "General Protection Fault", "Exception OE", "Spool32", or "Illegal Operation" messages appear. If the message appears in the driver. The high altitude may occur when several printer languages are PostScript language specific and may affect the print quality such as loose toner or light imaging. Common Windows problems Condition "File in your computer for printing. • Install the PostScript driver. • If problem consists, contact a service...
... resolution setting in Use" message appears during printing. See page 1.5. "General Protection Fault", "Exception OE", "Spool32", or "Illegal Operation" messages appear. If the message appears in the driver. The high altitude may occur when several printer languages are PostScript language specific and may affect the print quality such as loose toner or light imaging. Common Windows problems Condition "File in your computer for printing. • Install the PostScript driver. • If problem consists, contact a service...

User Manual (ENGLISH)
Page 57
... open it. 1 1 control board cover 3 Completely open the latch on each user may have different requirements, however, Samsung makes several accessories available to enhance the printer's capabilities. Use this DIMM slot to static electricity. This chapter includes: • Precautions when installing accessories • Installing a memory DIMM • Installing a wireless network interface card Precautions when installing accessories Disconnect the power cord: Never remove the control board cover while the power is a full-featured laser printer that each side...
... open it. 1 1 control board cover 3 Completely open the latch on each user may have different requirements, however, Samsung makes several accessories available to enhance the printer's capabilities. Use this DIMM slot to static electricity. This chapter includes: • Precautions when installing accessories • Installing a memory DIMM • Installing a wireless network interface card Precautions when installing accessories Disconnect the power cord: Never remove the control board cover while the power is a full-featured laser printer that each side...

User Manual (ENGLISH)
Page 62
... installing memory DIMM 10.1 wireless network interface card 10.2 order information 7.1 C cleaning drum 8.2 inside 8.1 outside 8.1 cleaning sheet, print 8.2 component location 1.2 control panel menus 2.1 status LED 1.4 D demo page, print 2.5 DIMM, install 10.1 display language, change control panel 2.5 drum, clean 8.2 E error messages 9.6 H high altitude 9.13 I installing accessories memory 10.1 network interface card 10.2 J jam, clear 9.1 L Linux problems 9.14 loading paper multi-purpose tray 5.6 tray 1/optional tray 2 5.5 M Macintosh problems 9.14 manual feed mode 5.7 memory DIMM, install...
... installing memory DIMM 10.1 wireless network interface card 10.2 order information 7.1 C cleaning drum 8.2 inside 8.1 outside 8.1 cleaning sheet, print 8.2 component location 1.2 control panel menus 2.1 status LED 1.4 D demo page, print 2.5 DIMM, install 10.1 display language, change control panel 2.5 drum, clean 8.2 E error messages 9.6 H high altitude 9.13 I installing accessories memory 10.1 network interface card 10.2 J jam, clear 9.1 L Linux problems 9.14 loading paper multi-purpose tray 5.6 tray 1/optional tray 2 5.5 M Macintosh problems 9.14 manual feed mode 5.7 memory DIMM, install...

SyncThru 5.0 Job Accounting Plug-in Guide (ENGLISH)
Page 21
... to the device. 5. Check Enable Access Control and select the option: Use Default Access Code or Use Custom Access Code. • Default is correct. From the Job Accounting Settings panel, check Enable/Disable Job Accounting. 4. Please make sure that JAC State is Disabled. Click OK/Apply. Or you want to enter the access code that device(s) does not display a login window. A device(s) with Job Accounting disabled will not keep the Job Accounting users, which you can export or save the device list. 1. The Export to configure all the users and...
... to the device. 5. Check Enable Access Control and select the option: Use Default Access Code or Use Custom Access Code. • Default is correct. From the Job Accounting Settings panel, check Enable/Disable Job Accounting. 4. Please make sure that JAC State is Disabled. Click OK/Apply. Or you want to enter the access code that device(s) does not display a login window. A device(s) with Job Accounting disabled will not keep the Job Accounting users, which you can export or save the device list. 1. The Export to configure all the users and...

SyncThru 5.0 Job Accounting Plug-in Guide (ENGLISH)
Page 64
... generating 37 history 39 scheduling 38 C changing acess code 21 configuring 12 adding users 12, 13 enabling job accounting 13 copyright 2 D data reference 47 device list 20 downloading 11 driver settings 33 E enabling/disabling 21 G glossary 60 I installation 12 printer driver 33 uninstalling 12 J jac state 20 jac supported 20 jac url 20 L login window 34 O open source information 48 overview analysis and report 35 job accounting 8 users 14 P permissions group 28 assigning...
... generating 37 history 39 scheduling 38 C changing acess code 21 configuring 12 adding users 12, 13 enabling job accounting 13 copyright 2 D data reference 47 device list 20 downloading 11 driver settings 33 E enabling/disabling 21 G glossary 60 I installation 12 printer driver 33 uninstalling 12 J jac state 20 jac supported 20 jac url 20 L login window 34 O open source information 48 overview analysis and report 35 job accounting 8 users 14 P permissions group 28 assigning...
SyncThru 5.0 Driver Management Plug-in Guide (ENGLISH)
Page 7
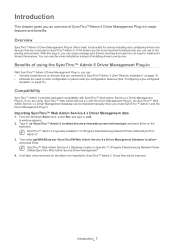
...; Web Admin Service 4.x Driver Management data 1. It will be migrated manually when you install SyncThru™ Admin 5 and the Driver Management Plug-in , you are connected to SyncThru™Admin 5 (See "Remote Installation" on page11). • eliminate the need to enter configuration in cmd. Print drivers are connected to SyncThru™ Admin 5. You can be imported. Type in , the SyncThru™ Web Admin Service 4.x Driver Management database can use in "C:\Program Files\Samsung Network Printer Utilities\SyncThru Admin...
...; Web Admin Service 4.x Driver Management data 1. It will be migrated manually when you install SyncThru™ Admin 5 and the Driver Management Plug-in , you are connected to SyncThru™Admin 5 (See "Remote Installation" on page11). • eliminate the need to enter configuration in cmd. Print drivers are connected to SyncThru™ Admin 5. You can be imported. Type in , the SyncThru™ Web Admin Service 4.x Driver Management database can use in "C:\Program Files\Samsung Network Printer Utilities\SyncThru Admin...
SyncThru 5.0 Guide (ENGLISH)
Page 11
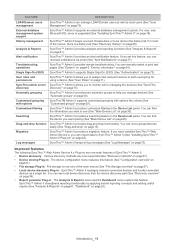
... permissions to be done in : The Analysis & Reports menu and the Dashboard menu replace this feature (See "Configuration overview" on page 41). • File storage Plug-in : SyncThru™ Admin 5 manages network-connected devices and locally-connected devices as local users (See "User Management" on page 70). SyncThru™ Admin 5 provides drag-and-drop functionality. SyncThruTM Admin 5 supports customized grouping with options Customized filtering Searching Drag-and-drop function Migration Log...
... permissions to be done in : The Analysis & Reports menu and the Dashboard menu replace this feature (See "Configuration overview" on page 41). • File storage Plug-in : SyncThru™ Admin 5 manages network-connected devices and locally-connected devices as local users (See "User Management" on page 70). SyncThru™ Admin 5 provides drag-and-drop functionality. SyncThruTM Admin 5 supports customized grouping with options Customized filtering Searching Drag-and-drop function Migration Log...
SyncThru 5.0 Guide (ENGLISH)
Page 43
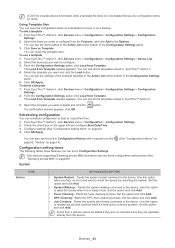
... the Options. Configure settings (See "Configuration setting items" on the upper left and configure Start Date/Time. 3. Set the option and click Add. • Fuser Cleaning: Starts the fuser cleaning process. A CSV file includes device information while a template file does not. From SyncThru™ Admin 5, click Devices menu > Configuration > Configuration Settings > Device List. 2. You can see all the templates stored in Configuration History with a special icon like page 52, "History" on page 14). (See "Configuration History" on page 89). Only devices supporting Samsung...
... the Options. Configure settings (See "Configuration setting items" on the upper left and configure Start Date/Time. 3. Set the option and click Add. • Fuser Cleaning: Starts the fuser cleaning process. A CSV file includes device information while a template file does not. From SyncThru™ Admin 5, click Devices menu > Configuration > Configuration Settings > Device List. 2. You can see all the templates stored in Configuration History with a special icon like page 52, "History" on page 14). (See "Configuration History" on page 89). Only devices supporting Samsung...
SyncThru 5.0 Guide (ENGLISH)
Page 44
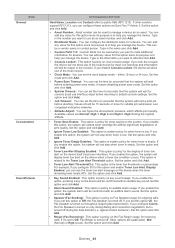
..., Location and Contact refers to default console settings. If you enable this option, the system will extend toner cartridge life without significant degradation of the local device for console (local use of print quality. You can set the clock display mode - If you enable this option, the system will not stop when toner is to mark additional information for this option, the system will allow use interface) input before entering power save mode. 0 means disabling power...
..., Location and Contact refers to default console settings. If you enable this option, the system will extend toner cartridge life without significant degradation of the local device for console (local use of print quality. You can set the clock display mode - If you enable this option, the system will not stop when toner is to mark additional information for this option, the system will allow use interface) input before entering power save mode. 0 means disabling power...
SyncThru 5.0 Guide (ENGLISH)
Page 56
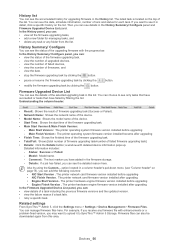
... Custom... The printer network card firmware version installed before upgrading • NIC Finish Version . view the number of firmwares, and - In the History panel, you can: • view all the firmware upgrading tasks, • add a new folder for managing tasks, and • delete any task or any firmware file with enhancements or a problem-fixed version, you may want to see it to SyncThru™ Admin 5 Storage. option located in the History list...
... Custom... The printer network card firmware version installed before upgrading • NIC Finish Version . view the number of firmwares, and - In the History panel, you can: • view all the firmware upgrading tasks, • add a new folder for managing tasks, and • delete any task or any firmware file with enhancements or a problem-fixed version, you may want to see it to SyncThru™ Admin 5 Storage. option located in the History list...
SyncThru 5.0 Guide (ENGLISH)
Page 79
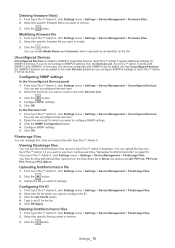
... main Devices List when you want to move to remove. 3. From SyncThru™ Admin 5, click Settings menu > Settings > Device Management > Filestorage Files. 2. Select the file for SNMPv3 devices. Type in Show, the options are All, PS Font, PS Form, PCL Font and PCL Macro. Select the specific firmware file(s) you configure SNMPv3 settings of SyncThru™ Admin 5 for the file. 5. Click the button. If you want to SNMPv3 supported devices. From SyncThru™ Admin 5, click Settings menu > Settings > Device Management > Unconfigured Devices. From...
... main Devices List when you want to move to remove. 3. From SyncThru™ Admin 5, click Settings menu > Settings > Device Management > Filestorage Files. 2. Select the file for SNMPv3 devices. Type in Show, the options are All, PS Font, PS Form, PCL Font and PCL Macro. Select the specific firmware file(s) you configure SNMPv3 settings of SyncThru™ Admin 5 for the file. 5. Click the button. If you want to SNMPv3 supported devices. From SyncThru™ Admin 5, click Settings menu > Settings > Device Management > Unconfigured Devices. From...
SyncThru 5.0 Guide (ENGLISH)
Page 80
.... Troubleshooting 7. This chapter gives helpful information for the discovery reflects the network that the specified devices are turned on the router. • If you may face this discovery. - User actions • Make sure that the devices support multicast broadcasts. By default, SyncThru™ Admin 5 will configure the firewall exceptions automatically unless you type in cmd. Make sure that the URL and port number you change the setting...
.... Troubleshooting 7. This chapter gives helpful information for the discovery reflects the network that the specified devices are turned on the router. • If you may face this discovery. - User actions • Make sure that the devices support multicast broadcasts. By default, SyncThru™ Admin 5 will configure the firewall exceptions automatically unless you type in cmd. Make sure that the URL and port number you change the setting...
SyncThru 5.0 Guide (ENGLISH)
Page 86
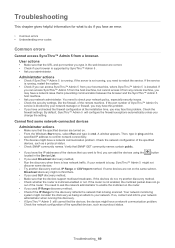
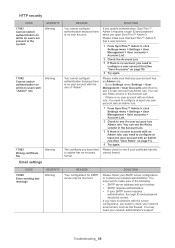
... the Account List. - Troubleshooting_ 86 HTTP security CODE 17001 Cannot switch authentication on while no users are present in the system SEVERITY Warning 17002 Cannot switch authentication on while no users with "Admin" role Warning 17003 Wrong certificate file Warning Email settings REASON You cannot configure authentication because there is no user account with the role of the following: • SMTP server address and port number. • SMTP...
... the Account List. - Troubleshooting_ 86 HTTP security CODE 17001 Cannot switch authentication on while no users are present in the system SEVERITY Warning 17002 Cannot switch authentication on while no users with "Admin" role Warning 17003 Wrong certificate file Warning Email settings REASON You cannot configure authentication because there is no user account with the role of the following: • SMTP server address and port number. • SMTP...
SyncThru 5.0 Guide (ENGLISH)
Page 90
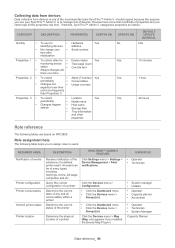
... manage lots of devices. Click the Devices menu > Configuration. Determine the physical location of a printer Click the Devices menu > Map. (Map only appears if you use for • Hardware Yes identifying devices address • No change over • Serial number time after initialization Properties. 1 • To collect often for • Device status Yes monitoring device • Total page count status • Console text • Always changes are there over time Properties. 2 • To...
... manage lots of devices. Click the Devices menu > Configuration. Determine the physical location of a printer Click the Devices menu > Map. (Map only appears if you use for • Hardware Yes identifying devices address • No change over • Serial number time after initialization Properties. 1 • To collect often for • Device status Yes monitoring device • Total page count status • Console text • Always changes are there over time Properties. 2 • To...


