Universal Print Driver Guide (ENGLISH)
Page 4
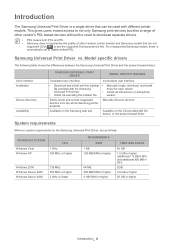
... download separate drivers. • PDL means both PCL and PS. • Samsung does not guarantee the quality of other vendors' printer devices and Samsung models that can be used with the device, or the product based driver. Manually discover devices. The Samsung Universal Print Driver is automatically set to see the supported Samsung device list). Model specific drivers The following table shows the differences between the Samsung Universal Print Driver and the product based drivers: User interface Installation Device discovery Availability SAMSUNG UNIVERSAL PRINT DRIVER MODEL...
... download separate drivers. • PDL means both PCL and PS. • Samsung does not guarantee the quality of other vendors' printer devices and Samsung models that can be used with the device, or the product based driver. Manually discover devices. The Samsung Universal Print Driver is automatically set to see the supported Samsung device list). Model specific drivers The following table shows the differences between the Samsung Universal Print Driver and the product based drivers: User interface Installation Device discovery Availability SAMSUNG UNIVERSAL PRINT DRIVER MODEL...

Universal Print Driver Guide (ENGLISH)
Page 9
... and install the Samsung Smart Panel program to see this option with network printers. There are connected either by Address: Searches for this window to install the Smart Panel of the user's guide. Search by USB or network. - You need to pop-up option You can only use this window. • Update Now: Updates the selected printer's information. • Buy Supplies: Opens the website for buying supplies. • TroubleShooting Guide: Opens the troubleshooting chapter of the model you print. Changing Samsung Universal Print Driver settings Setting the...
... and install the Samsung Smart Panel program to see this option with network printers. There are connected either by Address: Searches for this window to install the Smart Panel of the user's guide. Search by USB or network. - You need to pop-up option You can only use this window. • Update Now: Updates the selected printer's information. • Buy Supplies: Opens the website for buying supplies. • TroubleShooting Guide: Opens the troubleshooting chapter of the model you print. Changing Samsung Universal Print Driver settings Setting the...

User Manual (ENGLISH)
Page 3
CONTENTS Chapter 1: INTRODUCTION Special Features 1.2 Printer Components 1.4 Front View 1.4 Inside View 1.5 Rear View 1.5 Understanding the Control Panel 1.6 On Line/Error and Toner Save LEDs 1.6 Cancel button 1.7 Chapter 2: SETTING UP YOUR PRINTER Unpacking 2.2 Selecting a Location 2.3 Installing the Toner Cartridge 2.4 Loading Paper 2.6 Changing the Paper Size in the Tray 2.8 Connecting a Printer Cable 2.9 Turning the Printer on 2.10 Printing a Demo Page 2.11 Installing Printer Software 2.12 Printer Driver Features 2.13 Installing Printer software in Windows 2.14 ii
CONTENTS Chapter 1: INTRODUCTION Special Features 1.2 Printer Components 1.4 Front View 1.4 Inside View 1.5 Rear View 1.5 Understanding the Control Panel 1.6 On Line/Error and Toner Save LEDs 1.6 Cancel button 1.7 Chapter 2: SETTING UP YOUR PRINTER Unpacking 2.2 Selecting a Location 2.3 Installing the Toner Cartridge 2.4 Loading Paper 2.6 Changing the Paper Size in the Tray 2.8 Connecting a Printer Cable 2.9 Turning the Printer on 2.10 Printing a Demo Page 2.11 Installing Printer Software 2.12 Printer Driver Features 2.13 Installing Printer software in Windows 2.14 ii

User Manual (ENGLISH)
Page 6
Chapter 7: APPENDIX Using Your Printer in Linux 7.2 Installing the Printer Driver 7.2 Changing the Printer Connection Method 7.6 Using the Configuration Tool 7.8 Changing LLPR Properties 7.10 Printer Specifications 7.12 Paper Specifications 7.13 Overview 7.13 Supported Sizes of Paper 7.14 Guidelines for Using Paper 7.15 Paper Specifications 7.16 Paper Output Capacity 7.16 Printer and Paper Storage Environment 7.17 v
Chapter 7: APPENDIX Using Your Printer in Linux 7.2 Installing the Printer Driver 7.2 Changing the Printer Connection Method 7.6 Using the Configuration Tool 7.8 Changing LLPR Properties 7.10 Printer Specifications 7.12 Paper Specifications 7.13 Overview 7.13 Supported Sizes of Paper 7.14 Guidelines for Using Paper 7.15 Paper Specifications 7.16 Paper Output Capacity 7.16 Printer and Paper Storage Environment 7.17 v

User Manual (ENGLISH)
Page 17
... error, such as jammed paper, the open cover or the empty toner cartridge. See "Troubleshooting Error Messages" on and the Toner Save mode is on page 6.18. If you press this button once again, this LED is enabled. If the On Line/Error lights red, the printer is ready to cancel printing. In Manual Feed mode, if there is no paper in Ready mode, this LED is off and the Toner Save mode is receiving data, the On Line/Error LED blinks red to print...
... error, such as jammed paper, the open cover or the empty toner cartridge. See "Troubleshooting Error Messages" on and the Toner Save mode is on page 6.18. If you press this button once again, this LED is enabled. If the On Line/Error lights red, the printer is ready to cancel printing. In Manual Feed mode, if there is no paper in Ready mode, this LED is off and the Toner Save mode is receiving data, the On Line/Error LED blinks red to print...

User Manual (ENGLISH)
Page 18
... the problem, see page 4.8. Manual feeding Press this button during printing. The On Line/Error LED blinks while the print job is printed. In Manual Feed mode, you select Manual Feed for about 2 seconds until all LEDs blink slowly, and release. Toner Save mode on the size of paper in the manual feeder, when you can't cancel the print job by pressing this button to Ready mode. For detailed information, see "Using the Manual Feeder" on page 6.18. For detailed information, see "Troubleshooting Error Messages" on page...
... the problem, see page 4.8. Manual feeding Press this button during printing. The On Line/Error LED blinks while the print job is printed. In Manual Feed mode, you select Manual Feed for about 2 seconds until all LEDs blink slowly, and release. Toner Save mode on the size of paper in the manual feeder, when you can't cancel the print job by pressing this button to Ready mode. For detailed information, see "Using the Manual Feeder" on page 6.18. For detailed information, see "Troubleshooting Error Messages" on page...
User Manual (ENGLISH)
Page 31
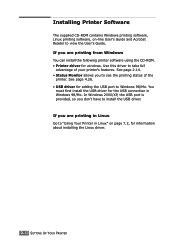
Installing Printer Software The supplied CD-ROM contains Windows printing software, Linux printing software, on page 7.2, for information about installing the Linux driver. 2.12 SETTING UP YOUR PRINTER Use this driver to take full advantage of the printer. See page 4.26. • USB driver for adding the USB port to install the USB driver. See page 2.14. • Status Monitor allows you don't have to Windows 98/Me. In Windows 2000/XP, the USB port is provided, so you to view the User's Guide. You must...
Installing Printer Software The supplied CD-ROM contains Windows printing software, Linux printing software, on page 7.2, for information about installing the Linux driver. 2.12 SETTING UP YOUR PRINTER Use this driver to take full advantage of the printer. See page 4.26. • USB driver for adding the USB port to install the USB driver. See page 2.14. • Status Monitor allows you don't have to Windows 98/Me. In Windows 2000/XP, the USB port is provided, so you to view the User's Guide. You must...

User Manual (ENGLISH)
Page 45
... select Manual Feed for every page to be helpful when you want to check the print quality after each page is started. 5 If you are printing multiple pages, load the next sheet after the first page prints out, and press the Cancel button. If you experience a paper jam from the software application, and then select the correct paper size and type. Using the Manual Feeder If you select Manual Feed in the Source option, you can be printed. 3.8 USING PRINT MATERIALS...
... select Manual Feed for every page to be helpful when you want to check the print quality after each page is started. 5 If you are printing multiple pages, load the next sheet after the first page prints out, and press the Cancel button. If you experience a paper jam from the software application, and then select the correct paper size and type. Using the Manual Feeder If you select Manual Feed in the Source option, you can be printed. 3.8 USING PRINT MATERIALS...
User Manual (ENGLISH)
Page 96
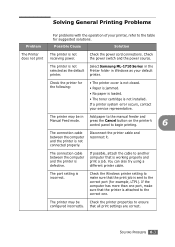
... loaded. • The toner cartridge is not selected as your default printer. SOLVING PROBLEMS 6.3 press the Cancel button on the printer's control panel to begin printing. 6 The connection cable between the computer and the printer is sent to the manual feeder and Manual Feed mode. You can also try using a different printer cable. Disconnect the printer cable and reconnect it. If the computer has more than one . The printer is not installed. Select Samsung ML-1710 Series in the Printer folder in Add paper...
... loaded. • The toner cartridge is not selected as your default printer. SOLVING PROBLEMS 6.3 press the Cancel button on the printer's control panel to begin printing. 6 The connection cable between the computer and the printer is sent to the manual feeder and Manual Feed mode. You can also try using a different printer cable. Disconnect the printer cable and reconnect it. If the computer has more than one . The printer is not installed. Select Samsung ML-1710 Series in the Printer folder in Add paper...

User Manual (ENGLISH)
Page 97
... feed into the printer. Remove excess paper from the document. Use only paper that the paper size in the print settings matches the paper in the tray. From the Start menu, choose Settings and Printers. Right-click the Samsung ML-1710 Serise printer icon, choose Properties, click the Details tab, and then choose the Spool Settings button. Half the page is 16(A4) or 17(Letter) pages per minute. unnecessary graphics from the tray. Change the page...
... feed into the printer. Remove excess paper from the document. Use only paper that the paper size in the print settings matches the paper in the tray. From the Start menu, choose Settings and Printers. Right-click the Samsung ML-1710 Serise printer icon, choose Properties, click the Details tab, and then choose the Spool Settings button. Half the page is 16(A4) or 17(Letter) pages per minute. unnecessary graphics from the tray. Change the page...
User Manual (ENGLISH)
Page 107
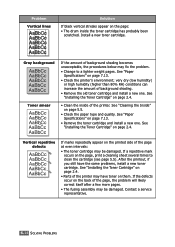
... old toner cartridge and install a new one . See "Paper Specifications" on page 2.4. See "Paper Specifications" on page 7.13. • Remove the toner cartridge and install a new one . If a repetitive mark occurs on the page, print a cleaning sheet several times to a lighter weight pages. See "Cleaning the Inside" on page 5.5. • Check the paper type and quality. Contact a service representative. 6.14 SOLVING PROBLEMS Problem Vertical lines Solution If black vertical streaks appear on the page: • The drum inside of the page at even intervals: • The toner cartridge...
... old toner cartridge and install a new one . See "Paper Specifications" on page 2.4. See "Paper Specifications" on page 7.13. • Remove the toner cartridge and install a new one . If a repetitive mark occurs on the page, print a cleaning sheet several times to a lighter weight pages. See "Cleaning the Inside" on page 5.5. • Check the paper type and quality. Contact a service representative. 6.14 SOLVING PROBLEMS Problem Vertical lines Solution If black vertical streaks appear on the page: • The drum inside of the page at even intervals: • The toner cartridge...
User Manual (ENGLISH)
Page 108
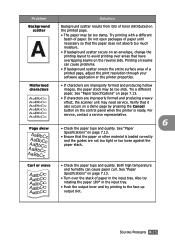
... a demo page by pressing the Cancel button on the reverse side. Problem Background scatter Misformed characters Page skew Solution Background scatter results from bits of toner distributed on page 7.13. • Turn over areas that the paper or other material is ready. See "Paper Specifications" on page 7.13. • Ensure that have overlapping seams on the control panel when the printer is loaded correctly and the guides are...
... a demo page by pressing the Cancel button on the reverse side. Problem Background scatter Misformed characters Page skew Solution Background scatter results from bits of toner distributed on page 7.13. • Turn over areas that the paper or other material is ready. See "Paper Specifications" on page 7.13. • Ensure that have overlapping seams on the control panel when the printer is loaded correctly and the guides are...

User Manual (ENGLISH)
Page 111
... Line/Error LED lights red • Paper jam occurs. To solve the problem, see "Clearing Paper Jams" on page 2.4. • You pressed the Cancel button while the printer is receiving data. • In Manual Feed mode, there is open. See "Installing the Toner Cartridge" on page 6.7. • The front cover is no paper in the Manual Feeder. Remove the old toner cartridge and install a new one. Find the light pattern below that matches the printer light pattern and follow the solutions to clear the error. Load paper into the Manual Feeder...
... Line/Error LED lights red • Paper jam occurs. To solve the problem, see "Clearing Paper Jams" on page 2.4. • You pressed the Cancel button while the printer is receiving data. • In Manual Feed mode, there is open. See "Installing the Toner Cartridge" on page 6.7. • The front cover is no paper in the Manual Feeder. Remove the old toner cartridge and install a new one. Find the light pattern below that matches the printer light pattern and follow the solutions to clear the error. Load paper into the Manual Feeder...
Service Manual
Page 6
... the repair or not. Be careful not to insert a finger or hair in the rotating unit. If those are got into the inner side of hair in the memory. A fire or electric shock can be written down. (2) Before servicing or replacing electric parts, take off a plug. (3) Take off printer cables and power code connected to printer. (4) Do use formal parts and same standardized goods when replacing parts.Must check...
... the repair or not. Be careful not to insert a finger or hair in the rotating unit. If those are got into the inner side of hair in the memory. A fire or electric shock can be written down. (2) Before servicing or replacing electric parts, take off a plug. (3) Take off printer cables and power code connected to printer. (4) Do use formal parts and same standardized goods when replacing parts.Must check...
Service Manual
Page 8
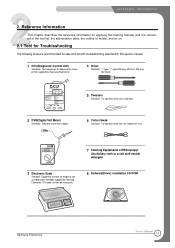
... Standard : For general home use, small type. 2 DVM(Digital Volt Meter) Standard : Indicates more than 3 digits. 6 Cotton Swab Standard : For general home use, for medical ser-vice 7 Cleaning Equipments a IPA(Isopropyl Alcohol)dry cloth or a soft stuff neutral detergent 3 Electronic Scale Standard : Equipment to check the weight of consumables(toner cartridge) supplied by Samsung Electronics. (The gram unit can be measured.) 8 Software(Driver) installation CD ROM Samsung Electronics Service Manual...
... Standard : For general home use, small type. 2 DVM(Digital Volt Meter) Standard : Indicates more than 3 digits. 6 Cotton Swab Standard : For general home use, for medical ser-vice 7 Cleaning Equipments a IPA(Isopropyl Alcohol)dry cloth or a soft stuff neutral detergent 3 Electronic Scale Standard : Equipment to check the weight of consumables(toner cartridge) supplied by Samsung Electronics. (The gram unit can be measured.) 8 Software(Driver) installation CD ROM Samsung Electronics Service Manual...

Service Manual
Page 21
... D U C T 2) Cancel button Printing demo page Printing configuration sheet Manual feeding Cleaning inside printer Canceling print job Toner Save mode on/off In Ready mode, press and hold this button for about 2 seconds until all LEDs turn the Toner Save mode on or off. Press this button for about 6 seconds until all LEDs blink slowly, and release. Press this button each time you load a sheet of the print job. This may take some time depending on , and release. Service Manual 4-4 Samsung Electronics After cleaning the printer...
... D U C T 2) Cancel button Printing demo page Printing configuration sheet Manual feeding Cleaning inside printer Canceling print job Toner Save mode on/off In Ready mode, press and hold this button for about 2 seconds until all LEDs turn the Toner Save mode on or off. Press this button for about 6 seconds until all LEDs blink slowly, and release. Press this button each time you load a sheet of the print job. This may take some time depending on , and release. Service Manual 4-4 Samsung Electronics After cleaning the printer...

Service Manual
Page 34
... (Laser Scanning Unit). * Generally, the electronic potential of OPC is printed out because toner on OPC drum to recover toners. - Output voltage: : -400V ~ 800V DC °æ 50V(Use ZENER, DEV gear) - Function: It is big up . 5) Supply Voltage(SUP) - Error: 1. Samsung Electronics Service Manual 4-17 S U M M A RY OF PRO D U C T 4.5.1 HVPS(High Voltage Power Supply) 1) Transfer High Voltage (THV+) - Function: It is a voltage to transfer a toner developed on developing roller...
... (Laser Scanning Unit). * Generally, the electronic potential of OPC is printed out because toner on OPC drum to recover toners. - Output voltage: : -400V ~ 800V DC °æ 50V(Use ZENER, DEV gear) - Function: It is big up . 5) Supply Voltage(SUP) - Error: 1. Samsung Electronics Service Manual 4-17 S U M M A RY OF PRO D U C T 4.5.1 HVPS(High Voltage Power Supply) 1) Transfer High Voltage (THV+) - Function: It is a voltage to transfer a toner developed on developing roller...

Service Manual
Page 53
... The error in the paper cassette. The Out bin is open or close. The front part of paper is jammed between pickup unit and Feed sensor. LSU Scanner Motor not ready or Hsync signal not output. The front part of paper is jammed between the Discharge sensor and Feed sensor. The fuser power turned off 50 Paper Out 69 Sleep Mode Description The printer is stopped to minimize the power consumption. 2) Error Code When detecting the malfunction, the printing...
... The error in the paper cassette. The Out bin is open or close. The front part of paper is jammed between pickup unit and Feed sensor. LSU Scanner Motor not ready or Hsync signal not output. The front part of paper is jammed between the Discharge sensor and Feed sensor. The fuser power turned off 50 Paper Out 69 Sleep Mode Description The printer is stopped to minimize the power consumption. 2) Error Code When detecting the malfunction, the printing...
Service Manual
Page 66
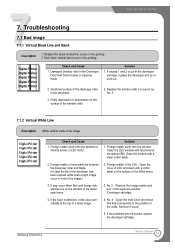
... cartridge) 4. Samsung Electronics Service Manual 7-1 Solution 1. Digital Printer Digital Printer Digital Printer Digital Printer Digital Printer Check and Cause 1. No. 4. : Open the front cover and check ribs that corresponds to print out. 2. No 3. : Remove the foreign matter and burr of a black image. 4. If the problems are on the window of LSU mirror. Dark black vertical band occur in the developer. 3. If causes 1 and 2 occur in the LSU : Open the cover of the transfer roller...
... cartridge) 4. Samsung Electronics Service Manual 7-1 Solution 1. Digital Printer Digital Printer Digital Printer Digital Printer Digital Printer Check and Cause 1. No. 4. : Open the front cover and check ribs that corresponds to print out. 2. No 3. : Remove the foreign matter and burr of a black image. 4. If the problems are on the window of LSU mirror. Dark black vertical band occur in the developer. 3. If causes 1 and 2 occur in the LSU : Open the cover of the transfer roller...
Service Manual
Page 85
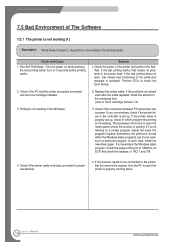
... check the address of the printer and perform the SelfTest. If the scanner needs to be connected to the printer, first the remove the scanner from the PC to Toner Cartridge Service 7.4) 3. If the printer driver is properly set up , check in the printer itself. Run Self-Test Mode : Turn the power on while pressing the test printing button for 2 or 3 seconds before printing works. 2. Replace the printer cable. If the test printing does not work, that means no problems...
... check the address of the printer and perform the SelfTest. If the scanner needs to be connected to the printer, first the remove the scanner from the PC to Toner Cartridge Service 7.4) 3. If the printer driver is properly set up , check in the printer itself. Run Self-Test Mode : Turn the power on while pressing the test printing button for 2 or 3 seconds before printing works. 2. Replace the printer cable. If the test printing does not work, that means no problems...


