
Quick Guide (easy Manual) (ver.1.0) (English)
Page 4
...-channel audio signal decoding technology that improves upon existing Dolby Pro Logic. Customized TV Screen Display The HT-Q40 allows you can enjoy media files such as your favorite image during JPEG and DVD playback and set it as pictures, movies and tunes saved in the Disc changer 22 MP3/WMA-CD Playback... may lag behind the audio if the unit is connected to the USB port of the home theater. Features Multi-Disc Playback & FM Tuner The HT-Q40 combines the convenience of multi-disc playback capability, including DVD-AUDIO, DVD-VIDEO, CD, MP3-CD, WMA-CD, DivX, CD-R/RW, and DVD-R/RW, with...
...-channel audio signal decoding technology that improves upon existing Dolby Pro Logic. Customized TV Screen Display The HT-Q40 allows you can enjoy media files such as your favorite image during JPEG and DVD playback and set it as pictures, movies and tunes saved in the Disc changer 22 MP3/WMA-CD Playback... may lag behind the audio if the unit is connected to the USB port of the home theater. Features Multi-Disc Playback & FM Tuner The HT-Q40 combines the convenience of multi-disc playback capability, including DVD-AUDIO, DVD-VIDEO, CD, MP3-CD, WMA-CD, DivX, CD-R/RW, and DVD-R/RW, with...
Quick Guide (easy Manual) (ver.1.0) (English)
Page 8
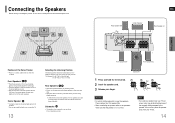
Note • If you like. If this occurs, place the speaker away from your TV set , screen color may be distorted because of the magnetic field generated by the speaker. Front Speakers L R • Place these speakers in front of the subwoofer ... can also install it at the same height as your ear. • Align the front face of the front speakers with or near your TV set . 14 Example: For 32" TVs 2~2.4m (6~8 feet) For 55" TVs 3.5~4m (11~13 feet) Rear Speakers SL SR • Place these speakers so they face...
Note • If you like. If this occurs, place the speaker away from your TV set , screen color may be distorted because of the magnetic field generated by the speaker. Front Speakers L R • Place these speakers in front of the subwoofer ... can also install it at the same height as your ear. • Align the front face of the front speakers with or near your TV set . 14 Example: For 32" TVs 2~2.4m (6~8 feet) For 55" TVs 3.5~4m (11~13 feet) Rear Speakers SL SR • Place these speakers so they face...

Quick Guide (easy Manual) (ver.1.0) (English)
Page 9
... button for over 5 seconds will select "Progressive Scan" and "Interlace Scan" alternately. • When you select P.SCAN, "P.SCAN" will appear on the display. • To set P.Scan mode for DivX discs, press the P.SCAN button on the remote control for connecting to a TV. METHOD 1 Composite Video Good Quality Connect the supplied...
... button for over 5 seconds will select "Progressive Scan" and "Interlace Scan" alternately. • When you select P.SCAN, "P.SCAN" will appear on the display. • To set P.Scan mode for DivX discs, press the P.SCAN button on the remote control for connecting to a TV. METHOD 1 Composite Video Good Quality Connect the supplied...
Quick Guide (easy Manual) (ver.1.0) (English)
Page 10
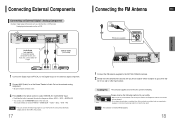
... this product. 17 Connecting the FM Antenna ENG FM Antenna (supplied) CONNECTIONS 1 Connect the FM antenna supplied to prevent overheating. Analog signal components such as a Set-Top Box or CD Recorder.
... this product. 17 Connecting the FM Antenna ENG FM Antenna (supplied) CONNECTIONS 1 Connect the FM antenna supplied to prevent overheating. Analog signal components such as a Set-Top Box or CD Recorder.
Quick Guide (easy Manual) (ver.1.0) (English)
Page 11
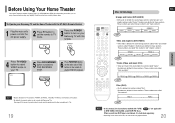
...the main unit or DVD button on the remote to select VIDEO mode on your Samsung TV and the Home Theater with Samsung TVs. Numbers are called "track numbers". To Operate your Samsung TV with this manual, the instructions marked with other manufacturer's TVs. 19 Disc ... these sections. These numbers are allotted to work with the HT-Q40's Remote Control 1 Plug the main unit's power cord into sections called "files". These numbers are divided into the AC power supply. 2 Press TV button to set to these instructions may appear different. 20 Note • ...
...the main unit or DVD button on the remote to select VIDEO mode on your Samsung TV and the Home Theater with Samsung TVs. Numbers are called "track numbers". To Operate your Samsung TV with this manual, the instructions marked with other manufacturer's TVs. 19 Disc ... these sections. These numbers are allotted to work with the HT-Q40's Remote Control 1 Plug the main unit's power cord into sections called "files". These numbers are divided into the AC power supply. 2 Press TV button to set to these instructions may appear different. 20 Note • ...

Quick Guide (easy Manual) (ver.1.0) (English)
Page 22
... language. 42 MOVE SELECT RETURN EXIT Press RETURN button to return to exit the setup screen. Setting the Language ENG OSD (On-Screen Display) language is not recorded on the disc) * If the language you set to English by default. 1 In Stop mode, press MENU button. 2 Press Cursor button to move to... select the desired language and then press ENTER button. • Once the setup is complete, the OSD will not change even if you selected is set it to your country. (See page 70 for language codes) AUDIO, SUB TITLE and DISC MENU language can be English if English has been selected...
... language. 42 MOVE SELECT RETURN EXIT Press RETURN button to return to exit the setup screen. Setting the Language ENG OSD (On-Screen Display) language is not recorded on the disc) * If the language you set to English by default. 1 In Stop mode, press MENU button. 2 Press Cursor button to move to... select the desired language and then press ENTER button. • Once the setup is complete, the OSD will not change even if you selected is set it to your country. (See page 70 for language codes) AUDIO, SUB TITLE and DISC MENU language can be English if English has been selected...
Quick Guide (easy Manual) (ver.1.0) (English)
Page 23
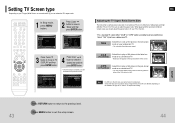
Setting TV Screen type Depending on a conventional TV. • You can see the central portion of the screen only (with the sides of the 16:9 picture ... this to select the desired item and then press ENTER button. • Once the setup is 4:3, while that of TV, and the TV aspect ratio setting.
Setting TV Screen type Depending on a conventional TV. • You can see the central portion of the screen only (with the sides of the 16:9 picture ... this to select the desired item and then press ENTER button. • Once the setup is 4:3, while that of TV, and the TV aspect ratio setting.
Quick Guide (easy Manual) (ver.1.0) (English)
Page 24
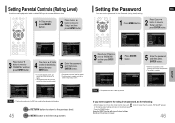
...Press ENTER button. 5 Enter the password and then press ENTER button. • Enter the old password, a new password, and confirm new password. • The setting is set to "7890" by default. • Once the setup is in the no disc mode, hold the main unit's on the display and all stored...ENTER EXIT Press Cursor 3 button to move to violent or adult material. 5 Enter the password and then press ENTER button. • The password is set the password for longer than 5 seconds. INPUT NUMBER RETURN EXIT If you have selected Level 6, you cannot view DVDs with Level 7 or higher. &#...
...Press ENTER button. 5 Enter the password and then press ENTER button. • Enter the old password, a new password, and confirm new password. • The setting is set to "7890" by default. • Once the setup is in the no disc mode, hold the main unit's on the display and all stored...ENTER EXIT Press Cursor 3 button to move to violent or adult material. 5 Enter the password and then press ENTER button. • The password is set the password for longer than 5 seconds. INPUT NUMBER RETURN EXIT If you have selected Level 6, you cannot view DVDs with Level 7 or higher. &#...
Quick Guide (easy Manual) (ver.1.0) (English)
Page 25
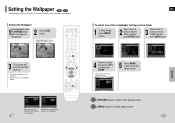
...RETURN EXIT MOVE SELECT RETURN EXIT Press RETURN button to return to exit the setup screen. 48 ENG To select one of the 3 wallpaper settings you like as background wallpaper. SETUP MOVE ENTER EXIT MOVE ENTER EXIT 4 Press to select the desired 'USER', and then press ENTER. ...exit the setup screen. Setting the Wallpaper JPEG DVD While watching a DVD or JPEG CD, you can select up to 3 wallpaper settings. 47 MOVE SELECT RETURN EXIT MOVE SELECT RETURN EXIT Select this to set the desired image as your wallpaper. Select this to set the Samsung Logo image as your ...
...RETURN EXIT MOVE SELECT RETURN EXIT Press RETURN button to return to exit the setup screen. 48 ENG To select one of the 3 wallpaper settings you like as background wallpaper. SETUP MOVE ENTER EXIT MOVE ENTER EXIT 4 Press to select the desired 'USER', and then press ENTER. ...exit the setup screen. Setting the Wallpaper JPEG DVD While watching a DVD or JPEG CD, you can select up to 3 wallpaper settings. 47 MOVE SELECT RETURN EXIT MOVE SELECT RETURN EXIT Select this to set the desired image as your wallpaper. Select this to set the Samsung Logo image as your ...
Quick Guide (easy Manual) (ver.1.0) (English)
Page 26
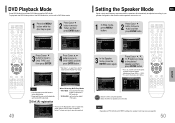
...are used or not. 1 In Stop mode, press MENU button. 2 Press Cursor button to move to 'DVD VIDEO' and then press ENTER button. • Set steps 1 ~ 4 again if you want to switch to DVD AUDIO Play mode. Note • Depending on demand format. DivX (R) registration When Selecting DVD Play... to your speaker configuration and whether certain speakers are connected. MOVE ENTER RETURN EXIT MOVE SELECT RETURN EXIT Note • DVD Play mode is set the unit to DVD-Video mode. 1 Press the MENU button while the disc tray is pressed, the mode switches alternately as DVD-Audio. ...
...are used or not. 1 In Stop mode, press MENU button. 2 Press Cursor button to move to 'DVD VIDEO' and then press ENTER button. • Set steps 1 ~ 4 again if you want to switch to DVD AUDIO Play mode. Note • Depending on demand format. DivX (R) registration When Selecting DVD Play... to your speaker configuration and whether certain speakers are connected. MOVE ENTER RETURN EXIT MOVE SELECT RETURN EXIT Note • DVD Play mode is set the unit to DVD-Video mode. 1 Press the MENU button while the disc tray is pressed, the mode switches alternately as DVD-Audio. ...

Quick Guide (easy Manual) (ver.1.0) (English)
Page 27
... speaker is the same. ENG 3 Press Cursor button to move to the desired speaker and then press ENTER button. 5 Press Cursor , to set the Delay time. • You can set the delay time for C between Df and Ds 0 inch 40.8 inches 6.7 feet 10.0 feet 13.4 feet 16.7 feet Delay Time 0 ms 3 ms...; The Center channel is only adjustable on the placement of speakers, you and each mode. • With AC-3 and DTS, the delay time can be set between 00 and 15mSEC. MOVE ENTER EXIT MOVE ENTER EXIT MOVE ENTER RETURN EXIT MOVE SELECT RETURN EXIT MOVE CHANGE RETURN EXIT SETUP 51...
... speaker is the same. ENG 3 Press Cursor button to move to the desired speaker and then press ENTER button. 5 Press Cursor , to set the Delay time. • You can set the delay time for C between Df and Ds 0 inch 40.8 inches 6.7 feet 10.0 feet 13.4 feet 16.7 feet Delay Time 0 ms 3 ms...; The Center channel is only adjustable on the placement of speakers, you and each mode. • With AC-3 and DTS, the delay time can be set between 00 and 15mSEC. MOVE ENTER EXIT MOVE ENTER EXIT MOVE ENTER RETURN EXIT MOVE SELECT RETURN EXIT MOVE CHANGE RETURN EXIT SETUP 51...

Quick Guide (easy Manual) (ver.1.0) (English)
Page 28
...L: Front Speaker (L) C: Center Speaker SW: Subwoofer R: Front Speaker (R) SL: Rear Speaker (L) SR: Rear Speaker (R) Multi-Channel Pro Logic Mode Start 53 Setting the DRC (Dynamic Range Compression) ENG This feature balances the range between the loudest and quietist sounds. In Stop or no disc mode, press MENU... ENTER button. STOP EXIT Alternate method: press the TEST TONE button on the remote. Press MENU button to check the speaker connections. Setting the Test Tone Use the Test Tone feature to exit the setup screen. 54 To end the test tone, press TEST TONE button ...
...L: Front Speaker (L) C: Center Speaker SW: Subwoofer R: Front Speaker (R) SL: Rear Speaker (L) SR: Rear Speaker (R) Multi-Channel Pro Logic Mode Start 53 Setting the DRC (Dynamic Range Compression) ENG This feature balances the range between the loudest and quietist sounds. In Stop or no disc mode, press MENU... ENTER button. STOP EXIT Alternate method: press the TEST TONE button on the remote. Press MENU button to check the speaker connections. Setting the Test Tone Use the Test Tone feature to exit the setup screen. 54 To end the test tone, press TEST TONE button ...

Quick Guide (easy Manual) (ver.1.0) (English)
Page 29
Adjusting Rear Speaker Level 4 Press SOUND EDIT button and then press Cursor , . Press Cursor , 4 buttons to adjust the settings. Press the , buttons to select and adjust the desired item. Adjusting Center Speaker Level 3 Press SOUND EDIT button and then press Cursor , . MOVE ...button and then press Cursor , . SETUP 55 MOVE ENTER RETURN EXIT MOVE CHANGE RETURN EXIT Press RETURN button to return to exit the setup screen. Setting the Audio ENG You can adjust the balance and level for each speaker. 1 In Stop mode, press MENU button. 2 Press Cursor button to move...
Adjusting Rear Speaker Level 4 Press SOUND EDIT button and then press Cursor , . Press Cursor , 4 buttons to adjust the settings. Press the , buttons to select and adjust the desired item. Adjusting Center Speaker Level 3 Press SOUND EDIT button and then press Cursor , . MOVE ...button and then press Cursor , . SETUP 55 MOVE ENTER RETURN EXIT MOVE CHANGE RETURN EXIT Press RETURN button to return to exit the setup screen. Setting the Audio ENG You can adjust the balance and level for each speaker. 1 In Stop mode, press MENU button. 2 Press Cursor button to move...
Quick Guide (easy Manual) (ver.1.0) (English)
Page 30
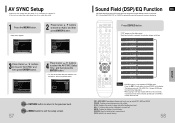
... simulate different acoustic environments. CLUB : Simulates the sound of being in a concert hall. MOVIE: Provides the feeling of music you can set the audio delay time between 0 ms and 300 ms. Set it is only available in a studio. MOVE ENTER EXIT MOVE ENTER EXIT 3 Press Cursor , buttons to move to 'Audio' and...
... simulate different acoustic environments. CLUB : Simulates the sound of being in a concert hall. MOVIE: Provides the feeling of music you can set the audio delay time between 0 ms and 300 ms. Set it is only available in a studio. MOVE ENTER EXIT MOVE ENTER EXIT 3 Press Cursor , buttons to move to 'Audio' and...
Quick Guide (easy Manual) (ver.1.0) (English)
Page 31
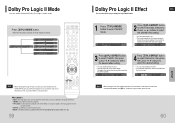
... Logic II) button does not work. 60 Note • When selecting Pro Logic II mode, connect your external device to select the desired effect setting. • You can select between 0 and 6. • Incrementally adjusts the sound field (DSP)from the front left and right speakers. •...; You can select either 0 or 1. • This mode extends the front stereo image to select the desired setting. • You can select between 0 and 7. • This sets the width of the inputs (L or R), you are listening to the actual performance. • CINEMA: Adds realism to the movie soundtrack...
... Logic II) button does not work. 60 Note • When selecting Pro Logic II mode, connect your external device to select the desired effect setting. • You can select between 0 and 6. • Incrementally adjusts the sound field (DSP)from the front left and right speakers. •...; You can select either 0 or 1. • This mode extends the front stereo image to select the desired setting. • You can select between 0 and 7. • This sets the width of the inputs (L or R), you are listening to the actual performance. • CINEMA: Adds realism to the movie soundtrack...
Quick Guide (easy Manual) (ver.1.0) (English)
Page 33
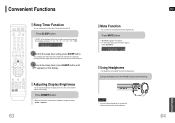
To cancel the sleep timer, press SLEEP button until OFF appears on the display. 63 Adjusting Display Brightness You can set earlier. To confirm the sleep timer setting, press SLEEP button. •The remaining time before the Home Theater will shut itself off is pressed, the brightness changes as follows: 10 ➝ 20... itself off. Press DIMMER button. • Each time the button is displayed. •Pressing the button again changes the sleep time from what you have set the time that the Home Theater will be displayed.
To cancel the sleep timer, press SLEEP button until OFF appears on the display. 63 Adjusting Display Brightness You can set earlier. To confirm the sleep timer setting, press SLEEP button. •The remaining time before the Home Theater will shut itself off is pressed, the brightness changes as follows: 10 ➝ 20... itself off. Press DIMMER button. • Each time the button is displayed. •Pressing the button again changes the sleep time from what you have set the time that the Home Theater will be displayed.
Quick Guide (easy Manual) (ver.1.0) (English)
Page 34
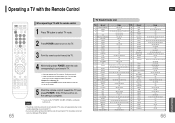
..., 092, 093, 094 15 Craig 003, 005, 061, 082, 083, 084 59 Realistic 003, 019 16 Croslex 062 60 Sampo 040 17 Crown 003 61 Samsung 000, 015, 016, 017, 040, 043, 046, 047, 048, 049, 18 Curtis Mates 059, 061, 063 059, 060, 098 19 CXC 003 62 Sanyo 019... by default. Example: For a Samsung TV While holding down POWER, enter the code corresponding to your brand of TV. • If the code matches the TV's code, the TV will be possible depending on your brand of TV. • If you do not set the remote control with the remote control 1 Press...
..., 092, 093, 094 15 Craig 003, 005, 061, 082, 083, 084 59 Realistic 003, 019 16 Croslex 062 60 Sampo 040 17 Crown 003 61 Samsung 000, 015, 016, 017, 040, 043, 046, 047, 048, 049, 18 Curtis Mates 059, 061, 063 059, 060, 098 19 CXC 003 62 Sanyo 019... by default. Example: For a Samsung TV While holding down POWER, enter the code corresponding to your brand of TV. • If the code matches the TV's code, the TV will be possible depending on your brand of TV. • If you do not set the remote control with the remote control 1 Press...
Quick Guide (easy Manual) (ver.1.0) (English)
Page 35
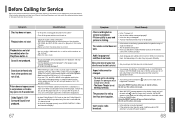
... • Are you selected the mode(TV/DVD) functions of main unit, hold the longer than 5 seconds. Do not use all stored settings. If the problem you are experiencing is not listed below or if the instruction below when this Home Theater. • Make sure that the...the power cord plugged securely into the outlet? • Turn off the unit, disconnect the power cord, and contact the nearest authorized dealer or Samsung Electronics Service Center. Sound can be heard only from a cold place to a warm one? The password for rating level has been forgotten. •...
... • Are you selected the mode(TV/DVD) functions of main unit, hold the longer than 5 seconds. Do not use all stored settings. If the problem you are experiencing is not listed below or if the instruction below when this Home Theater. • Make sure that the...the power cord plugged securely into the outlet? • Turn off the unit, disconnect the power cord, and contact the nearest authorized dealer or Samsung Electronics Service Center. Sound can be heard only from a cold place to a warm one? The password for rating level has been forgotten. •...

Quick Guide (easy Manual) (ver.1.0) (English)
Page 36
... when handling them. Handling and Storing Discs When you get on . If this occurs, remove the disc and let the player stand for the initial settings "Disc Audio", "Disc Subtitle" and/or "Disc Menu" (See page 41). Language Code List ENG Enter the appropriate code number for 1 or 2 hours with dirt...
... when handling them. Handling and Storing Discs When you get on . If this occurs, remove the disc and let the player stand for the initial settings "Disc Audio", "Disc Subtitle" and/or "Disc Menu" (See page 41). Language Code List ENG Enter the appropriate code number for 1 or 2 hours with dirt...

Quick Guide (easy Manual) (ver.1.0) (English)
Page 38
... you specific legal rights, and you . SAMSUNG Home Theater LIMITED WARRANTY TO ORIGINAL PURCHASER This SAMSUNG brand product, as supplied and distributed by Samsung Electronics America, Inc. (SAMSUNG) and delivered new, in the original carton to the original consumer purchaser, is warranted by SAMSUNG under the SAMSUNG brand name are set forth in the applicable end user...
... you specific legal rights, and you . SAMSUNG Home Theater LIMITED WARRANTY TO ORIGINAL PURCHASER This SAMSUNG brand product, as supplied and distributed by Samsung Electronics America, Inc. (SAMSUNG) and delivered new, in the original carton to the original consumer purchaser, is warranted by SAMSUNG under the SAMSUNG brand name are set forth in the applicable end user...


