
Instruction Manual
Page 2
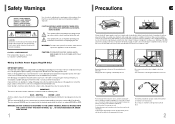
... for continuous use only. Do not connect the plug to disconnect the player completely from the power supply, remove the main plug from your player or disc have been stored in cold temperatures. The wire coloured BLUE must be connected to important operating and maintenance instructions accompanying the unit. Phones Protect the player from the wall outlet. Your player is no alternative to rain or moisture. Use of controls, adjustments or...
... for continuous use only. Do not connect the plug to disconnect the player completely from the power supply, remove the main plug from your player or disc have been stored in cold temperatures. The wire coloured BLUE must be connected to important operating and maintenance instructions accompanying the unit. Phones Protect the player from the wall outlet. Your player is no alternative to rain or moisture. Use of controls, adjustments or...
Instruction Manual
Page 3
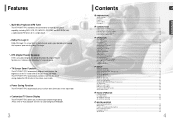
... Function...26 Zoom (Screen Enlarge) Function ...27 EZ VIEW Function ...27 Selecting Audio/Subtitle Language ...28 Moving Directly to a Scene/Song ...29 Using Disc Menu...30 Using the Title Menu...30 SETUP Setting the Language...31 Setting TV Screen type...33 Setting Parental Controls (Rating Level) ...35 Setting the Password...36 Setting the Wallpaper ...37 Setting the Speaker Mode ...39 Setting the Test Tone ...40 Setting the Delay Time ...41 Setting the Audio Quality ...43 Setting the DRC (Dynamic Range Compression) ...45 AV SYNC Setup...46 Dolby...
... Function...26 Zoom (Screen Enlarge) Function ...27 EZ VIEW Function ...27 Selecting Audio/Subtitle Language ...28 Moving Directly to a Scene/Song ...29 Using Disc Menu...30 Using the Title Menu...30 SETUP Setting the Language...31 Setting TV Screen type...33 Setting Parental Controls (Rating Level) ...35 Setting the Password...36 Setting the Wallpaper ...37 Setting the Speaker Mode ...39 Setting the Test Tone ...40 Setting the Delay Time ...41 Setting the Audio Quality ...43 Setting the DRC (Dynamic Range Compression) ...45 AV SYNC Setup...46 Dolby...
Instruction Manual
Page 4
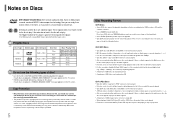
... min. 20 min. If such discs are played, a "WRONG DISC FORMAT" message appears on the TV screen. • DVD discs purchased abroad may not be played. Connecting to Dolby Digital surround sound and MPEG-2 video compression technology. Do not use the following types of disc! • LD, CD-G, CD-I D E O DVD (Digital Versatile Disc) offers fantastic audio and video, thanks to a VCR results in a distorted picture from copy-protected DVD discs. • This product incorporates copyright...
... min. 20 min. If such discs are played, a "WRONG DISC FORMAT" message appears on the TV screen. • DVD discs purchased abroad may not be played. Connecting to Dolby Digital surround sound and MPEG-2 video compression technology. Do not use the following types of disc! • LD, CD-G, CD-I D E O DVD (Digital Versatile Disc) offers fantastic audio and video, thanks to a VCR results in a distorted picture from copy-protected DVD discs. • This product incorporates copyright...
Instruction Manual
Page 5
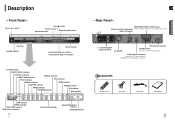
...buttons Tuning Up & Skip ( ) buttons Tuning Down & Skip ( ) buttons P.SCAN indicator DOLBY DIGITAL indicator DTS Disc indicator LINEAR PCM indicator TITLE indicator REPEAT indicator PBC indicator GROUP indicator TUNER indicator CHAPTER indicator TRACK indicator PROGRAM indicator STEREO indicator RTA indicator RDS indicator DSP indicator MPEG indicator DVD AUDIO indicator PRO LOGIC indicator 7 System Status Display RADIO FREQUENCY indicator SPEAKER indicator 5.1 Channel Speaker Output Terminals Cooling Fan FM Antenna Connector SCART JACK Connect to a TV with component video inputs...
...buttons Tuning Up & Skip ( ) buttons Tuning Down & Skip ( ) buttons P.SCAN indicator DOLBY DIGITAL indicator DTS Disc indicator LINEAR PCM indicator TITLE indicator REPEAT indicator PBC indicator GROUP indicator TUNER indicator CHAPTER indicator TRACK indicator PROGRAM indicator STEREO indicator RTA indicator RDS indicator DSP indicator MPEG indicator DVD AUDIO indicator PRO LOGIC indicator 7 System Status Display RADIO FREQUENCY indicator SPEAKER indicator 5.1 Channel Speaker Output Terminals Cooling Fan FM Antenna Connector SCART JACK Connect to a TV with component video inputs...

Instruction Manual
Page 6
... (+)and (-)to (-). • Use the correct type of the Remote Control The remote control can also be used up to the correct polarities (+ and -). 3 Replace the battery cover. Range of Operation of batteries.Batteries that look similar may differ in a straight line. button AUDIO button Cursor/Enter button MUTE button TEST TONE button SOUND EDIT button DSP/EQ button DIGEST button EZ VIEW, NTSC/PAL button Insert Remote Batteries 1 Remove the battery cover on...
... (+)and (-)to (-). • Use the correct type of the Remote Control The remote control can also be used up to the correct polarities (+ and -). 3 Replace the battery cover. Range of Operation of batteries.Batteries that look similar may differ in a straight line. button AUDIO button Cursor/Enter button MUTE button TEST TONE button SOUND EDIT button DSP/EQ button DIGEST button EZ VIEW, NTSC/PAL button Insert Remote Batteries 1 Remove the battery cover on...
Instruction Manual
Page 8
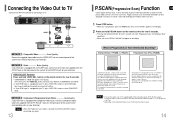
... 1 METHOD 3 METHOD 1 Composite Video Good Quality Connect the supplied video cable from the VIDEO OUT jack on your television. METHOD 2 Scart Better Quality If you select P.SCAN, "P.SCAN" will appear in a series of video consecutively down the screen, line by using Scart setting. • If Scart (RGB Input) is selected, the VIDEO and SCART outputs do not feed any signal. One frame, displayed every 1/30th of a second...
... 1 METHOD 3 METHOD 1 Composite Video Good Quality Connect the supplied video cable from the VIDEO OUT jack on your television. METHOD 2 Scart Better Quality If you select P.SCAN, "P.SCAN" will appear in a series of video consecutively down the screen, line by using Scart setting. • If Scart (RGB Input) is selected, the VIDEO and SCART outputs do not feed any signal. One frame, displayed every 1/30th of a second...
Instruction Manual
Page 10
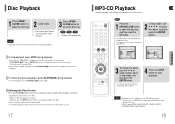
... pressed once, "PRESS PLAY" is pressed, playback starts from the stop playback. OPERATION 3 To change the album, use to select the album, and then press the ENTER button. Selecting the Video Format Press and hold NT/PAL button on the remote controller for over 5 seconds while the power is turned off. • By default, the video format is pressed, playback resumes from the beginning. DVD VCD CD •...
... pressed once, "PRESS PLAY" is pressed, playback starts from the stop playback. OPERATION 3 To change the album, use to select the album, and then press the ENTER button. Selecting the Video Format Press and hold NT/PAL button on the remote controller for over 5 seconds while the power is turned off. • By default, the video format is pressed, playback resumes from the beginning. DVD VCD CD •...
Instruction Manual
Page 11
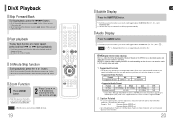
... button, your selection will change as that the users can be zoomed only in ZOOM X2 mode. 19 GB Subtitle Display Press the SUBTITLE button. • Each time you press the button, your selection will toggle between "SUBTITLE ON" (1/1, 1/2 ...) and "SUBTITLE OFF". • If the disc has only one supported audio item in the disc. It will be supported when the screen resolution is used for video...
... button, your selection will change as that the users can be zoomed only in ZOOM X2 mode. 19 GB Subtitle Display Press the SUBTITLE button. • Each time you press the button, your selection will toggle between "SUBTITLE ON" (1/1, 1/2 ...) and "SUBTITLE OFF". • If the disc has only one supported audio item in the disc. It will be supported when the screen resolution is used for video...
Instruction Manual
Page 13
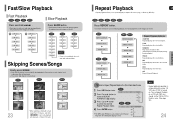
... be played. • You cannot skip chapters consecutively. OPERATION To Select a Repeat Playback Mode in the Disc Information Screen 1 DVD Press INFO button twice. 2 Press Cursor button to move to REPEAT PLAYBACK ( ) display. 3 Press Cursor button to OFF in the disc menu. (See page 30.) 24 DVD RECEIVER SMART NAVI Something like you Back for good Love of my life More than words I need you My...
... be played. • You cannot skip chapters consecutively. OPERATION To Select a Repeat Playback Mode in the Disc Information Screen 1 DVD Press INFO button twice. 2 Press Cursor button to move to REPEAT PLAYBACK ( ) display. 3 Press Cursor button to OFF in the disc menu. (See page 30.) 24 DVD RECEIVER SMART NAVI Something like you Back for good Love of my life More than words I need you My...

Instruction Manual
Page 16
... from disc to disc. 1 In Stop mode, press MENU button. • When playing a VCD (version 2.), this feature may be able to time display. When some functions are disabled, select "PBC OFF" to select the desired item. • Press ENTER button. Press MENU button to a Scene/Song DVD VCD CD 1Press INFO button. Moving Directly to exit the setup screen. 30 Press Cursor , 2 buttons to move to move a folder. OPERATION Moving...
... from disc to disc. 1 In Stop mode, press MENU button. • When playing a VCD (version 2.), this feature may be able to time display. When some functions are disabled, select "PBC OFF" to select the desired item. • Press ENTER button. Press MENU button to a Scene/Song DVD VCD CD 1Press INFO button. Moving Directly to exit the setup screen. 30 Press Cursor , 2 buttons to move to move a folder. OPERATION Moving...
Instruction Manual
Page 17
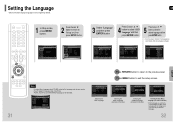
... previous level. Selecting the OSD Language Selecting the Audio Language (recorded on the disc) Selecting the Subtitle Language (recorded on the disc) Selecting the Disc Menu Language (recorded on the disc) * If the language you selected is not recorded on the disc, menu language will be selected. Setting the Language GB OSD (On-Screen Display) language is set to English by default. 1 In Stop mode, press MENU button. 2 Press Cursor button to move to 'Setup...
... previous level. Selecting the OSD Language Selecting the Audio Language (recorded on the disc) Selecting the Subtitle Language (recorded on the disc) Selecting the Disc Menu Language (recorded on the disc) * If the language you selected is not recorded on the disc, menu language will be selected. Setting the Language GB OSD (On-Screen Display) language is set to English by default. 1 In Stop mode, press MENU button. 2 Press Cursor button to move to 'Setup...
Instruction Manual
Page 18
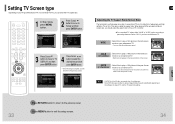
... TVs is 16:9. Press MENU button to the previous level. SETUP 33 Press RETURN button to return to exit the setup screen. 34 Select "16:9" if you should adjust the aspect ratio to fit your widescreen TV. • You can enjoy the widescreen aspect. 4:3LB (4:3 Letterbox) : Select this to play a 16:9 picture in the pan & scan mode on the software, the type of TV...
... TVs is 16:9. Press MENU button to the previous level. SETUP 33 Press RETURN button to return to exit the setup screen. 34 Select "16:9" if you should adjust the aspect ratio to fit your widescreen TV. • You can enjoy the widescreen aspect. 4:3LB (4:3 Letterbox) : Select this to play a 16:9 picture in the pan & scan mode on the software, the type of TV...
Instruction Manual
Page 19
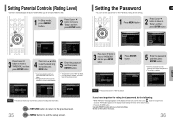
... can set to the previous screen. Note • This function works only if a DVD disc contains the rating level information. 35 Press RETURN button to return to exit the setup screen. Note • The password is complete. Press MENU button to the previous level. Press Cursor , button 4 to select the desired rating level and then press ENTER button. • If you will be taken to "7890" by default. If...
... can set to the previous screen. Note • This function works only if a DVD disc contains the rating level information. 35 Press RETURN button to return to exit the setup screen. Note • The password is complete. Press MENU button to the previous level. Press Cursor , button 4 to select the desired rating level and then press ENTER button. • If you will be taken to "7890" by default. If...
Instruction Manual
Page 20
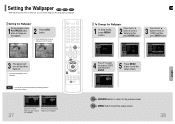
... previous level. PAUSE COPY LOGO DATA 3 The power will be displayed on . • The selected wallpaper will turn off and then back on the TV screen. SETUP Press RETURN button to return to set the Samsung Logo image as your wallpaper. Setting the Wallpaper JPEG DVD VCD While watching a DVD, VCD or JPEG CD, you can set up to three wallpapers by repeating operation from...
... previous level. PAUSE COPY LOGO DATA 3 The power will be displayed on . • The selected wallpaper will turn off and then back on the TV screen. SETUP Press RETURN button to return to set the Samsung Logo image as your wallpaper. Setting the Wallpaper JPEG DVD VCD While watching a DVD, VCD or JPEG CD, you can set up to three wallpapers by repeating operation from...
Instruction Manual
Page 21
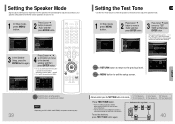
... previous level. Multi-Channel Pro Logic Mode Start 40 NONE : Select this when using the speakers. To end the test tone, press TEST TONE button again. Setting the Speaker Mode Signal outputs and frequency responses from the speakers will automatically be adjusted according to your speaker configuration and whether certain speakers are installed. SETUP 39 SMALL : Select this when no problem. Setting the Test Tone GB Use the Test Tone feature to check the speaker connections and to adjust the speaker levels. 1 In Stop mode, press MENU button. 2 Press Cursor button...
... previous level. Multi-Channel Pro Logic Mode Start 40 NONE : Select this when using the speakers. To end the test tone, press TEST TONE button again. Setting the Speaker Mode Signal outputs and frequency responses from the speakers will automatically be adjusted according to your speaker configuration and whether certain speakers are installed. SETUP 39 SMALL : Select this when no problem. Setting the Test Tone GB Use the Test Tone feature to check the speaker connections and to adjust the speaker levels. 1 In Stop mode, press MENU button. 2 Press Cursor button...

Instruction Manual
Page 24
... Dolby Digital sound when watching movies at low volume at night. 1 In Stop mode, press MENU button. 2 Press Cursor button to move to 'AV-SYNC' and then press ENTER button. • AV-SYNC screen appears. 4 Press Cursor , buttons to select the Delay Time of AV-SYNC and then press the ENTER button. • You can use this case, adjust the delay time of audio to optimal status to fit the video. 1 Press the MENU button...
... Dolby Digital sound when watching movies at low volume at night. 1 In Stop mode, press MENU button. 2 Press Cursor button to move to 'AV-SYNC' and then press ENTER button. • AV-SYNC screen appears. 4 Press Cursor , buttons to select the Delay Time of AV-SYNC and then press the ENTER button. • You can use this case, adjust the delay time of audio to optimal status to fit the video. 1 Press the MENU button...

Instruction Manual
Page 25
... AUDIO INPUT jacks (L and R) on the player. SETUP Note • When selecting Pro Logic II mode, connect your external device to select the mode. • You can select the desired Dolby Pro Logic II audio mode. STEREO: Select this to listen to the center speaker only. Press PL II MODE button. • Each time the button is pressed, the mode changes as if using five speakers, while using just the front left and right speakers and the subwoofer...
... AUDIO INPUT jacks (L and R) on the player. SETUP Note • When selecting Pro Logic II mode, connect your external device to select the mode. • You can select the desired Dolby Pro Logic II audio mode. STEREO: Select this to listen to the center speaker only. Press PL II MODE button. • Each time the button is pressed, the mode changes as if using five speakers, while using just the front left and right speakers and the subwoofer...

Instruction Manual
Page 26
... follows: Press SLEEP button. • "SLEEP" will shut itself off is displayed. •Pressing the button again changes the sleep time from ROCK, POP, or CLASSIC, depending on the display. SETUP Note • This feature works with CDs, MP3-CDs and 2 channel DVD-Audio and Dolby Digital discs. • When playing a DVD disc encoded with a throbbing bass beat. STUDIO : Provides a sense of a movie theater. PASS: Select this for normal listening...
... follows: Press SLEEP button. • "SLEEP" will shut itself off is displayed. •Pressing the button again changes the sleep time from ROCK, POP, or CLASSIC, depending on the display. SETUP Note • This feature works with CDs, MP3-CDs and 2 channel DVD-Audio and Dolby Digital discs. • When playing a DVD disc encoded with a throbbing bass beat. STUDIO : Provides a sense of a movie theater. PASS: Select this for normal listening...
Instruction Manual
Page 28
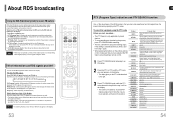
... signal is that you have selected, and tunes in that the traffic announcement is weak. Each time you press the button, the display change to show you start from step 1 again. • When pressing the buttons on the primary remote control, make sure that you the PTY codes described to preset stations. • To stop searching any ) and is sent. To search for a program using...
... signal is that you have selected, and tunes in that the traffic announcement is weak. Each time you press the button, the display change to show you start from step 1 again. • When pressing the buttons on the primary remote control, make sure that you the PTY codes described to preset stations. • To stop searching any ) and is sent. To search for a program using...
Instruction Manual
Page 30
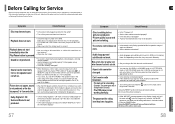
... even when the menu function is selected. • Are you using a deformed disc or a disc with 5.1 channel sound. • Is the audio language correctly set C, SL, and SR to the default values. • Press the POWER button. Refer to the DVD disc jacket and then select the appropriate function. • Is the antenna connected properly? • If the antenna's input signal is shaking. • Is the TV power on the display of work for 1 or...
... even when the menu function is selected. • Are you using a deformed disc or a disc with 5.1 channel sound. • Is the audio language correctly set C, SL, and SR to the default values. • Press the POWER button. Refer to the DVD disc jacket and then select the appropriate function. • Is the antenna connected properly? • If the antenna's input signal is shaking. • Is the TV power on the display of work for 1 or...


