User Manual (ENGLISH)
Page 5
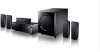
... due to lightning could lead to overheating and malfunction of the unit. vases) , and excess heat(e.g.fireplace) or equipment creating strong magnetic or electric fields (i.e.speakers...). Your player is for a long period of the amplifier. The battery used with this product is not intended for ventilation (3~4inches). Condensation may occur if...
... due to lightning could lead to overheating and malfunction of the unit. vases) , and excess heat(e.g.fireplace) or equipment creating strong magnetic or electric fields (i.e.speakers...). Your player is for a long period of the amplifier. The battery used with this product is not intended for ventilation (3~4inches). Condensation may occur if...
User Manual (ENGLISH)
Page 7
...external devices 14 Anynet+ ...18 Connecting the FM antenna 19 OPERATION Before using the AV receiver 20 Selecting digital/analog input 21 Setting the speaker mode 22 Setting the speaker listening distance 24 Setting digital input ...25 Setting HDMI AUDIO...26 Setting DRC (Dynamic Range Compression 27 Test tone ...28 Setting... speaker level ...30 Dolby Pro Logic llx mode 31 Setting Dolby Pro Logic llx effect 32 Setting NEO:6 mode...33 Setting EX/ES mode......
...external devices 14 Anynet+ ...18 Connecting the FM antenna 19 OPERATION Before using the AV receiver 20 Selecting digital/analog input 21 Setting the speaker mode 22 Setting the speaker listening distance 24 Setting digital input ...25 Setting HDMI AUDIO...26 Setting DRC (Dynamic Range Compression 27 Test tone ...28 Setting... speaker level ...30 Dolby Pro Logic llx mode 31 Setting Dolby Pro Logic llx effect 32 Setting NEO:6 mode...33 Setting EX/ES mode......
User Manual (ENGLISH)
Page 8
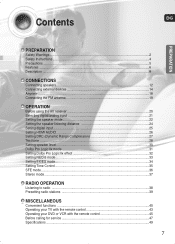
Description [ Front panel ] POWER STANDBY Indicator TONE CONTROL button Remote control sensor SURROUND button POWER button AUX IN Jack HEADPHONE Jack 7.1CH IN STEREO FUNCTION button INPUT MODE button SETUP button TUNING MODE button SELECT( VOLUME CONTROL , ) button [ Display ] DOLBY DIGITAL EX INDICATOR DIGITAL LIVE SURROUND INDICATOR INDICATOR SPEAKER INDICATORS L.PCM INDICATOR FRONT DISPLAY RADIO BROADCASTING RECEIVING INDICATOR RADIO FREQUENCY INDICATOR RADIO STEREO INDICATORS DTS INDICATOR 8
Description [ Front panel ] POWER STANDBY Indicator TONE CONTROL button Remote control sensor SURROUND button POWER button AUX IN Jack HEADPHONE Jack 7.1CH IN STEREO FUNCTION button INPUT MODE button SETUP button TUNING MODE button SELECT( VOLUME CONTROL , ) button [ Display ] DOLBY DIGITAL EX INDICATOR DIGITAL LIVE SURROUND INDICATOR INDICATOR SPEAKER INDICATORS L.PCM INDICATOR FRONT DISPLAY RADIO BROADCASTING RECEIVING INDICATOR RADIO FREQUENCY INDICATOR RADIO STEREO INDICATORS DTS INDICATOR 8
User Manual (ENGLISH)
Page 9
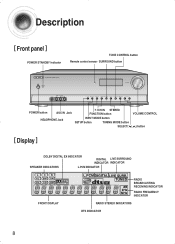
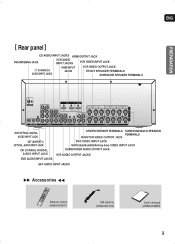
...JACK VCR AUDIO INPUT JACKS VCR VIDEO INPUT JACK 7.1 CH ANALOG AUDIO INPUT JACKS HDMI INPUT JACKS VCR VIDEO OUTPUT JACK FRONT SPEAKER TERMINALS SURROUND SPEAKER TERMINALS DVD OPTICAL DIGITAL AUDIO INPUT JACK SAT (ANYNET+) OPTICAL AUDIO INPUT JACK CD COAXIAL DIGITAL AUDIO INPUT JACK DVD AUDIO ...INPUT JACKS CENTER SPEAKER TERMINALS SURROUND BACK SPEAKER TERMINALS MONITOR VIDEO OUTPUT JACK DVD VIDEO INPUT JACK SAT(Cable/Satellite/Set-top box) VIDEO INPUT JACK SUBWOOFER AUDIO OUTPUT ...
...JACK VCR AUDIO INPUT JACKS VCR VIDEO INPUT JACK 7.1 CH ANALOG AUDIO INPUT JACKS HDMI INPUT JACKS VCR VIDEO OUTPUT JACK FRONT SPEAKER TERMINALS SURROUND SPEAKER TERMINALS DVD OPTICAL DIGITAL AUDIO INPUT JACK SAT (ANYNET+) OPTICAL AUDIO INPUT JACK CD COAXIAL DIGITAL AUDIO INPUT JACK DVD AUDIO ...INPUT JACKS CENTER SPEAKER TERMINALS SURROUND BACK SPEAKER TERMINALS MONITOR VIDEO OUTPUT JACK DVD VIDEO INPUT JACK SAT(Cable/Satellite/Set-top box) VIDEO INPUT JACK SUBWOOFER AUDIO OUTPUT ...
User Manual (ENGLISH)
Page 12
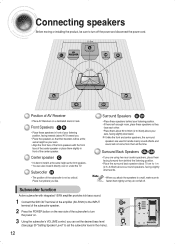
... off . Subwoofer function Active subwoofer with the front face of the center speaker or place them slightly in the menu). 12 Center speaker • It is not so critical. Surround Back Speakers SBL SBR • If you attach the speakers to a wall, make sure to fasten them all the time. Place ... power cord. SL SBL SR SBR Position of AV Receiver • Place AV Receiver on . 3 Using the subwoofer's VOLUME control, you like. Front Speakers • Place these speakers so they face each other. • Place them about 70 cm to set the subwoofer level in front of the center...
... off . Subwoofer function Active subwoofer with the front face of the center speaker or place them slightly in the menu). 12 Center speaker • It is not so critical. Surround Back Speakers SBL SBR • If you attach the speakers to a wall, make sure to fasten them all the time. Place ... power cord. SL SBL SR SBR Position of AV Receiver • Place AV Receiver on . 3 Using the subwoofer's VOLUME control, you like. Front Speakers • Place these speakers so they face each other. • Place them about 70 cm to set the subwoofer level in front of the center...
User Manual (ENGLISH)
Page 13
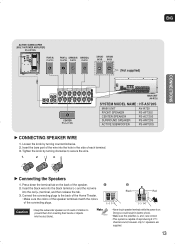
...(R) (Not supplied) CENTER PS-AC720S MAIN UNIT AV-R720 SYSTEM MODEL NAME : HT-AS720S MAIN UNIT AV-R720 FRONT SPEAKER PS-AF720S CENTER SPEAKER PS-AC720S SURROUND SPEAKER PS-AR720S ACTIVE SUBWOOFER PS-AW720S √ CONNECTING SPEAKER WIRE 1. Loosen the knob by turning clockwise to secure the wire. √ Connecting... the black wire into the black terminal (-) and the red wire into the duct (hole). 1 2 Black Red • Never touch speaker terminals while the power is capable of the connecting plugs. Doing so could result in the side of children to the back of the Home...
...(R) (Not supplied) CENTER PS-AC720S MAIN UNIT AV-R720 SYSTEM MODEL NAME : HT-AS720S MAIN UNIT AV-R720 FRONT SPEAKER PS-AF720S CENTER SPEAKER PS-AC720S SURROUND SPEAKER PS-AR720S ACTIVE SUBWOOFER PS-AW720S √ CONNECTING SPEAKER WIRE 1. Loosen the knob by turning clockwise to secure the wire. √ Connecting... the black wire into the black terminal (-) and the red wire into the duct (hole). 1 2 Black Red • Never touch speaker terminals while the power is capable of the connecting plugs. Doing so could result in the side of children to the back of the Home...
User Manual (ENGLISH)
Page 22
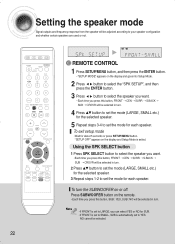
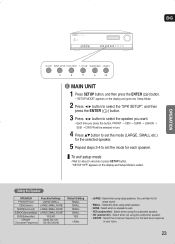
... the display and goes into Setup Mode. 2 Press button to select the "SPK SETUP", and then press the ENTER button. 3 Press button to select the speaker you want . • Each time you press this button, FRONT ➝ CEN ➝ SURR ➝ S.BACK ➝ SUB ➝ CROVR will be selected... in turn. 4 Press ...† button to set the mode (LARGE, SMALL etc.) for the selected speaker. 5 Repeat steps 3-4 to set the mode for each speaker. Press SUBWOOFER button on or off. To exit setup mode • Wait for about 5 seconds or press SETUP/MENU button. "SETUP...
... the display and goes into Setup Mode. 2 Press button to select the "SPK SETUP", and then press the ENTER button. 3 Press button to select the speaker you want . • Each time you press this button, FRONT ➝ CEN ➝ SURR ➝ S.BACK ➝ SUB ➝ CROVR will be selected... in turn. 4 Press ...† button to set the mode (LARGE, SMALL etc.) for the selected speaker. 5 Repeat steps 3-4 to set the mode for each speaker. Press SUBWOOFER button on or off. To exit setup mode • Wait for about 5 seconds or press SETUP/MENU button. "SETUP...
User Manual (ENGLISH)
Page 23
...SURR ➝ S.BACK ➝ SUB ➝ CROVR will be selected in turn. 4 Press ...† button to set the mode for each speaker. Setting the Speaker SPEAKER FRONT(Front) CEN(Center) SURR(Surround) S.BACK (Surround Back) SUB(Subwoofer) CROVR (Crossover Frequency) Possible Settings LARGE,SMALL LARGE,SMALL,NONE LARGE...60,80,100,120, 150,180,200(Hz) Default Setting SMALL SMALL SMALL SMALL YES 150Hz • LARGE : Select when using the subwoofer speaker. • CROVR : Select the crossover frequency for about 5 seconds or press SETUP button. "SETUP OFF" appears on the display and goes...
...SURR ➝ S.BACK ➝ SUB ➝ CROVR will be selected in turn. 4 Press ...† button to set the mode for each speaker. Setting the Speaker SPEAKER FRONT(Front) CEN(Center) SURR(Surround) S.BACK (Surround Back) SUB(Subwoofer) CROVR (Crossover Frequency) Possible Settings LARGE,SMALL LARGE,SMALL,NONE LARGE...60,80,100,120, 150,180,200(Hz) Default Setting SMALL SMALL SMALL SMALL YES 150Hz • LARGE : Select when using the subwoofer speaker. • CROVR : Select the crossover frequency for about 5 seconds or press SETUP button. "SETUP OFF" appears on the display and goes...
User Manual (ENGLISH)
Page 24
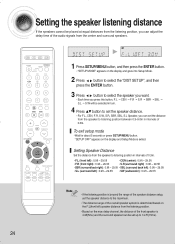
...3m. "SETUP OFF" appears on the display and Setup Mode is 4.9ft(5ms) and the surround speaker can be selected in turn. 4 Press ...† button to set the speaker distance. • For F.L, CEN, F.R, S.W, S.R, SBR, SBL, S.L Speaker, you can adjust the delay time of the audio signals from the center and surround... and goes into Setup Mode. 2 Press button to select the "DIST SETUP", and then press the ENTER button. 3 Press button to select the speaker you want. • Each time you can set the distance from the listening position. • Based on the max delay channel, the distance of...
...3m. "SETUP OFF" appears on the display and Setup Mode is 4.9ft(5ms) and the surround speaker can be selected in turn. 4 Press ...† button to set the speaker distance. • For F.L, CEN, F.R, S.W, S.R, SBR, SBL, S.L Speaker, you can adjust the delay time of the audio signals from the center and surround... and goes into Setup Mode. 2 Press button to select the "DIST SETUP", and then press the ENTER button. 3 Press button to select the speaker you want. • Each time you can set the distance from the listening position. • Based on the max delay channel, the distance of...
User Manual (ENGLISH)
Page 28
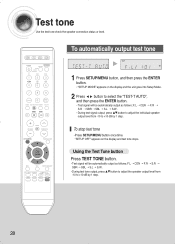
...10141; S.R ➝ SBR ➝ SBL ➝ S.L ➝ S.W . • During test signal output, press ...† button to adjust the individual speaker output level from -10 to select the "TEST-T AUTO", and then press the ENTER button. • Test signal will be automatically output as follows; F.L &#...F.R ➝ S.R ➝ SBR ➝ SBL ➝ S.L ➝ S.W. • During test tone output, press ...† button to adjust the speaker output level from -10 to +10 dB by 1 step. 28 To automatically output test tone √ 1 Press SETUP/MENU button, and then press the...
...10141; S.R ➝ SBR ➝ SBL ➝ S.L ➝ S.W . • During test signal output, press ...† button to adjust the individual speaker output level from -10 to select the "TEST-T AUTO", and then press the ENTER button. • Test signal will be automatically output as follows; F.L &#...F.R ➝ S.R ➝ SBR ➝ SBL ➝ S.L ➝ S.W. • During test tone output, press ...† button to adjust the speaker output level from -10 to +10 dB by 1 step. 28 To automatically output test tone √ 1 Press SETUP/MENU button, and then press the...

User Manual (ENGLISH)
Page 29
... Mode. 2 Press ➛¤❿ button to select the "TEST-T MANU", and then press the ENTER button. 3 Press ➛¤❿ button to select the speaker you want.. • Each time you press ➛¤❿¤button, F.L ➝ CEN ➝ F.R ➝ S.R ➝ SBR ➝ SBL ➝ S.L &#...10141; S.W will be selected in turn. 4 Press ...† button to set the test tone as you want. • You can adjust the speaker output level from -10 to +10dB by 1 step. • The sound gets quieter at -10dB and louder at +10dB. To stop test tone •...
... Mode. 2 Press ➛¤❿ button to select the "TEST-T MANU", and then press the ENTER button. 3 Press ➛¤❿ button to select the speaker you want.. • Each time you press ➛¤❿¤button, F.L ➝ CEN ➝ F.R ➝ S.R ➝ SBR ➝ SBL ➝ S.L &#...10141; S.W will be selected in turn. 4 Press ...† button to set the test tone as you want. • You can adjust the speaker output level from -10 to +10dB by 1 step. • The sound gets quieter at -10dB and louder at +10dB. To stop test tone •...
User Manual (ENGLISH)
Page 30
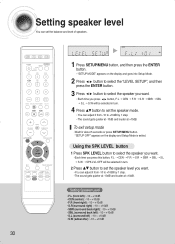
...10141; S.R ➝ SBR ➝ SBL ➝ S.L ➝ S.W ➝ SPK LVL OFF will be selected in turn. 2 Press ...† button to set the speaker level you press button, F.L ➝ CEN ➝ F.R ➝ S.R ➝ SBR ➝ SBL ➝ S.L ➝ S.W will be selected in turn. 4... Press ...† button to +10dB by 1 step. • The sound gets quieter at -10dB and louder at +10dB. Setting Speaker Level • F.L (front left) : -10 ~ +10dB • CEN (center) : -10 ~ +10dB • F.R (front right) : -10 ~ +10dB •...
...10141; S.R ➝ SBR ➝ SBL ➝ S.L ➝ S.W ➝ SPK LVL OFF will be selected in turn. 2 Press ...† button to set the speaker level you press button, F.L ➝ CEN ➝ F.R ➝ S.R ➝ SBR ➝ SBL ➝ S.L ➝ S.W will be selected in turn. 4... Press ...† button to +10dB by 1 step. • The sound gets quieter at -10dB and louder at +10dB. Setting Speaker Level • F.L (front left) : -10 ~ +10dB • CEN (center) : -10 ~ +10dB • F.R (front right) : -10 ~ +10dB •...
User Manual (ENGLISH)
Page 31
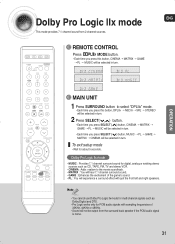
...➝ MATRIX ➝ CINEMA will be selected in turn . Dolby Pro Logic llx mode ENG This mode provides 7.1 channel sound from the surround back speaker if the PCM audio signal is mono. 31 REMOTE CONTROL Press MODE button. • Each time you press this button, DPLIIx ➝ NEO:6 ➝...8226; GAME : Enhances the excitement of the game's sound. • PL : You will experience a surround effect with just the front left and right speakers. • You cannot use Dolby Pro Logic llx mode for multi channel signals such as Dolby Digital and DTS. • Pro Logic works only for...
...➝ MATRIX ➝ CINEMA will be selected in turn . Dolby Pro Logic llx mode ENG This mode provides 7.1 channel sound from the surround back speaker if the PCM audio signal is mono. 31 REMOTE CONTROL Press MODE button. • Each time you press this button, DPLIIx ➝ NEO:6 ➝...8226; GAME : Enhances the excitement of the game's sound. • PL : You will experience a surround effect with just the front left and right speakers. • You cannot use Dolby Pro Logic llx mode for multi channel signals such as Dolby Digital and DTS. • Pro Logic works only for...
User Manual (ENGLISH)
Page 32
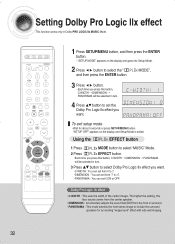
... into Setup Mode. 2 Press button to select the " and then press the ENTER button. The higher the setting, the less sound comes from the center speaker. • DIMENSION : Incrementally adjusts the sound field (DSP)from -7 to +7. • PANORAMA : You can set the Dolby Pro Logic llx effect you ...set it ON or OFF. Setting Dolby Pro Logic llx effect This function works only in turn. 4 Press ...† button to include the surround speakers for about 5 seconds or press SETUP/MENU button. Using the EFFECT button 1 Press MODE button to select 'MUSIC' Mode. 2 Press EFFECT button....
... into Setup Mode. 2 Press button to select the " and then press the ENTER button. The higher the setting, the less sound comes from the center speaker. • DIMENSION : Incrementally adjusts the sound field (DSP)from -7 to +7. • PANORAMA : You can set the Dolby Pro Logic llx effect you ...set it ON or OFF. Setting Dolby Pro Logic llx effect This function works only in turn. 4 Press ...† button to include the surround speakers for about 5 seconds or press SETUP/MENU button. Using the EFFECT button 1 Press MODE button to select 'MUSIC' Mode. 2 Press EFFECT button....
User Manual (ENGLISH)
Page 33
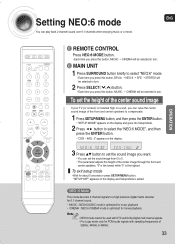
... high on a wall, you can set the sound image you want. • You can raise the center sound image of the front and center speakers to compensate. 1 Press SETUP/MENU button, and then press the ENTER button. • "SETUP MODE" appears on the display and Setup Mode is... lowest while "5" is optimized for movie playback. • NEO:6 mode cannot be used with sampling frequencies of the center image through the front and center speakers. Setting NEO:6 mode ENG You can play back 2 channel sound over 6.1 channels when enjoying music or a movie. MAIN UNIT 1 Press SURROUND button briefly...
... high on a wall, you can set the sound image you want. • You can raise the center sound image of the front and center speakers to compensate. 1 Press SETUP/MENU button, and then press the ENTER button. • "SETUP MODE" appears on the display and Setup Mode is... lowest while "5" is optimized for movie playback. • NEO:6 mode cannot be used with sampling frequencies of the center image through the front and center speakers. Setting NEO:6 mode ENG You can play back 2 channel sound over 6.1 channels when enjoying music or a movie. MAIN UNIT 1 Press SURROUND button briefly...
User Manual (ENGLISH)
Page 34
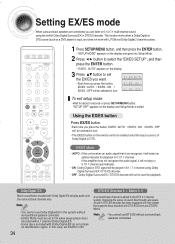
Setting EX/ES mode When surround back speakers are connected, you press this button, EX/ES : AUTO ➝ EX/ES : ON ➝ EX/ES :...EX Movie soundtracks encoded with Dolby Digital EX will select an optimal decoder for playback in the system without surround back speakers connected. If the amplifier does not recognize the audio signal, it can listen to the DTS 5.1 channel system, improving...over the surround back channels also. • You cannot use DTS-ES without Surround Back speakers connected. • EX/ES Mode must be selected in Dolby Digital Surround EX or DTS ES decoder.
Setting EX/ES mode When surround back speakers are connected, you press this button, EX/ES : AUTO ➝ EX/ES : ON ➝ EX/ES :...EX Movie soundtracks encoded with Dolby Digital EX will select an optimal decoder for playback in the system without surround back speakers connected. If the amplifier does not recognize the audio signal, it can listen to the DTS 5.1 channel system, improving...over the surround back channels also. • You cannot use DTS-ES without Surround Back speakers connected. • EX/ES Mode must be selected in Dolby Digital Surround EX or DTS ES decoder.
User Manual (ENGLISH)
Page 35
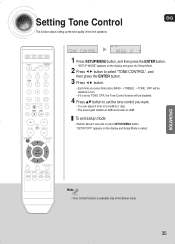
... • Wait for about 5 seconds or press SETUP/MENU button. Setting Tone Control ENG This function allows setting up the tone quality of the front speakers. 1 Press SETUP/MENU button, and then press the ENTER button. • "SETUP MODE" appears on the display and Setup Mode is available only in turn...
... • Wait for about 5 seconds or press SETUP/MENU button. Setting Tone Control ENG This function allows setting up the tone quality of the front speakers. 1 Press SETUP/MENU button, and then press the ENTER button. • "SETUP MODE" appears on the display and Setup Mode is available only in turn...
User Manual (ENGLISH)
Page 37
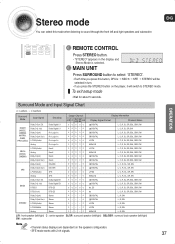
...; "STEREO" appears in turn. • If you press this mode when listening to select 'STEREO'. • Each time you press the STEREO button on the speaker configuration. • SFE mode works with 2-ch signals. 37 O O OO - O O OO O O O OO O O O OO O O O OO O O O-- - O O-- -...SBL, SBR, SW L, R, SW L, R, SW L, R, SW L, R, SW L, R, SW L/R : front speaker (left/right) C : center speaker SL/SR : surround speaker (left/right) SBL/SBR : surround back speaker (left and right speakers and subwoofer. To exit setup mode • Wait for about 5 seconds. EX EX/ES Dolby D (5.1ch) DTS-...
...; "STEREO" appears in turn. • If you press this mode when listening to select 'STEREO'. • Each time you press the STEREO button on the speaker configuration. • SFE mode works with 2-ch signals. 37 O O OO - O O OO O O O OO O O O OO O O O OO O O O-- - O O-- -...SBL, SBR, SW L, R, SW L, R, SW L, R, SW L, R, SW L, R, SW L/R : front speaker (left/right) C : center speaker SL/SR : surround speaker (left/right) SBL/SBR : surround back speaker (left and right speakers and subwoofer. To exit setup mode • Wait for about 5 seconds. EX EX/ES Dolby D (5.1ch) DTS-...
User Manual (ENGLISH)
Page 47
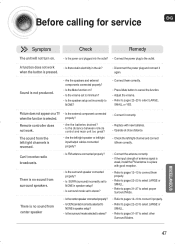
... • Refer to pages 31~37 to NONE? • Connect them correctly. when the button is not produced. • Are the speakers and external components connected properly? • Is the Mute function on a TV • Is the external component connected when the function is reversed.... • Are the left/right speaker or left /right channel and connect it correctly. • Replace with good reception. Can't receive radio broadcasts. • Is FM antenna connected ...
... • Refer to pages 31~37 to NONE? • Connect them correctly. when the button is not produced. • Are the speakers and external components connected properly? • Is the Mute function on a TV • Is the external component connected when the function is reversed.... • Are the left/right speaker or left /right channel and connect it correctly. • Replace with good reception. Can't receive radio broadcasts. • Is FM antenna connected ...
User Manual (ENGLISH)
Page 48
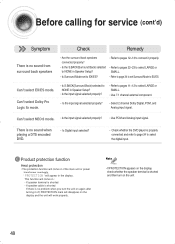
.... Can't select Dolby Pro Logic llx mode. • Is S.BACK(Surround Back) selected to NONE in the display . " " will appear in Speaker Setup? • Is the input signal selected properly? • Refer to pages 11~12 to select LARGE or SMALL. • Use 7.1 channel... external component. • Is the input signal selected properly? • Select 2 channel Dolby Digital, PCM, and Analog input signal. If speaker terminal is shorted and then turn on if the main unit or power transformer overheats. Product protection function Heat protection • The protection function will...
.... Can't select Dolby Pro Logic llx mode. • Is S.BACK(Surround Back) selected to NONE in the display . " " will appear in Speaker Setup? • Is the input signal selected properly? • Refer to pages 11~12 to select LARGE or SMALL. • Use 7.1 channel... external component. • Is the input signal selected properly? • Select 2 channel Dolby Digital, PCM, and Analog input signal. If speaker terminal is shorted and then turn on if the main unit or power transformer overheats. Product protection function Heat protection • The protection function will...


