

User Manual (user Manual) (ver.1.0) (English)
Page 5
... video product should never be operated only from the type of power source indicated on the appliance and in the operating instructions should be operated from the appliance. POWER CORD PROTECTION Power-supply cords should be routed so that could result in a fire or electric shock. The video product may fall, causing serious injury to a child or adult, and serious damage to overturn. Quick...
... video product should never be operated only from the type of power source indicated on the appliance and in the operating instructions should be operated from the appliance. POWER CORD PROTECTION Power-supply cords should be routed so that could result in a fire or electric shock. The video product may fall, causing serious injury to a child or adult, and serious damage to overturn. Quick...
User Manual (user Manual) (ver.1.0) (English)
Page 6
... into such power lines or circuits. When the power-supply cord or plug is a safety feature. b. c. e. If the video product has been dropped or the cabinet has been damaged. this product yourself as the original part. See the figure below. REPLACEMENT PARTS When replacement parts are unable to service this indicates a need for the grounding electrode. GROUND CLAMP ANTENNA LEAD IN WIRE ANTENNA DISCHARGE UNIT...
... into such power lines or circuits. When the power-supply cord or plug is a safety feature. b. c. e. If the video product has been dropped or the cabinet has been damaged. this product yourself as the original part. See the figure below. REPLACEMENT PARTS When replacement parts are unable to service this indicates a need for the grounding electrode. GROUND CLAMP ANTENNA LEAD IN WIRE ANTENNA DISCHARGE UNIT...
User Manual (user Manual) (ver.1.0) (English)
Page 8
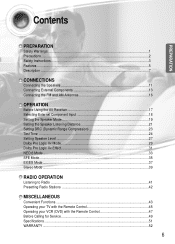
... OPERATION Before Using the AV Receiver 17 Selecting External Component Input 18 Setting the Speaker Mode 19 Setting the Speaker Listening Distance 21 Setting DRC (Dynamic Range Compression 23 Test Tone ...24 Setting Speaker Level ...27 Dolby Pro Logic llx Mode 29 Dolby Pro Logic llx Effect 31 NEO:6 Mode...33 SFE Mode...35 EX/ES Mode ...37 Stereo Mode ...39 RADIO OPERATION Listening to Radio ...41 Presetting Radio Stations 42 MISCELLANEOUS Convenient Functions ...43 Operating your TV with the Remote Control 45 Operating your VCR (DVD...
... OPERATION Before Using the AV Receiver 17 Selecting External Component Input 18 Setting the Speaker Mode 19 Setting the Speaker Listening Distance 21 Setting DRC (Dynamic Range Compression 23 Test Tone ...24 Setting Speaker Level ...27 Dolby Pro Logic llx Mode 29 Dolby Pro Logic llx Effect 31 NEO:6 Mode...33 SFE Mode...35 EX/ES Mode ...37 Stereo Mode ...39 RADIO OPERATION Listening to Radio ...41 Presetting Radio Stations 42 MISCELLANEOUS Convenient Functions ...43 Operating your TV with the Remote Control 45 Operating your VCR (DVD...

User Manual (user Manual) (ver.1.0) (English)
Page 10
... [ Rear Panel ] AM ANTENNA JACK FM ANTENNA JACK 5.1 CH ANALOG AUDIO JACKS VCR/SAT VIDEO INPUT JACK VCR VIDEO OUTPUT JACK COOLING FAN CD COAXIAL DIGITAL AUDIO INPUT JACK DVD OPTICAL DIGITAL AUDIO INPUT JACK SAT(SETTOP BOX) OPTICAL DIGITAL AUDIO INPUT JACK DVD VIDEO INPUT FRONT SPEAKER SURROUND BACK SPEAKER TERMINALS JACK TERMINALS SURROUND SPEAKER TERMINALS MONITOR VIDEO OUTPUT JACK CENTER SPEAKER TERMINALS DVD AUDIO INPUT JACKS VCR/SAT AUDIO INPUT JACKS CD AUDIO INPUT JACKS VCR AUDIO OUTPUT JACKS SUBWOOFER OUTPUT JACKS 1, 2 √√ Accessories œœ Remote Control...
... [ Rear Panel ] AM ANTENNA JACK FM ANTENNA JACK 5.1 CH ANALOG AUDIO JACKS VCR/SAT VIDEO INPUT JACK VCR VIDEO OUTPUT JACK COOLING FAN CD COAXIAL DIGITAL AUDIO INPUT JACK DVD OPTICAL DIGITAL AUDIO INPUT JACK SAT(SETTOP BOX) OPTICAL DIGITAL AUDIO INPUT JACK DVD VIDEO INPUT FRONT SPEAKER SURROUND BACK SPEAKER TERMINALS JACK TERMINALS SURROUND SPEAKER TERMINALS MONITOR VIDEO OUTPUT JACK CENTER SPEAKER TERMINALS DVD AUDIO INPUT JACKS VCR/SAT AUDIO INPUT JACKS CD AUDIO INPUT JACKS VCR AUDIO OUTPUT JACKS SUBWOOFER OUTPUT JACKS 1, 2 √√ Accessories œœ Remote Control...
User Manual (user Manual) (ver.1.0) (English)
Page 14
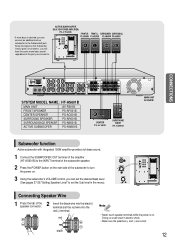
... AV-R601B Subwoofer function Active subwoofer with integrated 150W amplifier provides rich bass sound. 1 Connect the SUBWOOFER OUT terminal of the amplifier (HT-AS601B) to the INPUT terminal of the subwoofer speaker. 2 Press the POWER button on the rear side of the subwoofer to turn the power on. 3 Using the subwoofer's VOLUME control, you can connect an additional active subwoofer to the Subwoofer2 port. red • Never touch speaker terminals while the power is on the Subwoofer 1and 2 ports is desired...
... AV-R601B Subwoofer function Active subwoofer with integrated 150W amplifier provides rich bass sound. 1 Connect the SUBWOOFER OUT terminal of the amplifier (HT-AS601B) to the INPUT terminal of the subwoofer speaker. 2 Press the POWER button on the rear side of the subwoofer to turn the power on. 3 Using the subwoofer's VOLUME control, you can connect an additional active subwoofer to the Subwoofer2 port. red • Never touch speaker terminals while the power is on the Subwoofer 1and 2 ports is desired...

User Manual (user Manual) (ver.1.0) (English)
Page 20
... Press INPUT button. • Each time you connect the Digital Audio Output jack of an external audio component to sound in Analog 2 Channel or Dolby Digital 5.1 Channel using this unit. Method 2 Press DIRECT FUNCTION Select button. • You can listen to the optical/coaxial Digital Audio Input jack on the main unit. • You can operate this function only with the remote control. 18 OPERATION Selecting External Component Input To Select the Function REMOTE CONTROL Method 1 Press the FUNCTION button. • Each time you press the this button, 5.1CH MULTI...
... Press INPUT button. • Each time you connect the Digital Audio Output jack of an external audio component to sound in Analog 2 Channel or Dolby Digital 5.1 Channel using this unit. Method 2 Press DIRECT FUNCTION Select button. • You can listen to the optical/coaxial Digital Audio Input jack on the main unit. • You can operate this function only with the remote control. 18 OPERATION Selecting External Component Input To Select the Function REMOTE CONTROL Method 1 Press the FUNCTION button. • Each time you press the this button, 5.1CH MULTI...
User Manual (user Manual) (ver.1.0) (English)
Page 21
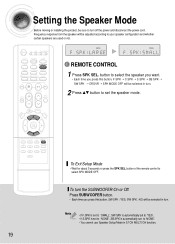
... SPK SEL. button of the remote control to 'NONE'. • You cannot use Speaker Setup Mode in 5.1CH MULTI CH function. 19 Press SUBWOOFER button. • Each time you press this button, SW SPK : YES, SW SPK : NO will be adjusted according to set to select SPK MODE OFF. Frequency response from the speaker will be sure to turn off the power and disconnect the power cord. button to select the speaker you want. •...
... SPK SEL. button of the remote control to 'NONE'. • You cannot use Speaker Setup Mode in 5.1CH MULTI CH function. 19 Press SUBWOOFER button. • Each time you press this button, SW SPK : YES, SW SPK : NO will be adjusted according to set to select SPK MODE OFF. Frequency response from the speaker will be sure to turn off the power and disconnect the power cord. button to select the speaker you want. •...
User Manual (user Manual) (ver.1.0) (English)
Page 22
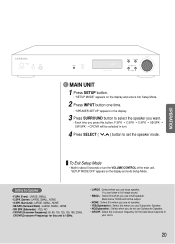
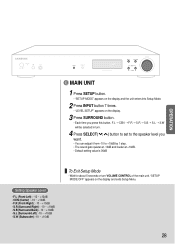
... the best bass response in your room. 20 Bass below 100Hz will be output. • NONE : Select this when you use no speaker. • YES(Subwoofer) : Select this when you use Subwoofer Speaker. • NO(Subwoofer) : Select when you do not use Subwoofer Speaker. • CROVR: Select the crossover frequency for this unit is 150Hz. • LARGE : Select when you use large speaker. OPERATION MAIN UNIT 1 Press SETUP button. • "SETUP MODE" appears on the display and exits Setup Mode...
... the best bass response in your room. 20 Bass below 100Hz will be output. • NONE : Select this when you use no speaker. • YES(Subwoofer) : Select this when you use Subwoofer Speaker. • NO(Subwoofer) : Select when you do not use Subwoofer Speaker. • CROVR: Select the crossover frequency for this unit is 150Hz. • LARGE : Select when you use large speaker. OPERATION MAIN UNIT 1 Press SETUP button. • "SETUP MODE" appears on the display and exits Setup Mode...
User Manual (user Manual) (ver.1.0) (English)
Page 24
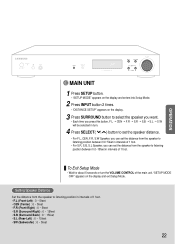
... • S.R (Surround-Right) : 0 ~ 15feet • S.B (Surround Back) : 0 ~ 15feet • S.L (Rear-Left) : 0 ~ 15feet • SW (Subwoofer) : 0 ~ 5feet 22 OPERATION MAIN UNIT 1 Press SETUP button. • "SETUP MODE" appears on the display and enters into Setup Mode. 2 Press INPUT button 2 times. • "DISTANCE SETUP" appears on the display and exit Setup Mode. To Exit Setup Mode • Wait for about 5 seconds or turn . 4 Press SELECT( , ) button to set the speaker distance. • For F.L, CEN, F.R, S.W Speaker, you can set the...
... • S.R (Surround-Right) : 0 ~ 15feet • S.B (Surround Back) : 0 ~ 15feet • S.L (Rear-Left) : 0 ~ 15feet • SW (Subwoofer) : 0 ~ 5feet 22 OPERATION MAIN UNIT 1 Press SETUP button. • "SETUP MODE" appears on the display and enters into Setup Mode. 2 Press INPUT button 2 times. • "DISTANCE SETUP" appears on the display and exit Setup Mode. To Exit Setup Mode • Wait for about 5 seconds or turn . 4 Press SELECT( , ) button to set the speaker distance. • For F.L, CEN, F.R, S.W Speaker, you can set the...

User Manual (user Manual) (ver.1.0) (English)
Page 25
"SETUP MODE OFF" appears on the display. 3 Press SURROUND button to enjoy Dolby Digital sound when watching movies at low volume at night. √ MAIN UNIT 1 Press SETUP button. • "SETUP MODE" appears on the display and enters into Setup Mode. 2 Press INPUT button 3 times. • "DRC SETUP" appears on the display and the unit exits Setup Mode. To Exit Setup Mode • Wait for about 5 seconds or turn . Setting DRC (Dynamic Range Compression) You can only set DRC...
"SETUP MODE OFF" appears on the display. 3 Press SURROUND button to enjoy Dolby Digital sound when watching movies at low volume at night. √ MAIN UNIT 1 Press SETUP button. • "SETUP MODE" appears on the display and enters into Setup Mode. 2 Press INPUT button 3 times. • "DRC SETUP" appears on the display and the unit exits Setup Mode. To Exit Setup Mode • Wait for about 5 seconds or turn . Setting DRC (Dynamic Range Compression) You can only set DRC...
User Manual (user Manual) (ver.1.0) (English)
Page 27
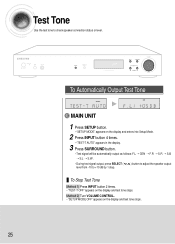
...; "TEST-T OFF" appears on the display and test tone stops. 25 To Automatically Output Test Tone √ MAIN UNIT 1 Press SETUP button. • "SETUP MODE" appears on the display and enters into Setup Mode. 2 Press INPUT button 4 times. • "TEST-T AUTO" appears in the display. 3 Press SURROUND button. • Test signal will be automatically output as follows; F.L ➝ CEN ➝ F.R ➝ S.R ➝ S.B ➝ S.L ➝ S.W . • During test signal output, press SELECT ( , ) button to adjust the speaker output level from -10 to check speaker connection status...
...; "TEST-T OFF" appears on the display and test tone stops. 25 To Automatically Output Test Tone √ MAIN UNIT 1 Press SETUP button. • "SETUP MODE" appears on the display and enters into Setup Mode. 2 Press INPUT button 4 times. • "TEST-T AUTO" appears in the display. 3 Press SURROUND button. • Test signal will be automatically output as follows; F.L ➝ CEN ➝ F.R ➝ S.R ➝ S.B ➝ S.L ➝ S.W . • During test signal output, press SELECT ( , ) button to adjust the speaker output level from -10 to check speaker connection status...
User Manual (user Manual) (ver.1.0) (English)
Page 28
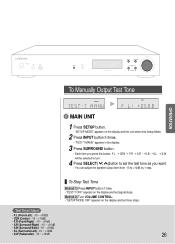
... display and test signal stops. OPERATION To Manually Output Test Tone √ MAIN UNIT 1 Press SETUP button. • "SETUP MODE" appears on the display and the unit enters into Setup Mode. 2 Press INPUT button 5 times. • "TEST-T MANU" appears in the display. 3 Press SURROUND button. • Each time you press this button, F.L ➝ CEN ➝ F.R ➝ S.R ➝ S.B ➝ S.L ➝ S.W will be selected in turn. 4 Press SELECT( , )button to set the test tone as you want. • You can adjust the speaker output level...
... display and test signal stops. OPERATION To Manually Output Test Tone √ MAIN UNIT 1 Press SETUP button. • "SETUP MODE" appears on the display and the unit enters into Setup Mode. 2 Press INPUT button 5 times. • "TEST-T MANU" appears in the display. 3 Press SURROUND button. • Each time you press this button, F.L ➝ CEN ➝ F.R ➝ S.R ➝ S.B ➝ S.L ➝ S.W will be selected in turn. 4 Press SELECT( , )button to set the test tone as you want. • You can adjust the speaker output level...
User Manual (user Manual) (ver.1.0) (English)
Page 30
OPERATION MAIN UNIT 1 Press SETUP button. • "SETUP MODE" appears on the display and the unit enters into Setup Mode. 2 Press INPUT button 7 times. • "LEVEL SETUP" appears on the display and exits Setup Menu. 28 "SETUP MODE OFF" appears on the display. 3 Press SURROUND button. • Each time you press this button, F.L ➝ CEN ➝ F.R ➝ S.R ➝ S.B ➝ S.L ➝ S.W will be selected in turn. 4 Press SELECT( , ) button to set to the speaker level you want. • You can...
OPERATION MAIN UNIT 1 Press SETUP button. • "SETUP MODE" appears on the display and the unit enters into Setup Mode. 2 Press INPUT button 7 times. • "LEVEL SETUP" appears on the display and exits Setup Menu. 28 "SETUP MODE OFF" appears on the display. 3 Press SURROUND button. • Each time you press this button, F.L ➝ CEN ➝ F.R ➝ S.R ➝ S.B ➝ S.L ➝ S.W will be selected in turn. 4 Press SELECT( , ) button to set to the speaker level you want. • You can...
User Manual (user Manual) (ver.1.0) (English)
Page 32
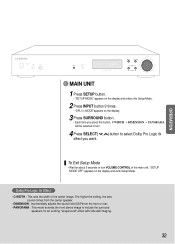
Dolby Pro Logic ll x Mode • MUSIC : Provides 5.1 Channel Surround sound to digital, analog or existing stereo sources such as Dolby Digital and DTS. • Pro Logic works only for about 5 seconds. OPERATION To Exit Setup Mode • Wait for PCM audio signals with sampling frequencies of the game's sound. • PROLOGIC : You will experience a surround effect with just the front left and right speakers. • You cannot use Dolby Pro Logic ll x Mode for multi channel signals such...
Dolby Pro Logic ll x Mode • MUSIC : Provides 5.1 Channel Surround sound to digital, analog or existing stereo sources such as Dolby Digital and DTS. • Pro Logic works only for about 5 seconds. OPERATION To Exit Setup Mode • Wait for PCM audio signals with sampling frequencies of the game's sound. • PROLOGIC : You will experience a surround effect with just the front left and right speakers. • You cannot use Dolby Pro Logic ll x Mode for multi channel signals such...
User Manual (user Manual) (ver.1.0) (English)
Page 34
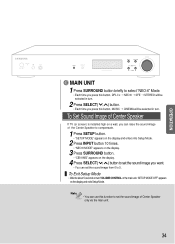
... be selected in turn VOLUME CONTROL of the center image. Dolby Pro Logic llx Effect • C-WIDTH : This sets the width of the main unit. OPERATION MAIN UNIT 1 Press SETUP button. • "SETUP MODE" appears on the display and enters into Setup Mode. 2 Press INPUT button 9 times. • "DPL ll x MODE"appears on the display and exits Setup Mode. The higher the setting, the less sound comes from the center speaker. • DIMENSION : Incrementally adjusts the sound...
... be selected in turn VOLUME CONTROL of the center image. Dolby Pro Logic llx Effect • C-WIDTH : This sets the width of the main unit. OPERATION MAIN UNIT 1 Press SETUP button. • "SETUP MODE" appears on the display and enters into Setup Mode. 2 Press INPUT button 9 times. • "DPL ll x MODE"appears on the display and exits Setup Mode. The higher the setting, the less sound comes from the center speaker. • DIMENSION : Incrementally adjusts the sound...
User Manual (user Manual) (ver.1.0) (English)
Page 36
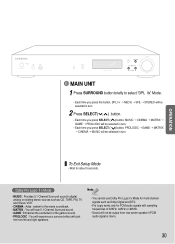
... function to set the sound image from 0 to select "NEO:6" Mode. • Each time you press this button, DPL ll x ➝ NEO:6 ➝ SFE ➝ STEREO will be selected in turn. 2 Press SELECT( , ) button. • Each time you want. • You can use this button, MUSIC ➝ CINEMA will be selected in turn. OPERATION MAIN UNIT 1 Press SURROUND button briefly to 5. To Exit Setup Mode • Wait for about 5 seconds or turn VOLUME CONTROL of Center Speaker...
... function to set the sound image from 0 to select "NEO:6" Mode. • Each time you press this button, DPL ll x ➝ NEO:6 ➝ SFE ➝ STEREO will be selected in turn. 2 Press SELECT( , ) button. • Each time you want. • You can use this button, MUSIC ➝ CINEMA will be selected in turn. OPERATION MAIN UNIT 1 Press SURROUND button briefly to 5. To Exit Setup Mode • Wait for about 5 seconds or turn VOLUME CONTROL of Center Speaker...
User Manual (user Manual) (ver.1.0) (English)
Page 43
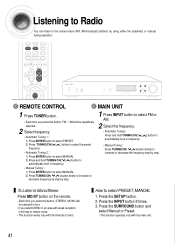
... SURROUND button and select Manual or Preset. • This function operates only with the Remote Control. How to reduce noise. • This function works only with the main unit. 41 Press the INPUT button 8 times. 3. REMOTE CONTROL 1 Press TUNER button. • Each time you press this button, FM ➝ AM will be selected in turn. • If you press this button, STEREO, MONO will be repetitively selected. 2 Select frequency. • Automatic Tuning 1 : 1) Press ENTER button to select PRESET. 2) Press TUNING...
... SURROUND button and select Manual or Preset. • This function operates only with the Remote Control. How to reduce noise. • This function works only with the main unit. 41 Press the INPUT button 8 times. 3. REMOTE CONTROL 1 Press TUNER button. • Each time you press this button, FM ➝ AM will be selected in turn. • If you press this button, STEREO, MONO will be repetitively selected. 2 Select frequency. • Automatic Tuning 1 : 1) Press ENTER button to select PRESET. 2) Press TUNING...
User Manual (user Manual) (ver.1.0) (English)
Page 51
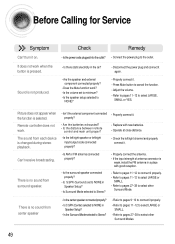
... select other Surround Mode. properly? Remote controller does not work when the button is no sound from center speaker • Is the center speaker connected properly? • Is C.SPK (Center) selected to NONE in the air? • Are the speaker and external component connected properly? • Does the Mute function work? • Is the volume set to NONE in a place with new batteries. • Operate at close distance. • Check the left /right input/output code connected...
... select other Surround Mode. properly? Remote controller does not work when the button is no sound from center speaker • Is the center speaker connected properly? • Is C.SPK (Center) selected to NONE in the air? • Are the speaker and external component connected properly? • Does the Mute function work? • Is the volume set to NONE in a place with new batteries. • Operate at close distance. • Check the left /right input/output code connected...
User Manual (user Manual) (ver.1.0) (English)
Page 52
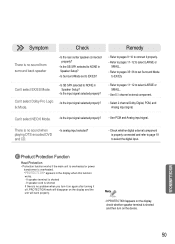
... the input signal selected properly? • Use PCM and Analog input signal. There is no problem when you turn it on again after turning it properly. • Refer to pages 11~12 to select LARGE or SMALL. • Refer to pages 35~36 to set Surround Mode to select LARGE or SMALL. • Use 5.1 channel external component. • Select 2 channel Dolby Digital, PCM, and Analog input signal. If speaker cord is shorted If there is no sound when playing...
... the input signal selected properly? • Use PCM and Analog input signal. There is no problem when you turn it on again after turning it properly. • Refer to pages 11~12 to select LARGE or SMALL. • Refer to pages 35~36 to set Surround Mode to select LARGE or SMALL. • Use 5.1 channel external component. • Select 2 channel Dolby Digital, PCM, and Analog input signal. If speaker cord is shorted If there is no sound when playing...
User Manual (user Manual) (ver.1.0) (English)
Page 54
... may not apply to software products distributed by SAMSUNG under the SAMSUNG brand name are set forth in this statement, noncommercial use of products, equipment, systems, utilities, services, parts, supplies, accessories, applications, installations, repairs, external wiring or connectors not supplied and authorized by a SAMSUNG authorized service center. Transportation of SAMSUNG and must contact SAMSUNG for in the applicable end user license agreement. All replaced parts and products become the...
... may not apply to software products distributed by SAMSUNG under the SAMSUNG brand name are set forth in this statement, noncommercial use of products, equipment, systems, utilities, services, parts, supplies, accessories, applications, installations, repairs, external wiring or connectors not supplied and authorized by a SAMSUNG authorized service center. Transportation of SAMSUNG and must contact SAMSUNG for in the applicable end user license agreement. All replaced parts and products become the...

