
Open Source Guide (ENGLISH)
Page 1
... later version published by the Free Software Foundation. If the Program does not specify a version number of this License which applies to it to your rights, we have received copies, or rights, from time to time. SHOULD THE PROGRAM PROVE DEFECTIVE, YOU ASSUME THE COST OF ALL NECESSARY SERVICING, REPAIR OR CORRECTION. 12. This product uses some software programs which are outside its...
... later version published by the Free Software Foundation. If the Program does not specify a version number of this License which applies to it to your rights, we have received copies, or rights, from time to time. SHOULD THE PROGRAM PROVE DEFECTIVE, YOU ASSUME THE COST OF ALL NECESSARY SERVICING, REPAIR OR CORRECTION. 12. This product uses some software programs which are outside its...

Open Source Guide (ENGLISH)
Page 2
...redistribute and change. It is found. To apply these terms (or, alternatively, under these terms, attach the following notices to where the full notice is safest to attach them to the start of each file should have at least the "copyright" line and a pointer to the library. and each source file ...to the public, we recommend making it free software that everyone can do so by permitting redistribution under the terms of warranty; 16. How to Apply These Terms to Your New Libraries If you develop a new library, and you want it to be of the greatest possible use to ...
...redistribute and change. It is found. To apply these terms (or, alternatively, under these terms, attach the following notices to where the full notice is safest to attach them to the start of each file should have at least the "copyright" line and a pointer to the library. and each source file ...to the public, we recommend making it free software that everyone can do so by permitting redistribution under the terms of warranty; 16. How to Apply These Terms to Your New Libraries If you develop a new library, and you want it to be of the greatest possible use to ...
User Manual (ENGLISH)
Page 4
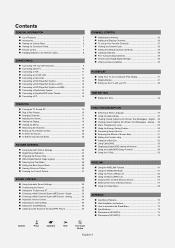
... Problems 70 Wall Installation Instructions 71 How to the Sound of the Sub (PIP) Picture 35 Symbol Press Important ➢ Note One-Touch Button FUNCTION DESCRIPTION Selecting a Menu Language 47 Using the Game Mode 47 Viewing Closed Captions (On-Screen Text Messages) - Digital 33 Choosing a Multi-Channel Sound (MTS) track - Analog 34 Automatic Volume Control 34 Selecting the Internal Mute 35 Setting the On/Off Melody 35 Listening to assemble the Stand-Base 73 Specifications...
... Problems 70 Wall Installation Instructions 71 How to the Sound of the Sub (PIP) Picture 35 Symbol Press Important ➢ Note One-Touch Button FUNCTION DESCRIPTION Selecting a Menu Language 47 Using the Game Mode 47 Viewing Closed Captions (On-Screen Text Messages) - Digital 33 Choosing a Multi-Channel Sound (MTS) track - Analog 34 Automatic Volume Control 34 Selecting the Internal Mute 35 Setting the On/Off Melody 35 Listening to assemble the Stand-Base 73 Specifications...
User Manual (ENGLISH)
Page 5
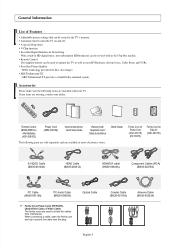
... (Power Cord) (HP-S5073), (Audio/Video Cable, S-Video Cable) The ferrite cores are included with no Set-Top Box needed. Optical Cable Coaxial Cable (BN39-00110A) Antenna Cable (BN39-00333A) English-5 Remote Control The supplied remote can be stored in HD digital tuner, non-subscription HD broadcasts can be used to shield the cables from interference. SRS TruSurround XT - Automatic timer to turn the TV on and off. If any items are available at most DVD players, Set-top boxes, Cable Boxes and...
... (Power Cord) (HP-S5073), (Audio/Video Cable, S-Video Cable) The ferrite cores are included with no Set-Top Box needed. Optical Cable Coaxial Cable (BN39-00110A) Antenna Cable (BN39-00333A) English-5 Remote Control The supplied remote can be stored in HD digital tuner, non-subscription HD broadcasts can be used to shield the cables from interference. SRS TruSurround XT - Automatic timer to turn the TV on and off. If any items are available at most DVD players, Set-top boxes, Cable Boxes and...

User Manual (ENGLISH)
Page 6
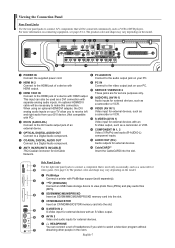
...; POWER Press to turn the TV on the remote control. ¨ CH Press to increase or decrease the volume. buttons as you must use the + VOL - Remote Control Sensor Aim the remote control towards this spot on -screen menu, use the remote control. Press to change channels. In the on the TV. ∏ Speakers English-6 In the on -screen menu. Viewing the Control Panel Buttons on the Lower-Right Part of your TV's basic features, including the on -screen menu, use the...
...; POWER Press to turn the TV on the remote control. ¨ CH Press to increase or decrease the volume. buttons as you must use the + VOL - Remote Control Sensor Aim the remote control towards this spot on -screen menu, use the remote control. Press to change channels. In the on the TV. ∏ Speakers English-6 In the on -screen menu. Viewing the Control Panel Buttons on the Lower-Right Part of your TV's basic features, including the on -screen menu, use the...
User Manual (ENGLISH)
Page 7
... an S-Video output. Ø AV IN 2 Video and audio inputs for external devices with Connect to the video output jack on the model. Œ POWER IN Connect the supplied power cord. HDMI output. ˝ SERVICE 1/SERVICE 2 ˇ HDMI 1/DVI IN These jacks are for external devices, such as a camcorder or VCR. Side Panel Jacks Use the right side panel jacks to connect a component that will be connected continuously, such as VCR or DVD players. English-7 An optional HDMI/DVI cable will be...
... an S-Video output. Ø AV IN 2 Video and audio inputs for external devices with Connect to the video output jack on the model. Œ POWER IN Connect the supplied power cord. HDMI output. ˝ SERVICE 1/SERVICE 2 ˇ HDMI 1/DVI IN These jacks are for external devices, such as a camcorder or VCR. Side Panel Jacks Use the right side panel jacks to connect a component that will be connected continuously, such as VCR or DVD players. English-7 An optional HDMI/DVI cable will be...
User Manual (ENGLISH)
Page 8
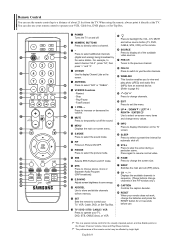
... Audio Program (SAP broadcast). Æ E.SAVING Adjusts screen brightness to save energy. ı ADD/DEL Use to store and delete channels to/from memory. ˜ SET Sets the remote to control your TV, VCR, Cable, DVD, or Set-Top Box. ∑ P.SIZE Press to change the screen size. µ SWAP Switches the main and sub (PIP) picture. ¥ CH / Displays the available channels in sequence. (These buttons change the batteries and press the RESET button for 2-3 seconds before use the remote control...
... Audio Program (SAP broadcast). Æ E.SAVING Adjusts screen brightness to save energy. ı ADD/DEL Use to store and delete channels to/from memory. ˜ SET Sets the remote to control your TV, VCR, Cable, DVD, or Set-Top Box. ∑ P.SIZE Press to change the screen size. µ SWAP Switches the main and sub (PIP) picture. ¥ CH / Displays the available channels in sequence. (These buttons change the batteries and press the RESET button for 2-3 seconds before use the remote control...

User Manual (ENGLISH)
Page 12
... the DVD player/ Set-Top Box. 2. Connect Audio Cables between the HDMI 1/DVI IN jack on the TV and the DVI jack on the camcorder. 2. DVD Player / Set-Top Box TV Rear Panel 1. English-12 Connect a Video Cable (or S-Video Cable) between the DVI IN [R-AUDIO-L] jack on the TV and the AUDIO OUT jacks on the external device. Be sure to the cable. They allow you to view the camcorder tapes without using a VCR TV Side Panel Camcorder 1 S-Video Cable (Not supplied) or 1 Video Cable (Not supplied) 2 Audio Cable (Not supplied...
... the DVD player/ Set-Top Box. 2. Connect Audio Cables between the HDMI 1/DVI IN jack on the TV and the DVI jack on the camcorder. 2. DVD Player / Set-Top Box TV Rear Panel 1. English-12 Connect a Video Cable (or S-Video Cable) between the DVI IN [R-AUDIO-L] jack on the TV and the AUDIO OUT jacks on the external device. Be sure to the cable. They allow you to view the camcorder tapes without using a VCR TV Side Panel Camcorder 1 S-Video Cable (Not supplied) or 1 Video Cable (Not supplied) 2 Audio Cable (Not supplied...
User Manual (ENGLISH)
Page 13
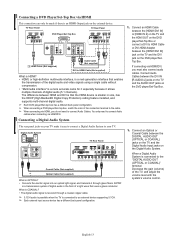
... DVD player/SetTop Box. TV Rear Panel TV Rear Panel DVD Player/Set-Top Box 1 HDMI Cable (Not supplied) Audio Cable (Not supplied) DVI to HDMI Cable (Not supplied) What is HDMI? • HDMI, or high-definition multimedia interface, is a next-generation interface that enables the transmission of the TV, and adjust the volume level with the system's volume control. English-13 Connect an Optical or Coaxial Cable between HDMI and DVI is connected to the "DIGITAL AUDIO OUT (OPTICAL or COAXIAL)" terminal: Decrease the gain (volume) of the digital audio and video signals using...
... DVD player/SetTop Box. TV Rear Panel TV Rear Panel DVD Player/Set-Top Box 1 HDMI Cable (Not supplied) Audio Cable (Not supplied) DVI to HDMI Cable (Not supplied) What is HDMI? • HDMI, or high-definition multimedia interface, is a next-generation interface that enables the transmission of the TV, and adjust the volume level with the system's volume control. English-13 Connect an Optical or Coaxial Cable between HDMI and DVI is connected to the "DIGITAL AUDIO OUT (OPTICAL or COAXIAL)" terminal: Decrease the gain (volume) of the digital audio and video signals using...
User Manual (ENGLISH)
Page 14
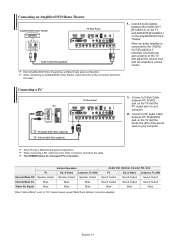
... Off Speaker Output Speaker Output Speaker Output Internal Mute On Mute Mute Mute Video No Signal Mute Mute Mute Audio Out (Optical, Coaxial, R/L Out) TV AV, S-Video Component, PC, HDMI Sound Output Sound Output Sound Output Sound Output Sound Output Sound Output Mute Mute Mute When "Internal Mute" is connected to "On", Sound menus except "Multi-Track Options" cannot be adjusted. Connecting a PC PC TV Rear Panel 2 PC Audio Cable (Not supplied) 1 D-Sub Cable (Not supplied) 1. Connecting an Amplifier/DVD Home Theater Amplifier/DVD Home Theater TV Rear Panel Audio...
... Off Speaker Output Speaker Output Speaker Output Internal Mute On Mute Mute Mute Video No Signal Mute Mute Mute Audio Out (Optical, Coaxial, R/L Out) TV AV, S-Video Component, PC, HDMI Sound Output Sound Output Sound Output Sound Output Sound Output Sound Output Mute Mute Mute When "Internal Mute" is connected to "On", Sound menus except "Multi-Track Options" cannot be adjusted. Connecting a PC PC TV Rear Panel 2 PC Audio Cable (Not supplied) 1 D-Sub Cable (Not supplied) 1. Connecting an Amplifier/DVD Home Theater Amplifier/DVD Home Theater TV Rear Panel Audio...

User Manual (ENGLISH)
Page 15
... the ENTER button. Operation Turning the TV On and Off Press the POWER button on the remote control. You can select the correct signal source among "STD", "HRC" and "IRC" by pressing the ... Plug & Play Feature When the TV is connected to memorize the channels of the OSD. Press the POWER button on the remote control. i Menu language, Channels and Time will be set ." is automatically displayed. menu is displayed. Plug & Play Select Home Mode when installing this TV at...
... the ENTER button. Operation Turning the TV On and Off Press the POWER button on the remote control. You can select the correct signal source among "STD", "HRC" and "IRC" by pressing the ... Plug & Play Feature When the TV is connected to memorize the channels of the OSD. Press the POWER button on the remote control. i Menu language, Channels and Time will be set ." is automatically displayed. menu is displayed. Plug & Play Select Home Mode when installing this TV at...
User Manual (ENGLISH)
Page 19
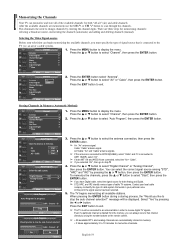
...; button to change channels by using the number buttons on the remote control. ➢ • All available DTV and analog channels are connected, select the "Air + Cable". ➢ If you like to the TV (i.e. To memorize the channels, press the ... Press the ENTER button select "Antenna". Move Enter Return Storing Channels in progress. Digital Channel : STD √ Analog Channel : STD √ Start Move Enter Return Auto Program Auto Program in Memory (Automatic Method) TV Channel Antenna : Air Auto Program Channel...
...; button to change channels by using the number buttons on the remote control. ➢ • All available DTV and analog channels are connected, select the "Air + Cable". ➢ If you like to the TV (i.e. To memorize the channels, press the ... Press the ENTER button select "Antenna". Move Enter Return Storing Channels in progress. Digital Channel : STD √ Analog Channel : STD √ Start Move Enter Return Auto Program Auto Program in Memory (Automatic Method) TV Channel Antenna : Air Auto Program Channel...
User Manual (ENGLISH)
Page 28
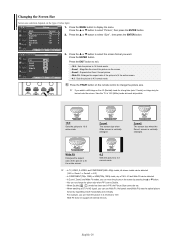
... modes, you can not change the picture size. ➢ If you watch a still image or the 4:3 (Normal) mode for a long time (over 2 hours), an image may be burned onto the screen. Changing the Screen Size Screen size selection depends on the remote control to change the picture size when PIP is set in 4:3 format to select the screen format you want. Press the ... Press the ... or † button to select "Size", then press the ENTER button. Press the P.SIZE button...
... modes, you can not change the picture size. ➢ If you watch a still image or the 4:3 (Normal) mode for a long time (over 2 hours), an image may be burned onto the screen. Changing the Screen Size Screen size selection depends on the remote control to change the picture size when PIP is set in 4:3 format to select the screen format you want. Press the ... Press the ... or † button to select "Size", then press the ENTER button. Press the P.SIZE button...

User Manual (ENGLISH)
Page 32
... display the menu. Sound Control Using Automatic Sound Settings Your TV has automatic sound settings ("Standard", "Music", "Movie", "Speech", and "Custom") that is automatically switched to the "Custom" mode. TV Sound Resetting the Equalizer Settings to exit. Press the ... Press the EXIT button to the Factory Defaults ... or † button to select "Equalizer", then press the ENTER button. Balance 100Hz 300Hz 1KHz 3KHz 10KHz Move Adjust Return Press the EXIT button to select "Sound...
... display the menu. Sound Control Using Automatic Sound Settings Your TV has automatic sound settings ("Standard", "Music", "Movie", "Speech", and "Custom") that is automatically switched to the "Custom" mode. TV Sound Resetting the Equalizer Settings to exit. Press the ... Press the EXIT button to the Factory Defaults ... or † button to select "Equalizer", then press the ENTER button. Balance 100Hz 300Hz 1KHz 3KHz 10KHz Move Adjust Return Press the EXIT button to select "Sound...
User Manual (ENGLISH)
Page 41
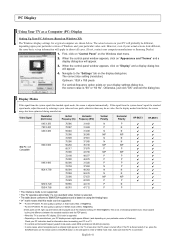
... interlace mode is not supported. • The TV operates abnormally if a non-standard video format is selected. • The table above conforms to the "Settings" tab on your videocard user guide; For the display modes listed below . This is not a mechanical problem but a result caused by referring to your display settings dialog box, the correct value is disconnected). The correct size setting (resolution) Optimum: 1024 x 768 pixels If a vertical-frequency...
... interlace mode is not supported. • The TV operates abnormally if a non-standard video format is selected. • The table above conforms to the "Settings" tab on your videocard user guide; For the display modes listed below . This is not a mechanical problem but a result caused by referring to your display settings dialog box, the correct value is disconnected). The correct size setting (resolution) Optimum: 1024 x 768 pixels If a vertical-frequency...
User Manual (ENGLISH)
Page 47
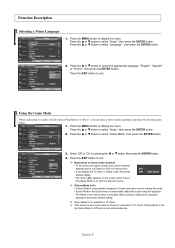
...; Picture Mode is automatically changed to exit. ➢ Restrictions on with the selected source. Adjust the sound using the equalizer. • The Reset in the setup menu. • If you can enjoy a more realistic gaming experience by pressing the ... Set Game Mode to select "Language", then press the ENTER button. Press the ... or † button to Off and connect external devices. Function Description Selecting a Menu Language TV Setup Plug & Play Language Time Game Mode V-Chip Caption Menu Transparency...
...; Picture Mode is automatically changed to exit. ➢ Restrictions on with the selected source. Adjust the sound using the equalizer. • The Reset in the setup menu. • If you can enjoy a more realistic gaming experience by pressing the ... Set Game Mode to select "Language", then press the ENTER button. Press the ... or † button to Off and connect external devices. Function Description Selecting a Menu Language TV Setup Plug & Play Language Time Game Mode V-Chip Caption Menu Transparency...

User Manual (ENGLISH)
Page 65
... the TV and the USB jack on . To Connect a Printer Using a USB Cable TV Side Panel USB Cable PictBridge-supporting Photo Printer 1. Press the œ or √ button to print the file? Move Enter Photo Menu Return Slide Show Rotate Zoom Copy Delete Print List Exit Print Do you have installed. (Refer to a photo x3. Press the INFO button to its original size. The selected photo image will...
... the TV and the USB jack on . To Connect a Printer Using a USB Cable TV Side Panel USB Cable PictBridge-supporting Photo Printer 1. Press the œ or √ button to print the file? Move Enter Photo Menu Return Slide Show Rotate Zoom Copy Delete Print List Exit Print Do you have installed. (Refer to a photo x3. Press the INFO button to its original size. The selected photo image will...
User Manual (ENGLISH)
Page 70
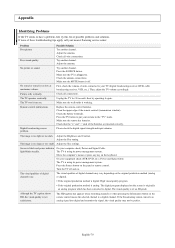
.... Picture rolls vertically. The TV won't turn on the panel or remote control. Try another channel. Check the antenna connections. Replace the remote control batteries. Check the battery terminals. Power and Signal Cable. The visual qualities of these troubleshooting tips apply, call your equipment check (STB, DVD, etc) ; Adjust the antenna. Press the SOURCE button. Press the TV button to put your TV (digital broadcasting receiver, DVD, cable broadcasting receiver, VCR, etc.). Adjust the Size settings. The visual qualities of the remote control (transmission...
.... Picture rolls vertically. The TV won't turn on the panel or remote control. Try another channel. Check the antenna connections. Replace the remote control batteries. Check the battery terminals. Power and Signal Cable. The visual qualities of these troubleshooting tips apply, call your equipment check (STB, DVD, etc) ; Adjust the antenna. Press the SOURCE button. Press the TV button to put your TV (digital broadcasting receiver, DVD, cable broadcasting receiver, VCR, etc.). Adjust the Size settings. The visual qualities of the remote control (transmission...
User Manual (ENGLISH)
Page 71
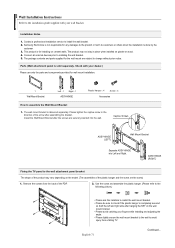
... the wall mount bracket to the wall to avoid injury from the back of the plastic hanger and the screw are subject to change without prior notice. Wall Installation Instructions Refer to the installation guide supplied with your dealer.) Please use only the parts and components provided for wall mount installation. 1 Wall Mount Bracket Left : 1 Right : 1 ASSY-HINGE Plastic Hanger : 4 Screw : 4 Accessories How to assemble the Wall Mount Bracket 1. Installation Notes 1. Contact a professional installation service to installing the wall bracket. 5. Samsung...
... the wall mount bracket to the wall to avoid injury from the back of the plastic hanger and the screw are subject to change without prior notice. Wall Installation Instructions Refer to the installation guide supplied with your dealer.) Please use only the parts and components provided for wall mount installation. 1 Wall Mount Bracket Left : 1 Right : 1 ASSY-HINGE Plastic Hanger : 4 Screw : 4 Accessories How to assemble the Wall Mount Bracket 1. Installation Notes 1. Contact a professional installation service to installing the wall bracket. 5. Samsung...
User Manual (ENGLISH)
Page 72
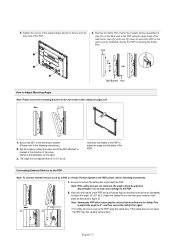
...° by ±2°. Note: Viewing the PDP after setting its angle at step (#) on the back side of the wall mount, push (!) and hook (@) down to following instructions.) 2. English-72 If the safety pins are not removed, the angle cannot be adjusted. PDP Wall Bracket Wall How to the illustration on the wall mount as illustrated in picture 2) to adjust the angle (not the sides of...
...° by ±2°. Note: Viewing the PDP after setting its angle at step (#) on the back side of the wall mount, push (!) and hook (@) down to following instructions.) 2. English-72 If the safety pins are not removed, the angle cannot be adjusted. PDP Wall Bracket Wall How to the illustration on the wall mount as illustrated in picture 2) to adjust the angle (not the sides of...


