User Manual (ENGLISH)
Page 4
......9 Front Panel LED Indicators 10 Front side buttons 11 Side Panel Jacks ...11 Rear Panel Jacks ...12 Remote Control...13 Connections 16 Connecting VHF and UHF Antennas 16 Antennas with 75-ohm Round Leads 16 Connecting Cable TV 17 Cable without a Cable Box 17 Cable with a Cable Box that Descrambles... 28 Navigating Menus by Using the Menu Map 29 Selecting a Menu Language 30 Memorizing Channels 31 Changing Channels 33 Customizing Your Remote Control 34 Remote Control Codes 38 Setting the Clock...41 Setting the On/Off Timer 43 Setting the Sleep Timer 44 Viewing an External Signal ...
......9 Front Panel LED Indicators 10 Front side buttons 11 Side Panel Jacks ...11 Rear Panel Jacks ...12 Remote Control...13 Connections 16 Connecting VHF and UHF Antennas 16 Antennas with 75-ohm Round Leads 16 Connecting Cable TV 17 Cable without a Cable Box 17 Cable with a Cable Box that Descrambles... 28 Navigating Menus by Using the Menu Map 29 Selecting a Menu Language 30 Memorizing Channels 31 Changing Channels 33 Customizing Your Remote Control 34 Remote Control Codes 38 Setting the Clock...41 Setting the On/Off Timer 43 Setting the Sleep Timer 44 Viewing an External Signal ...
User Manual (ENGLISH)
Page 9
...) jack • Game mode • Easy-to-use on-screen menu system you can access from the front panel or remote control • Automatic timer to turn the TV on and off at any piece is a full-featured, high-performance unit that you to view and play photo (JPEG) and...sure that exceeds industry standards. In addition, it has these special features: • Easy-to-operate remote control • Dynamic menus and Navigating menus by using the latest technology. List of Features Your TV is designed and engineered using the menu map • Easy-to-use channel manager menu. •...
...) jack • Game mode • Easy-to-use on-screen menu system you can access from the front panel or remote control • Automatic timer to turn the TV on and off at any piece is a full-featured, high-performance unit that you to view and play photo (JPEG) and...sure that exceeds industry standards. In addition, it has these special features: • Easy-to-operate remote control • Dynamic menus and Navigating menus by using the latest technology. List of Features Your TV is designed and engineered using the menu map • Easy-to-use channel manager menu. •...
User Manual (ENGLISH)
Page 10
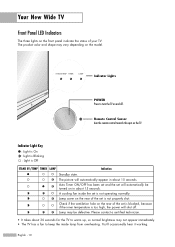
... a fan to keep the inside the set will automatically appear in about 15 seconds. Remote Control Sensor Aim the remote control towards this spot on the front panel indicate the status of your TV. Auto Timer ON/OFF has been set and the set is too high, the power will shut off . A cooling... not properly shut. You'll occasionally hear it working. Lamp cover on and off . Lamp may be turned on in about 30 seconds for the TV to turn the TV on the rear of the set is Off STAND BY/TEMP TIMER LAMP Indication Standby state. Your New Wide...
... a fan to keep the inside the set will automatically appear in about 15 seconds. Remote Control Sensor Aim the remote control towards this spot on the front panel indicate the status of your TV. Auto Timer ON/OFF has been set and the set is too high, the power will shut off . A cooling... not properly shut. You'll occasionally hear it working. Lamp cover on and off . Lamp may be turned on in about 30 seconds for the TV to turn the TV on the rear of the set is Off STAND BY/TEMP TIMER LAMP Indication Standby state. Your New Wide...
User Manual (ENGLISH)
Page 11
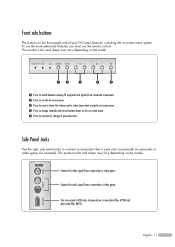
... the audio signal from a camcorder or video game. The product color and shape may vary depending on the model. Œ Press to switch between viewing TV programs and signals from connected components. ´ Press to see the on-screen menu. ˇ Press to raise or lower the volume and to select... right side panel jacks to view photo files (JPEG) and play audio files (MP3). Front side buttons The buttons on the front panel control your TV's basic features, including the on-screen menu system. To use the more advanced features, you must use the...
... the audio signal from a camcorder or video game. The product color and shape may vary depending on the model. Œ Press to switch between viewing TV programs and signals from connected components. ´ Press to see the on-screen menu. ˇ Press to raise or lower the volume and to select... right side panel jacks to view photo files (JPEG) and play audio files (MP3). Front side buttons The buttons on the front panel control your TV's basic features, including the on-screen menu system. To use the more advanced features, you must use the...
User Manual (ENGLISH)
Page 13
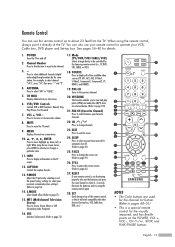
...23 feet from an external device. (Refer to a particular channel. 3. INFO Press to display information on -screen menus, press ENTER to page 56) 14. EXIT Press to page 66) 27. RESET If your personal, customized picture settings.) (Refer to activate (or change) a particular item...PAUSE buttons. CAPTION Controls the caption decoder. 13. P.MODE Adjust the TV picture by the Samsung remote control (i.e., TV, DVD, STB, CABLE, or VCR). 18. P.SIZE Press to display all of this remote control, so that it directly at the TV. SET Used during set up to increase or decrease the volume. ...
...23 feet from an external device. (Refer to a particular channel. 3. INFO Press to display information on -screen menus, press ENTER to page 56) 14. EXIT Press to page 66) 27. RESET If your personal, customized picture settings.) (Refer to activate (or change) a particular item...PAUSE buttons. CAPTION Controls the caption decoder. 13. P.MODE Adjust the TV picture by the Samsung remote control (i.e., TV, DVD, STB, CABLE, or VCR). 18. P.SIZE Press to display all of this remote control, so that it directly at the TV. SET Used during set up to increase or decrease the volume. ...
User Manual (ENGLISH)
Page 14
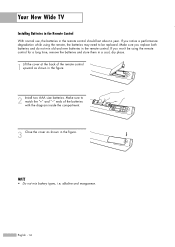
... - 14 If you won't be replaced. NOTE • Do not mix battery types, i.e, alkaline and manganese. Make sure you notice a performance degradation while using the remote control for a long time, remove the batteries and store them in a cool, dry place. 1 Lift the cover at the back of the batteries with the... diagram inside the compartment. 3 Close the cover as shown in the figure. Your New Wide TV Installing Batteries in the Remote Control With normal use, the batteries in the...
... - 14 If you won't be replaced. NOTE • Do not mix battery types, i.e, alkaline and manganese. Make sure you notice a performance degradation while using the remote control for a long time, remove the batteries and store them in a cool, dry place. 1 Lift the cover at the back of the batteries with the... diagram inside the compartment. 3 Close the cover as shown in the figure. Your New Wide TV Installing Batteries in the Remote Control With normal use, the batteries in the...
User Manual (ENGLISH)
Page 28
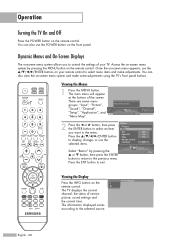
...Size Digital NR DNIe My Color Control Film Mode √ 16:9 On On Off Select "Return" by pressing the MENU button on the Air remote control. 3 The TV displays the current channel, the status of certain picture, sound settings and the current time. The main menu will appear at the bottom of...the ENTER button to select an item you to display, change, or use the POWER button on the remote control. Access the on-screen menu system by pressing the ... Operation Turning the TV On and Off Press the POWER button on the front panel. Press the ENTER button to control the ...
...Size Digital NR DNIe My Color Control Film Mode √ 16:9 On On Off Select "Return" by pressing the MENU button on the Air remote control. 3 The TV displays the current channel, the status of certain picture, sound settings and the current time. The main menu will appear at the bottom of...the ENTER button to select an item you to display, change, or use the POWER button on the remote control. Access the on-screen menu system by pressing the ... Operation Turning the TV On and Off Press the POWER button on the front panel. Press the ENTER button to control the ...

User Manual (ENGLISH)
Page 32
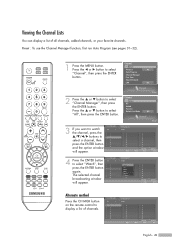
...signal Cable : "Cable" antenna signal Air+Cable : "Air" and "Cable" antenna signals Auto Program Select the antennas to the previous menu. The TV begins memorizing all available stations. Stop Enter Cable 3 85% Return Auto Program Auto Program is connected to "STD". Select "Return" by using the ... Program in your particular area. Even if a particular channel is done on the remote control. • When connecting Digital Cable to start the auto program. By default, the cable TV system is set to with the SOURCE button on your local cable company to identify...
...signal Cable : "Cable" antenna signal Air+Cable : "Air" and "Cable" antenna signals Auto Program Select the antennas to the previous menu. The TV begins memorizing all available stations. Stop Enter Cable 3 85% Return Auto Program Auto Program is connected to "STD". Select "Return" by using the ... Program in your particular area. Even if a particular channel is done on the remote control. • When connecting Digital Cable to start the auto program. By default, the cable TV system is set to with the SOURCE button on your local cable company to identify...
User Manual (ENGLISH)
Page 34
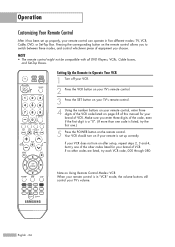
...with all DVD Players, VCRs, Cable boxes, and Set-Top Boxes. Operation Customizing Your Remote Control After it has been set up correctly. If no other codes listed for your TV's volume. Pressing the corresponding button on the remote control. Make sure you enter three digits of the code, even if the first... digit is in five different modes: TV, VCR, Cable, DVD, or Set-Top Box. If your VCR does not turn on after set-up properly, your remote is listed, try each VCR code, 000 through 080. English - 34 Your VCR should ...
...with all DVD Players, VCRs, Cable boxes, and Set-Top Boxes. Operation Customizing Your Remote Control After it has been set up correctly. If no other codes listed for your TV's volume. Pressing the corresponding button on the remote control. Make sure you enter three digits of the code, even if the first... digit is in five different modes: TV, VCR, Cable, DVD, or Set-Top Box. If your VCR does not turn on after set-up properly, your remote is listed, try each VCR code, 000 through 080. English - 34 Your VCR should ...
User Manual (ENGLISH)
Page 35
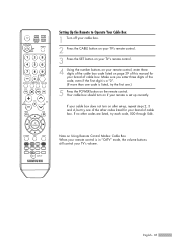
... Operate Your Cable Box 1 Turn off your cable box. 2 Press the CABLE button on your TV's remote control. 3 Press the SET button on your TV's remote control. 4 Using the number buttons on your remote control, enter three digits of the cable box code listed on after set-up, repeat steps 2, 3 and 4, but try one ....) 5 Press the POWER button on if your remote is set up correctly. If your cable...
... Operate Your Cable Box 1 Turn off your cable box. 2 Press the CABLE button on your TV's remote control. 3 Press the SET button on your TV's remote control. 4 Using the number buttons on your remote control, enter three digits of the cable box code listed on after set-up, repeat steps 2, 3 and 4, but try one ....) 5 Press the POWER button on if your remote is set up correctly. If your cable...
User Manual (ENGLISH)
Page 36
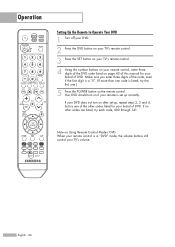
..., the volume buttons still control your TV's volume. If your DVD does not turn on the remote control. Operation Setting Up the Remote to Operate Your DVD 1 Turn off your DVD. 2 Press the DVD button on your TV's remote control. 3 Press the SET button on your TV's remote control. 4 Using the number buttons... on your remote control, enter three digits of the DVD code listed on after set up , repeat steps 2, 3 and 4, but try ...
..., the volume buttons still control your TV's volume. If your DVD does not turn on the remote control. Operation Setting Up the Remote to Operate Your DVD 1 Turn off your DVD. 2 Press the DVD button on your TV's remote control. 3 Press the SET button on your TV's remote control. 4 Using the number buttons... on your remote control, enter three digits of the DVD code listed on after set up , repeat steps 2, 3 and 4, but try ...
User Manual (ENGLISH)
Page 37
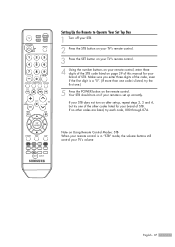
... volume buttons still control your remote is listed, try the first one of the other codes are listed, try one .) 5 Press the POWER button on the remote control. Setting Up the Remote to Operate Your Set Top Box 1 Turn off your STB. 2 Press the STB button on your TV's remote control. 3 Press the SET ...button on your TV's remote control. 4 Using the number buttons on your remote control, enter three digits of the STB code listed on page 39 of this manual for your brand of STB. ...
... volume buttons still control your remote is listed, try the first one of the other codes are listed, try one .) 5 Press the POWER button on the remote control. Setting Up the Remote to Operate Your Set Top Box 1 Turn off your STB. 2 Press the STB button on your TV's remote control. 3 Press the SET ...button on your TV's remote control. 4 Using the number buttons on your remote control, enter three digits of the STB code listed on page 39 of this manual for your brand of STB. ...
User Manual (ENGLISH)
Page 41
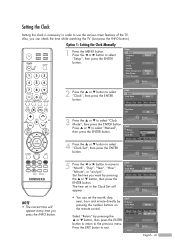
...press the ENTER button. Month / Day / Year Hour / Minute Time Zone DST Off Setup • You can check the time while watching the TV. (Just press the INFO button.) Option 1: Setting the Clock Manually 1 Press the MENU button. Clock Mode Clock Set Setup Enter Manual Auto -- :... -- -- 4 Press the ... Select "Return" by pressing the number buttons on the remote control. Setup Return Language Clock Timer Game Mode V-Chip Caption Menu Transparency Blue Screen † Color Weakness English Off Medium Off 2 Press the ...
...press the ENTER button. Month / Day / Year Hour / Minute Time Zone DST Off Setup • You can check the time while watching the TV. (Just press the INFO button.) Option 1: Setting the Clock Manually 1 Press the MENU button. Clock Mode Clock Set Setup Enter Manual Auto -- :... -- -- 4 Press the ... Select "Return" by pressing the number buttons on the remote control. Setup Return Language Clock Timer Game Mode V-Chip Caption Menu Transparency Blue Screen † Color Weakness English Off Medium Off 2 Press the ...
User Manual (ENGLISH)
Page 43
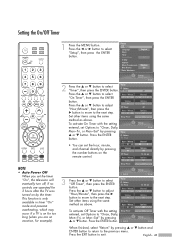
...are operated for example). 1 Press the MENU button. This function is only available in timer "On" mode and prevents overheating, which may occur if a TV is on for too long (when you set the timer "On", the television will eventually turn off Options Off --- or † button to adjust "... 12 : 00 am Sleep Timer Setup Enter off Channel Air 3 Options Off off , if no controls are on vacation, for 3 hours after the TV was turned on the remote control. On Timer • You can set the hour, minute, Hour / Minute ... 12 : 00 am † To activate Off Timer with ...
...are operated for example). 1 Press the MENU button. This function is only available in timer "On" mode and prevents overheating, which may occur if a TV is on for too long (when you set the timer "On", the television will eventually turn off Options Off --- or † button to adjust "... 12 : 00 am Sleep Timer Setup Enter off Channel Air 3 Options Off off , if no controls are on vacation, for 3 hours after the TV was turned on the remote control. On Timer • You can set the hour, minute, Hour / Minute ... 12 : 00 am † To activate Off Timer with ...
User Manual (ENGLISH)
Page 44
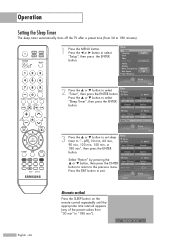
... "Sleep Timer", then press the ENTER 12 : 00 am Options Daily --- 3 Press the ... or † button to set sleep timer to "- - (off the TV after a preset time (from "30 min" to 180 minutes). 1 Press the MENU button. Volume 10 Off Timer Hour / Minute 12 : 00 am Sleep Timer 12...Timer Return On Timer Hour / Minute 12 : 00 am Options Daily ... 30 min † Setup Enter Alternate method Press the SLEEP button on the remote control repeatedly until the appropriate time interval appears (any of the preset values from 30 to "180 min"). or † button, then press the ...
... "Sleep Timer", then press the ENTER 12 : 00 am Options Daily --- 3 Press the ... or † button to set sleep timer to "- - (off the TV after a preset time (from "30 min" to 180 minutes). 1 Press the MENU button. Volume 10 Off Timer Hour / Minute 12 : 00 am Sleep Timer 12...Timer Return On Timer Hour / Minute 12 : 00 am Options Daily ... 30 min † Setup Enter Alternate method Press the SLEEP button on the remote control repeatedly until the appropriate time interval appears (any of the preset values from 30 to "180 min"). or † button, then press the ...
User Manual (ENGLISH)
Page 45
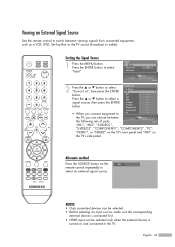
...", then press the ENTER Source List Return TV √ button. signal source, then press the ENTER S-Video1 ---- the TV, you connect equipment to †PC ---- S-Video2 ---- Viewing an External Signal Source Use the remote control to switch between Input the following sets... of jacks: Enter "AV1", "AV2", "S-VIDEO1", "S-VIDEO2", "COMPONENT1", "COMPONENT2", "PC", "HDMI1", or "HDMI2" on the TV's rear panel and "AV3" on the TV's side panel. Setting the Signal Source...
...", then press the ENTER Source List Return TV √ button. signal source, then press the ENTER S-Video1 ---- the TV, you connect equipment to †PC ---- S-Video2 ---- Viewing an External Signal Source Use the remote control to switch between Input the following sets... of jacks: Enter "AV1", "AV2", "S-VIDEO1", "S-VIDEO2", "COMPONENT1", "COMPONENT2", "PC", "HDMI1", or "HDMI2" on the TV's rear panel and "AV3" on the TV's side panel. Setting the Signal Source...
User Manual (ENGLISH)
Page 48
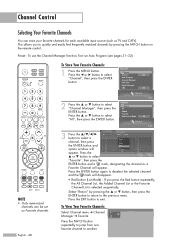
English - 48 To Store Your Favorite Channels: 1 Press the MENU button. Select "Return" by pressing the FAV.CH button on the remote control. or † button to another. Press the ... To View Your Favorite Channels: Select Channel menu ➔ Channel Air Manager ➔ Favorite 2 Press the FAV.... Added Channel List or the Favorite Channel List is selected sequentially. Press the 20 ... Channel Control Selecting Your Favorite Channels You can be set as TV and CATV).
English - 48 To Store Your Favorite Channels: 1 Press the MENU button. Select "Return" by pressing the FAV.CH button on the remote control. or † button to another. Press the ... To View Your Favorite Channels: Select Channel menu ➔ Channel Air Manager ➔ Favorite 2 Press the FAV.... Added Channel List or the Favorite Channel List is selected sequentially. Press the 20 ... Channel Control Selecting Your Favorite Channels You can be set as TV and CATV).
User Manual (ENGLISH)
Page 49
... Delete Name Favorite Return 21 4 7 10 13 16 19 22 List Mode Enter Delete All Return Alternate method Press the CH MGR button on the remote control to select "Channel", then press the ENTER button. 2 Press the ... or † button to select "Watch", then 2 press the ENTER button 5 8 again. 11 14...
... Delete Name Favorite Return 21 4 7 10 13 16 19 22 List Mode Enter Delete All Return Alternate method Press the CH MGR button on the remote control to select "Channel", then press the ENTER button. 2 Press the ... or † button to select "Watch", then 2 press the ENTER button 5 8 again. 11 14...
User Manual (ENGLISH)
Page 56
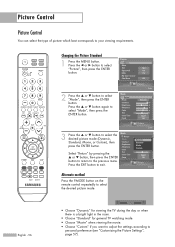
...Cool1 OK Picture Enter Alternate method Press the P.MODE button on the remote control repeatedly to personal preference (see "Customizing the Picture Settings", page 57). English - 56 Dynamic • Choose "Dynamic" for viewing the TV during the day or when there is a bright light in the ...room. • Choose "Standard" for general TV watching mode. • Choose "Movie" when viewing the movie. ...
...Cool1 OK Picture Enter Alternate method Press the P.MODE button on the remote control repeatedly to personal preference (see "Customizing the Picture Settings", page 57). English - 56 Dynamic • Choose "Dynamic" for viewing the TV during the day or when there is a bright light in the ...room. • Choose "Standard" for general TV watching mode. • Choose "Movie" when viewing the movie. ...
User Manual (ENGLISH)
Page 59
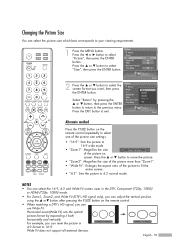
...picture. • "Zoom2": Magnifies the size of the picture more than "Zoom1". • "Wide Fit": Enlarges the aspect ratio of the picture on the remote control. • When watching a DTV's HD signal, you can select the 16:9, 4:3 and Wide Fit screen sizes in 4 : 3 Wide Fit 4:3 ...can adjust the vertical position using the ... Wide Fit does not support all external devices. Enter Alternate method Press the P.SIZE button on the remote control repeatedly to select one of the picture size settings. • "16:9": Sets the picture to 16:9 wide mode. • "Zoom1":...
...picture. • "Zoom2": Magnifies the size of the picture more than "Zoom1". • "Wide Fit": Enlarges the aspect ratio of the picture on the remote control. • When watching a DTV's HD signal, you can select the 16:9, 4:3 and Wide Fit screen sizes in 4 : 3 Wide Fit 4:3 ...can adjust the vertical position using the ... Wide Fit does not support all external devices. Enter Alternate method Press the P.SIZE button on the remote control repeatedly to select one of the picture size settings. • "16:9": Sets the picture to 16:9 wide mode. • "Zoom1":...


