
Open Source Guide (ENGLISH)
Page 1
.... and that refer to this service if you wish), that you receive source code or can get it to be licensed as a special exception, the source code distributed need to make sure that you have . they , too, receive or can change . keep intact all its terms and conditions for any change the software or use or not licensed at no warranty...
.... and that refer to this service if you wish), that you receive source code or can get it to be licensed as a special exception, the source code distributed need to make sure that you have . they , too, receive or can change . keep intact all its terms and conditions for any change the software or use or not licensed at no warranty...

Open Source Guide (ENGLISH)
Page 2
...These Terms to Your New Libraries If you develop a new library, and you want it free software that everyone can do so by permitting redistribution under these terms, attach the following notices to ... exclusion of the greatest possible use to where the full notice is safest to attach them to the start of each file should have at least the "copyright" line and a pointer to the ... FAILURE OF THE LIBRARY TO OPERATE WITH ANY OTHER SOFTWARE), EVEN IF SUCH HOLDER OR OTHER PARTY HAS BEEN ADVISED OF THE POSSIBILITY OF SUCH DAMAGES. You can redistribute and change. To apply these terms (...
...These Terms to Your New Libraries If you develop a new library, and you want it free software that everyone can do so by permitting redistribution under these terms, attach the following notices to ... exclusion of the greatest possible use to where the full notice is safest to attach them to the start of each file should have at least the "copyright" line and a pointer to the ... FAILURE OF THE LIBRARY TO OPERATE WITH ANY OTHER SOFTWARE), EVEN IF SUCH HOLDER OR OTHER PARTY HAS BEEN ADVISED OF THE POSSIBILITY OF SUCH DAMAGES. You can redistribute and change. To apply these terms (...
User Manual (ENGLISH)
Page 2
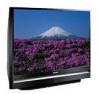
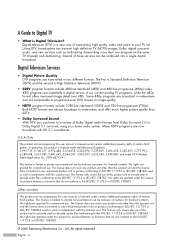
... image quality. • HDTV program formats include 1080-line interlaced (1080i) and 720-line progressive (720p). No rights are granted under this product unit. No rights are granted for commercial use . English - 2 A Guide to your home audio system. Digital television (DTV) is a new way of transmitting high quality video and audio to Digital TV • What is Digital Television? Several of these services can transmit high definition TV (HDTV) images, Dolby digital surround audio...
... image quality. • HDTV program formats include 1080-line interlaced (1080i) and 720-line progressive (720p). No rights are granted under this product unit. No rights are granted for commercial use . English - 2 A Guide to your home audio system. Digital television (DTV) is a new way of transmitting high quality video and audio to Digital TV • What is Digital Television? Several of these services can transmit high definition TV (HDTV) images, Dolby digital surround audio...
User Manual (ENGLISH)
Page 3
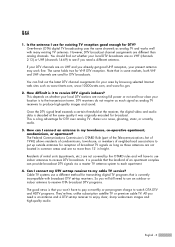
... and HDTV programs. They're free, unlike subscription satellite TV or premium cable TV. It is an antenna and a DTV set-top receiver to put up outside antennas for DTV? Q&A 1. So you will have to pay a monthly or per-program charge to my cable TV service? Cable TV systems use for existing TV reception good enough for reception of neighborhood associations to enjoy clear, sharp widescreen images and high-quality audio...
... and HDTV programs. They're free, unlike subscription satellite TV or premium cable TV. It is an antenna and a DTV set-top receiver to put up outside antennas for DTV? Q&A 1. So you will have to pay a monthly or per-program charge to my cable TV service? Cable TV systems use for existing TV reception good enough for reception of neighborhood associations to enjoy clear, sharp widescreen images and high-quality audio...
User Manual (ENGLISH)
Page 4
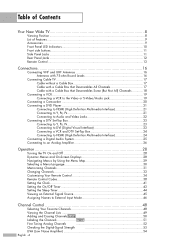
... Panel LED Indicators 10 Front side buttons 11 Side Panel Jacks ...11 Rear Panel Jacks ...12 Remote Control...13 Connections 16 Connecting VHF and UHF Antennas 16 Antennas with 75-ohm Round Leads 16 Connecting Cable TV 17 Cable without a Cable Box 17 Cable with a Cable Box that Descrambles All Channels 17 Cable with a Cable Box that Descrambles Some (But Not All) Channels 18 Connecting a VCR 19 Connecting a VCR to the Video or S-Video/Audio jack 19 Connecting a Camcorder 20 Connecting a DVD Player 21 Connecting to HDMI (High...
... Panel LED Indicators 10 Front side buttons 11 Side Panel Jacks ...11 Rear Panel Jacks ...12 Remote Control...13 Connections 16 Connecting VHF and UHF Antennas 16 Antennas with 75-ohm Round Leads 16 Connecting Cable TV 17 Cable without a Cable Box 17 Cable with a Cable Box that Descrambles All Channels 17 Cable with a Cable Box that Descrambles Some (But Not All) Channels 18 Connecting a VCR 19 Connecting a VCR to the Video or S-Video/Audio jack 19 Connecting a Camcorder 20 Connecting a DVD Player 21 Connecting to HDMI (High...
User Manual (ENGLISH)
Page 5
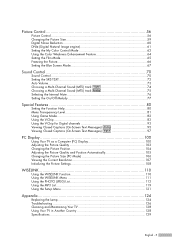
Picture Control 56 Picture Control...56 Changing the Picture Size 59 Digital Noise Reduction 60 DNIe (Digital Natural Image engine 61 Setting the My Color Control Mode 62 Using the Color Weakness Enhancement Feature 64 Setting the Film Mode 65 Freezing the Picture 66 Setting the Blue Screen Mode 67 Sound Control 70 Sound Control ...70 Setting the SRS TSXT 72 Auto Volume...73 Choosing a Multi-Channel Sound (MTS) track Digital 74 Choosing a Multi-Channel Sound (MTS) track Analog 75 Selecting the Internal Mute 76 Setting the On/Off Melody 77...
Picture Control 56 Picture Control...56 Changing the Picture Size 59 Digital Noise Reduction 60 DNIe (Digital Natural Image engine 61 Setting the My Color Control Mode 62 Using the Color Weakness Enhancement Feature 64 Setting the Film Mode 65 Freezing the Picture 66 Setting the Blue Screen Mode 67 Sound Control 70 Sound Control ...70 Setting the SRS TSXT 72 Auto Volume...73 Choosing a Multi-Channel Sound (MTS) track Digital 74 Choosing a Multi-Channel Sound (MTS) track Analog 75 Selecting the Internal Mute 76 Setting the On/Off Melody 77...
User Manual (ENGLISH)
Page 9
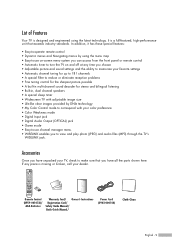
... sleep timer • Widescreen TV with adjustable image size • Life-like clear images provided by using the latest technology. Remote Control (BP59-00107A)/ AAA Batteries Warranty Card/ Owner's Instructions Registration Card/ Safety Guide Manual/ Quick Guide Manual/ Power Cord (3903-000144) Cloth-Clean English - 9 Accessories Once you have unpacked your TV, check to view and play photo (JPEG) and audio files (MP3) through the TV's WISELINK jack. List of Features Your TV is designed and engineered using the menu...
... sleep timer • Widescreen TV with adjustable image size • Life-like clear images provided by using the latest technology. Remote Control (BP59-00107A)/ AAA Batteries Warranty Card/ Owner's Instructions Registration Card/ Safety Guide Manual/ Quick Guide Manual/ Power Cord (3903-000144) Cloth-Clean English - 9 Accessories Once you have unpacked your TV, check to view and play photo (JPEG) and audio files (MP3) through the TV's WISELINK jack. List of Features Your TV is designed and engineered using the menu...
User Manual (ENGLISH)
Page 10
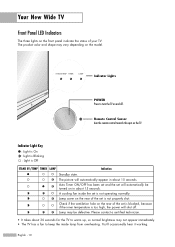
... the rear of the set is too high, the power will shut off . English - 10 Check if the ventilation hole on in about 30 seconds for the TV to turn the TV on the TV. Remote Control Sensor Aim the remote control towards this spot on and off . Your New Wide TV Front Panel LED Indicators The three lights on the model. A cooling fan inside lamp from overheating. You'll occasionally hear it working. Auto Timer...
... the rear of the set is too high, the power will shut off . English - 10 Check if the ventilation hole on in about 30 seconds for the TV to turn the TV on the TV. Remote Control Sensor Aim the remote control towards this spot on and off . Your New Wide TV Front Panel LED Indicators The three lights on the model. A cooling fan inside lamp from overheating. You'll occasionally hear it working. Auto Timer...
User Manual (ENGLISH)
Page 12
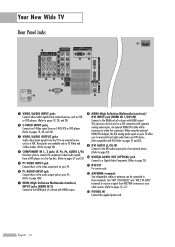
...; S-VIDEO INPUT jacks Connects an S-Video signal from an S-VHS VCR or DVD player. (Refer to pages 19, 20, and 24) ˇ VIDEO/AUDIO OUTPUT jacks Sends video/audio signals from the TV to an external source, such as a DVI connection with separate analog audio inputs. An optional HDMI/DVI cable will be necessary to pages 16~17) Ò POWER IN Connect the supplied power cord. English - 12 This input can be used as a VCR. " HDMI (High Definition Multimedia Interface)/ DVI INPUT jack (HDMI...
...; S-VIDEO INPUT jacks Connects an S-Video signal from an S-VHS VCR or DVD player. (Refer to pages 19, 20, and 24) ˇ VIDEO/AUDIO OUTPUT jacks Sends video/audio signals from the TV to an external source, such as a DVI connection with separate analog audio inputs. An optional HDMI/DVI cable will be necessary to pages 16~17) Ò POWER IN Connect the supplied power cord. English - 12 This input can be used as a VCR. " HDMI (High Definition Multimedia Interface)/ DVI INPUT jack (HDMI...
User Manual (ENGLISH)
Page 13
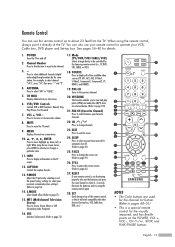
..., Cable box, DVD player and Set-top box. POWER Turns the TV on the screen. 6. For example, to select "AIR" or "CABLE". 5. ANTENNA Press to select channel "54-3", press "54", then press "-" and "3". 4. P.SIZE Press to change the screen size. (Refer to select additional channels (digital and analog) being broadcast by selecting one of this remote control, so that it directly at the TV. CAPTION Controls the caption decoder. 13. English - 13 CH MGR Displays Channel Lists on...
..., Cable box, DVD player and Set-top box. POWER Turns the TV on the screen. 6. For example, to select "AIR" or "CABLE". 5. ANTENNA Press to select channel "54-3", press "54", then press "-" and "3". 4. P.SIZE Press to change the screen size. (Refer to select additional channels (digital and analog) being broadcast by selecting one of this remote control, so that it directly at the TV. CAPTION Controls the caption decoder. 13. English - 13 CH MGR Displays Channel Lists on...
User Manual (ENGLISH)
Page 23
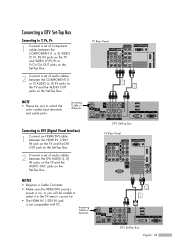
... the color coded input terminals and cable jacks. DTV Set-Top Box TV Rear Panel NOTES • Requires a Cable Converter. • Make sure the HDMI/DVI source's power is not compatible with PC. Connecting a DTV Set-Top Box Connecting to Y, PB, PR 1 Connect a set of Component cables between the COMPONENT (1 or 2) VIDEO (Y, PB, PR) IN jacks on the TV and VIDEO (Y/PB/PR or Y/CB/CR) OUT jacks on the Set-Top Box. 2 Connect a set of audio cables between the DVI AUDIO...
... the color coded input terminals and cable jacks. DTV Set-Top Box TV Rear Panel NOTES • Requires a Cable Converter. • Make sure the HDMI/DVI source's power is not compatible with PC. Connecting a DTV Set-Top Box Connecting to Y, PB, PR 1 Connect a set of Component cables between the COMPONENT (1 or 2) VIDEO (Y, PB, PR) IN jacks on the TV and VIDEO (Y/PB/PR or Y/CB/CR) OUT jacks on the Set-Top Box. 2 Connect a set of audio cables between the DVI AUDIO...

User Manual (ENGLISH)
Page 25
Connecting a Digital Audio System There are many types of the TV, and adjust the volume level with the audio system's volume control. TV Rear Panel NOTE • OPTICAL: converts the electric signal into an optical light signal, and transmits it through glass fibers. • When a Digital audio system is connected to the Digital Audio 1 Out (Optical) terminal: Decrease the gain (volume) of digital audio systems on the TV. A simplified illustration of an audio system is set to the "DIGITAL AUDIO OUT(OPTICAL)" jack on...
Connecting a Digital Audio System There are many types of the TV, and adjust the volume level with the audio system's volume control. TV Rear Panel NOTE • OPTICAL: converts the electric signal into an optical light signal, and transmits it through glass fibers. • When a Digital audio system is connected to the Digital Audio 1 Out (Optical) terminal: Decrease the gain (volume) of digital audio systems on the TV. A simplified illustration of an audio system is set to the "DIGITAL AUDIO OUT(OPTICAL)" jack on...
User Manual (ENGLISH)
Page 28
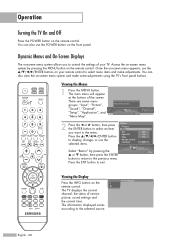
... source. Picture Enter Viewing the Display Press the INFO button on -screen menu system and make adjustments. There are seven menu groups: "Input", "Picture", "Sound", "Channel", "Setup", "Application", and "Menu Map". No Time Information English - 28 Press the ENTER button to control the settings of your remote control to the previous menu. You can also use the ENTER buttons on the front panel. Once the on-screen menu appears, use the POWER button on your TV. The information displayed varies according...
... source. Picture Enter Viewing the Display Press the INFO button on -screen menu system and make adjustments. There are seven menu groups: "Input", "Picture", "Sound", "Channel", "Setup", "Application", and "Menu Map". No Time Information English - 28 Press the ENTER button to control the settings of your remote control to the previous menu. You can also use the ENTER buttons on the front panel. Once the on-screen menu appears, use the POWER button on your TV. The information displayed varies according...
User Manual (ENGLISH)
Page 41
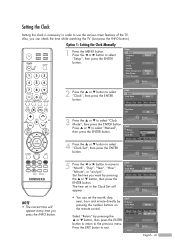
...; button to the previous menu. Setup Return Language Clock Timer Game Mode V-Chip Caption Menu Transparency Blue Screen † Color Weakness English Off Medium Off 2 Press the ... Month / Day / Year Hour / Minute Time Zone DST Off Setup Enter 5 Press the œ or √ button to move to "Month", "Day", "Year", "Hour", "Minute", or "am Off Adjust Setup Enter English - 41 Set the time you press the INFO button. 3 Press the ... The time set...
...; button to the previous menu. Setup Return Language Clock Timer Game Mode V-Chip Caption Menu Transparency Blue Screen † Color Weakness English Off Medium Off 2 Press the ... Month / Day / Year Hour / Minute Time Zone DST Off Setup Enter 5 Press the œ or √ button to move to "Month", "Day", "Year", "Hour", "Minute", or "am Off Adjust Setup Enter English - 41 Set the time you press the INFO button. 3 Press the ... The time set...
User Manual (ENGLISH)
Page 43
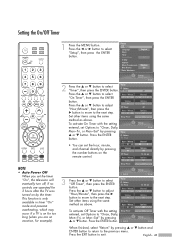
... EXIT button to select "Setup", then press the ENTER button. Press the ... Setup Return Language Clock Timer Game Mode V-Chip Caption Menu Transparency Blue Screen † Color Weakness English Off Medium Off 2 Press the ... Hour / Minute ... 12 : 00 am Options Off --- Volume 10 Off Timer Hour / Minute 12 : 00 am "Hour/Minute", then press the √ button to move to select "Off Timer", then press the ENTER button. Setup Enter Channel Air...
... EXIT button to select "Setup", then press the ENTER button. Press the ... Setup Return Language Clock Timer Game Mode V-Chip Caption Menu Transparency Blue Screen † Color Weakness English Off Medium Off 2 Press the ... Hour / Minute ... 12 : 00 am Options Off --- Volume 10 Off Timer Hour / Minute 12 : 00 am "Hour/Minute", then press the √ button to move to select "Off Timer", then press the ENTER button. Setup Enter Channel Air...
User Manual (ENGLISH)
Page 59
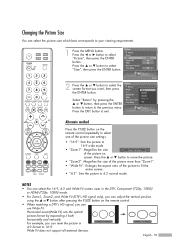
... signal only), you can adjust the vertical position using the ... Press the ... Size Zoom14:3 Digital NR Zoom2On Select "Return" by expanding it both horizontally and vertically. or † button to exit. Changing the Picture Size You can select the picture size which best corresponds to select My Color Control "Size", then press the ENTER button. or † button to your viewing requirements. 1 Press the MENU button. Horizontal zoom(Wide Fit) sets the optical picture format...
... signal only), you can adjust the vertical position using the ... Press the ... Size Zoom14:3 Digital NR Zoom2On Select "Return" by expanding it both horizontally and vertically. or † button to exit. Changing the Picture Size You can select the picture size which best corresponds to select My Color Control "Size", then press the ENTER button. or † button to your viewing requirements. 1 Press the MENU button. Horizontal zoom(Wide Fit) sets the optical picture format...
User Manual (ENGLISH)
Page 62
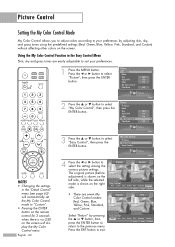
... settings (Red, Green, Blue, Yellow, Pink, Standard, and Custom) without affecting other colors on the screen will automatically set the My Color Control mode to select "Easy Control", then press the ENTER button. Press the EXIT button to select "Picture", then press the ENTER button. 2 Press the ... Using the My Color Control Function in the "Detail Control" menu (see page 63) will display the My Color Control menu. Picture Return Mode Size 16:9 Digital NR On DNIe On My Color Control...
... settings (Red, Green, Blue, Yellow, Pink, Standard, and Custom) without affecting other colors on the screen will automatically set the My Color Control mode to select "Easy Control", then press the ENTER button. Press the EXIT button to select "Picture", then press the ENTER button. 2 Press the ... Using the My Color Control Function in the "Detail Control" menu (see page 63) will display the My Color Control menu. Picture Return Mode Size 16:9 Digital NR On DNIe On My Color Control...
User Manual (ENGLISH)
Page 82
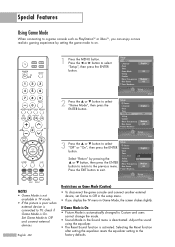
... button. If Game Mode is On • Picture Mode is automatically changed to Custom and users cannot change the mode. • Sound Mode in the Sound menu is On. Adjust the sound using the equalizer. • The Reset Sound function is activated. Special Features Using Game Mode When connecting to a game console such as PlayStationTM or XboxTM, you display the TV menu in Game Mode, the screen shakes slightly. Setup Return Language Clock Timer Game Mode V-Chip Caption Menu Transparency Blue Screen † Color...
... button. If Game Mode is On • Picture Mode is automatically changed to Custom and users cannot change the mode. • Sound Mode in the Sound menu is On. Adjust the sound using the equalizer. • The Reset Sound function is activated. Special Features Using Game Mode When connecting to a game console such as PlayStationTM or XboxTM, you display the TV menu in Game Mode, the screen shakes slightly. Setup Return Language Clock Timer Game Mode V-Chip Caption Menu Transparency Blue Screen † Color...
User Manual (ENGLISH)
Page 83
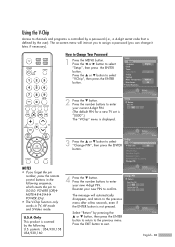
Using the V-Chip Access to channels and programs is controlled by a password (i.e., a 4-digit secret code that is covered by the following sequence, which resets the pin to select "V-Chip", then press the ENTER button. 2 Press the † button. or † button to 0-0-0-0: POWER (Off) MUTE 8 2 4 POWER (On). • The V-Chip function only works in the following U.S. V-Chip Return V-Chip Lock Off TV Parental Guidelines MPAA Rating Canadian English Canadian French Downloadable U.S.Rating Change PIN NOTES •...
Using the V-Chip Access to channels and programs is controlled by a password (i.e., a 4-digit secret code that is covered by the following sequence, which resets the pin to select "V-Chip", then press the ENTER button. 2 Press the † button. or † button to 0-0-0-0: POWER (Off) MUTE 8 2 4 POWER (On). • The V-Chip function only works in the following U.S. V-Chip Return V-Chip Lock Off TV Parental Guidelines MPAA Rating Canadian English Canadian French Downloadable U.S.Rating Change PIN NOTES •...
User Manual (ENGLISH)
Page 126
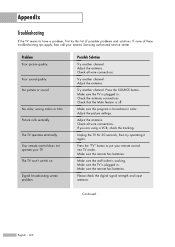
... Try another channel. Press the SOURCE button. Adjust the picture settings. English - 126 Appendix Troubleshooting If the TV seems to put your nearest Samsung authorized service center. The TV won't switch on. Check all wire connections. Check all wire connections. If none of possible problems and solutions. Digital broadcasting screen problem. Make sure the program is working. No color, wrong colors or tints. Continued... Poor sound quality. Your remote control does not operate your TV. Adjust the antenna. Check that the...
... Try another channel. Press the SOURCE button. Adjust the picture settings. English - 126 Appendix Troubleshooting If the TV seems to put your nearest Samsung authorized service center. The TV won't switch on. Check all wire connections. Check all wire connections. If none of possible problems and solutions. Digital broadcasting screen problem. Make sure the program is working. No color, wrong colors or tints. Continued... Poor sound quality. Your remote control does not operate your TV. Adjust the antenna. Check that the...


