Owner Instructions
Page 7
... (On-Screen Text Messages) Digital 96 Using the CableCARD 98 Using the CableCARD Setup Function 99 Using the Guide 101 Appendix 104 PIP Settings ...104 Replacing the Lamp 104 Troubleshooting 106 Cleaning and Maintaining Your TV 107 Using Your TV in Another Country 107 Specifications ...107 English - 7
... (On-Screen Text Messages) Digital 96 Using the CableCARD 98 Using the CableCARD Setup Function 99 Using the Guide 101 Appendix 104 PIP Settings ...104 Replacing the Lamp 104 Troubleshooting 106 Cleaning and Maintaining Your TV 107 Using Your TV in Another Country 107 Specifications ...107 English - 7

Owner Instructions
Page 104
... screen quality it needs to a Samsung Service center. • Caution 1. The lamp type is indicated on the front (TIMER, LAMP, & STAND BY/TEMP) are flashing. • Check before replacing the lamp as it ? Do not touch the glass part of the lamp with the correct code numbered lamp to avoid damage to the TV. 2. Appendix PIP Settings ▲...
... screen quality it needs to a Samsung Service center. • Caution 1. The lamp type is indicated on the front (TIMER, LAMP, & STAND BY/TEMP) are flashing. • Check before replacing the lamp as it ? Do not touch the glass part of the lamp with the correct code numbered lamp to avoid damage to the TV. 2. Appendix PIP Settings ▲...
Owner Instructions
Page 105
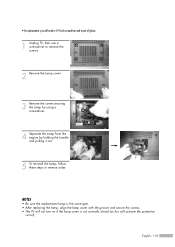
... will activate the protective circuit). NOTES • Be sure the replacement Lamp is the same type. • After replacing the lamp, align the lamp cover with the groove and secure the screws. • The TV will not turn on if the lamp cover is not correctly closed (as this will need a 5.91-Inch ...screwdriver and a pair of gloves. 1 Unplug TV, then use a screwdriver to remove ...
... will activate the protective circuit). NOTES • Be sure the replacement Lamp is the same type. • After replacing the lamp, align the lamp cover with the groove and secure the screws. • The TV will not turn on if the lamp cover is not correctly closed (as this will need a 5.91-Inch ...screwdriver and a pair of gloves. 1 Unplug TV, then use a screwdriver to remove ...


