Owner Instructions
Page 6
...Panel Jacks 12 Front Panel LED Indicators 13 Rear Panel Jacks ...14 Remote Control...15 Connections 18 Connecting VHF and UHF Antennas 18 Antennas with 75-ohm Round Leads 18 Connecting Cable TV 19 Cable without a Cable Box 19 Cable ... Multimedia Interface 26 Connecting a Digital Audio System 27 Connecting to an Analog Amplifier 27 Operation 30 Turning the TV On and Off 30 Viewing the Menus and On-Screen Displays 30 Selecting a Menu Language 31 Memorizing the ... 40 Setting the Sleep Timer 41 Viewing an External Signal Source 42 Assigning Names to External Input Mode 43 English - 6
...Panel Jacks 12 Front Panel LED Indicators 13 Rear Panel Jacks ...14 Remote Control...15 Connections 18 Connecting VHF and UHF Antennas 18 Antennas with 75-ohm Round Leads 18 Connecting Cable TV 19 Cable without a Cable Box 19 Cable ... Multimedia Interface 26 Connecting a Digital Audio System 27 Connecting to an Analog Amplifier 27 Operation 30 Turning the TV On and Off 30 Viewing the Menus and On-Screen Displays 30 Selecting a Menu Language 31 Memorizing the ... 40 Setting the Sleep Timer 41 Viewing an External Signal Source 42 Assigning Names to External Input Mode 43 English - 6
Owner Instructions
Page 42
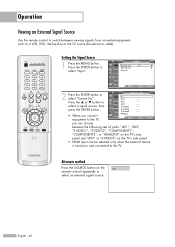
Input Input Source List : TV Picture Edit Name Anynet Sound Channel Setup Guide Move Enter √ √ Return 2 Press the ENTER button to select "Input". English - 42 Press the ... Press the ENTER button to select "Source List". Alternate method Press the SOURCE button on... the following sets of jacks: "AV1", "AV2", "S-VIDEO1", "S-VIDEO2", "COMPONENT1", "COMPONENT2", or "HDMI/DVI" on the TV's rear panel and "AV3" or "S-VIDEO3" on the TV's side panel. • HDMI input can choose between viewing signals from connected equipment, such as a VCR, DVD, Set-Top...
Input Input Source List : TV Picture Edit Name Anynet Sound Channel Setup Guide Move Enter √ √ Return 2 Press the ENTER button to select "Input". English - 42 Press the ... Press the ENTER button to select "Source List". Alternate method Press the SOURCE button on... the following sets of jacks: "AV1", "AV2", "S-VIDEO1", "S-VIDEO2", "COMPONENT1", "COMPONENT2", or "HDMI/DVI" on the TV's rear panel and "AV3" or "S-VIDEO3" on the TV's side panel. • HDMI input can choose between viewing signals from connected equipment, such as a VCR, DVD, Set-Top...
Owner Instructions
Page 63
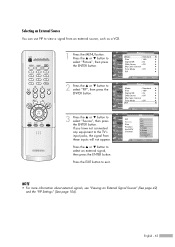
... S-Video2 : SA-IVRid3eo3 Component1 ▼ Enter Return Press the ... NOTE • For more information about external signals, see "Viewing an External Signal Source" (See page 42) and the "PIP Settings" (See page 104). Picture Input Mode : Standard √ Picture Size Digital NR : 16:9 : On √ √ Sound DNIe Demo : Off &#...to select "Picture", then press the ENTER button. or † button to select "Source", then press the ENTER button. Press the EXIT button to the TV's input jacks, the signal from an external source, such as a VCR. 1 Press the MENU button.
... S-Video2 : SA-IVRid3eo3 Component1 ▼ Enter Return Press the ... NOTE • For more information about external signals, see "Viewing an External Signal Source" (See page 42) and the "PIP Settings" (See page 104). Picture Input Mode : Standard √ Picture Size Digital NR : 16:9 : On √ √ Sound DNIe Demo : Off &#...to select "Picture", then press the ENTER button. or † button to select "Source", then press the ENTER button. Press the EXIT button to the TV's input jacks, the signal from an external source, such as a VCR. 1 Press the MENU button.


