Owner Instructions
Page 3
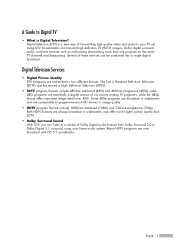
... High Definition Television (HDTV). • SDTV program formats include 480-line interlaced (480i) and 480-line progressive (480p) video. 480i programs are essentially a digital version of Dolby digital audio formats from Dolby Surround 2.0 to Dolby Digital 5.1 surround, using your TV set. Several of transmitting high quality video and audio to progressive-scan DVD movies in widescreen, and offer much higher picture quality than one program on the same TV channel) and datacasting. Some 480p programs...
... High Definition Television (HDTV). • SDTV program formats include 480-line interlaced (480i) and 480-line progressive (480p) video. 480i programs are essentially a digital version of Dolby digital audio formats from Dolby Surround 2.0 to Dolby Digital 5.1 surround, using your TV set. Several of transmitting high quality video and audio to progressive-scan DVD movies in widescreen, and offer much higher picture quality than one program on the same TV channel) and datacasting. Some 480p programs...
Owner Instructions
Page 5
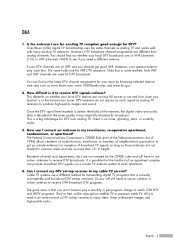
... clear, sharp widescreen images and high-quality audio. It is an antenna and a DTV set-top receiver to watch OTA DTV and HDTV programs. They're free, unlike subscription satellite TV or premium cable TV. So you won't have to my cable TV service? Q&A 1. Is the antenna I connect an antenna in my townhouse, co-operative apartment, condominium, or apartment? You should find out the latest DTV channel assignments for DTV...
... clear, sharp widescreen images and high-quality audio. It is an antenna and a DTV set-top receiver to watch OTA DTV and HDTV programs. They're free, unlike subscription satellite TV or premium cable TV. So you won't have to my cable TV service? Q&A 1. Is the antenna I connect an antenna in my townhouse, co-operative apartment, condominium, or apartment? You should find out the latest DTV channel assignments for DTV...
Owner Instructions
Page 6
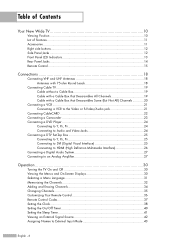
... 26 Connecting a Digital Audio System 27 Connecting to an Analog Amplifier 27 Operation 30 Turning the TV On and Off 30 Viewing the Menus and On-Screen Displays 30 Selecting a Menu Language 31 Memorizing the Channels 32 Adding and Erasing Channels 34 Changing Channels 35 Customizing Your Remote Control 36 Remote Control Codes 37 Setting the Clock...38 Setting the On/Off Timer 40 Setting the Sleep Timer 41 Viewing an External Signal Source 42 Assigning Names to External Input Mode 43...
... 26 Connecting a Digital Audio System 27 Connecting to an Analog Amplifier 27 Operation 30 Turning the TV On and Off 30 Viewing the Menus and On-Screen Displays 30 Selecting a Menu Language 31 Memorizing the Channels 32 Adding and Erasing Channels 34 Changing Channels 35 Customizing Your Remote Control 36 Remote Control Codes 37 Setting the Clock...38 Setting the On/Off Timer 40 Setting the Sleep Timer 41 Viewing an External Signal Source 42 Assigning Names to External Input Mode 43...
Owner Instructions
Page 7
... Tuning Analog Channels Analog 48 Checking the Digital-Signal Strength Digital 49 LNA (Low Noise Amplifier 50 Picture Control 52 Picture Control...52 Changing the Picture Size 55 Digital Noise Reduction 56 Viewing the DNIe Demonstration 57 Setting the My Color Control Mode 58 Using the Color Weakness Enhancement Feature 60 Setting the Film Mode 61 Viewing Picture-In-Picture 62 Freezing the Picture 69 Setting the Blue Screen Mode 70 Sound Control 72 Sound Control ...72 Auto Volume...74 Choosing a Multi-Channel Sound (MTS) track Digital 75 Choosing a Multi-Channel Sound (MTS...
... Tuning Analog Channels Analog 48 Checking the Digital-Signal Strength Digital 49 LNA (Low Noise Amplifier 50 Picture Control 52 Picture Control...52 Changing the Picture Size 55 Digital Noise Reduction 56 Viewing the DNIe Demonstration 57 Setting the My Color Control Mode 58 Using the Color Weakness Enhancement Feature 60 Setting the Film Mode 61 Viewing Picture-In-Picture 62 Freezing the Picture 69 Setting the Blue Screen Mode 70 Sound Control 72 Sound Control ...72 Auto Volume...74 Choosing a Multi-Channel Sound (MTS) track Digital 75 Choosing a Multi-Channel Sound (MTS...
Owner Instructions
Page 11
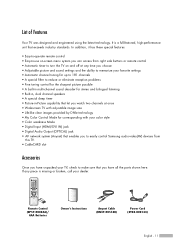
... • Widescreen TV with adjustable image size • Life-like clear images provided by DNle technology • My Color Control Mode for corresponding with your color style • Color weakness Mode • Digital Input (HDMI/DVI IN) jack • Digital Audio Output (OPTICAL) jack • AV network system (Anynet) that enables you to make sure that exceeds industry standards. Remote Control (BP59-00084A)/ AAA Batteries Owner's Instructions Anynet Cable (BN39-00518B) Power Cord (3903-000144) English...
... • Widescreen TV with adjustable image size • Life-like clear images provided by DNle technology • My Color Control Mode for corresponding with your color style • Color weakness Mode • Digital Input (HDMI/DVI IN) jack • Digital Audio Output (OPTICAL) jack • AV network system (Anynet) that enables you to make sure that exceeds industry standards. Remote Control (BP59-00084A)/ AAA Batteries Owner's Instructions Anynet Cable (BN39-00518B) Power Cord (3903-000144) English...
Owner Instructions
Page 13
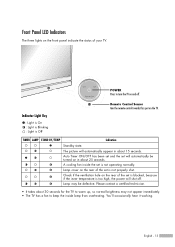
... turned on and off . Front Panel LED Indicators The three lights on the TV. A cooling fan inside lamp from overheating. Please contact a certified technician. • It takes about 15 seconds. TIMER LAMP STAND BY/TEMP Indication Standby state. The picture will shut off . You'll occasionally hear it working. English - 13 Indicator Light Key : Light is On : Light is Blinking : Light is not operating normally. Auto Timer ON/OFF has been set and the set is Off Remote Control...
... turned on and off . Front Panel LED Indicators The three lights on the TV. A cooling fan inside lamp from overheating. Please contact a certified technician. • It takes about 15 seconds. TIMER LAMP STAND BY/TEMP Indication Standby state. The picture will shut off . You'll occasionally hear it working. English - 13 Indicator Light Key : Light is On : Light is Blinking : Light is not operating normally. Auto Timer ON/OFF has been set and the set is Off Remote Control...
Owner Instructions
Page 15
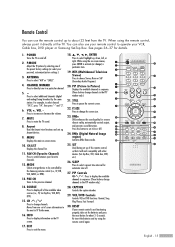
... the Samsung remote control (i.e., TV, STB, VCR, CABLE, or DVD). 13. You can use your remote control to operate your favorite channels. 12. POWER Turns the TV on -screen menu. 10. P.MODE Adjust the TV picture by selecting one set of the available video sources (i.e., TV, Set-Top Box, VCR, DVD, DTV). 15. Press to about 2~3 seconds. VOL +, VOL Press to mute the TV sound. 8. PIP (Picture In Picture) Displays the available channels in sequence. (These buttons change channels in the PIP window only.) 28. SET Used during set it...
... the Samsung remote control (i.e., TV, STB, VCR, CABLE, or DVD). 13. You can use your remote control to operate your favorite channels. 12. POWER Turns the TV on -screen menu. 10. P.MODE Adjust the TV picture by selecting one set of the available video sources (i.e., TV, Set-Top Box, VCR, DVD, DTV). 15. Press to about 2~3 seconds. VOL +, VOL Press to mute the TV sound. 8. PIP (Picture In Picture) Displays the available channels in sequence. (These buttons change channels in the PIP window only.) 28. SET Used during set it...
Owner Instructions
Page 24
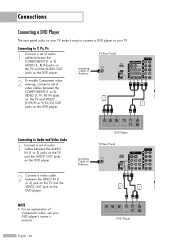
... Audio and Video Jacks 1 Connect a set of Component video, see your TV. DVD Player TV Rear Panel Incoming Cable or Antenna 2 Connect a video cable between the VIDEO IN (1 or 2) jack on the TV and the VIDEO OUT jack on the DVD player. 2 1 NOTE • For an explanation of audio cables between the AUDIO IN (1 or 2) jacks on the TV and the AUDIO OUT jacks on the DVD player. Connections Connecting a DVD Player The rear panel jacks on your TV make it easy to connect a DVD player to your DVD player's owner's manual...
... Audio and Video Jacks 1 Connect a set of Component video, see your TV. DVD Player TV Rear Panel Incoming Cable or Antenna 2 Connect a video cable between the VIDEO IN (1 or 2) jack on the TV and the VIDEO OUT jack on the DVD player. 2 1 NOTE • For an explanation of audio cables between the AUDIO IN (1 or 2) jacks on the TV and the AUDIO OUT jacks on the DVD player. Connections Connecting a DVD Player The rear panel jacks on your TV make it easy to connect a DVD player to your DVD player's owner's manual...
Owner Instructions
Page 25
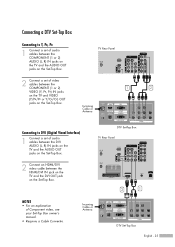
... your Set-Top Box owner's manual. • Requires a Cable Converter. DTV Set-Top Box TV Rear Panel 2 Connect an HDMI/DVI video cable between the COMPONENT (1 or 2) VIDEO (Y, PB, PR) IN jacks on the TV and VIDEO (Y/PB/PR or Y/CB/CR) OUT jacks on the Set-Top Box. Incoming Cable or Antenna DTV Set-Top Box English - 25 Connecting a DTV Set-Top Box Connecting to DVI (Digital Visual Interface) 1 Connect a set of audio cables between the COMPONENT (1 or 2) AUDIO (L, R) IN jacks on the TV and the AUDIO...
... your Set-Top Box owner's manual. • Requires a Cable Converter. DTV Set-Top Box TV Rear Panel 2 Connect an HDMI/DVI video cable between the COMPONENT (1 or 2) VIDEO (Y, PB, PR) IN jacks on the TV and VIDEO (Y/PB/PR or Y/CB/CR) OUT jacks on the Set-Top Box. Incoming Cable or Antenna DTV Set-Top Box English - 25 Connecting a DTV Set-Top Box Connecting to DVI (Digital Visual Interface) 1 Connect a set of audio cables between the COMPONENT (1 or 2) AUDIO (L, R) IN jacks on the TV and the AUDIO...
Owner Instructions
Page 27
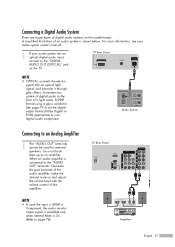
... using a glass conductor. Audio System Connecting to an amplifier. Connecting a Digital Audio System There are many types of digital audio systems on the TV. TV Rear Panel NOTE • OPTICAL: converts the electric signal into an optical light signal, and transmits it through glass fibers. You must hook them up to an Analog Amplifier 1 The "AUDIO OUT" terminals cannot be used for external speakers. NOTE • In case the input is HDMI or Component, the audio monitor output signal...
... using a glass conductor. Audio System Connecting to an amplifier. Connecting a Digital Audio System There are many types of digital audio systems on the TV. TV Rear Panel NOTE • OPTICAL: converts the electric signal into an optical light signal, and transmits it through glass fibers. You must hook them up to an Analog Amplifier 1 The "AUDIO OUT" terminals cannot be used for external speakers. NOTE • In case the input is HDMI or Component, the audio monitor output signal...
Owner Instructions
Page 30
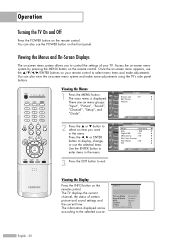
... view the on the front panel. Viewing the Display Press the INFO button on the remote control. There are six menu groups: Input Picture Source List Edit Name Anynet : TV √ √ "Input", "Picture", "Sound", Sound "Channel", "Setup", and Channel "Guide". Cable 3 Picture Mode Standard Sound Mode Custom MTS Stereo Caption Off V-Chip Off No Time Information English - 30 Once the on-screen menu appears, use the POWER button on -screen menu system and make adjustments. Viewing the Menus and On-Screen Displays The on the remote control. Access the on-screen menu...
... view the on the front panel. Viewing the Display Press the INFO button on the remote control. There are six menu groups: Input Picture Source List Edit Name Anynet : TV √ √ "Input", "Picture", "Sound", Sound "Channel", "Setup", and Channel "Guide". Cable 3 Picture Mode Standard Sound Mode Custom MTS Stereo Caption Off V-Chip Off No Time Information English - 30 Once the on-screen menu appears, use the POWER button on -screen menu system and make adjustments. Viewing the Menus and On-Screen Displays The on the remote control. Access the on-screen menu...
Owner Instructions
Page 32
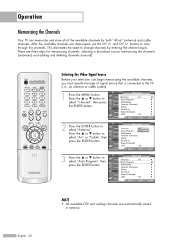
... analog channels are memorized, use the CH and CH buttons to select "Channel", then press the ENTER button. or † button to scan through the channels. Selecting the Video Signal Source Before your television can memorize and store all of signal source that is connected to the TV (i.e., an antenna or cable system). 1 Press the MENU button. After the available channels are automatically stored in memory. Press the ... Channel Input Picture Sound Channel Setup Guide Antenna :ACirable Auto Program Cable...
... analog channels are memorized, use the CH and CH buttons to select "Channel", then press the ENTER button. or † button to scan through the channels. Selecting the Video Signal Source Before your television can memorize and store all of signal source that is connected to the TV (i.e., an antenna or cable system). 1 Press the MENU button. After the available channels are automatically stored in memory. Press the ... Channel Input Picture Sound Channel Setup Guide Antenna :ACirable Auto Program Cable...
Owner Instructions
Page 33
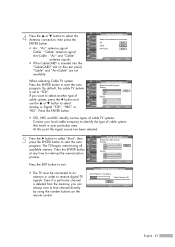
... number buttons on the rear panel, "Cable" and "Air+Cable" are not available. Input Picture Sound Channel Setup Guide Auto Program Select the antennas to receive digital TV signals. At this point the signal source has been selected. 5 Press the √ button to select "Start", then press the ENTER button to "STD". Even if a particular channel is set to start the auto program. Analog STD HRC IRC Digital STD HRC IRC ✔ Start ✔ Move Enter Return Auto Program Auto Program...
... number buttons on the rear panel, "Cable" and "Air+Cable" are not available. Input Picture Sound Channel Setup Guide Auto Program Select the antennas to receive digital TV signals. At this point the signal source has been selected. 5 Press the √ button to select "Start", then press the ENTER button to "STD". Even if a particular channel is set to start the auto program. Analog STD HRC IRC Digital STD HRC IRC ✔ Start ✔ Move Enter Return Auto Program Auto Program...
Owner Instructions
Page 38
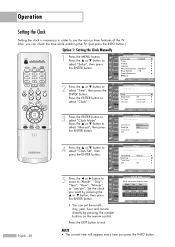
... current time will appear every time you want by pressing the number buttons on the remote control. Setup Input Picture Sound Channel Setup Guide Language : English √ Time √ V-Chip √ Caption √ Menu Transparency : Medium √ Blue Screen : Off √ Color Weakness √ ▼ More Move Enter Return 2 Press the ... Press the ... Input Picture Sound Channel Setup Guide • You can check the time while watching the TV. (Just press the INFO button.) Option 1: Setting the Clock Manually 1 Press the MENU button. Press...
... current time will appear every time you want by pressing the number buttons on the remote control. Setup Input Picture Sound Channel Setup Guide Language : English √ Time √ V-Chip √ Caption √ Menu Transparency : Medium √ Blue Screen : Off √ Color Weakness √ ▼ More Move Enter Return 2 Press the ... Press the ... Input Picture Sound Channel Setup Guide • You can check the time while watching the TV. (Just press the INFO button.) Option 1: Setting the Clock Manually 1 Press the MENU button. Press...
Owner Instructions
Page 40
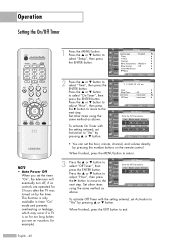
... On Timer with the setting entered, set the hour, minute, channel, and volume directly by pressing the number buttons on the remote control. or † button to select "Setup", then press the ENTER button. 2 Press the ... Press the ... Press the ... Set other items using the same method as above . or † button. Press the ... Setup Input Picture Sound Channel Setup Guide Language : English √ Time √ V-Chip √ Caption √ Menu Transparency : Medium √ Blue Screen : Off √ Color Weakness...
... On Timer with the setting entered, set the hour, minute, channel, and volume directly by pressing the number buttons on the remote control. or † button to select "Setup", then press the ENTER button. 2 Press the ... Press the ... Press the ... Set other items using the same method as above . or † button. Press the ... Setup Input Picture Sound Channel Setup Guide Language : English √ Time √ V-Chip √ Caption √ Menu Transparency : Medium √ Blue Screen : Off √ Color Weakness...
Owner Instructions
Page 41
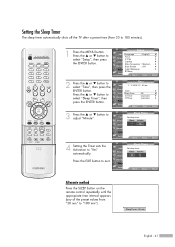
... Adjust Return Input Picture Sound Channel Setup Guide Sleep Timer Set sleep timer. Sleep Timer : 90 min English - 41 Minute 30 Activation ▲ Yes ▼ Move Adjust Return Alternate method Press the SLEEP button on the remote control repeatedly until the appropriate time interval appears (any of the preset values from 30 to 180 minutes). 1 Press the MENU button. Setting the Sleep Timer The sleep timer automatically shuts off the TV after a preset time...
... Adjust Return Input Picture Sound Channel Setup Guide Sleep Timer Set sleep timer. Sleep Timer : 90 min English - 41 Minute 30 Activation ▲ Yes ▼ Move Adjust Return Alternate method Press the SLEEP button on the remote control repeatedly until the appropriate time interval appears (any of the preset values from 30 to 180 minutes). 1 Press the MENU button. Setting the Sleep Timer The sleep timer automatically shuts off the TV after a preset time...
Owner Instructions
Page 58
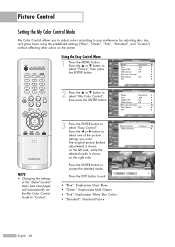
... - 58 Using the Easy Control Menu 1 Press the MENU button. My Color Control Input Easy Control : Custom √ Picture Detail Control √ Sound Channel Setup Guide Move Enter Return Original Custom Press the ENTER button to "Custom". Easy Control œ Standard Custom Move Enter √ Return • "Blue": Emphasizes Clear Blues. • "Green": Emphasizes Mild Greens. • "Pink": Emphasizes Warm Skin Colors. • "Standard": Standard Picture. NOTE • Changing the settings in the "Detail Control" menu (see...
... - 58 Using the Easy Control Menu 1 Press the MENU button. My Color Control Input Easy Control : Custom √ Picture Detail Control √ Sound Channel Setup Guide Move Enter Return Original Custom Press the ENTER button to "Custom". Easy Control œ Standard Custom Move Enter √ Return • "Blue": Emphasizes Clear Blues. • "Green": Emphasizes Mild Greens. • "Pink": Emphasizes Warm Skin Colors. • "Standard": Standard Picture. NOTE • Changing the settings in the "Detail Control" menu (see...
Owner Instructions
Page 84
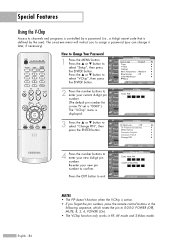
or † button to channels and programs is controlled by a password (i.e., a 4-digit secret code that is defined by the user). Guide 0~9 Enter PIN Return 3 Press the ... English - 84 Special Features Using the V-Chip Access to select "V-Chip", then press the ENTER button. or † button to enter your new 4-digit pin number. Press the ... Setup Input Picture Sound Channel Setup Guide Language : English √ Time √ V-Chip √ Caption √ Menu Transparency : Medium √ Blue Screen : Off √ Color Weakness √ ▼...
or † button to channels and programs is controlled by a password (i.e., a 4-digit secret code that is defined by the user). Guide 0~9 Enter PIN Return 3 Press the ... English - 84 Special Features Using the V-Chip Access to select "V-Chip", then press the ENTER button. or † button to enter your new 4-digit pin number. Press the ... Setup Input Picture Sound Channel Setup Guide Language : English √ Time √ V-Chip √ Caption √ Menu Transparency : Medium √ Blue Screen : Off √ Color Weakness √ ▼...

Owner Instructions
Page 104
... glass part of the lamp with the correct code numbered lamp to avoid damage to the TV. 2. It is indicated on the front (TIMER, LAMP, & STAND BY/TEMP) are flashing. • Check before replacing the lamp as new. • When do I need to replace the lamp? After replacing the lamp, the screen quality will not allow for proper cool down time. Replace with your bare hands nor insert any foreign object inside the cover as...
... glass part of the lamp with the correct code numbered lamp to avoid damage to the TV. 2. It is indicated on the front (TIMER, LAMP, & STAND BY/TEMP) are flashing. • Check before replacing the lamp as new. • When do I need to replace the lamp? After replacing the lamp, the screen quality will not allow for proper cool down time. Replace with your bare hands nor insert any foreign object inside the cover as...
Owner Instructions
Page 106
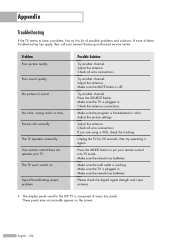
... the program is working. Make sure the wall outlet is broadcasted in color. The TV operates erratically. Adjust the picture settings. Make sure the TV is off. Please check the digital signal strength and input antenna. • The display panel used for 30 seconds, then try this list of possible problems and solutions. Appendix Troubleshooting If the TV seems to put your TV. No picture or sound. Picture rolls vertically. Your remote control does not operate your remote control into TV mode. Digital broadcasting screen problem...
... the program is working. Make sure the wall outlet is broadcasted in color. The TV operates erratically. Adjust the picture settings. Make sure the TV is off. Please check the digital signal strength and input antenna. • The display panel used for 30 seconds, then try this list of possible problems and solutions. Appendix Troubleshooting If the TV seems to put your TV. No picture or sound. Picture rolls vertically. Your remote control does not operate your remote control into TV mode. Digital broadcasting screen problem...


