
Open Source Guide (ENGLISH)
Page 1
... user how to view a copy of this service if you wish), that you receive source code or can redistribute and change it is not allowed. ❑ Preamble The licenses for enforcing compliance by third parties to distribute software through you, then the only way you redistribute the Program (or any other program whose permissions for everyone's free use pieces of it free software...
... user how to view a copy of this service if you wish), that you receive source code or can redistribute and change it is not allowed. ❑ Preamble The licenses for enforcing compliance by third parties to distribute software through you, then the only way you redistribute the Program (or any other program whose permissions for everyone's free use pieces of it free software...

Open Source Guide (ENGLISH)
Page 2
... library, and you want it to be of the greatest possible use to the public, we recommend making it free software that everyone can do so by permitting redistribution under these terms,...TO OPERATE WITH ANY OTHER SOFTWARE), EVEN IF SUCH HOLDER OR OTHER PARTY HAS BEEN ADVISED OF THE POSSIBILITY OF SUCH DAMAGES. and each file should have at least the "copyright" line and... a pointer to where the full notice is safest to attach them to the start of each source file to the library. To apply these terms (or, alternatively, under the terms of warranty; You can redistribute and change...
... library, and you want it to be of the greatest possible use to the public, we recommend making it free software that everyone can do so by permitting redistribution under these terms,...TO OPERATE WITH ANY OTHER SOFTWARE), EVEN IF SUCH HOLDER OR OTHER PARTY HAS BEEN ADVISED OF THE POSSIBILITY OF SUCH DAMAGES. and each file should have at least the "copyright" line and... a pointer to where the full notice is safest to attach them to the start of each source file to the library. To apply these terms (or, alternatively, under the terms of warranty; You can redistribute and change...
Quick Guide (ENGLISH)
Page 1
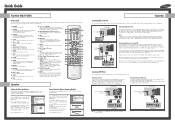
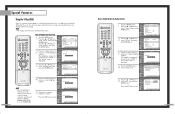
... a cable system). MENU Displays the main on the cable converter box. P.SIZE Press to change channels. PRE-CH Tunes to choose Stereo, Mono or SAP (Separate Audio Program). 19. MTS (Multichannel Television Stereo) Press to the previous channel. 13. ADD/DEL Press to select the size of PIP window. SET Used during a particular scene. PIP Controls SIZE; Press to add or erase channels in the TV's memory. or † button to video1 simultaneously. Input Picture Sound Channel Setup Channel Antenna...
... a cable system). MENU Displays the main on the cable converter box. P.SIZE Press to change channels. PRE-CH Tunes to choose Stereo, Mono or SAP (Separate Audio Program). 19. MTS (Multichannel Television Stereo) Press to the previous channel. 13. ADD/DEL Press to select the size of PIP window. SET Used during a particular scene. PIP Controls SIZE; Press to add or erase channels in the TV's memory. or † button to video1 simultaneously. Input Picture Sound Channel Setup Channel Antenna...
Quick Guide (ENGLISH)
Page 2
...; The cooling fan will shut off. Press the SOURCE button on the Set-Top Box and select channel to technical limitation of cable converter. Black dot / bright dot on the remote control of the screen. All projection TV use a screwdriver to a certain number of the screen. Your TV may have up , so normal brightness may have an effect on the function of the lamp can be replaced from time to replace the lamp. • When changing the lamp...
...; The cooling fan will shut off. Press the SOURCE button on the Set-Top Box and select channel to technical limitation of cable converter. Black dot / bright dot on the remote control of the screen. All projection TV use a screwdriver to a certain number of the screen. Your TV may have up , so normal brightness may have an effect on the function of the lamp can be replaced from time to replace the lamp. • When changing the lamp...
User Manual (ENGLISH)
Page 2
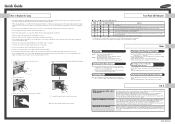
...-Channel Sound (MTS) track 65 Auto Volume ...66 Enjoying the Sound of External Speakers 67 Using the V-Chip (USA 68 Viewing Closed Caption Information 74 Setting the Blue Screen Mode 76 Setting The On/Off Melody 77 Using the Color Weakness Enhancement Feature 78 PC Display...80 Using Your TV as a Computer (PC) Display 80 How to Connect Your PC to the TV 80 Setting up Your PC Software (Based on Widows 98 81 Display Modes 82 Adjusting the Picture Quality...
...-Channel Sound (MTS) track 65 Auto Volume ...66 Enjoying the Sound of External Speakers 67 Using the V-Chip (USA 68 Viewing Closed Caption Information 74 Setting the Blue Screen Mode 76 Setting The On/Off Melody 77 Using the Color Weakness Enhancement Feature 78 PC Display...80 Using Your TV as a Computer (PC) Display 80 How to Connect Your PC to the TV 80 Setting up Your PC Software (Based on Widows 98 81 Display Modes 82 Adjusting the Picture Quality...
User Manual (ENGLISH)
Page 5
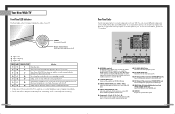
... exceeds industry standards. Connect the video signal from a camcorder or video game. Remote Control (BP59-00048B)/ AAA Batteries (4301-000103) 8 Warranty Cards (2)/ Registration Card (1) Instruction Manual/ Safety Guide Manual/ Quick Guide Manual Side Panel Buttons The buttons on the right side panel control your TV, check to activate (or change channels and move between viewing TV programs and signals from the side panel or remote control • Automatic timer to turn the TV on and off at once • Widescreen TV with adjustable image size • Life...
... exceeds industry standards. Connect the video signal from a camcorder or video game. Remote Control (BP59-00048B)/ AAA Batteries (4301-000103) 8 Warranty Cards (2)/ Registration Card (1) Instruction Manual/ Safety Guide Manual/ Quick Guide Manual Side Panel Buttons The buttons on the right side panel control your TV, check to activate (or change channels and move between viewing TV programs and signals from the side panel or remote control • Automatic timer to turn the TV on and off at once • Widescreen TV with adjustable image size • Life...
User Manual (ENGLISH)
Page 6
... picture will automatically be connected to these to another component (such as a VCR. Lamp may not appear immediately. • The TV has a fan to connect components such as a Cable Set-Top Box). You'll occasionally hear it working. 10 Rear Panel Jacks Use the rear panel jacks to keep the inside the set is for device with DVI output. ˝ HDMI (High Definition Multimedia Interface) VIDEO/AUDIO INPUT jack Connect to turn the TV on the rear of the set...
... picture will automatically be connected to these to another component (such as a VCR. Lamp may not appear immediately. • The TV has a fan to connect components such as a Cable Set-Top Box). You'll occasionally hear it working. 10 Rear Panel Jacks Use the rear panel jacks to keep the inside the set is for device with DVI output. ˝ HDMI (High Definition Multimedia Interface) VIDEO/AUDIO INPUT jack Connect to turn the TV on the rear of the set...
User Manual (ENGLISH)
Page 7
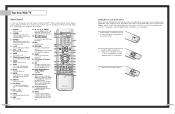
... of the preset factory settings (or select your personal, customized picture settings.) 4. +100 Press to select cable channels over 100 on the main screen with the diagram inside the compartment. 3 Slide the cover back into place. 13 You can use the remote control up to about 23 feet from the TV. S.MODE Adjust the TV sound by selecting one of the available video sources (i.e., TV, Set-Top box, VCR, DVD, DTV, PC). 14...
... of the preset factory settings (or select your personal, customized picture settings.) 4. +100 Press to select cable channels over 100 on the main screen with the diagram inside the compartment. 3 Slide the cover back into place. 13 You can use the remote control up to about 23 feet from the TV. S.MODE Adjust the TV sound by selecting one of the available video sources (i.e., TV, Set-Top box, VCR, DVD, DTV, PC). 14...

User Manual (ENGLISH)
Page 11
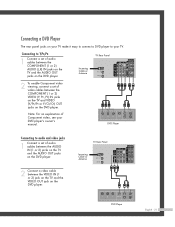
... audio out using a VCR. 1 Locate the A/V output jacks on the camcorder. TV Rear Panel Incoming Cable or Antenna 2 To enable Component video viewing, connect a set of audio cables between the COMPONENT (1 or 2) AUDIO (L,R) IN jacks on the TV and the AUDIO OUT jacks on the DVD player. Note: For an explanation of Component video, see your camcorder is stereo, you have mono camcorder, connect L(mono) to Y,PB,PR 1 Connect a set of two cables. TV Rear Panel Incoming Cable or Antenna DVD Player...
... audio out using a VCR. 1 Locate the A/V output jacks on the camcorder. TV Rear Panel Incoming Cable or Antenna 2 To enable Component video viewing, connect a set of audio cables between the COMPONENT (1 or 2) AUDIO (L,R) IN jacks on the TV and the AUDIO OUT jacks on the DVD player. Note: For an explanation of Component video, see your camcorder is stereo, you have mono camcorder, connect L(mono) to Y,PB,PR 1 Connect a set of two cables. TV Rear Panel Incoming Cable or Antenna DVD Player...

User Manual (ENGLISH)
Page 14
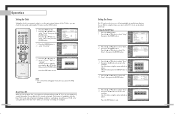
... adjustments using the TV's side panel buttons. Channel Setup Move Enter Exit 2 Press the ... Air 12 Signal V-Chip Picture Sound SRS TSXT MTS - - : - - Input Picture Sound Channel Setup Channel Antenna : AAnntt..11 Air/CATV : AAirnt.2 Auto Program Add/Delete Favorite Channels Name Fine Tune ▼ More Move Enter Return 27 Input Input Source List : TV Edit Name √ √ There are five menu groups: Picture "Input", "Picture", "Sound", Sound "Channel" and "Setup". Input Picture Sound Channel Setup Setup Language Time V-Chip Caption Blue Screen Melody...
... adjustments using the TV's side panel buttons. Channel Setup Move Enter Exit 2 Press the ... Air 12 Signal V-Chip Picture Sound SRS TSXT MTS - - : - - Input Picture Sound Channel Setup Channel Antenna : AAnntt..11 Air/CATV : AAirnt.2 Auto Program Add/Delete Favorite Channels Name Fine Tune ▼ More Move Enter Return 27 Input Input Source List : TV Edit Name √ √ There are five menu groups: Picture "Input", "Picture", "Sound", Sound "Channel" and "Setup". Input Picture Sound Channel Setup Setup Language Time V-Chip Caption Blue Screen Melody...

User Manual (ENGLISH)
Page 18
... P.MODE button (or by making a selection from the menu). Operation Picture Control You can use one of the standard picture settings. See next page.) Customizing the Picture 1 Press the MENU button. Input Picture Sound Channel Setup Mode Mode : Standard √ Contrast 90 Brightness 50 Sharpness 50 Color 50 Tint 50 50 Reset Move Enter Return 3 Press the ... or † button to select "Picture", then press the ENTER button. Standard • Choose "Dynamic" for viewing the TV during...
... P.MODE button (or by making a selection from the menu). Operation Picture Control You can use one of the standard picture settings. See next page.) Customizing the Picture 1 Press the MENU button. Input Picture Sound Channel Setup Mode Mode : Standard √ Contrast 90 Brightness 50 Sharpness 50 Color 50 Tint 50 50 Reset Move Enter Return 3 Press the ... or † button to select "Picture", then press the ENTER button. Standard • Choose "Dynamic" for viewing the TV during...
User Manual (ENGLISH)
Page 20
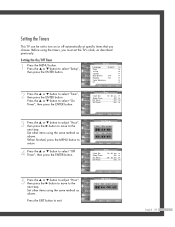
... MENU button to select "Clock Set". Press the ... Input Picture Sound Channel Setup Press the EXIT button to select "Time", then press the ENTER button. Before using the timers, you can be set the TV's clock, as above . or † button to exit. Set other items using the same method as above . Absent Power Off When you set the timer "On", your television will eventually be turned off, if you do not operate any controls...
... MENU button to select "Clock Set". Press the ... Input Picture Sound Channel Setup Press the EXIT button to select "Time", then press the ENTER button. Before using the timers, you can be set the TV's clock, as above . or † button to exit. Set other items using the same method as above . Absent Power Off When you set the timer "On", your television will eventually be turned off, if you do not operate any controls...

User Manual (ENGLISH)
Page 28
... press the ENTER button. Input Picture MCC Easy Control : Turkish Blue √ Detail Control √ Sound Channel Setup Move Enter Return 3 Press the ... There are three MCC colors: "Skin Tone", "Green Grass" and "Blue Sky". The previously adjusted MCC Colors will automatically set the MCC mode to "Custom". 3 Press the ENTER button to the factory defaults. or † button to display the "Detail Control" menu. Input Picture Sound Channel Setup Picture Mode Color Tone Size Digital NR DNIe MCC Film Mode PIP : Standard √...
... press the ENTER button. Input Picture MCC Easy Control : Turkish Blue √ Detail Control √ Sound Channel Setup Move Enter Return 3 Press the ... There are three MCC colors: "Skin Tone", "Green Grass" and "Blue Sky". The previously adjusted MCC Colors will automatically set the MCC mode to "Custom". 3 Press the ENTER button to the factory defaults. or † button to display the "Detail Control" menu. Input Picture Sound Channel Setup Picture Mode Color Tone Size Digital NR DNIe MCC Film Mode PIP : Standard √...
User Manual (ENGLISH)
Page 35
... pin number for Sound * a new TV set is "0000".) The "V-Chip" menu is defined by a password (i.e., a 4-digit secret code that is Channel displayed. V-Chip Input V-Chip Lock : Off √ TV Parental Guidelines √ Picture MPAA Rating √ Change PIN √ Sound Channel Setup Move Enter Return 5 Press the ... The on-screen menu will instruct you can change it later, if necessary). NOTE • The V-Chip doesn't function when the PIP is Channel displayed. Setup 0 9 Enter PIN Return 3 Press the ... Input Picture Sound Change PIN...
... pin number for Sound * a new TV set is "0000".) The "V-Chip" menu is defined by a password (i.e., a 4-digit secret code that is Channel displayed. V-Chip Input V-Chip Lock : Off √ TV Parental Guidelines √ Picture MPAA Rating √ Change PIN √ Sound Channel Setup Move Enter Return 5 Press the ... The on-screen menu will instruct you can change it later, if necessary). NOTE • The V-Chip doesn't function when the PIP is Channel displayed. Setup 0 9 Enter PIN Return 3 Press the ... Input Picture Sound Change PIN...

User Manual (ENGLISH)
Page 42
... Position Auto Adjustment Recall Channel Setup Move Enter √ √ √ Return 5 Pressing the œ or √ button to remove the picture noise. ▲ Coarse 1344 ▼ Press the EXIT button to exit. ▲ Fine 0 ▼ NOTE • This feature may change the width of screen. 1 Press the TV/VIDEO button to the DVI jack. Input Picture Sound Channel Setup Setup Language : English √ Time √ V-Chip √ Caption √ Blue Screen : Off √ Melody : On √ Color...
... Position Auto Adjustment Recall Channel Setup Move Enter √ √ √ Return 5 Pressing the œ or √ button to remove the picture noise. ▲ Coarse 1344 ▼ Press the EXIT button to exit. ▲ Fine 0 ▼ NOTE • This feature may change the width of screen. 1 Press the TV/VIDEO button to the DVI jack. Input Picture Sound Channel Setup Setup Language : English √ Time √ V-Chip √ Caption √ Blue Screen : Off √ Melody : On √ Color...
User Manual (ENGLISH)
Page 46
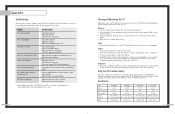
... TV is working. No color, wrong colors or tints. Make sure the MUTE button is composed of many years of the cabinet. • This DLP Projection TV projects the image onto a large screen by applying an optical system. Check the antenna connections. Adjust the picture settings. Make sure the remote has batteries. The TV operates erratically. Adjust the antenna. Check all wire connections. Make sure the remote has batteries. • The display panel used for one system may have a problem...
... TV is working. No color, wrong colors or tints. Make sure the MUTE button is composed of many years of the cabinet. • This DLP Projection TV projects the image onto a large screen by applying an optical system. Check the antenna connections. Adjust the picture settings. Make sure the remote has batteries. The TV operates erratically. Adjust the antenna. Check all wire connections. Make sure the remote has batteries. • The display panel used for one system may have a problem...
User Manual (ENGLISH)
Page 21
... on the TV and VIDEO (Y/PB/PR or Y/CB/CR) OUT jacks on the DVD player. Connecting to audio and video jacks 1 Connect a set of video cables between the VIDEO IN (1 or 2) jack on the TV and the VIDEO OUT jack on your TV make it easy to connect a DVD player to your DVD player's owner's manual. DVD Player Connecting to Y,PB,PR 1 Connect a set of Component video, see your TV. TV Rear Panel Incoming Cable or Antenna DVD Player English - 21 Connecting a DVD Player The rear panel jacks on the DVD player.
... on the TV and VIDEO (Y/PB/PR or Y/CB/CR) OUT jacks on the DVD player. Connecting to audio and video jacks 1 Connect a set of video cables between the VIDEO IN (1 or 2) jack on the TV and the VIDEO OUT jack on your TV make it easy to connect a DVD player to your DVD player's owner's manual. DVD Player Connecting to Y,PB,PR 1 Connect a set of Component video, see your TV. TV Rear Panel Incoming Cable or Antenna DVD Player English - 21 Connecting a DVD Player The rear panel jacks on the DVD player.
User Manual (ENGLISH)
Page 39
...; V-Chip √ Caption √ Blue Screen : Off √ Melody : On √ Color Weakness √ PC √ Move Enter Return 2 Press the ... Input Picture Sound Time Clock Set Sleep Timer On Timer Off Timer 10 : 30 am √ Off √ 06 : 30 am No Move Adjust Return English - 39 or † button to the next step. Press the ... Setting the On/Off Timer 1 Press the MENU button. or † button to adjust "Hour...
...; V-Chip √ Caption √ Blue Screen : Off √ Melody : On √ Color Weakness √ PC √ Move Enter Return 2 Press the ... Input Picture Sound Time Clock Set Sleep Timer On Timer Off Timer 10 : 30 am √ Off √ 06 : 30 am No Move Adjust Return English - 39 or † button to the next step. Press the ... Setting the On/Off Timer 1 Press the MENU button. or † button to adjust "Hour...
User Manual (ENGLISH)
Page 54
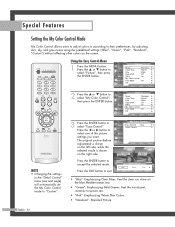
... Color Control Input Easy Control : Blue √ Detail Control √ Picture Sound Channel Setup Move Enter Return Original Blue Press the ENTER button to exit. Press the ... Input Picture Sound Channel Setup Picture Mode : Standard √ Color Tone : Warm1 √ Size : Wide √ Digital NR : Off √ DNIe : On √ My Color Control √ Film Mode : Off √ PIP √ Move Enter Return NOTE • Changing the settings in the "Detail Control" menu (see next page) will automatically set the My Color Control mode...
... Color Control Input Easy Control : Blue √ Detail Control √ Picture Sound Channel Setup Move Enter Return Original Blue Press the ENTER button to exit. Press the ... Input Picture Sound Channel Setup Picture Mode : Standard √ Color Tone : Warm1 √ Size : Wide √ Digital NR : Off √ DNIe : On √ My Color Control √ Film Mode : Off √ PIP √ Move Enter Return NOTE • Changing the settings in the "Detail Control" menu (see next page) will automatically set the My Color Control mode...
User Manual (ENGLISH)
Page 94
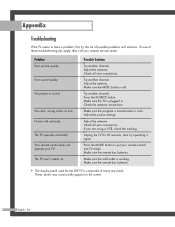
... working. Check all wire connections. Press the MODE button to have a problem, first try operating it again. Make sure the remote has batteries. These, pixels may occasionally appear on . Appendix Troubleshooting If the TV seems to put your nearest service center. If none of these troubleshooting tips apply, then call your remote control into TV mode. Possible Solution Try another channel. Poor sound quality. Your remote control does not operate your TV. Adjust...
... working. Check all wire connections. Press the MODE button to have a problem, first try operating it again. Make sure the remote has batteries. These, pixels may occasionally appear on . Appendix Troubleshooting If the TV seems to put your nearest service center. If none of these troubleshooting tips apply, then call your remote control into TV mode. Possible Solution Try another channel. Poor sound quality. Your remote control does not operate your TV. Adjust...


