User Manual (ENGLISH)
Page 2
... 21 Operation ...24 Turning the TV On and Off 24 Viewing the Menus and On-Screen Displays 24 Selecting the Menu Language 25 Selecting the Antenna Input 25 Memorizing the Channels 26 Adding and Erasing Channels 27 Changing Channels 28 Selecting Your Favorite Channels 29 Scanning the Channels 30 Labeling the Channels 31 Picture Control ...32 Sound Control ...34 Setting the Clock 36 Setting the Timers 37 Viewing an External Signal Source 39 Assigning Names to External Input Mode 40...
... 21 Operation ...24 Turning the TV On and Off 24 Viewing the Menus and On-Screen Displays 24 Selecting the Menu Language 25 Selecting the Antenna Input 25 Memorizing the Channels 26 Adding and Erasing Channels 27 Changing Channels 28 Selecting Your Favorite Channels 29 Scanning the Channels 30 Labeling the Channels 31 Picture Control ...32 Sound Control ...34 Setting the Clock 36 Setting the Timers 37 Viewing an External Signal Source 39 Assigning Names to External Input Mode 40...
User Manual (ENGLISH)
Page 3
...-Channel Sound (MTS) track 63 Auto Volume ...64 Enjoying the Sound of External Speakers 65 Using the V-Chip (USA 66 Viewing Closed Caption Information 72 Setting the Blue Screen Mode 74 Setting The On/Off Melody 75 Using the Color Weakness Enhancement Feature 76 PC Display...78 Using Your TV as a Computer (PC) Display 78 How to Connect Your PC to the TV 78 Setting up Your PC Software (Based on Windows 98 79 Display Modes 80 Adjusting the Picture Quality...
...-Channel Sound (MTS) track 63 Auto Volume ...64 Enjoying the Sound of External Speakers 65 Using the V-Chip (USA 66 Viewing Closed Caption Information 72 Setting the Blue Screen Mode 74 Setting The On/Off Melody 75 Using the Color Weakness Enhancement Feature 76 PC Display...78 Using Your TV as a Computer (PC) Display 78 How to Connect Your PC to the TV 78 Setting up Your PC Software (Based on Windows 98 79 Display Modes 80 Adjusting the Picture Quality...
User Manual (ENGLISH)
Page 6
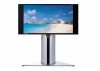
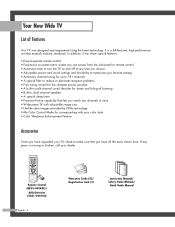
... Wide TV List of Features Your TV was designed and engineered using the latest technology. It is missing or broken, call your TV, check to make sure that exceeds industry standards. Remote Control (BP59-00048C)/ AAA Batteries (4301-000103) English - 6 Warranty Cards (2)/ Registration Card (1) Instruction Manual/ Safety Guide Manual/ Quick Guide Manual If any time you choose • Adjustable picture and sound settings and the ability to memorize your favorite settings • Automatic channel...
... Wide TV List of Features Your TV was designed and engineered using the latest technology. It is missing or broken, call your TV, check to make sure that exceeds industry standards. Remote Control (BP59-00048C)/ AAA Batteries (4301-000103) English - 6 Warranty Cards (2)/ Registration Card (1) Instruction Manual/ Safety Guide Manual/ Quick Guide Manual If any time you choose • Adjustable picture and sound settings and the ability to memorize your favorite settings • Automatic channel...
User Manual (ENGLISH)
Page 9
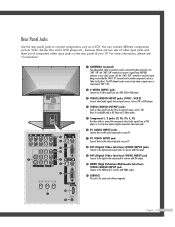
...) Connect video/audio signals from external sources, such as a VCR. The PIP channel can connect different components such as a Cable Set-Top Box). Note: It is for repair and software upgrades. English - 9 Rear Panel Jacks Use the rear panel jacks to receive a signal from VHF/UHF antennas or your cable system. Use "ANT 1 IN" and "ANT 2 IN" terminals to connect components such as VCR or DVD players. ¨ VIDEO/AUDIO OUTPUT jacks Sends a video signal from the TV to these terminals. " DVI (Digital Video Interface) AUDIO INPUT jacks Connect...
...) Connect video/audio signals from external sources, such as a VCR. The PIP channel can connect different components such as a Cable Set-Top Box). Note: It is for repair and software upgrades. English - 9 Rear Panel Jacks Use the rear panel jacks to receive a signal from VHF/UHF antennas or your cable system. Use "ANT 1 IN" and "ANT 2 IN" terminals to connect components such as VCR or DVD players. ¨ VIDEO/AUDIO OUTPUT jacks Sends a video signal from the TV to these terminals. " DVI (Digital Video Interface) AUDIO INPUT jacks Connect...
User Manual (ENGLISH)
Page 10
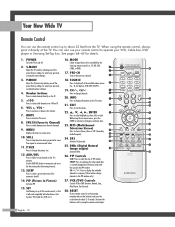
.... 14. S.MODE Adjust the TV sound by the Samsung remote control (i.e., TV, STB, VCR, CABLE, or DVD). 17. Number buttons Press to select channels directly on the TV. 5. +100 Press to select cable channels over 100 on -screen menu. 10. P.SIZE Press to change channels. 20. PIP (Picture In Picture) Activates PIP. 15. MENU Displays the main on TV. 6. SET Used during a particular scene. MTS (Multichannel Television Stereo) Press to add or erase channels in the PIP window. PIP Controls SIZE; VCR/DVD Controls Controls VCR or DVD functions: Rewind...
.... 14. S.MODE Adjust the TV sound by the Samsung remote control (i.e., TV, STB, VCR, CABLE, or DVD). 17. Number buttons Press to select channels directly on the TV. 5. +100 Press to select cable channels over 100 on -screen menu. 10. P.SIZE Press to change channels. 20. PIP (Picture In Picture) Activates PIP. 15. MENU Displays the main on TV. 6. SET Used during a particular scene. MTS (Multichannel Television Stereo) Press to add or erase channels in the PIP window. PIP Controls SIZE; VCR/DVD Controls Controls VCR or DVD functions: Rewind...
User Manual (ENGLISH)
Page 19
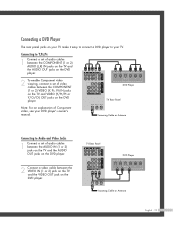
TV Rear Panel DVD Player Incoming Cable or Antenna English - 19 DVD Player TV Rear Panel Note: For an explanation of Component video, see your DVD player's owner's manual. Connecting to Y,PB,PR 1 Connect a set of audio cables between the COMPONENT (1 or 2) AUDIO (L,R) IN jacks on the TV and the AUDIO OUT jacks on the DVD player. 2 To enable Component video viewing, connect a set of audio cables between the AUDIO IN (1 or 2) jacks on the TV and the AUDIO OUT jacks on the DVD player. 2 Connect a video cable between the COMPONENT (1 or...
TV Rear Panel DVD Player Incoming Cable or Antenna English - 19 DVD Player TV Rear Panel Note: For an explanation of Component video, see your DVD player's owner's manual. Connecting to Y,PB,PR 1 Connect a set of audio cables between the COMPONENT (1 or 2) AUDIO (L,R) IN jacks on the TV and the AUDIO OUT jacks on the DVD player. 2 To enable Component video viewing, connect a set of audio cables between the AUDIO IN (1 or 2) jacks on the TV and the AUDIO OUT jacks on the DVD player. 2 Connect a video cable between the COMPONENT (1 or...
User Manual (ENGLISH)
Page 24
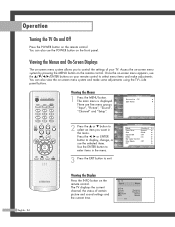
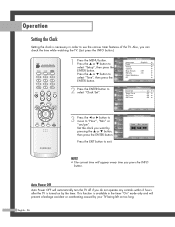
... on-screen menu appears, use the POWER button on the remote control. Operation Turning the TV On and Off Press the POWER button on the remote control. The TV displays the current channel, the status of your remote control to control the settings of certain picture and sound settings and the current time. or † button to select an item you to select menu items and make some adjustments using the TV's side panel buttons. Channel Setup Move Enter Exit 2 Press the ... Access the on-screen menu...
... on-screen menu appears, use the POWER button on the remote control. Operation Turning the TV On and Off Press the POWER button on the remote control. The TV displays the current channel, the status of your remote control to control the settings of certain picture and sound settings and the current time. or † button to select an item you to select menu items and make some adjustments using the TV's side panel buttons. Channel Setup Move Enter Exit 2 Press the ... Access the on-screen menu...
User Manual (ENGLISH)
Page 26
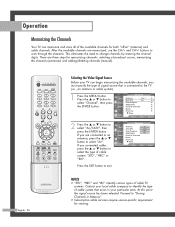
... the signal source has been selected. Operation Memorizing the Channels Your TV can begin memorizing the available channels, you connected cable, press the ... If you are memorized, use the CH and CH buttons to an antenna, press the ... or † button to exit. After the available channels are connected to scan through the channels. Input Picture Sound Channel Setup Channel Antenna : AntA.1ir Air/CATV : AirSTD Auto Program HRC Add/Delete IRC Favorite Channels Name...
... the signal source has been selected. Operation Memorizing the Channels Your TV can begin memorizing the available channels, you connected cable, press the ... If you are memorized, use the CH and CH buttons to an antenna, press the ... or † button to exit. After the available channels are connected to scan through the channels. Input Picture Sound Channel Setup Channel Antenna : AntA.1ir Air/CATV : AirSTD Auto Program HRC Add/Delete IRC Favorite Channels Name...
User Manual (ENGLISH)
Page 29
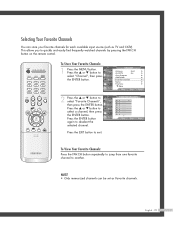
... Channels You can be set as TV and CATV). English - 29 This allows you to select a channel, then press the ENTER button. or † button to quickly and easily find frequently watched channels by pressing the FAV.CH button on the remote control. Input Picture Sound Channel Setup Channel Antenna : Ant.1 Air/CATV : Air Auto Program Add/Delete Favorite Channels Name Fine Tune M More Move Enter Return 2 Press the ... Input Picture Sound Channel Setup Favorite Channels...
... Channels You can be set as TV and CATV). English - 29 This allows you to select a channel, then press the ENTER button. or † button to quickly and easily find frequently watched channels by pressing the FAV.CH button on the remote control. Input Picture Sound Channel Setup Channel Antenna : Ant.1 Air/CATV : Air Auto Program Add/Delete Favorite Channels Name Fine Tune M More Move Enter Return 2 Press the ... Input Picture Sound Channel Setup Favorite Channels...
User Manual (ENGLISH)
Page 31
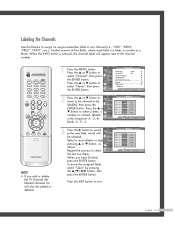
...", then press the ENTER button. Input Picture Sound Channel Setup Channel Antenna : Ant.1 Air/CATV : Air Auto Program Add/Delete Favorite Channels Name Fine Tune M More Move Enter Return 2 Press the ... or Sound Air 4 - - - - Input Picture Air 2 Air 3 Name L CNN2 ---- Clear Clear ENTER button. Labeling the Channels Use this sequence: A...Z, ✽, Setup M Move Adjust Return blank, 0...9, -). 3 Press the √ button to switch to the channel number. or † button to any channel (i.e., "CBS", "ESPN", "PBS2...
...", then press the ENTER button. Input Picture Sound Channel Setup Channel Antenna : Ant.1 Air/CATV : Air Auto Program Add/Delete Favorite Channels Name Fine Tune M More Move Enter Return 2 Press the ... or Sound Air 4 - - - - Input Picture Air 2 Air 3 Name L CNN2 ---- Clear Clear ENTER button. Labeling the Channels Use this sequence: A...Z, ✽, Setup M Move Adjust Return blank, 0...9, -). 3 Press the √ button to switch to the channel number. or † button to any channel (i.e., "CBS", "ESPN", "PBS2...

User Manual (ENGLISH)
Page 32
Resetting the Picture Settings to the Factory Defaults You can use the on-screen menus to change the "Contrast", "Brightness", "Sharpness", "Color" and "Tint" according to personal preference. (Alternatively, you can return to the factory default picture settings. 4 Press the MENU button to select "Reset", then press the ENTER button. Operation Picture Control You can use one of a particular item. or † button to exit. Input Picture Sound Channel Setup Mode Mode Contrast Brightness Sharpness Color Tint G 50 Reset : Standard √ 90...
Resetting the Picture Settings to the Factory Defaults You can use the on-screen menus to change the "Contrast", "Brightness", "Sharpness", "Color" and "Tint" according to personal preference. (Alternatively, you can return to the factory default picture settings. 4 Press the MENU button to select "Reset", then press the ENTER button. Operation Picture Control You can use one of a particular item. or † button to exit. Input Picture Sound Channel Setup Mode Mode Contrast Brightness Sharpness Color Tint G 50 Reset : Standard √ 90...

User Manual (ENGLISH)
Page 33
... factory settings. • Choose "Cinema" when viewing a movie. Input Picture Sound Channel Setup Mode Mode Contrast Brightness Sharpness Color Tint G 50 Reset : Standard √ 90 50 50 60 R 50 Move Enter Return 3 Press the ENTER button again to exit. Press the ... Using Automatic Picture Settings Your TV has automatic picture settings ("Dynamic", "Standard" and "Cinema") that are preset at the factory. You can select "Custom" which automatically recalls your personalized picture settings. 1 Press the MENU button...
... factory settings. • Choose "Cinema" when viewing a movie. Input Picture Sound Channel Setup Mode Mode Contrast Brightness Sharpness Color Tint G 50 Reset : Standard √ 90 50 50 60 R 50 Move Enter Return 3 Press the ENTER button again to exit. Press the ... Using Automatic Picture Settings Your TV has automatic picture settings ("Dynamic", "Standard" and "Cinema") that are preset at the factory. You can select "Custom" which automatically recalls your personalized picture settings. 1 Press the MENU button...
User Manual (ENGLISH)
Page 35
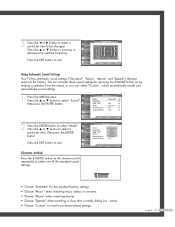
... Move Adjust Return Using Automatic Sound Settings Your TV has automatic sound settings ("Standard", "Music", "Movie" and "Speech") that is mostly dialog (i.e., news). • Choose "Custom" to recall your personalized sound settings. 1 Press the MENU button. Input Picture Sound Channel Setup Sound Mode Equalizer SRS TSXT MTS Auto Volume Internal Mute : SSttannddaarrdd Music : OfMf ovie : SStepreeeoch : OCfuf stom : Off Move Enter Return Alternate method Press the S.MODE button on the remote control repeatedly to be changed. Input Picture Sound Channel Setup...
... Move Adjust Return Using Automatic Sound Settings Your TV has automatic sound settings ("Standard", "Music", "Movie" and "Speech") that is mostly dialog (i.e., news). • Choose "Custom" to recall your personalized sound settings. 1 Press the MENU button. Input Picture Sound Channel Setup Sound Mode Equalizer SRS TSXT MTS Auto Volume Internal Mute : SSttannddaarrdd Music : OfMf ovie : SStepreeeoch : OCfuf stom : Off Move Enter Return Alternate method Press the S.MODE button on the remote control repeatedly to be changed. Input Picture Sound Channel Setup...
User Manual (ENGLISH)
Page 36
.... Input Picture Sound Time Clock Set Sleep Timer On Timer Off Timer - - : - - Input Picture Sound Channel Setup Setup Language : English √ Time √ V-Chip √ Caption √ Blue Screen : Off √ Melody : On √ Color Weakness √ PC √ Move Enter Return 2 Press the ENTER button to select "Setup", then press the ENTER button. or † button, then press the ENTER button. or † button to select "Clock Set". Set the clock you can check the time while watching the TV...
.... Input Picture Sound Time Clock Set Sleep Timer On Timer Off Timer - - : - - Input Picture Sound Channel Setup Setup Language : English √ Time √ V-Chip √ Caption √ Blue Screen : Off √ Melody : On √ Color Weakness √ PC √ Move Enter Return 2 Press the ENTER button to select "Setup", then press the ENTER button. or † button, then press the ENTER button. or † button to select "Clock Set". Set the clock you can check the time while watching the TV...
User Manual (ENGLISH)
Page 37
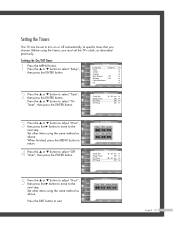
... automatically at specific times that you choose. When finished, press the MENU button to the next step. Set other items using the same method as above . Input Picture Sound Channel Setup Off Timer Hour L 12 M Min am/pm Activation 00 am Vol. or † button to the next step. Press the ... Input Picture Sound Channel Setup Setup Language : English √ Time √ V-Chip √ Caption √ Blue Screen : Off √ Melody : On √ Color Weakness √...
... automatically at specific times that you choose. When finished, press the MENU button to the next step. Set other items using the same method as above . Input Picture Sound Channel Setup Off Timer Hour L 12 M Min am/pm Activation 00 am Vol. or † button to the next step. Press the ... Input Picture Sound Channel Setup Setup Language : English √ Time √ V-Chip √ Caption √ Blue Screen : Off √ Melody : On √ Color Weakness √...
User Manual (ENGLISH)
Page 52
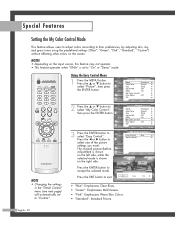
... adjusting skin, sky, and grass tones using the predefined settings ("Blue", "Green", "Pink", "Standard", "Custom") without affecting other colors on the left side, while the selected mode is set to exit. Input Picture Sound Channel Setup Picture Mode : Standard √ Color Tone : Warm1 √ Size : Wide √ Digital NR : Off √ DNIe : On √ My Color Control √ Film Mode : Off √ PIP √ Move Enter Return Input Picture Sound Channel Setup Picture Mode : Standard √ Color Tone : Warm1 √ Size...
... adjusting skin, sky, and grass tones using the predefined settings ("Blue", "Green", "Pink", "Standard", "Custom") without affecting other colors on the left side, while the selected mode is set to exit. Input Picture Sound Channel Setup Picture Mode : Standard √ Color Tone : Warm1 √ Size : Wide √ Digital NR : Off √ DNIe : On √ My Color Control √ Film Mode : Off √ PIP √ Move Enter Return Input Picture Sound Channel Setup Picture Mode : Standard √ Color Tone : Warm1 √ Size...

User Manual (ENGLISH)
Page 53
... MENU button. Input Picture Sound Channel Setup Picture Mode : Standard √ Color Tone : Warm1 √ Size : Wide √ Digital NR : Off √ DNIe : On √ My Color Control √ Film Mode : Off √ PIP √ Move Enter Return 2 Press the ... There are three colors: "Pink", "Green" and "Blue". Press the œ or √ button to adjust the value of the colors, you want, then press the ENTER button. The previously adjusted colors will refresh the adjusted screen...
... MENU button. Input Picture Sound Channel Setup Picture Mode : Standard √ Color Tone : Warm1 √ Size : Wide √ Digital NR : Off √ DNIe : On √ My Color Control √ Film Mode : Off √ PIP √ Move Enter Return 2 Press the ... There are three colors: "Pink", "Green" and "Blue". Press the œ or √ button to adjust the value of the colors, you want, then press the ENTER button. The previously adjusted colors will refresh the adjusted screen...
User Manual (ENGLISH)
Page 66
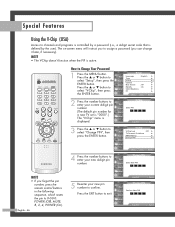
... remote control buttons in the following sequence, which resets the pin to enter your current 4-digit pin Input V-Chip number. NOTE • The V-Chip doesn't function when the PIP is Channel displayed. Picture Enter PIN (The default pin number for Sound * a new TV set is "0000".) The "V-Chip" menu is active. V-Chip Input V-Chip Lock : Off √ TV Parental Guidelines √ Picture MPAA Rating √ Change PIN √ Sound Channel Setup Move Enter Return 4 Press the number buttons to 0-0-0-0: POWER (Off), MUTE, 8, 2, 4, POWER...
... remote control buttons in the following sequence, which resets the pin to enter your current 4-digit pin Input V-Chip number. NOTE • The V-Chip doesn't function when the PIP is Channel displayed. Picture Enter PIN (The default pin number for Sound * a new TV set is "0000".) The "V-Chip" menu is active. V-Chip Input V-Chip Lock : Off √ TV Parental Guidelines √ Picture MPAA Rating √ Change PIN √ Sound Channel Setup Move Enter Return 4 Press the number buttons to 0-0-0-0: POWER (Off), MUTE, 8, 2, 4, POWER...
User Manual (ENGLISH)
Page 88
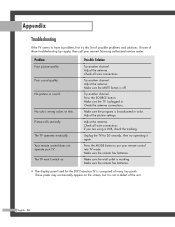
... display panel used for 30 seconds, then try this list of these troubleshooting tips apply, then call your nearest Samsung authorized service center. Make sure the wall outlet is off. Try another channel. Adjust the antenna. Adjust the antenna. Problem Poor picture quality. Poor sound quality. Try another channel. Make sure the program is composed of the unit. Unplug the TV for the DLP Projection TV is broadcasted in . Check all wire connections...
... display panel used for 30 seconds, then try this list of these troubleshooting tips apply, then call your nearest Samsung authorized service center. Make sure the wall outlet is off. Try another channel. Adjust the antenna. Adjust the antenna. Problem Poor picture quality. Poor sound quality. Try another channel. Make sure the program is composed of the unit. Unplug the TV for the DLP Projection TV is broadcasted in . Check all wire connections...
User Manual (ENGLISH)
Page 91
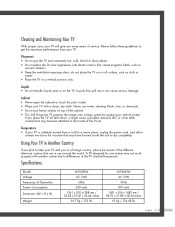
... maximum performance from a cold to a warm place, unplug the power cord, and allow at least two hours for one system may become attached to a foreign country, please be aware of the cabinet. • This DLP Projection TV projects the image onto a large screen by applying an optical system. Specifications Model Voltage Frequency of service. Placement • Do not put heavy objects on the...
... maximum performance from a cold to a warm place, unplug the power cord, and allow at least two hours for one system may become attached to a foreign country, please be aware of the cabinet. • This DLP Projection TV projects the image onto a large screen by applying an optical system. Specifications Model Voltage Frequency of service. Placement • Do not put heavy objects on the...


