
Open Source Guide (ENGLISH)
Page 2
You can redistribute and change. To apply these terms (or, alternatively, under the terms of warranty; and each source file to most effectively convey the exclusion of the ordinary General Public License). It is found. How to Apply These Terms to Your New Libraries ... the greatest possible use to the public, we recommend making it free software that everyone can do so by permitting redistribution under these terms, attach the following notices to where the full notice is safest to attach them to the start of each file should have at least the "copyright" line and a pointer to...
You can redistribute and change. To apply these terms (or, alternatively, under the terms of warranty; and each source file to most effectively convey the exclusion of the ordinary General Public License). It is found. How to Apply These Terms to Your New Libraries ... the greatest possible use to the public, we recommend making it free software that everyone can do so by permitting redistribution under these terms, attach the following notices to where the full notice is safest to attach them to the start of each file should have at least the "copyright" line and a pointer to...
Safety Guide (ENGLISH)
Page 1
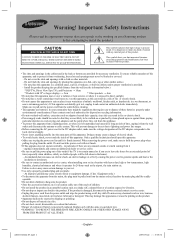
... the power outlet and wipe the product using a soft, dry cloth. This may cause serious damage to hold the power plug when pulling the plug from it and contact an authorized dealer immediately. Important Safety Instructions (Please read the appropriate section that they exit from the appliance. • To protect this product. THERE ARE NO USER SERVICEABLE PARTS INSIDE...
... the power outlet and wipe the product using a soft, dry cloth. This may cause serious damage to hold the power plug when pulling the plug from it and contact an authorized dealer immediately. Important Safety Instructions (Please read the appropriate section that they exit from the appliance. • To protect this product. THERE ARE NO USER SERVICEABLE PARTS INSIDE...

Safety Guide (ENGLISH)
Page 5
... (tandem blades) plug cap. For 120 Volt applications, use only UL Listed detachable power supply cord with Section 15.119 of Korea - This television receiver provides display of television closed captioning in a residential installation. Voluntary Control Council for help. This device may not cause harmful interference, and 2. This equipment generates, uses, and can radiate radio frequency energy and, if not installed and used in the user manual. - Increase the...
... (tandem blades) plug cap. For 120 Volt applications, use only UL Listed detachable power supply cord with Section 15.119 of Korea - This television receiver provides display of television closed captioning in a residential installation. Voluntary Control Council for help. This device may not cause harmful interference, and 2. This equipment generates, uses, and can radiate radio frequency energy and, if not installed and used in the user manual. - Increase the...
User Manual (ENGLISH)
Page 4
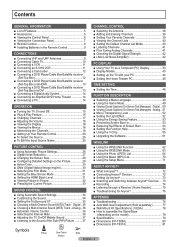
...55 ■ Upgrading the Software 61 WISELINK PICTURE CONTROL ■ Using Automatic Picture Settings 26 ■ Digital Noise Reduction 27 ■ Changing the Screen Size 28 ■ Configuring Detailed Settings on the model 79 ■ Specifications 79 ■ Dimensions (FP-T5084 80 ■ Dimensions (FP-T6374 81 Button English - 4 Contents GENERAL INFORMATION CHANNEL CONTROL ■ List of Features 5 ■ Accessories 5 ■ Viewing the Control Panel 6 ■ Viewing the Connection Panel 7 ■ Remote Control 8 ■ Installing Batteries in...
...55 ■ Upgrading the Software 61 WISELINK PICTURE CONTROL ■ Using Automatic Picture Settings 26 ■ Digital Noise Reduction 27 ■ Changing the Screen Size 28 ■ Configuring Detailed Settings on the model 79 ■ Specifications 79 ■ Dimensions (FP-T5084 80 ■ Dimensions (FP-T6374 81 Button English - 4 Contents GENERAL INFORMATION CHANNEL CONTROL ■ List of Features 5 ■ Accessories 5 ■ Viewing the Control Panel 6 ■ Viewing the Connection Panel 7 ■ Remote Control 8 ■ Installing Batteries in...
User Manual (ENGLISH)
Page 5
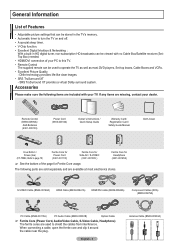
...; Remote Control The supplied remote can be viewed with your dealer. When connecting a cable, open the ferrite core and clip it around the cable near the plug. English - 5 Antenna Cable (BN39-00333A) S-VIDEO Cable (BN39-00149A) HDMI Cable (BN39-00641A) HDMI/DVI cable (BN39-00643A) Component Cables (RCA) (BN39-00279A) PC Cable (BN39-00115A) PC Audio Cable (BN39-00061B) Optical Cable ➢ Ferrite Core (Power Cord, Audio/Video Cable, S-Video Cable, Headphone) The ferrite cores are available at most DVD players, Set-top boxes, Cable Boxes and...
...; Remote Control The supplied remote can be viewed with your dealer. When connecting a cable, open the ferrite core and clip it around the cable near the plug. English - 5 Antenna Cable (BN39-00333A) S-VIDEO Cable (BN39-00149A) HDMI Cable (BN39-00641A) HDMI/DVI cable (BN39-00643A) Component Cables (RCA) (BN39-00279A) PC Cable (BN39-00115A) PC Audio Cable (BN39-00061B) Optical Cable ➢ Ferrite Core (Power Cord, Audio/Video Cable, S-Video Cable, Headphone) The ferrite cores are available at most DVD players, Set-top boxes, Cable Boxes and...
User Manual (ENGLISH)
Page 7
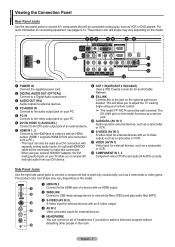
... 1, 2 Connect to the HDMI jack of headphones if you to receive left and right audio from a PC.) - Viewing the Connection Panel Rear Panel Jacks Use the rear panel jacks to connect A/V components that is used as a DVI connection with separate analog audio inputs. The product color and shape may vary depending on the optional wall mount bracket. The product color and shape may vary depending on the model. 1 POWER IN Connect the supplied power cord. 2 DIGITAL AUDIO OUT (OPTICAL) Connect to a Digital Audio component. 3 AUDIO OUT (R/L) Audio outputs...
... 1, 2 Connect to the HDMI jack of headphones if you to receive left and right audio from a PC.) - Viewing the Connection Panel Rear Panel Jacks Use the rear panel jacks to connect A/V components that is used as a DVI connection with separate analog audio inputs. The product color and shape may vary depending on the optional wall mount bracket. The product color and shape may vary depending on the model. 1 POWER IN Connect the supplied power cord. 2 DIGITAL AUDIO OUT (OPTICAL) Connect to a Digital Audio component. 3 AUDIO OUT (R/L) Audio outputs...
User Manual (ENGLISH)
Page 8
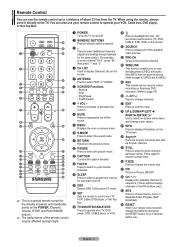
... the sound. 9 MENU Displays the main on Samsung DVD recorders. (Refer to page 74) d CH Press to change channels. Rewind - Stop - Press again to stop the action during a particular scene. Fast/Forward 7 + VOL - g INFO Press to display information on -screen menu items and change channels in Picture ON/OFF. Play/Pause - English - 8 Remote Control You can also use your remote control to operate your VCR, Cable box, DVD player, or Set-Top Box. When using the remote...
... the sound. 9 MENU Displays the main on Samsung DVD recorders. (Refer to page 74) d CH Press to change channels. Rewind - Stop - Press again to stop the action during a particular scene. Fast/Forward 7 + VOL - g INFO Press to display information on -screen menu items and change channels in Picture ON/OFF. Play/Pause - English - 8 Remote Control You can also use your remote control to operate your VCR, Cable box, DVD player, or Set-Top Box. When using the remote...
User Manual (ENGLISH)
Page 13
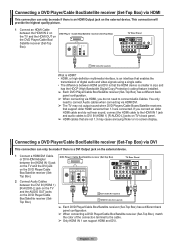
... support older HDMI versions than 1.3 are not 1.3 may cause annoying flicker or no screen display. Connecting a DVD Player/Cable Box/Satellite receiver (Set-Top Box) via DVI This connection can only be made if there is an interface that enables the transmission of the connection terminal to connect Audio Cables. English - 13 TV Rear Panel 1 HDMI Cable (Not supplied) What is HDMI? • HDMI, or high-definition multimedia interface, is a DVI Output jack on the external device. 1 Connect a HDMI/DVI Cable or DVI-HDMI Adapter...
... support older HDMI versions than 1.3 are not 1.3 may cause annoying flicker or no screen display. Connecting a DVD Player/Cable Box/Satellite receiver (Set-Top Box) via DVI This connection can only be made if there is an interface that enables the transmission of the connection terminal to connect Audio Cables. English - 13 TV Rear Panel 1 HDMI Cable (Not supplied) What is HDMI? • HDMI, or high-definition multimedia interface, is a DVI Output jack on the external device. 1 Connect a HDMI/DVI Cable or DVI-HDMI Adapter...

User Manual (ENGLISH)
Page 14
... "DIGITAL AUDIO OUT (OPTICAL)" jack: Decrease the gain (volume) Optical Cable (Not supplied) of the sound card on the Amplifier/DVD Home Theater. Connecting an Amplifier/DVD Home Theater 1 Connect Audio Cables between the [HDMI IN 1] jack on the TV and the PC output jack on your computer. 2 Connect a 3.5 mm Stereo plug to 2 RCA Cable (Not supplied) 1 HDMI/DVI Cable (Not supplied) ➢ Each PC has a different back panel configuration. ➢ When connecting a PC, match the color of a light...
... "DIGITAL AUDIO OUT (OPTICAL)" jack: Decrease the gain (volume) Optical Cable (Not supplied) of the sound card on the Amplifier/DVD Home Theater. Connecting an Amplifier/DVD Home Theater 1 Connect Audio Cables between the [HDMI IN 1] jack on the TV and the PC output jack on your computer. 2 Connect a 3.5 mm Stereo plug to 2 RCA Cable (Not supplied) 1 HDMI/DVI Cable (Not supplied) ➢ Each PC has a different back panel configuration. ➢ When connecting a PC, match the color of a light...

User Manual (ENGLISH)
Page 28
... PIP is vertically enlarged. Your TV comes with six screen size options, each designed to work best with specific types of the picture to fit the entire screen. 4:3 Sets the picture to display the menu. Press the ENTER button. Zoom2 The screen size when the Zoom1 screen is vertically enlarged. Press the EXIT button to exit. • 16:9 : Sets the picture to 16:9 wide mode. • Zoom1 : Magnifies the size of the picture on the remote control...
... PIP is vertically enlarged. Your TV comes with six screen size options, each designed to work best with specific types of the picture to fit the entire screen. 4:3 Sets the picture to display the menu. Press the ENTER button. Zoom2 The screen size when the Zoom1 screen is vertically enlarged. Press the EXIT button to exit. • 16:9 : Sets the picture to 16:9 wide mode. • Zoom1 : Magnifies the size of the picture on the remote control...
User Manual (ENGLISH)
Page 29
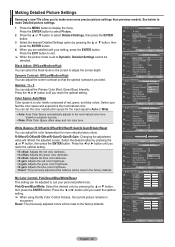
.... My Color Control: Pink/Green/Blue/White/Reset This setting can select the black level on program sources. • Wide: Wide Color Space offers deep and rich color tone. Making Detailed Picture Settings Samsung's new TVs allow you to make Detailed picture settings. 1 Press the MENU button to display the menu. R-Offset/G-Offset/B-Offset/R-Gain/G-Gain/B-Gain: Changing the adjustment value will refresh the adjusted screen. T V Picture ▲ More Color Tone : Cool1 Detailed Settings Size : 16:9 Digital NR : Auto Active Color : On...
.... My Color Control: Pink/Green/Blue/White/Reset This setting can select the black level on program sources. • Wide: Wide Color Space offers deep and rich color tone. Making Detailed Picture Settings Samsung's new TVs allow you to make Detailed picture settings. 1 Press the MENU button to display the menu. R-Offset/G-Offset/B-Offset/R-Gain/G-Gain/B-Gain: Changing the adjustment value will refresh the adjusted screen. T V Picture ▲ More Color Tone : Cool1 Detailed Settings Size : 16:9 Digital NR : Auto Active Color : On...
User Manual (ENGLISH)
Page 31
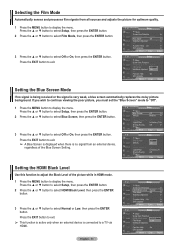
... an external device is very weak, a blue screen automatically replaces the noisy picture background. If you wish to continue viewing the poor picture, you must set the "Blue Screen" mode to "Off". 1 Press the MENU button to a TV via HDMI. English - 31 T V Setup ▲ More Screen Burn Protection HDMI Black Level : Normal Film Mode : Off Wall-Mount Adjustment PIP Function Help : On SW Upgrade Move Enter Return T V Setup ▲ More Screen Burn Protection HDMI Black Level : NNoormrmaal l Film Mode : OLfof w Wall-Mount Adjustment PIP Function...
... an external device is very weak, a blue screen automatically replaces the noisy picture background. If you wish to continue viewing the poor picture, you must set the "Blue Screen" mode to "Off". 1 Press the MENU button to a TV via HDMI. English - 31 T V Setup ▲ More Screen Burn Protection HDMI Black Level : Normal Film Mode : Off Wall-Mount Adjustment PIP Function Help : On SW Upgrade Move Enter Return T V Setup ▲ More Screen Burn Protection HDMI Black Level : NNoormrmaal l Film Mode : OLfof w Wall-Mount Adjustment PIP Function...
User Manual (ENGLISH)
Page 43
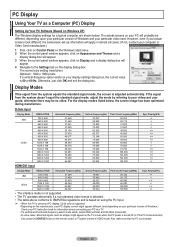
... conforms to IBM/VESA regulations and is based on using the PC Input. ➢ • When this TV is used as stripes) might appear on the TV screen when the PC power is turned off (or if the PC is disconnected). The correct size setting (resolution) Optimum: 1920 x 1080 pixels If a vertical-frequency option exists on your videocard user guide; For the display modes listed below . Otherwise...
... conforms to IBM/VESA regulations and is based on using the PC Input. ➢ • When this TV is used as stripes) might appear on the TV screen when the PC power is turned off (or if the PC is disconnected). The correct size setting (resolution) Optimum: 1920 x 1080 pixels If a vertical-frequency option exists on your videocard user guide; For the display modes listed below . Otherwise...
User Manual (ENGLISH)
Page 49
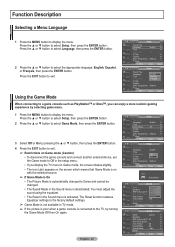
... Game and cannot be changed to display the menu. English - 49 T V Setup Plug & Play ► Language : English ► Time ► Game Mode : Off ► V-Chip ► Caption ► Menu Transparency : Medium ► ▼ More Move Enter Return T V Setup Plug & Play Language Time : English Game Mode : OOff f V-Chip On Caption Menu Transparency : Medium ▼ More Move Enter Return AV1 Game Mode T V Sound Mode : CSutasntodmard Equalizer Music SRS TruSurround XT : OMfof vie Multi-Track Options Speech Auto Volume...
... Game and cannot be changed to display the menu. English - 49 T V Setup Plug & Play ► Language : English ► Time ► Game Mode : Off ► V-Chip ► Caption ► Menu Transparency : Medium ► ▼ More Move Enter Return T V Setup Plug & Play Language Time : English Game Mode : OOff f V-Chip On Caption Menu Transparency : Medium ▼ More Move Enter Return AV1 Game Mode T V Sound Mode : CSutasntodmard Equalizer Music SRS TruSurround XT : OMfof vie Multi-Track Options Speech Auto Volume...
User Manual (ENGLISH)
Page 61
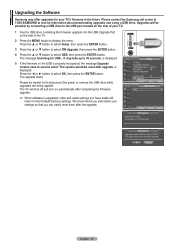
... firmware on the USB is upgraded, video and audio settings you have made will return to version xxxx? The system would be possible by connecting a USB drive to the USB port located on the side of the TV. 2 Press the MENU button to disconnect the power or remove the USB drive while upgrades are being applied. T V Setup ▲ More Screen Burn Protection ► HDMI Black Level : Normal ► Film Mode : Off ► Wall-Mount Adjustment ► PIP...
... firmware on the USB is upgraded, video and audio settings you have made will return to version xxxx? The system would be possible by connecting a USB drive to the USB port located on the side of the TV. 2 Press the MENU button to disconnect the power or remove the USB drive while upgrades are being applied. T V Setup ▲ More Screen Burn Protection ► HDMI Black Level : Normal ► Film Mode : Off ► Wall-Mount Adjustment ► PIP...
User Manual (ENGLISH)
Page 72
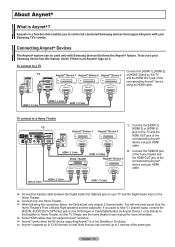
... corresponding Anynet+ device using an HDMI cable. 2. Anynet+ is in total. Connecting Anynet+ Devices The Anynet+ system can connect up to 12 AV devices in the Standby or On status. ➢ Anynet+ supports up to control all connected Samsung devices that have the Anynet+ feature. If you can be sure your TV and the Digital Audio Input on the DVD player or Cable/Satellite Box (ie Anynet...
... corresponding Anynet+ device using an HDMI cable. 2. Anynet+ is in total. Connecting Anynet+ Devices The Anynet+ system can connect up to 12 AV devices in the Standby or On status. ➢ Anynet+ supports up to control all connected Samsung devices that have the Anynet+ feature. If you can be sure your TV and the Digital Audio Input on the DVD player or Cable/Satellite Box (ie Anynet...
User Manual (ENGLISH)
Page 74
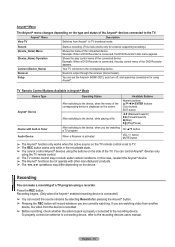
...+ menu changes depending on the type and status of the Anynet+ devices connected to the recording device. You can make a recording of a TV program using Anynet+. Your TV connects to TV. ➢ The REC button works only while in Tuner Audio Device Operating Status After switching to the recording devices users manual. Recording You can control Anynet+ devices only using the buttons on the TV remote control is displayed...
...+ menu changes depending on the type and status of the Anynet+ devices connected to the recording device. You can make a recording of a TV program using Anynet+. Your TV connects to TV. ➢ The REC button works only while in Tuner Audio Device Operating Status After switching to the recording devices users manual. Recording You can control Anynet+ devices only using the buttons on the TV remote control is displayed...

User Manual (ENGLISH)
Page 75
... switching to a view mode. ■ Use the remote control when the Anynet+ setting or switching to On in the Anynet+ setup menu. ■ Search Anynet+ devices again. ■ You can connect an Anynet+ device using the WISELINK feature, sound may not output properly through the receiver. ➢ When listening through a receiver instead of CH, CH LIST, PRE-CH, and FAV.CH to change the TV mode. (Note that the channel button...
... switching to a view mode. ■ Use the remote control when the Anynet+ setting or switching to On in the Anynet+ setup menu. ■ Search Anynet+ devices again. ■ You can connect an Anynet+ device using the WISELINK feature, sound may not output properly through the receiver. ➢ When listening through a receiver instead of CH, CH LIST, PRE-CH, and FAV.CH to change the TV mode. (Note that the channel button...
User Manual (ENGLISH)
Page 76
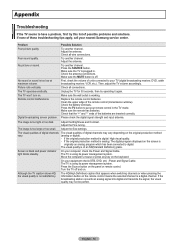
... the remote control means the selected channel is using its power management system. Problem Poor picture quality. Make sure the TV is black and power indicator light blinks steadily. Replace the remote control batteries. Clean the upper edge of these troubleshooting tips apply, call your nearest Samsung service center. Press the TV button to put your TV (digital broadcasting receiver, DVD, cable broadcasting receiver, VCR, etc.). check the Power and Signal Cable. English - 76 Remote control malfunctions Digital broadcasting screen problem...
... the remote control means the selected channel is using its power management system. Problem Poor picture quality. Make sure the TV is black and power indicator light blinks steadily. Replace the remote control batteries. Clean the upper edge of these troubleshooting tips apply, call your nearest Samsung service center. Press the TV button to put your TV (digital broadcasting receiver, DVD, cable broadcasting receiver, VCR, etc.). check the Power and Signal Cable. English - 76 Remote control malfunctions Digital broadcasting screen problem...
User Manual (ENGLISH)
Page 79
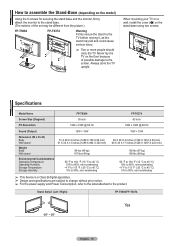
... more people should carry the TV. When mounting your TV on a wall, install the cover (1) on the stand-base using two screws. Specifications Model Name Screen Size (Diagonal) PC Resolution FP-T5084 50 inch 1920 x 1080 @ 60 Hz FP-T6374 63 inch 1920 x 1080 @ 60 Hz Sound (Output) 15W + 15W Dimension (W x H x D) Body With stand Weight Body With stand 51 X 29 X 4 inches (1289 X 739 X 95 mm) 51 X 32 X 13 inches (1289 X 804 X 320 mm) 99 lbs...
... more people should carry the TV. When mounting your TV on a wall, install the cover (1) on the stand-base using two screws. Specifications Model Name Screen Size (Diagonal) PC Resolution FP-T5084 50 inch 1920 x 1080 @ 60 Hz FP-T6374 63 inch 1920 x 1080 @ 60 Hz Sound (Output) 15W + 15W Dimension (W x H x D) Body With stand Weight Body With stand 51 X 29 X 4 inches (1289 X 739 X 95 mm) 51 X 32 X 13 inches (1289 X 804 X 320 mm) 99 lbs...


