User Manual (ENGLISH)
Page 5
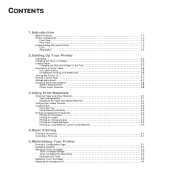
... Using Manual Feed Mode 3.2 Printing on Special Print Materials 3.3 Printing on Envelopes ...3.3 Printing on Labels ...3.3 Printing on Transparencies 3.4 Printing on Preprinted Paper 3.4 Printing on Card Stock or Custom-sized Materials 3.5 4.Basic Printing Printing a Document ...4.1 Canceling a Print Job ...4.1 5.Maintaining Your Printer Printing a Configuration Page 5.1 Replacing Supplies ...5.1 Managing Toner Cartridges ...5.2 Toner Cartridge Storage ...5.2 Toner Cartridge Life Expectancy 5.2 Redistributing Toner ...5.2 Replacing Toner Cartridges ...5.3 Replacing the Imaging Unit...
... Using Manual Feed Mode 3.2 Printing on Special Print Materials 3.3 Printing on Envelopes ...3.3 Printing on Labels ...3.3 Printing on Transparencies 3.4 Printing on Preprinted Paper 3.4 Printing on Card Stock or Custom-sized Materials 3.5 4.Basic Printing Printing a Document ...4.1 Canceling a Print Job ...4.1 5.Maintaining Your Printer Printing a Configuration Page 5.1 Replacing Supplies ...5.1 Managing Toner Cartridges ...5.2 Toner Cartridge Storage ...5.2 Toner Cartridge Life Expectancy 5.2 Redistributing Toner ...5.2 Replacing Toner Cartridges ...5.3 Replacing the Imaging Unit...
User Manual (ENGLISH)
Page 6
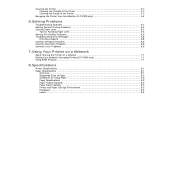
... Problems 6.2 Clearing Paper Jams ...6.3 Tips for Avoiding Paper Jams 6.5 Solving Print Quality Problems 6.5 Troubleshooting Error Messages 6.8 LED status legend ...6.8 Common Windows Problems ...6.8 Common Macintosh Problems 6.9 Common Linux Problems ...6.9 7.Using Your Printer on a Network About Sharing the Printer on a Network 7.1 Setting Up a Network-Connected Printer(CLP-300N only 7.1 Using SetIP Program ...7.1 8.Specifications Printer Specifications ...8.1 Paper Specifications ...8.1 Overview ...8.1 Supported Sizes of Paper 8.2 Guidelines for Using Paper 8.2 Paper Specifications...
... Problems 6.2 Clearing Paper Jams ...6.3 Tips for Avoiding Paper Jams 6.5 Solving Print Quality Problems 6.5 Troubleshooting Error Messages 6.8 LED status legend ...6.8 Common Windows Problems ...6.8 Common Macintosh Problems 6.9 Common Linux Problems ...6.9 7.Using Your Printer on a Network About Sharing the Printer on a Network 7.1 Setting Up a Network-Connected Printer(CLP-300N only 7.1 Using SetIP Program ...7.1 8.Specifications Printer Specifications ...8.1 Paper Specifications ...8.1 Overview ...8.1 Supported Sizes of Paper 8.2 Guidelines for Using Paper 8.2 Paper Specifications...
User Manual (ENGLISH)
Page 11
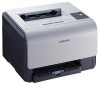
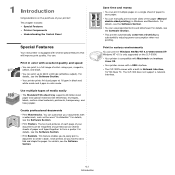
... create a book. The CLP-300 does not support a network interface. 8 1.1 Introduction This chapter includes: • Special Features • Printer Components • Understanding the Control Panel Special Features Your new printer is equipped with a watermark, such as the word "Confidential." You can print in a full range of media easily • The Standard 150-sheet tray supports A4/letter-sized paper and special materials like letterhead, envelopes, labels, custom-sized materials, postcards, transparency, and...
... create a book. The CLP-300 does not support a network interface. 8 1.1 Introduction This chapter includes: • Special Features • Printer Components • Understanding the Control Panel Special Features Your new printer is equipped with a watermark, such as the word "Confidential." You can print in a full range of media easily • The Standard 150-sheet tray supports A4/letter-sized paper and special materials like letterhead, envelopes, labels, custom-sized materials, postcards, transparency, and...
User Manual (ENGLISH)
Page 12
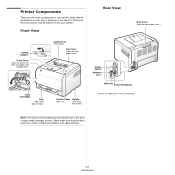
... Output Support Front Cover (Open to access the toner cartridges and imaging unit.) Toner Cartridges Tray (150-sheet paper feeder) Output Tray (Face down) Top Cover (Open to clear paper jams.) Control Panel Handle (See 1.3.) (Use to lift the printer.) Power Switch Network Port* USB Port Power Receptacle * Only the CLP-300N comes with a network port. NOTE: The surface of the output tray may be different from approaching it. 1.2 Introduction Please make sure that all illustrations on this User's Guide are the main components of pages at once. Note that you print a large number...
... Output Support Front Cover (Open to access the toner cartridges and imaging unit.) Toner Cartridges Tray (150-sheet paper feeder) Output Tray (Face down) Top Cover (Open to clear paper jams.) Control Panel Handle (See 1.3.) (Use to lift the printer.) Power Switch Network Port* USB Port Power Receptacle * Only the CLP-300N comes with a network port. NOTE: The surface of the output tray may be different from approaching it. 1.2 Introduction Please make sure that all illustrations on this User's Guide are the main components of pages at once. Note that you print a large number...

User Manual (ENGLISH)
Page 13
... error, fuser error, or ITB error. You can not print. • Each toner cartridge is experiencing a service required error, such as jammed paper, open cover, empty paper, not installated waste toner container, or full waste toner container. • The printer is wrong. Stop button Function Description Printing demo page In Ready mode, press and hold this button for about 2 seconds until the Status LED blinks fast, and release. This may take some time depending on the size of its life. You can print. Printing configuration sheets...
... error, fuser error, or ITB error. You can not print. • Each toner cartridge is experiencing a service required error, such as jammed paper, open cover, empty paper, not installated waste toner container, or full waste toner container. • The printer is wrong. Stop button Function Description Printing demo page In Ready mode, press and hold this button for about 2 seconds until the Status LED blinks fast, and release. This may take some time depending on the size of its life. You can print. Printing configuration sheets...
User Manual (ENGLISH)
Page 14
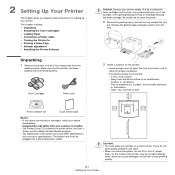
... be contaminated by -step instructions for proper ventilation. • Provide the proper environment: - for example, when opening/closing the tray or installing/removing the toner cartridge. Clean, dry, and free of dust Printer software CD Quick Install Guide NOTES: • If any items are missing or damaged, notify your country's specifications. Make sure that the printer has been packed with the following items: Toner Cartridges Power Cord CAUTION: Because your...
... be contaminated by -step instructions for proper ventilation. • Provide the proper environment: - for example, when opening/closing the tray or installing/removing the toner cartridge. Clean, dry, and free of dust Printer software CD Quick Install Guide NOTES: • If any items are missing or damaged, notify your country's specifications. Make sure that the printer has been packed with the following items: Toner Cartridges Power Cord CAUTION: Because your...
User Manual (ENGLISH)
Page 20
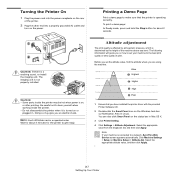
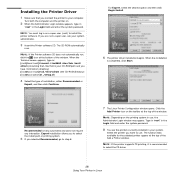
... the dropdown list, and then click Apply. The imaging unit is a cracking sound, re-install the imaging unit. Be careful not to burn yourself when working inside the printer may give you have installed the printer driver with the provided Printer Software CD. 2 Double-click the Smart Panel icon on the Windows task bar (or Notification Area in . To print a demo page: In Ready mode, press and hold the Stop button for...
... the dropdown list, and then click Apply. The imaging unit is a cracking sound, re-install the imaging unit. Be careful not to burn yourself when working inside the printer may give you have installed the printer driver with the provided Printer Software CD. 2 Double-click the Smart Panel icon on the Windows task bar (or Notification Area in . To print a demo page: In Ready mode, press and hold the Stop button for...
User Manual (ENGLISH)
Page 21
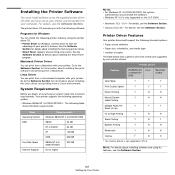
... the Software Section for Windows You can install the following standard options: • Paper source selection • Paper size, orientation, and media type • number of copies The table below lists a general overview of your computer. Your printer supports the following table shows Windows requirements. NOTE: For details about installing the Samsung printer driver. • Smart Panel. Installing the Printer Software You must install software using the supplied printer driver CD after you have set up ) Fit to Page Printing Y N N Scale Printing Y N Y Booklet Printing...
... the Software Section for Windows You can install the following standard options: • Paper source selection • Paper size, orientation, and media type • number of copies The table below lists a general overview of your computer. Your printer supports the following table shows Windows requirements. NOTE: For details about installing the Samsung printer driver. • Smart Panel. Installing the Printer Software You must install software using the supplied printer driver CD after you have set up ) Fit to Page Printing Y N N Scale Printing Y N Y Booklet Printing...
User Manual (ENGLISH)
Page 37
... color mode. A print job is attached to the table for the following: After locating the problem, clear it . It usually takes more time than one . If using a different printer cable. Select Samsung CLP-300 Series as your printer, refer to the correct one port, make sure that all of the print settings are set the resolution to Normal or Draft. Check the message on the Smart Panel program window, add paper to the tray and press the Stop button...
... color mode. A print job is attached to the table for the following: After locating the problem, clear it . It usually takes more time than one . If using a different printer cable. Select Samsung CLP-300 Series as your printer, refer to the correct one port, make sure that all of the print settings are set the resolution to Normal or Draft. Check the message on the Smart Panel program window, add paper to the tray and press the Stop button...
User Manual (ENGLISH)
Page 38
... Download as not to Best and then try a new printer cable. The print quality of the graphic properties window. Change the resolution to damage internal components. otherwise a jam will be reduced. An incorrect type of Use only paper that your application. After opening the front cover, remove the imaging unit and then clear the debris. Check the file to another application. Always pull firmly and evenly; If necessary, replace the toner cartridge. After printing...
... Download as not to Best and then try a new printer cable. The print quality of the graphic properties window. Change the resolution to damage internal components. otherwise a jam will be reduced. An incorrect type of Use only paper that your application. After opening the front cover, remove the imaging unit and then clear the debris. Check the file to another application. Always pull firmly and evenly; If necessary, replace the toner cartridge. After printing...
User Manual (ENGLISH)
Page 41
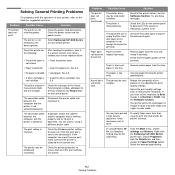
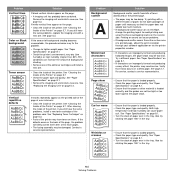
... printer may need service. See "Paper Specifications" on the back of the printer. See page 2.7. Problem Vertical lines AaBbCc AaBbCc AaBbCc AaBbCc AaBbCc Color or Black background AaBbCc AaBbCc AaBbCc AaBbCc AaBbCc Toner smear Solution If black vertical streaks appear on page 8.1. • Check the printer's environment; See page 5.3. If the defects occur on page 8.1. • Remove the imaging unit and install a new one . • Clean the inside of paper over in the tray. Try printing with a new...
... printer may need service. See "Paper Specifications" on the back of the printer. See page 2.7. Problem Vertical lines AaBbCc AaBbCc AaBbCc AaBbCc AaBbCc Color or Black background AaBbCc AaBbCc AaBbCc AaBbCc AaBbCc Toner smear Solution If black vertical streaks appear on page 8.1. • Check the printer's environment; See page 5.3. If the defects occur on page 8.1. • Remove the imaging unit and install a new one . • Clean the inside of paper over in the tray. Try printing with a new...
User Manual (ENGLISH)
Page 42
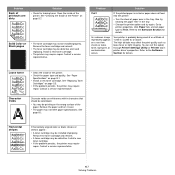
...; Check for details. Install a new toner cartridge. • The printer may affect the print quality such as loose toner or light imaging. The high altitude may require repair. See "Paper Specifications" on page 5.7. See "Cleaning the Inside of the Printer" on page 8.1. • Install a new toner cartridge. See "Replacing Toner Cartridges" on a next few sheets or loose toner, light print, or contamination occurs. Go to printer properties, click Paper tab, and set this option through Printer Settings Utility or Printer tab in the tray. See page 8.1. An unknown image...
...; Check for details. Install a new toner cartridge. • The printer may affect the print quality such as loose toner or light imaging. The high altitude may require repair. See "Paper Specifications" on page 5.7. See "Cleaning the Inside of the Printer" on page 8.1. • Install a new toner cartridge. See "Replacing Toner Cartridges" on a next few sheets or loose toner, light print, or contamination occurs. Go to printer properties, click Paper tab, and set this option through Printer Settings Utility or Printer tab in the tray. See page 8.1. An unknown image...

User Manual (ENGLISH)
Page 43
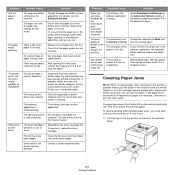
...; A paper jam has occurred. If the message appears in the tray. • The waste toner container is not installated or full. Some parts of graphics, text, or illustrations are missing. See "Replacing Toner Cartridges" on page 5.3 • The lighting toner cartridge is opened. To solve the problem, see "Clearing Paper Jams" on page 6.3. • The front or top cover is wrong. "Fail To Print", "A printer timeout error occurred." Load paper in standby mode or after printing has been completed, check the connection...
...; A paper jam has occurred. If the message appears in the tray. • The waste toner container is not installated or full. Some parts of graphics, text, or illustrations are missing. See "Replacing Toner Cartridges" on page 5.3 • The lighting toner cartridge is opened. To solve the problem, see "Clearing Paper Jams" on page 6.3. • The front or top cover is wrong. "Fail To Print", "A printer timeout error occurred." Load paper in standby mode or after printing has been completed, check the connection...
User Manual (ENGLISH)
Page 46
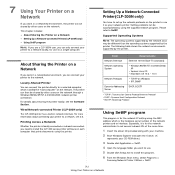
... network. Setting Up a Network-Connected Printer(CLP-300N only) You have to set several network IPs at the same time. 1 Insert the driver CD provided along with your machine. 2 Start Windows Explorer and open the X drive. (X represents your CD-ROM drive.) 3 Double click Application > SetIP. 4 Open the language folder you want to use. 5 Double click Setup.exe to a network, see the Software Section. The following table shows the network environments supported by other users on the network...
... network. Setting Up a Network-Connected Printer(CLP-300N only) You have to set several network IPs at the same time. 1 Insert the driver CD provided along with your machine. 2 Start Windows Explorer and open the X drive. (X represents your CD-ROM drive.) 3 Double click Application > SetIP. 4 Open the language folder you want to use. 5 Double click Setup.exe to a network, see the Software Section. The following table shows the network environments supported by other users on the network...
User Manual (ENGLISH)
Page 48
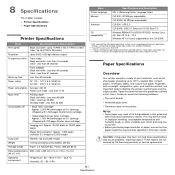
...-C (Samsung Printer Language Color) CLP-300: 32 MB(non expandable) CLP-300N: 64 MB(non expandable) CLP-300: USB 2.0 CLP-300N: USB 2.0, Ethernet 10/100 Base TX Windows 98/Me/NT 4.0/2000/XP/2003, Various Linux OS, Mac OS 10.3 ~10.4 Windows NT 4.0 is only supported on the printer. This may be affected by operating environment, printing interval, media type, and media size. **** Please visit www.samsungprinter.com to download the latest software version. These repairs...
...-C (Samsung Printer Language Color) CLP-300: 32 MB(non expandable) CLP-300N: 64 MB(non expandable) CLP-300: USB 2.0 CLP-300N: USB 2.0, Ethernet 10/100 Base TX Windows 98/Me/NT 4.0/2000/XP/2003, Various Linux OS, Mac OS 10.3 ~10.4 Windows NT 4.0 is only supported on the printer. This may be affected by operating environment, printing interval, media type, and media size. **** Please visit www.samsungprinter.com to download the latest software version. These repairs...
User Manual (ENGLISH)
Page 55
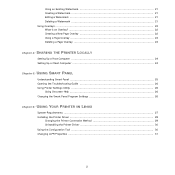
... a New Page Overlay 22 Using a Page Overlay ...23 Deleting a Page Overlay 23 Chapter 4: SHARING THE PRINTER LOCALLY Setting Up a Host Computer 24 Setting Up a Client Computer 24 Chapter 5: USING SMART PANEL Understanding Smart Panel ...25 Opening the Troubleshooting Guide 26 Using Printer Settings Utility 26 Using Onscreen Help ...26 Changing the Smart Panel Program Settings 26 Chapter 6: USING YOUR PRINTER IN LINUX System Requirements ...27 Installing the Printer Driver ...28 Changing the Printer Connection Method 29 Uninstalling the Printer Driver 30 Using the Configuration...
... a New Page Overlay 22 Using a Page Overlay ...23 Deleting a Page Overlay 23 Chapter 4: SHARING THE PRINTER LOCALLY Setting Up a Host Computer 24 Setting Up a Client Computer 24 Chapter 5: USING SMART PANEL Understanding Smart Panel ...25 Opening the Troubleshooting Guide 26 Using Printer Settings Utility 26 Using Onscreen Help ...26 Changing the Smart Panel Program Settings 26 Chapter 6: USING YOUR PRINTER IN LINUX System Requirements ...27 Installing the Printer Driver ...28 Changing the Printer Connection Method 29 Uninstalling the Printer Driver 30 Using the Configuration...
User Manual (ENGLISH)
Page 78
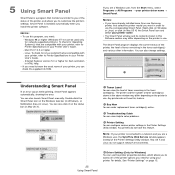
... status of the printer, the level of toner cartridge(s) shown in the above window may differ depending on the printer in use this feature. Click this feature. 2 Buy Now You can order replacement toner cartridge(s) online. 3 Troubleshooting Guide You can configure various printer settings in your printer, refer to customize the printer's settings. Any printers do not have this program, you install the printer software. Any printers do not support network environments. 5 Driver Setting (Only for using your printer. Mac OS X and Linux...
... status of the printer, the level of toner cartridge(s) shown in the above window may differ depending on the printer in use this feature. Click this feature. 2 Buy Now You can order replacement toner cartridge(s) online. 3 Troubleshooting Guide You can configure various printer settings in your printer, refer to customize the printer's settings. Any printers do not have this program, you install the printer software. Any printers do not support network environments. 5 Driver Setting (Only for using your printer. Mac OS X and Linux...
User Manual (ENGLISH)
Page 81
... cdrom]# ./setup.sh 4 Select the type of the window. Turn both the computer and the printer on. 2 When the Administrator Login window appears, type in "root" in use . When the Terminal screen appears, type in as a super user (root) to use , the Administrator Login window may appear. For Expert, select the desired option and then click Begin Install. 6 The printer driver installation begins. Click the Add Printer icon on the printing system...
... cdrom]# ./setup.sh 4 Select the type of the window. Turn both the computer and the printer on. 2 When the Administrator Login window appears, type in "root" in use . When the Terminal screen appears, type in as a super user (root) to use , the Administrator Login window may appear. For Expert, select the desired option and then click Begin Install. 6 The printer driver installation begins. Click the Add Printer icon on the printing system...
User Manual (ENGLISH)
Page 85
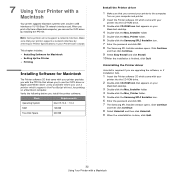
.... 5 Double-click the Samsung SPLC Installer icon. 6 Enter the password and click OK. 7 The Samsung SPL Installer window opens. Uninstalling the Printer driver Uninstall is required if you are upgrading the software, or if installation fails. 1 Insert the Printer software CD which came with your Printer User's Guide. When you print a file from a Macintosh computer, you connect your printer to Printer Specifications in USB interface or 10/100 Base-TX network interface card. Turn on your computer and printer. 2 Insert the Printer software...
.... 5 Double-click the Samsung SPLC Installer icon. 6 Enter the password and click OK. 7 The Samsung SPL Installer window opens. Uninstalling the Printer driver Uninstall is required if you are upgrading the software, or if installation fails. 1 Insert the Printer software CD which came with your Printer User's Guide. When you print a file from a Macintosh computer, you connect your printer to Printer Specifications in USB interface or 10/100 Base-TX network interface card. Turn on your computer and printer. 2 Insert the Printer software...
Service Manual
Page 63
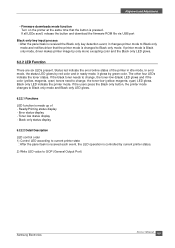
... scroll, release the button and download the firmware ROM file via USB port Black only key input process : After the panel task is made up of the printer in ready mode, it changes printer mode to Black only mode. In error mode, the status LED glows by red color and in idle mode. Ready/Printing status display - Error status display - Status led indicate the error/online status of - Toner low status display - Black only status display 6.2.2.2 Detail Description LED control order 1) Control LED according to current printer state : After the panel task is received...
... scroll, release the button and download the firmware ROM file via USB port Black only key input process : After the panel task is made up of the printer in ready mode, it changes printer mode to Black only mode. In error mode, the status LED glows by red color and in idle mode. Ready/Printing status display - Error status display - Status led indicate the error/online status of - Toner low status display - Black only status display 6.2.2.2 Detail Description LED control order 1) Control LED according to current printer state : After the panel task is received...


