User Manual (ENGLISH)
Page 7
... the AC power for the duration of the lightning storm. 16 If you are not considered to persons: * AWG: American Wire Gauge i Laser Safety Statement The printer is certified in the risk of fire or electric shock. 10 Do not allow anything to rest on the power cable. Use only a damp...it should be 16 AWG* or bigger. 18 SAVE THESE INSTRUCTIONS. The laser system and printer are designed so there is never any kind onto or into the machine. 12 To reduce the risk of electric shock, do not disassemble the machine. When using this product, these basic safety precautions should always ...
... the AC power for the duration of the lightning storm. 16 If you are not considered to persons: * AWG: American Wire Gauge i Laser Safety Statement The printer is certified in the risk of fire or electric shock. 10 Do not allow anything to rest on the power cable. Use only a damp...it should be 16 AWG* or bigger. 18 SAVE THESE INSTRUCTIONS. The laser system and printer are designed so there is never any kind onto or into the machine. 12 To reduce the risk of electric shock, do not disassemble the machine. When using this product, these basic safety precautions should always ...
User Manual (ENGLISH)
Page 20
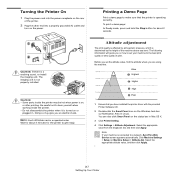
...: Each LED blinks red in Mac OS X. 3 Click Printer Setting. 4 Click Settings > Altitude Adjustment. To print a demo page: In Ready mode, press and hold the Stop button for about 3 minutes...Area in . The imaging unit is turned on the power. Wait for the printer to a network, SyncThru Web Service screen appears automatically. Printing a Demo Page Print a demo ...value, and then click Apply. • 2.7 Setting Up Your Printer CAUTION: • Some parts inside the printer. • Do not disassemble the printer when it is not properly installed. Click Machine Settings > Setup...
...: Each LED blinks red in Mac OS X. 3 Click Printer Setting. 4 Click Settings > Altitude Adjustment. To print a demo page: In Ready mode, press and hold the Stop button for about 3 minutes...Area in . The imaging unit is turned on the power. Wait for the printer to a network, SyncThru Web Service screen appears automatically. Printing a Demo Page Print a demo ...value, and then click Apply. • 2.7 Setting Up Your Printer CAUTION: • Some parts inside the printer. • Do not disassemble the printer when it is not properly installed. Click Machine Settings > Setup...
Service Manual
Page 4
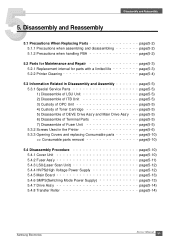
... and Adjustments 6.1 Control Panel 6-1 6.2 Function 6-2 6.3 Jam Removal 6-6 6.4 Sample Pattern 6-9 6.5 Periodic Defective Image 6-10 6.6 How to use EDC (Engine Diagnostic Control) Mode 6-11 6.7 Error Message 6-17 7. Disassembly and Reassembly 5.1 Precautions When Replacing Parts 5-2 5.2 Parts for Maintenance and Repair 5-3 5.3 Information Related in...
... and Adjustments 6.1 Control Panel 6-1 6.2 Function 6-2 6.3 Jam Removal 6-6 6.4 Sample Pattern 6-9 6.5 Periodic Defective Image 6-10 6.6 How to use EDC (Engine Diagnostic Control) Mode 6-11 6.7 Error Message 6-17 7. Disassembly and Reassembly 5.1 Precautions When Replacing Parts 5-2 5.2 Parts for Maintenance and Repair 5-3 5.3 Information Related in...
Service Manual
Page 9
...of the machine. Take care to note the exact location of parts and also cable routing before servicing or replacing any electrical parts. (3) Disconnect printer interface cables and power cables. (4) Only use excessive force, especially when fitting screws into plastic. (6) Take care not to a humidifier or ... place candles, burning cigarettes, etc. Exposure for your fingers, hair or clothing in any parts do so could cause a fire. 1.2.4 Assembly / Disassembly Precautions Replace parts carefully, always use Samsung parts. Take care not to fluorescent or incandescent room lighting.
...of the machine. Take care to note the exact location of parts and also cable routing before servicing or replacing any electrical parts. (3) Disconnect printer interface cables and power cables. (4) Only use excessive force, especially when fitting screws into plastic. (6) Take care not to a humidifier or ... place candles, burning cigarettes, etc. Exposure for your fingers, hair or clothing in any parts do so could cause a fire. 1.2.4 Assembly / Disassembly Precautions Replace parts carefully, always use Samsung parts. Take care not to fluorescent or incandescent room lighting.

Service Manual
Page 10
...Back injury could cause the printer to tip or fall possibly causing personal injury or damaging the printer. (5) Do not install the printer on a sloping or unstable surface. Failure to cool down before disassembly. (2) Do not put ...hand or hair into the rotating parts. The fuser unit works at a high temperature. The printer weighs 13.6Kg, ensure the printer is installed on the printer. After installation, double check that the printer is installed safely. If do not lift carefully. (4) Ensure the printer is stable. 1-4 Service Manual Samsung...
...Back injury could cause the printer to tip or fall possibly causing personal injury or damaging the printer. (5) Do not install the printer on a sloping or unstable surface. Failure to cool down before disassembly. (2) Do not put ...hand or hair into the rotating parts. The fuser unit works at a high temperature. The printer weighs 13.6Kg, ensure the printer is installed on the printer. After installation, double check that the printer is installed safely. If do not lift carefully. (4) Ensure the printer is stable. 1-4 Service Manual Samsung...
Service Manual
Page 47
... Ass'y and Main Drive Ass'y 6) Disassemble of Terminal Parts 7) Disassemble of Fuser Unit 5.3.2 Screws Used in the Printer 5.3.3 Opening Covers and replacing Consumable parts >> Consumable parts removal page(5-5) page(5-5) page(5-5) page(5-5) page(5-5) page(5-5) page(5-5) page(5-5) page(5-5) page(5-6) page(5-10) page(5-10) 5.4 Disassembly Procedure 5.4.1 Cover Unit 5.4.2 Fuser Ass'y 5.4.3 LSU(Laser Scan Unit) 5.4.4 HVPS(High Voltage Power...
... Ass'y and Main Drive Ass'y 6) Disassemble of Terminal Parts 7) Disassemble of Fuser Unit 5.3.2 Screws Used in the Printer 5.3.3 Opening Covers and replacing Consumable parts >> Consumable parts removal page(5-5) page(5-5) page(5-5) page(5-5) page(5-5) page(5-5) page(5-5) page(5-5) page(5-5) page(5-6) page(5-10) page(5-10) 5.4 Disassembly Procedure 5.4.1 Cover Unit 5.4.2 Fuser Ass'y 5.4.3 LSU(Laser Scan Unit) 5.4.4 HVPS(High Voltage Power...

Service Manual
Page 48
...create electric shock or fire hazards. * Take care when dismantling the unit to discharge any unauthorized changes or additions to the printer, these could lead to touch the PBA with moving and storing PBA 1. There are correct. Please keep PBA in a...parts inside. * Regularly check the condition of the chassis to note where each screw goes. Disassembly and Reassembly 5.1 Precautions when replacing parts 5.1.1 Precautions when assembling and disassembling * Use only approved Samsung spare parts. Once it is admitted to direct sunlight. >> Precautions when replacing PBA 1. ...
...create electric shock or fire hazards. * Take care when dismantling the unit to discharge any unauthorized changes or additions to the printer, these could lead to touch the PBA with moving and storing PBA 1. There are correct. Please keep PBA in a...parts inside. * Regularly check the condition of the chassis to note where each screw goes. Disassembly and Reassembly 5.1 Precautions when replacing parts 5.1.1 Precautions when assembling and disassembling * Use only approved Samsung spare parts. Once it is admitted to direct sunlight. >> Precautions when replacing PBA 1. ...
Service Manual
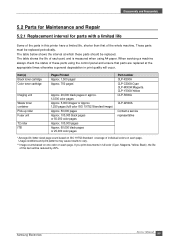
Page 49
... Samsung Electronics Service Manual 5-3 When servicing a machine always check the status of each page. Item(s) Black toner cartridge Color ...color pages Approx. 100,000 pages Approx. 60,000 black pages or 25,000 color pages Part number CLP-K300A CLP-C300A:Cyan CLP-M300A:Magenta CLP-Y300A:Yellow CLP-R300A CLP...colors on each page. Disassembly and Reassembly 5.2 Parts for Maintenance and Repair 5.2.1 Replacement interval for parts with a limited life Some of the parts in this item will occur. If you print documents in full color (Cyan, Magenta, Yellow, Black), the life of this printer...
... Samsung Electronics Service Manual 5-3 When servicing a machine always check the status of each page. Item(s) Black toner cartridge Color ...color pages Approx. 100,000 pages Approx. 60,000 black pages or 25,000 color pages Part number CLP-K300A CLP-C300A:Cyan CLP-M300A:Magenta CLP-Y300A:Yellow CLP-R300A CLP...colors on each page. Disassembly and Reassembly 5.2 Parts for Maintenance and Repair 5.2.1 Replacement interval for parts with a limited life Some of the parts in this item will occur. If you print documents in full color (Cyan, Magenta, Yellow, Black), the life of this printer...

Service Manual
Page 50
... and reduce print quality. * Do not touch transfer roller when cleaning inside of the printer. Disassembly and Reassembly 5.2.2 Printer Cleaning A printer should be regularly cleaned, especially if it is less likely to the User Manual for cleaning instructions. 5-4 Service Manual Samsung Electronics Grease and oils from our service center. (where available) * Do not touch the...
... and reduce print quality. * Do not touch transfer roller when cleaning inside of the printer. Disassembly and Reassembly 5.2.2 Printer Cleaning A printer should be regularly cleaned, especially if it is less likely to the User Manual for cleaning instructions. 5-4 Service Manual Samsung Electronics Grease and oils from our service center. (where available) * Do not touch the...

Service Manual
Page 51
...you need to get burned by a hot fuser. Take care not to spill toner spillages should contact a doctor. When you should be leaked Samsung Electronics Service Manual 5-5 When shutter is working on an outlet of the drive mechanism is critical and it harms ITB Belt. - Exposure to.... Do not turn ITB Belt back and forth. It is adjusted for the best gearing alignment. It is very dangerous to laser radiation can cause blindness. 2) Disassembly of terminal parts Do not adjust the variable resistors on a main frame even after removing the fuser. 7) When you replace ITB...
...you need to get burned by a hot fuser. Take care not to spill toner spillages should contact a doctor. When you should be leaked Samsung Electronics Service Manual 5-5 When shutter is working on an outlet of the drive mechanism is critical and it harms ITB Belt. - Exposure to.... Do not turn ITB Belt back and forth. It is adjusted for the best gearing alignment. It is very dangerous to laser radiation can cause blindness. 2) Disassembly of terminal parts Do not adjust the variable resistors on a main frame even after removing the fuser. 7) When you replace ITB...

Service Manual
Page 52
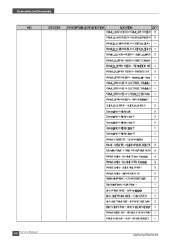
Please ensure that, when you disassemble the printer, you keep a note of which screw is used for which part and that, when reassembling the printer, the correct screws are used in this printer. Disassembly and Reassembly 5.3.2 Screws used in the printer The screws listed in the table below are used in the appropriate places. 5-6 Service Manual Samsung Electronics
Please ensure that, when you disassemble the printer, you keep a note of which screw is used for which part and that, when reassembling the printer, the correct screws are used in this printer. Disassembly and Reassembly 5.3.2 Screws used in the printer The screws listed in the table below are used in the appropriate places. 5-6 Service Manual Samsung Electronics

Service Manual
Page 53
Disassembly and Reassembly Samsung Electronics Service Manual 5-7
Disassembly and Reassembly Samsung Electronics Service Manual 5-7
Service Manual
Page 54
Disassembly and Reassembly 5-8 Service Manual Samsung Electronics
Disassembly and Reassembly 5-8 Service Manual Samsung Electronics

Service Manual
Page 55
Disassembly and Reassembly Samsung Electronics Service Manual 5-9
Disassembly and Reassembly Samsung Electronics Service Manual 5-9

Service Manual
Page 56
Open a Front-Cover and Remove the Imagine Unit. 3. Unscrew 1 screw on the Top Cover and then remove the Top Cover. 2. Unscrew 2 screws on the Right Cover and then remove the Right Cover after open the Rear Cover. 5-10 Service Manual Samsung Electronics Disassembly and Reassembly 5.4 Disassembly Procedure 5.4.1 Cover Unit 1. Remove the ITB Unit 1) Pull out the unit toward out side of printer slightly. 2) Lift up the unit gently. 3) Pull out the unit gently. 4.
Open a Front-Cover and Remove the Imagine Unit. 3. Unscrew 1 screw on the Top Cover and then remove the Top Cover. 2. Unscrew 2 screws on the Right Cover and then remove the Right Cover after open the Rear Cover. 5-10 Service Manual Samsung Electronics Disassembly and Reassembly 5.4 Disassembly Procedure 5.4.1 Cover Unit 1. Remove the ITB Unit 1) Pull out the unit toward out side of printer slightly. 2) Lift up the unit gently. 3) Pull out the unit gently. 4.

Service Manual
Page 57
Samsung Electronics Service Manual 5-11 5. Disassembly and Reassembly 5.4.2 Fuser Ass'y 1. Remove the Left Cover. Unscrew 4 screws on the Fuser after open the Rear Cover. 2. Take out the Fuser Ass'y from Printer. Push the Holder Shaft Fuser as shown in Picture. 3.
Samsung Electronics Service Manual 5-11 5. Disassembly and Reassembly 5.4.2 Fuser Ass'y 1. Remove the Left Cover. Unscrew 4 screws on the Fuser after open the Rear Cover. 2. Take out the Fuser Ass'y from Printer. Push the Holder Shaft Fuser as shown in Picture. 3.
Service Manual
Page 58
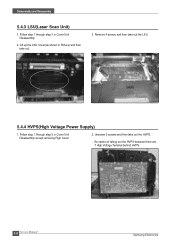
Remove 4 screws and then take out the HVPS. Follow step 1 through step 3 in Cover Unit Disassembly 2. Disassembly and Reassembly 5.4.3 LSU(Laser Scan Unit) 1. Follow step 1 through step 5 in Picture) and then take out. 3. Be careful of taking out the HVPS because there are 7 High Voltage Terminal behind HVPS. 5-12 Service Manual Samsung Electronics Unscrew 6 screws and then take out the LSU. 5.4.4 HVPS(High Voltage Power Supply) 1. Lift up the LSU Cover(as shown in Cover Unit Disassembly except removing Righ Cover 2.
Remove 4 screws and then take out the HVPS. Follow step 1 through step 3 in Cover Unit Disassembly 2. Disassembly and Reassembly 5.4.3 LSU(Laser Scan Unit) 1. Follow step 1 through step 5 in Picture) and then take out. 3. Be careful of taking out the HVPS because there are 7 High Voltage Terminal behind HVPS. 5-12 Service Manual Samsung Electronics Unscrew 6 screws and then take out the LSU. 5.4.4 HVPS(High Voltage Power Supply) 1. Lift up the LSU Cover(as shown in Cover Unit Disassembly except removing Righ Cover 2.
Service Manual
Page 59
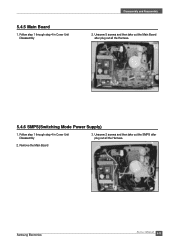
Unscrew 2 screws and then take out the Main Board after plug out all the Harness. 5.4.6 SMPS(Switching Mode Power Supply) 1. 5.4.5 Main Board 1. Follow step 1 through step 4 in Cover Unit Disassembly 3. Unscrew 5 screws and then take out the SMPS after plug out all the Harness. 2. Follow step 1 through step 4 in Cover Unit Disassembly Disassembly and Reassembly 2. Remove the Main Board Samsung Electronics Service Manual 5-13
Unscrew 2 screws and then take out the Main Board after plug out all the Harness. 5.4.6 SMPS(Switching Mode Power Supply) 1. 5.4.5 Main Board 1. Follow step 1 through step 4 in Cover Unit Disassembly 3. Unscrew 5 screws and then take out the SMPS after plug out all the Harness. 2. Follow step 1 through step 4 in Cover Unit Disassembly Disassembly and Reassembly 2. Remove the Main Board Samsung Electronics Service Manual 5-13

Service Manual
Page 60
Pull back the hook, which holds the Roller, like below picture and remove the Transfer Roller 5-14 Service Manual Samsung Electronics Remove the Main Board 3. Unscrew 8 screws and then take out the Drive Ass'y. 5.4.8 Transfer Roller 1. Remove the SMPS 4. Open Rear Cover. 2. Disassembly and Reassembly 5.4.7 Drive Ass'y 1. Follow step 1 through step 4 in Cover Unit Disassembly 2.
Pull back the hook, which holds the Roller, like below picture and remove the Transfer Roller 5-14 Service Manual Samsung Electronics Remove the Main Board 3. Unscrew 8 screws and then take out the Drive Ass'y. 5.4.8 Transfer Roller 1. Remove the SMPS 4. Open Rear Cover. 2. Disassembly and Reassembly 5.4.7 Drive Ass'y 1. Follow step 1 through step 4 in Cover Unit Disassembly 2.
