User Manual (ENGLISH)
Page 5
... Panel 1.3 LEDs ...1.3 Stop button ...1.3 2.Setting Up Your Printer Unpacking ...2.1 Installing the Toner Cartridges 2.2 Loading Paper ...2.3 Changing the Size of the Paper in the Tray 2.5 Connecting a Printer Cable ...2.6 For Local Printing ...2.6 For Network Printing (CLP-300N only 2.6 Turning the Printer On ...2.7 Printing a Demo Page ...2.7 Altitude adjustment...2.7 Installing the Printer Software 2.8 System Requirements ...2.8 Printer Driver Features ...2.8 3.Using Print Materials Choosing Paper...
... Panel 1.3 LEDs ...1.3 Stop button ...1.3 2.Setting Up Your Printer Unpacking ...2.1 Installing the Toner Cartridges 2.2 Loading Paper ...2.3 Changing the Size of the Paper in the Tray 2.5 Connecting a Printer Cable ...2.6 For Local Printing ...2.6 For Network Printing (CLP-300N only 2.6 Turning the Printer On ...2.7 Printing a Demo Page ...2.7 Altitude adjustment...2.7 Installing the Printer Software 2.8 System Requirements ...2.8 Printer Driver Features ...2.8 3.Using Print Materials Choosing Paper...
User Manual (ENGLISH)
Page 12
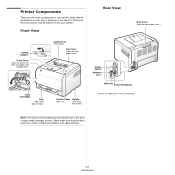
... you don't touch the surface, and prevent children from your printer. Printer Components These are from the CLP-300N and that you print a large number of pages at once. NOTE: The surface of your printer. Note that all illustrations on this User's Guide are the ...access the toner cartridges and imaging unit.) Toner Cartridges Tray (150-sheet paper feeder) Output Tray (Face down) Top Cover (Open to clear paper jams.) Control Panel Handle (See 1.3.) (Use to lift the printer.) Power Switch Network Port* USB Port Power Receptacle * Only the CLP-300N comes with a network port....
... you don't touch the surface, and prevent children from your printer. Printer Components These are from the CLP-300N and that you print a large number of pages at once. NOTE: The surface of your printer. Note that all illustrations on this User's Guide are the ...access the toner cartridges and imaging unit.) Toner Cartridges Tray (150-sheet paper feeder) Output Tray (Face down) Top Cover (Open to clear paper jams.) Control Panel Handle (See 1.3.) (Use to lift the printer.) Power Switch Network Port* USB Port Power Receptacle * Only the CLP-300N comes with a network port....

User Manual (ENGLISH)
Page 13
... each LED blinks red in the Smart Panel program window. The printer is cleared from the computer. Contact your sales or service representative. You can not print. • Each toner cartridge is ready to Ready mode. Stop button Function Description Printing demo page In Ready mode, press and hold this button for about 2 seconds until...
... each LED blinks red in the Smart Panel program window. The printer is cleared from the computer. Contact your sales or service representative. You can not print. • Each toner cartridge is ready to Ready mode. Stop button Function Description Printing demo page In Ready mode, press and hold this button for about 2 seconds until...
User Manual (ENGLISH)
Page 14
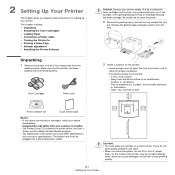
... from the direct airflow of temperature, sunlight, and humidity extremes or fluctuations - A firm, level surface - 2 Setting Up Your Printer This chapter gives you step-by toner, which can occur. • When you move the printer, do not, print quality problems can cause damage to allow for proper ventilation. • Provide the proper environment: -
... from the direct airflow of temperature, sunlight, and humidity extremes or fluctuations - A firm, level surface - 2 Setting Up Your Printer This chapter gives you step-by toner, which can occur. • When you move the printer, do not, print quality problems can cause damage to allow for proper ventilation. • Provide the proper environment: -
User Manual (ENGLISH)
Page 15
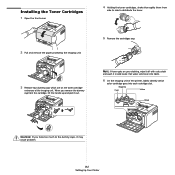
... Magenta Cyan Yellow Black CAUTION: If you remove the dummy cap from the cartridge, lift the handle up and pull it out. 4 Holding the toner cartridges, shake thoroughly them from side to side to the dummy caps, it in cold water. When you force too much to distribute the...2 Pull and remove the paper protecting the imaging unit. 3 Remove four dummy caps which color cartridge goes into fabric. 6 On the imaging unit of the imaging unit. NOTE: If toner gets on the toner cartridge entrances of the printer, labels identify which are on your clothing, wipe it off with a dry cloth and ...
... Magenta Cyan Yellow Black CAUTION: If you remove the dummy cap from the cartridge, lift the handle up and pull it out. 4 Holding the toner cartridges, shake thoroughly them from side to side to the dummy caps, it in cold water. When you force too much to distribute the...2 Pull and remove the paper protecting the imaging unit. 3 Remove four dummy caps which color cartridge goes into fabric. 6 On the imaging unit of the imaging unit. NOTE: If toner gets on the toner cartridge entrances of the printer, labels identify which are on your clothing, wipe it off with a dry cloth and ...
User Manual (ENGLISH)
Page 16
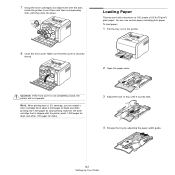
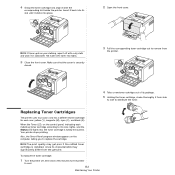
...2 Open the paper cover. Insert them with the printer prints 1,500 pages for black and white, 700 pages for color printing. You can hold a maximum of 150 sheets of the printer. 8 Close the front cover. However, the toner cartridge that the cover is shipped with the slots inside... the printer. 7 Grasp the toner cartridges and align them into their corresponding slots...
...2 Open the paper cover. Insert them with the printer prints 1,500 pages for black and white, 700 pages for color printing. You can hold a maximum of 150 sheets of the printer. 8 Close the front cover. However, the toner cartridge that the cover is shipped with the slots inside... the printer. 7 Grasp the toner cartridges and align them into their corresponding slots...
User Manual (ENGLISH)
Page 28
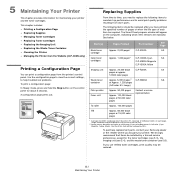
...the Waste Toner Container • Cleaning the Printer • Managing the Printer from the Website (CLP-300N only) Printing a Configuration Page You can print a configuration page from worn parts. If you print documents in full color (Cyan...Samsung dealer or the retailer where you need to replace the following items should be installed by 25%. Item(s) Black toner cartridge Pages Printed Approx. 2,000 pages* Part number CLP-K300A See Page 5.3 Color toner cartridges Approx. 1,000 pages* CLP-C300A:Cyan 5.3 CLP-M300A:Magenta CLP-Y300A:Yellow Imaging unit Approx. 20,000 black CLP...
...the Waste Toner Container • Cleaning the Printer • Managing the Printer from the Website (CLP-300N only) Printing a Configuration Page You can print a configuration page from worn parts. If you print documents in full color (Cyan...Samsung dealer or the retailer where you need to replace the following items should be installed by 25%. Item(s) Black toner cartridge Pages Printed Approx. 2,000 pages* Part number CLP-K300A See Page 5.3 Color toner cartridges Approx. 1,000 pages* CLP-C300A:Cyan 5.3 CLP-M300A:Magenta CLP-Y300A:Yellow Imaging unit Approx. 20,000 black CLP...
User Manual (ENGLISH)
Page 29
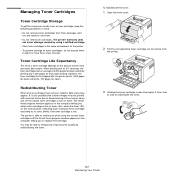
.... 2 Pull the corresponding toner cartridge out to remove from the printer. 3 Holding the toner cartridge, shake thoroughly it from side to side to flawed mixing of toner colors when one of 2,000 pages for black and white printing and 1,000 pages for colors. It is low on the computer telling you are ready to use them to...
.... 2 Pull the corresponding toner cartridge out to remove from the printer. 3 Holding the toner cartridge, shake thoroughly it from side to side to flawed mixing of toner colors when one of 2,000 pages for black and white printing and 1,000 pages for colors. It is low on the computer telling you are ready to use them to...
User Manual (ENGLISH)
Page 30
... out to cool. 5.3 Maintaining Your Printer Your printer stops printing. To replace the toner cartridge: 1 Turn the printer off with a dry cloth and wash it with the corresponding slot inside the printer. Replacing Toner Cartridges The printer uses four colors and has a different toner cartridge for the printer to remove from the printer. 4 Take a new toner cartridge out of its slot until...
... out to cool. 5.3 Maintaining Your Printer Your printer stops printing. To replace the toner cartridge: 1 Turn the printer off with a dry cloth and wash it with the corresponding slot inside the printer. Replacing Toner Cartridges The printer uses four colors and has a different toner cartridge for the printer to remove from the printer. 4 Take a new toner cartridge out of its slot until...

User Manual (ENGLISH)
Page 31
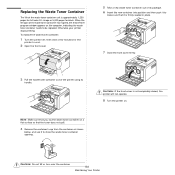
...cold water. Wait for about 3 minutes for the printer to get ready. • When printing text at 5% coverage, you can expect a toner cartridge life of the printer using the handle on . 3 Remove all of the toner cartridges and waste toner container from the printer. 4 Pull the imaging unit out of about ...life span of the imaging unit is not completely closed, the printer will not operate. CAUTION: If the front cover is approximately 20,000 pages for black or 12,500 pages for colors. 5.4 Maintaining Your Printer Replacing the Imaging Unit The life of the imaging unit has ...
...cold water. Wait for about 3 minutes for the printer to get ready. • When printing text at 5% coverage, you can expect a toner cartridge life of the printer using the handle on . 3 Remove all of the toner cartridges and waste toner container from the printer. 4 Pull the imaging unit out of about ...life span of the imaging unit is not completely closed, the printer will not operate. CAUTION: If the front cover is approximately 20,000 pages for black or 12,500 pages for colors. 5.4 Maintaining Your Printer Replacing the Imaging Unit The life of the imaging unit has ...

User Manual (ENGLISH)
Page 32
... imaging unit and the paper protecting the surface of the imaging unit. 9 Insert the toner cartridges and waste toner container into their corresponding slots until it to the printer. Wait for about 3 minutes for the printer to light for more than a few minutes. Remove the protective devices on . You...Be careful not to scratch the surface of the imaging unit. • To prevent damage, do not expose the imaging unit to get ready. 5.5 Maintaining Your Printer Cover it with a piece of paper to protect it if necessary. 7 Holding the handles on the new imaging unit, push the imaging ...
... imaging unit and the paper protecting the surface of the imaging unit. 9 Insert the toner cartridges and waste toner container into their corresponding slots until it to the printer. Wait for about 3 minutes for the printer to light for more than a few minutes. Remove the protective devices on . You...Be careful not to scratch the surface of the imaging unit. • To prevent damage, do not expose the imaging unit to get ready. 5.5 Maintaining Your Printer Cover it with a piece of paper to protect it if necessary. 7 Holding the handles on the new imaging unit, push the imaging ...
User Manual (ENGLISH)
Page 33
... color 5% image or 5,000 pages for the printer to cool. 2 Open the front cover. 5 Take a new waste toner container out of its handle. Replacing the Waste Toner Container The life of the waste toner container unit is not completely closed, the printer will not operate. 8 Turn the printer... on the computer, indicating the waste toner container needs to be replaced. CAUTION...
... color 5% image or 5,000 pages for the printer to cool. 2 Open the front cover. 5 Take a new waste toner container out of its handle. Replacing the Waste Toner Container The life of the waste toner container unit is not completely closed, the printer will not operate. 8 Turn the printer... on the computer, indicating the waste toner container needs to be replaced. CAUTION...
User Manual (ENGLISH)
Page 34
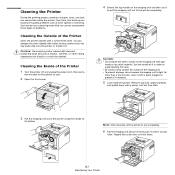
..., but be careful not to pull the imaging unit out of the printer completely. You can cause print quality problems such as toner specks or smearing. Over time, this action two or three times. 5.7 Maintaining Your Printer CAUTION: • Do not touch the green surface on the imaging... unit and then use it sounds 'click'. Cleaning the Printer During the printing process, particles of paper, toner, and dust can accumulate inside the printer. Repeat this build-up can dampen the cloth slightly with your hands or any dust, paper ...
..., but be careful not to pull the imaging unit out of the printer completely. You can cause print quality problems such as toner specks or smearing. Over time, this action two or three times. 5.7 Maintaining Your Printer CAUTION: • Do not touch the green surface on the imaging... unit and then use it sounds 'click'. Cleaning the Printer During the printing process, particles of paper, toner, and dust can accumulate inside the printer. Repeat this build-up can dampen the cloth slightly with your hands or any dust, paper ...
User Manual (ENGLISH)
Page 37
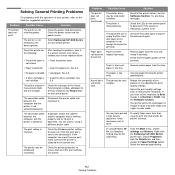
... to Normal or Draft. It usually takes more hard disk space and print the document again. Right-click the Samsung CLP-300 Series printer icon, choose Properties, click the Details tab, and then choose the Spool Settings button. The connection cable between the computer ... If a printer system error occurs, contact your printer, refer to another computer that all of toner. You can also try adjusting the print quality settings. There is • Install the toner cartridge. You may be in color mode. Problem The printer does not print. See 2.3. • A toner cartridge is ...
... to Normal or Draft. It usually takes more hard disk space and print the document again. Right-click the Samsung CLP-300 Series printer icon, choose Properties, click the Details tab, and then choose the Spool Settings button. The connection cable between the computer ... If a printer system error occurs, contact your printer, refer to another computer that all of toner. You can also try adjusting the print quality settings. There is • Install the toner cartridge. You may be in color mode. Problem The printer does not print. See 2.3. • A toner cartridge is ...
User Manual (ENGLISH)
Page 38
... not to Normal or Draft. After printing about 100 color pages, there will be reduced. Find and remove the jammed paper. The printer prints, but are removed; Change the page orientation in the tray. specifications. The printer cable is wrong, garbled, or incomplete. Redistribute the toner. Print the document again. The resolution is jammed...
... not to Normal or Draft. After printing about 100 color pages, there will be reduced. Find and remove the jammed paper. The printer prints, but are removed; Change the page orientation in the tray. specifications. The printer cable is wrong, garbled, or incomplete. Redistribute the toner. Print the document again. The resolution is jammed...
User Manual (ENGLISH)
Page 40
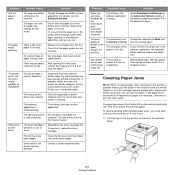
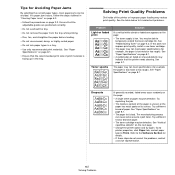
... recommended print materials. See "Paper Specifications" on page 8.1. • A combination of print materials is bad. See "Redistributing Toner" on the next page. • Change the printer option and try again. See "Paper Specifications" on page 8.1. • Ensure that the recommended print side of faded or ...Thick. Tips for Avoiding Paper Jams By selecting the correct paper types, most paper jams can cause some areas to reject toner. Ensure that the printer needs cleaning. See page 5.7. Try a different kind or brand of paper. See the table below to troubleshoot problems. ...
... recommended print materials. See "Paper Specifications" on page 8.1. • A combination of print materials is bad. See "Redistributing Toner" on the next page. • Change the printer option and try again. See "Paper Specifications" on page 8.1. • Ensure that the recommended print side of faded or ...Thick. Tips for Avoiding Paper Jams By selecting the correct paper types, most paper jams can cause some areas to reject toner. Ensure that the printer needs cleaning. See page 5.7. Try a different kind or brand of paper. See the table below to troubleshoot problems. ...
User Manual (ENGLISH)
Page 41
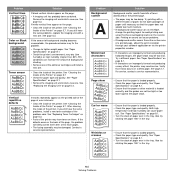
... and quality. Printing on page 8.1. • Turn the stack of the printer. Problem Vertical lines AaBbCc AaBbCc AaBbCc AaBbCc AaBbCc Color or Black background AaBbCc AaBbCc AaBbCc AaBbCc AaBbCc Toner smear Solution If black vertical streaks appear on page 8.1. • Check the printer's environment; See page 5.3. Remove the imaging unit and install a new one...
... and quality. Printing on page 8.1. • Turn the stack of the printer. Problem Vertical lines AaBbCc AaBbCc AaBbCc AaBbCc AaBbCc Color or Black background AaBbCc AaBbCc AaBbCc AaBbCc AaBbCc Toner smear Solution If black vertical streaks appear on page 8.1. • Check the printer's environment; See page 5.3. Remove the imaging unit and install a new one...
User Manual (ENGLISH)
Page 42
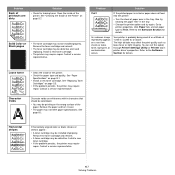
...does not feed into the printer: • Turn the stack of the printer. • Check the paper type and quality. Clean the inside of paper over . • The paper may not be installed improperly. Solid Color or Black pages A • The toner cartridge may not meet paper... AaBbCc AaBbCc If horizontally aligned color or black streaks or smears appear: • A toner cartridge may require repair. Go to Thin. See page 8.1. Loose toner • Clean the inside of 1,000 m (3,280 ft) or above. Install a new toner cartridge. • The printer may be installed properly. Problem...
...does not feed into the printer: • Turn the stack of the printer. • Check the paper type and quality. Clean the inside of paper over . • The paper may not be installed improperly. Solid Color or Black pages A • The toner cartridge may not meet paper... AaBbCc AaBbCc If horizontally aligned color or black streaks or smears appear: • A toner cartridge may require repair. Go to Thin. See page 8.1. Loose toner • Clean the inside of 1,000 m (3,280 ft) or above. Install a new toner cartridge. • The printer may be installed properly. Problem...

User Manual (ENGLISH)
Page 43
...products: Printing the PDF file as an image. Turn on page 5.3 • The lighting toner cartridge is almost empty. Troubleshooting Error Messages When the printer experiences an error, the control panel will indicate an error message with the indicator lights and the... appear. Just keep waiting until the printer finishes printing. Remove the old toner cartridge and install a new one . See "Replacing Toner Cartridges" on Print As Image from the StartUp Group, then restart Windows. Only install a Samsung toner cartridge, designed for your printer. • A paper jam has ...
...products: Printing the PDF file as an image. Turn on page 5.3 • The lighting toner cartridge is almost empty. Troubleshooting Error Messages When the printer experiences an error, the control panel will indicate an error message with the indicator lights and the... appear. Just keep waiting until the printer finishes printing. Remove the old toner cartridge and install a new one . See "Replacing Toner Cartridges" on Print As Image from the StartUp Group, then restart Windows. Only install a Samsung toner cartridge, designed for your printer. • A paper jam has ...
User Manual (ENGLISH)
Page 48
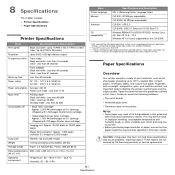
...First print out time From ready Black and white: Less than 14 seconds Color: Less than 26 seconds From coldboot Black and white: Less than 45 seconds Color: Less than 35 dBA Consumables life • Black Toner Cartridge: Approx. 2,000 ... This chapter includes: • Printer Specifications • Paper Specifications Printer Specifications Item Printer language Memory Interface OS compatibility**** Specifications and Description SPL-C (Samsung Printer Language Color) CLP-300: 32 MB(non expandable) CLP-300N: 64 MB(non expandable) CLP-300: USB 2.0 CLP-300N: USB 2.0, Ethernet 10/100 Base...
...First print out time From ready Black and white: Less than 14 seconds Color: Less than 26 seconds From coldboot Black and white: Less than 45 seconds Color: Less than 35 dBA Consumables life • Black Toner Cartridge: Approx. 2,000 ... This chapter includes: • Printer Specifications • Paper Specifications Printer Specifications Item Printer language Memory Interface OS compatibility**** Specifications and Description SPL-C (Samsung Printer Language Color) CLP-300: 32 MB(non expandable) CLP-300N: 64 MB(non expandable) CLP-300: USB 2.0 CLP-300N: USB 2.0, Ethernet 10/100 Base...


