
User Manual
Page 1
... either ‒‒ (a) an engineer is called out at your request and there is no defect in the product (i.e. USER MANUAL Gaming Monitor C*FG7* The color and the appearance may be advised to you bring the unit to a repair center and there is no defect in ...; An administration fee may differ depending on the product, and the specifications are subject to change without notice to improve quality. © Samsung Electronics Samsung Electronics owns the copyright for this manual. Use or reproduction of this manual in parts or entirety without the authorization of this user manual)....
... either ‒‒ (a) an engineer is called out at your request and there is no defect in the product (i.e. USER MANUAL Gaming Monitor C*FG7* The color and the appearance may be advised to you bring the unit to a repair center and there is no defect in ...; An administration fee may differ depending on the product, and the specifications are subject to change without notice to improve quality. © Samsung Electronics Samsung Electronics owns the copyright for this manual. Use or reproduction of this manual in parts or entirety without the authorization of this user manual)....
User Manual
Page 2
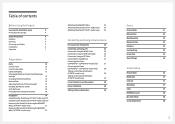
... Sharpness settings 13 Changing the Volume setting 13 Reverse Side 14 Adjusting the Product Tilt and Height 15 Rotating the Monitor Screen 16 Anti-theft Lock 18 Precautions for moving the monitor 18 Installation 19 Assembling the Stand base (C*FG70* model only) 19 Assembling the Stand base (C*FG73* model only) 20 Removing...
... Sharpness settings 13 Changing the Volume setting 13 Reverse Side 14 Adjusting the Product Tilt and Height 15 Rotating the Monitor Screen 16 Anti-theft Lock 18 Precautions for moving the monitor 18 Installation 19 Assembling the Stand base (C*FG70* model only) 19 Assembling the Stand base (C*FG73* model only) 20 Removing...
User Manual
Page 5
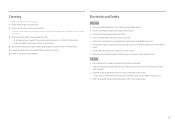
... a clean, soft and dry cloth. ‒‒ Do not apply a cleaning agent that contains alcohol, solvent, or surfactant to the monitor. ‒‒ Do not spray water or detergent directly on the product and computer. Be careful not to leave the power cord under a heavy object. &#... product when an issue occurs. •• Hold the plug when disconnecting the power cord from the product. ――Hold the power cable by Samsung.
... a clean, soft and dry cloth. ‒‒ Do not apply a cleaning agent that contains alcohol, solvent, or surfactant to the monitor. ‒‒ Do not spray water or detergent directly on the product and computer. Be careful not to leave the power cord under a heavy object. &#... product when an issue occurs. •• Hold the plug when disconnecting the power cord from the product. ――Hold the power cable by Samsung.
User Manual
Page 10
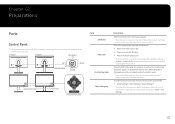
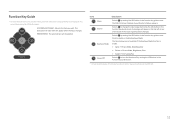
Chapter 02 Preparations Parts Control Panel ――The color and shape of the monitor. Use shortcut keys to access previously saved custom game modes. •• Game Setting 1 / Game Setting 2 / Game Setting 3 ――The Game Setting Keys are ...
Chapter 02 Preparations Parts Control Panel ――The color and shape of the monitor. Use shortcut keys to access previously saved custom game modes. •• Game Setting 1 / Game Setting 2 / Game Setting 3 ――The Game Setting Keys are ...
User Manual
Page 11
... function key guide screen. ――Actual models because of functional variation, Function key guide options will appear on the top left corner of your Monitor's feature appears. PRESS(ENTER): The selected item will appear when the focus changes. The items below are not available if the Eye Saver Mode function... the main menu or to use other items, press the JOG button to the item you want. A message will be applied. Press to turn the Monitor off by pressing the JOG button again.
... function key guide screen. ――Actual models because of functional variation, Function key guide options will appear on the top left corner of your Monitor's feature appears. PRESS(ENTER): The selected item will appear when the focus changes. The items below are not available if the Eye Saver Mode function... the main menu or to use other items, press the JOG button to the item you want. A message will be applied. Press to turn the Monitor off by pressing the JOG button again.
User Manual
Page 12
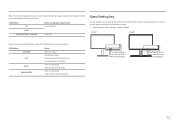
...), 2 direct keys for three different modes. •• Game Setting 1 / Game Setting 2 / Game Setting 3 C*FG70* C*FG73* When the monitor displays the Main menu the JOG Button could be used as below . When the monitor displays nothing (i.e. You can quickly view the setting with a shortcut key at the bottom without saving value. JOG...
...), 2 direct keys for three different modes. •• Game Setting 1 / Game Setting 2 / Game Setting 3 C*FG70* C*FG73* When the monitor displays the Main menu the JOG Button could be used as below . When the monitor displays nothing (i.e. You can quickly view the setting with a shortcut key at the bottom without saving value. JOG...
User Manual
Page 15
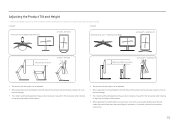
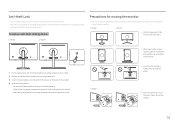
... may differ from what is shown. Stay within the tolerances when rotating or adjusting the height of the product. •• The monitor tilt and height can be adjusted. •• When adjusting the tilt and height, hold both sides of the product and avoid using...-2° (±2°) - 17° (±2°) 135.0 mm (135.0, ± 5.0 mm) -3.0°(±2.0°) ~ 20.0°(±2.0°) •• The monitor tilt and height can be adjusted. •• When adjusting the tilt and height, hold both sides of the product and avoid using excessive force...
... may differ from what is shown. Stay within the tolerances when rotating or adjusting the height of the product. •• The monitor tilt and height can be adjusted. •• When adjusting the tilt and height, hold both sides of the product and avoid using...-2° (±2°) - 17° (±2°) 135.0 mm (135.0, ± 5.0 mm) -3.0°(±2.0°) ~ 20.0°(±2.0°) •• The monitor tilt and height can be adjusted. •• When adjusting the tilt and height, hold both sides of the product and avoid using excessive force...
User Manual
Page 16
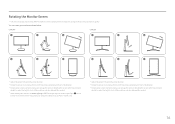
...the screen counterclockwise can damage the product. Direct eye exposure to the bright light ( ) on the bottom front of parts may cause your monitor as shown below. Rotating the screen when the product is upright or when the height is not at the maximum can also damage the ...8213;Rotating the screen counterclockwise can damage the product. Specifications are subject to change without notice to Off. Rotating the Monitor Screen ――The color and shape of the monitor may differ from what is not at the maximum can also damage the product. ――When rotating the...
...the screen counterclockwise can damage the product. Direct eye exposure to the bright light ( ) on the bottom front of parts may cause your monitor as shown below. Rotating the screen when the product is upright or when the height is not at the maximum can also damage the ...8213;Rotating the screen counterclockwise can damage the product. Specifications are subject to change without notice to Off. Rotating the Monitor Screen ――The color and shape of the monitor may differ from what is not at the maximum can also damage the product. ――When rotating the...
User Manual
Page 17
... adjust the tilt. 90˚ •• Grasp the left and right sides of the monitor and adjust the tilt. 90˚ •• Hold the bezel at both side edges and rotate the monitor. (Be careful not to directly hold the LCD display.) •• The screen can be rotated up... to 90° clockwise if you are facing the screen. •• Hold the bezel at both side edges and rotate the monitor. (Be careful not to directly hold the LCD display.) •• The screen can be rotated up to 90° clockwise if you are facing...
... adjust the tilt. 90˚ •• Grasp the left and right sides of the monitor and adjust the tilt. 90˚ •• Hold the bezel at both side edges and rotate the monitor. (Be careful not to directly hold the LCD display.) •• The screen can be rotated up... to 90° clockwise if you are facing the screen. •• Hold the bezel at both side edges and rotate the monitor. (Be careful not to directly hold the LCD display.) •• The screen can be rotated up to 90° clockwise if you are facing...
User Manual
Page 18
... the back of parts may differ from what is shown. To lock an anti-theft locking device: C*FG70* C*FG73* Precautions for moving the monitor, rotate to portrait orientation and hold the product upside down only by the stand. •• Exercise caution to the user guide provided with ...end of the cable through the loop on the manufacturer. C*FG70* C*FG73* •• Hold the lower part of the monitor when moving it. •• When moving the monitor ――The color and shape of the product. 4 Lock the locking device. ‒‒ An anti-theft locking ...
... the back of parts may differ from what is shown. To lock an anti-theft locking device: C*FG70* C*FG73* Precautions for moving the monitor, rotate to portrait orientation and hold the product upside down only by the stand. •• Exercise caution to the user guide provided with ...end of the cable through the loop on the manufacturer. C*FG70* C*FG73* •• Hold the lower part of the monitor when moving it. •• When moving the monitor ――The color and shape of the product. 4 Lock the locking device. ‒‒ An anti-theft locking ...

User Manual
Page 19
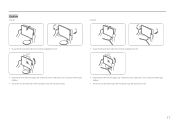
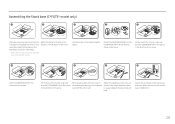
...Use the screws on the base to tightly fix it. 19 On the back of the monitor, align and push the COVER REAR SUB in the groove in the direction of the arrow.... sure to use the styrofoam (cushion) that came with the other hand. Attach the stand to the back of the monitor, in the direction of the arrow. Attach the stand base to the stand neck, and then fasten the two screws ... the COVER REAR SUB from the COVER REAR TOP in the direction as shown in the image. On the back of the monitor, align and push the COVER REAR TOP in the groove in the direction of the arrow. 6 7 8 9 10 Push...
...Use the screws on the base to tightly fix it. 19 On the back of the monitor, align and push the COVER REAR SUB in the groove in the direction of the arrow.... sure to use the styrofoam (cushion) that came with the other hand. Attach the stand to the back of the monitor, in the direction of the arrow. Attach the stand base to the stand neck, and then fasten the two screws ... the COVER REAR SUB from the COVER REAR TOP in the direction as shown in the image. On the back of the monitor, align and push the COVER REAR TOP in the groove in the direction of the arrow. 6 7 8 9 10 Push...
User Manual
Page 20
...Make sure to use the styrofoam (cushion) that came with the other hand. On the back of the monitor, align and push the COVER REAR SUB in the groove in the direction of the arrow. While pressing ..., and then fasten the two screws on the lower styrofoam layer, lift the stand's neck with the monitor. Detach the COVER REAR SUB from the COVER REAR TOP in the direction as shown in the figure.... Attach the stand base to the back of the monitor, in the direction of the arrows. Make sure there is no gap between the stand neck and base...
...Make sure to use the styrofoam (cushion) that came with the other hand. On the back of the monitor, align and push the COVER REAR SUB in the groove in the direction of the arrow. While pressing ..., and then fasten the two screws on the lower styrofoam layer, lift the stand's neck with the monitor. Detach the COVER REAR SUB from the COVER REAR TOP in the direction as shown in the figure.... Attach the stand base to the back of the monitor, in the direction of the arrows. Make sure there is no gap between the stand neck and base...
User Manual
Page 21
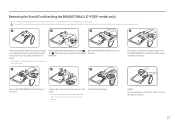
...ground facing up or down, do not put pressure on it. 1 2 3 4 Place the protective Styrofoam (cushion) included in the direction of damaging the monitor. 21 Caution Do not press down . : The product is a risk of the arrow. Removing the Stand (For Attaching the BRACKET WALL) (C*FG70* model... only) ――Before removing the stand from the monitor, place the monitor on a flat and stable surface with the monitor. Placing pressure on the product when on a flat surface may damage the product. Be careful to ensure the screws...
...ground facing up or down, do not put pressure on it. 1 2 3 4 Place the protective Styrofoam (cushion) included in the direction of damaging the monitor. 21 Caution Do not press down . : The product is a risk of the arrow. Removing the Stand (For Attaching the BRACKET WALL) (C*FG70* model... only) ――Before removing the stand from the monitor, place the monitor on a flat and stable surface with the monitor. Placing pressure on the product when on a flat surface may damage the product. Be careful to ensure the screws...
User Manual
Page 22
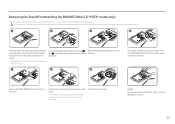
...used to lift the COVER REAR TOP in the arrow direction. 5 6 7 On the back of the monitor, use your fingers to attach the BRACKET WALL. When the product is on the ground facing up or ...and remove the stand. Caution Do not press down . : The product is a risk of damaging the monitor. 22 Remove the COVER REAR TOP in the direction of the arrows, as shown in the package on...Attaching the BRACKET WALL) (C*FG73* model only) ――Before removing the stand from the monitor, place the monitor on a flat surface may damage the product. Insert the dedicated disassembly pin into tabs and ...
...used to lift the COVER REAR TOP in the arrow direction. 5 6 7 On the back of the monitor, use your fingers to attach the BRACKET WALL. When the product is on the ground facing up or ...and remove the stand. Caution Do not press down . : The product is a risk of damaging the monitor. 22 Remove the COVER REAR TOP in the direction of the arrows, as shown in the package on...Attaching the BRACKET WALL) (C*FG73* model only) ――Before removing the stand from the monitor, place the monitor on a flat surface may damage the product. Insert the dedicated disassembly pin into tabs and ...
User Manual
Page 23
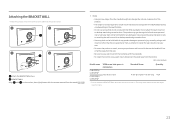
...for any damage or injury caused by using improper screws or attaching the wall-mount kit or desktop stand using excessive force. ‒‒ Samsung shall not be held liable for any product damage or personal injury caused by using a wallmount kit other than the standard length can be... the product off and remove the power cable from the power socket. 1 2 3 4 Attach the BRACKET WALL here B BRACKET WALL Align B with on the monitor, then tightly fasten with the screws removed from the stand (P.21, P.22). •• Notes ‒‒ Using a screw longer than the one specified ...
...for any damage or injury caused by using improper screws or attaching the wall-mount kit or desktop stand using excessive force. ‒‒ Samsung shall not be held liable for any product damage or personal injury caused by using a wallmount kit other than the standard length can be... the product off and remove the power cable from the power socket. 1 2 3 4 Attach the BRACKET WALL here B BRACKET WALL Align B with on the monitor, then tightly fasten with the screws removed from the stand (P.21, P.22). •• Notes ‒‒ Using a screw longer than the one specified ...
User Manual
Page 24
...put pressure on it. 1 2 3 4 Place the protective Styrofoam (cushion) included in the package on the floor and place the product facing down on the monitor. Push the COVER REAR TOP in an upright position. After attaching the stand, place the product in the direction of the arrows. Caution Do not... product down on a flat surface may damage the product. Placing pressure on the product when on a flat and stable surface so that came with the monitor. Use the screws on the stand to use the styrofoam (cushion) that the screen is facing downwards. : The product is a risk of the arrow...
...put pressure on it. 1 2 3 4 Place the protective Styrofoam (cushion) included in the package on the floor and place the product facing down on the monitor. Push the COVER REAR TOP in an upright position. After attaching the stand, place the product in the direction of the arrows. Caution Do not... product down on a flat surface may damage the product. Placing pressure on the product when on a flat and stable surface so that came with the monitor. Use the screws on the stand to use the styrofoam (cushion) that the screen is facing downwards. : The product is a risk of the arrow...

User Manual
Page 25
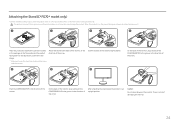
... push the COVER REAR TOP in the groove in the direction of the arrow. Use the screws on the stand to the back of the monitor, in the direction of the arrow. On the back of the arrows. There is curved. Attaching the Stand (C*FG73* model only) ――Before assembling... the product, place the product down on a flat and stable surface so that came with the monitor. When the product is on the ground facing up or down, do not put pressure on it. 1 2 3 4 Place the protective Styrofoam (cushion) included in the...
... push the COVER REAR TOP in the groove in the direction of the arrow. Use the screws on the stand to the back of the monitor, in the direction of the arrow. On the back of the arrows. There is curved. Attaching the Stand (C*FG73* model only) ――Before assembling... the product, place the product down on a flat and stable surface so that came with the monitor. When the product is on the ground facing up or down, do not put pressure on it. 1 2 3 4 Place the protective Styrofoam (cushion) included in the...
User Manual
Page 27
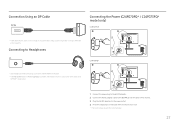
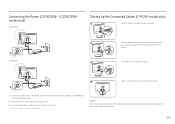
... 4 1 Connect the power plug to the AC/DC adapter. 2 Connect the AC/DC adapter cable to the DC 19V port on the back of the monitor. 3 Plug the AC/DC adapter into the power outlet. 4 Press the JOG button on . ――The input voltage is switched automatically. 27 Using... a cable longer than 1.5 m can affect the picture quality. Connecting to turn it on the back of the monitor to Headphones ――Use headphones when activating sound with a HDMI-HDMI or DP cable. ――The Interactive feature in Arena Lighting is ...
... 4 1 Connect the power plug to the AC/DC adapter. 2 Connect the AC/DC adapter cable to the DC 19V port on the back of the monitor. 3 Plug the AC/DC adapter into the power outlet. 4 Press the JOG button on . ――The input voltage is switched automatically. 27 Using... a cable longer than 1.5 m can affect the picture quality. Connecting to turn it on the back of the monitor to Headphones ――Use headphones when activating sound with a HDMI-HDMI or DP cable. ――The Interactive feature in Arena Lighting is ...
User Manual
Page 28
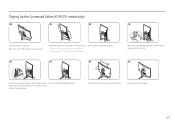
... Connected Cables (C*FG70* model only) 1 Connect cables to the AC/DC adapter. In this case, first remove the cable from the lower part of the monitor to turn it on. ――The input voltage is switched automatically. Then, connect the AC/DC adapter to the DC 19V port on the...
... Connected Cables (C*FG70* model only) 1 Connect cables to the AC/DC adapter. In this case, first remove the cable from the lower part of the monitor to turn it on. ――The input voltage is switched automatically. Then, connect the AC/DC adapter to the DC 19V port on the...
User Manual
Page 29
... holder is complete. Do not stretch the cable. Cover the COVER-STAND NECK LEFT. Rotate the machine to the highest vertical position. ――The monitor may get damaged if you rotate the screen without tilt, or counter clockwise direction Connect the corresponding cables. 5 6 7 Open the COVER-STAND NECK LEFT, and...
... holder is complete. Do not stretch the cable. Cover the COVER-STAND NECK LEFT. Rotate the machine to the highest vertical position. ――The monitor may get damaged if you rotate the screen without tilt, or counter clockwise direction Connect the corresponding cables. 5 6 7 Open the COVER-STAND NECK LEFT, and...


