User Manual
Page 2
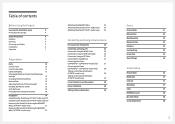
... HDMI-DVI Cable 26 Connection Using an DP Cable 27 Connecting to Headphones 27 Connecting the Power (C24FG70FQ* / C24FG73FQ* model only) 27 Connecting the Power (C27FG70FQ* / C27FG73FQ* model only) 28 Tidying Up the Connected Cables (C*FG70* model only) 28 Tidying Up the Connected Cables (C*FG73* model only) 29 Correct posture to use the product 30 Driver Installation 30 Setting Optimum Resolution 30 Game Picture Mode Refresh Rate Black Equalizer Response Time FreeSync Low Input Lag Screen Size Save Settings Screen Setup Picture Mode Brightness Contrast Sharpness Color...
... HDMI-DVI Cable 26 Connection Using an DP Cable 27 Connecting to Headphones 27 Connecting the Power (C24FG70FQ* / C24FG73FQ* model only) 27 Connecting the Power (C27FG70FQ* / C27FG73FQ* model only) 28 Tidying Up the Connected Cables (C*FG70* model only) 28 Tidying Up the Connected Cables (C*FG73* model only) 29 Correct posture to use the product 30 Driver Installation 30 Setting Optimum Resolution 30 Game Picture Mode Refresh Rate Black Equalizer Response Time FreeSync Low Input Lag Screen Size Save Settings Screen Setup Picture Mode Brightness Contrast Sharpness Color...
User Manual
Page 3
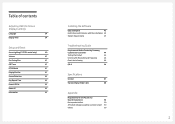
... Adjusting OSD (On Screen Display) settings Language 39 Display Time 39 Setup and Reset Arena Lighting (C*FG70* model only) 40 Volume 41 Eco Saving Plus 41 Off Timer 41 PC/AV Mode 41 DisplayPort Ver. 41 Source Detection 42 Key Repeat Time 42 Power LED On 42 Reset All 42 Information 42 Installing the Software Easy Setting Box 43 Restrictions and Problems with the Installation 43 System Requirements 43 Troubleshooting Guide Requirements Before Contacting Samsung Customer Service...
... Adjusting OSD (On Screen Display) settings Language 39 Display Time 39 Setup and Reset Arena Lighting (C*FG70* model only) 40 Volume 41 Eco Saving Plus 41 Off Timer 41 PC/AV Mode 41 DisplayPort Ver. 41 Source Detection 42 Key Repeat Time 42 Power LED On 42 Reset All 42 Information 42 Installing the Software Easy Setting Box 43 Restrictions and Problems with the Installation 43 System Requirements 43 Troubleshooting Guide Requirements Before Contacting Samsung Customer Service...
User Manual
Page 4
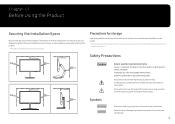
... cm (3.93 Inches) 10 cm (3.93 Inches) Safety Precautions Caution RISK OF ELECTRIC SHOCK DO NOT OPEN Caution : TO REDUCE THE RISK OF ELECTRIC SHOCK, DO NOT REMOVE COVER. (OR BACK) THERE ARE NO USER SERVICEABLE PARTS INSIDE. Personal injury or damage to properties may result if instructions are not followed. 4 This symbol alerts you want to clean the inside...
... cm (3.93 Inches) 10 cm (3.93 Inches) Safety Precautions Caution RISK OF ELECTRIC SHOCK DO NOT OPEN Caution : TO REDUCE THE RISK OF ELECTRIC SHOCK, DO NOT REMOVE COVER. (OR BACK) THERE ARE NO USER SERVICEABLE PARTS INSIDE. Personal injury or damage to properties may result if instructions are not followed. 4 This symbol alerts you want to clean the inside...
User Manual
Page 5
... the power plug or the power socket with other products. •• Keep the power socket where the power cord is connected unobstructed. ‒‒ The power cord must be disconnected to the product when cleaning is finished. 6 Power on the product and computer. Otherwise, an electric shock may result. 3 Wipe the monitor with your product by the plug and do not touch the cable with...
... the power plug or the power socket with other products. •• Keep the power socket where the power cord is connected unobstructed. ‒‒ The power cord must be disconnected to the product when cleaning is finished. 6 Power on the product and computer. Otherwise, an electric shock may result. 3 Wipe the monitor with your product by the plug and do not touch the cable with...
User Manual
Page 6
... ventilation. •• Keep the plastic packaging out of the reach of children. ‒‒ Children may suffocate. •• Do not install the product on cabinets or shelves of the right size. •• Set down the product on its front. •• When installing the product on a cabinet or shelf, make sure that the...
... ventilation. •• Keep the plastic packaging out of the reach of children. ‒‒ Children may suffocate. •• Do not install the product on cabinets or shelves of the right size. •• Set down the product on its front. •• When installing the product on a cabinet or shelf, make sure that the...
User Manual
Page 7
... damaged, turn off the power and disconnect the power cord. Then contact Samsung Customer Service Center. 7 Then contact Samsung Customer Service Center. ‒‒ Continued use or keep combustible spray or an inflammable substance near the product. •• Ensure the vents are not blocked by pulling the power cord or any cable. •• If a gas leakage is found, do not touch the...
... damaged, turn off the power and disconnect the power cord. Then contact Samsung Customer Service Center. 7 Then contact Samsung Customer Service Center. ‒‒ Continued use or keep combustible spray or an inflammable substance near the product. •• Ensure the vents are not blocked by pulling the power cord or any cable. •• If a gas leakage is found, do not touch the...
User Manual
Page 10
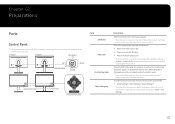
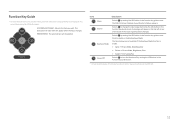
... Game Setting Key Power LED Return Function Key Guide Parts JOG Button Power LED Function Key Guide Game Setting Key Description Multi directional button that helps navigate. ――The JOG button is power status indicator and works as Enter. Press the JOG button when the screen is shown. The Function Key Guide will appear. Use shortcut keys to access previously saved custom game modes. •• Game Setting 1 / Game Setting 2 / Game Setting 3 ―...
... Game Setting Key Power LED Return Function Key Guide Parts JOG Button Power LED Function Key Guide Game Setting Key Description Multi directional button that helps navigate. ――The JOG button is power status indicator and works as Enter. Press the JOG button when the screen is shown. The Function Key Guide will appear. Use shortcut keys to access previously saved custom game modes. •• Game Setting 1 / Game Setting 2 / Game Setting 3 ―...
User Manual
Page 11
...;• Game → Picture Mode, Black Equalizer •• Picture → Picture Mode, Brightness, Color •• System → Eco Saving Plus Power Off Selects to turn the Monitor off by moving the JOG button in the function key guide screen. The description for each item will appear on the top left corner of the screen if the input signal has been changed. Eye Saver Mode Selects by moving the...
...;• Game → Picture Mode, Black Equalizer •• Picture → Picture Mode, Brightness, Color •• System → Eco Saving Plus Power Off Selects to turn the Monitor off by moving the JOG button in the function key guide screen. The description for each item will appear on the top left corner of the screen if the input signal has been changed. Eye Saver Mode Selects by moving the...
User Manual
Page 12
...-signal mode), 2 direct keys for three different modes. •• Game Setting 1 / Game Setting 2 / Game Setting 3 C*FG70* C*FG73* When the monitor displays the Main menu the JOG Button could be used as below . JOG Button UP/DOWN LEFT RIGHT PRESS(ENTER) Action Move the option Exit the Main menu. Close Sublist without using an OSD menu. Move to next depth. When the monitor displays nothing (i.e. JOG Button UP Power saving/Non-signal mode Source Change...
...-signal mode), 2 direct keys for three different modes. •• Game Setting 1 / Game Setting 2 / Game Setting 3 C*FG70* C*FG73* When the monitor displays the Main menu the JOG Button could be used as below . JOG Button UP/DOWN LEFT RIGHT PRESS(ENTER) Action Move the option Exit the Main menu. Close Sublist without using an OSD menu. Move to next depth. When the monitor displays nothing (i.e. JOG Button UP Power saving/Non-signal mode Source Change...
User Manual
Page 13
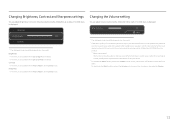
... when Picture Mode is set to a problem with the volume of a connected input device is enabled. Set the input volume for the input device to Cinema mode. The function mutes the audio to improve sound effect when there is sound noise or when the input signal is weak, usually due to Cinema mode. Changing Brightness, Contrast and Sharpness settings You can adjust Volume by moving the JOG button left or right, if no OSD menu is displayed. To...
... when Picture Mode is set to a problem with the volume of a connected input device is enabled. Set the input volume for the input device to Cinema mode. The function mutes the audio to improve sound effect when there is sound noise or when the input signal is weak, usually due to Cinema mode. Changing Brightness, Contrast and Sharpness settings You can adjust Volume by moving the JOG button left or right, if no OSD menu is displayed. To...
User Manual
Page 26
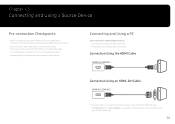
... the product you connect a source device first before connecting all other cables. Connection Using the HDMI Cable HDMI IN 1, HDMI IN 2 Connection Using an HDMI-DVI Cable HDMI IN 1, HDMI IN 2 ――The audio function is not supported if the source device is not supported. Chapter 03 Connecting and Using a Source Device Pre-connection Checkpoints ――Before connecting a source device, read the user manual provided with sound input. (C*FG70* model only) 26 This feature works in Arena Lighting is connected using the HDMI-DVI cable. ――...
... the product you connect a source device first before connecting all other cables. Connection Using the HDMI Cable HDMI IN 1, HDMI IN 2 Connection Using an HDMI-DVI Cable HDMI IN 1, HDMI IN 2 ――The audio function is not supported if the source device is not supported. Chapter 03 Connecting and Using a Source Device Pre-connection Checkpoints ――Before connecting a source device, read the user manual provided with sound input. (C*FG70* model only) 26 This feature works in Arena Lighting is connected using the HDMI-DVI cable. ――...
User Manual
Page 30
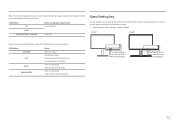
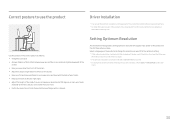
... times for this product by installing the corresponding drivers. ――To install the latest version of the product so you power on the OSD menu. 30 Setting Optimum Resolution An information message about setting optimum resolution will be selected in front of the screen. •• Adjust the angle so light does not reflect on the screen. •• Keep your forearms perpendicular to...
... times for this product by installing the corresponding drivers. ――To install the latest version of the product so you power on the OSD menu. 30 Setting Optimum Resolution An information message about setting optimum resolution will be selected in front of the screen. •• Adjust the angle so light does not reflect on the screen. •• Keep your forearms perpendicular to...

User Manual
Page 31
.... Specifications are preset at the factory. In PC mode •• Custom: Customize the screen settings. •• High-Brightness: Maximize the screen brightness. •• FPS: Increase the brightness of darker areas of parts may vary depending on the RPG game screen. •• AOS: Increase the contrast ratio to obtain a picture quality optimized for the AOS game screen. •• sRGB: Adjust the color system...
.... Specifications are preset at the factory. In PC mode •• Custom: Customize the screen settings. •• High-Brightness: Maximize the screen brightness. •• FPS: Increase the brightness of darker areas of parts may vary depending on the RPG game screen. •• AOS: Increase the contrast ratio to obtain a picture quality optimized for the AOS game screen. •• sRGB: Adjust the color system...
User Manual
Page 33
... AMD graphics card. Try the following actions: decrease the game setting values, change the frequency? ――The FreeSync function is solution that screen flickering may fluctuate depending on the resolution. The displayed FreeSync menu items on the monitor. 2 Enable FreeSync in HDMI1, HDMI2 or DisplayPort mode. Note that eliminates screen tearing without all the usual lag and latency. The refresh rate setting method please...
... AMD graphics card. Try the following actions: decrease the game setting values, change the frequency? ――The FreeSync function is solution that screen flickering may fluctuate depending on the resolution. The displayed FreeSync menu items on the monitor. 2 Enable FreeSync in HDMI1, HDMI2 or DisplayPort mode. Note that eliminates screen tearing without all the usual lag and latency. The refresh rate setting method please...

User Manual
Page 36
... when Eco Saving Plus is optimized for 3D graphics and instant messaging on the product model. This also provides a sharp image. •• Movie: Select this monitor. •• Cinema: Obtain the brightness and sharpness of the FPS game screen. In AV mode When the external input is connected through HDMI/DP and PC/AV Mode is the standard mode of this mode when...
... when Eco Saving Plus is optimized for 3D graphics and instant messaging on the product model. This also provides a sharp image. •• Movie: Select this monitor. •• Cinema: Obtain the brightness and sharpness of the FPS game screen. In AV mode When the external input is connected through HDMI/DP and PC/AV Mode is the standard mode of this mode when...
User Manual
Page 38
... is input in AV mode and the monitor can be compatible with some source devices. ――The HDMI Black Level feature is set to the product via HDMI, image quality degradation (contrast/ color degradation, black level, etc.) may not be used to Screen Fit in the default settings, and it was tested by TÜV Rheinland and certified as 720P @ 60 Hz and 1080P @ 60 Hz. Configuring H-Position & V-Position H-Position...
... is input in AV mode and the monitor can be compatible with some source devices. ――The HDMI Black Level feature is set to the product via HDMI, image quality degradation (contrast/ color degradation, black level, etc.) may not be used to Screen Fit in the default settings, and it was tested by TÜV Rheinland and certified as 720P @ 60 Hz and 1080P @ 60 Hz. Configuring H-Position & V-Position H-Position...
User Manual
Page 41
...;Supplied for the wide models only such as 16:9 or 16:10. ――If the monitor is displaying the message Check Signal Cable or power saving mode activates, press the JOG button to display the functionbutton screen and then select the button to display the On Screen Display (OSD). The picture size will be reduced by 25% over the default setting. •• High: The power consumption will automatically power off timer can be set...
...;Supplied for the wide models only such as 16:9 or 16:10. ――If the monitor is displaying the message Check Signal Cable or power saving mode activates, press the JOG button to display the functionbutton screen and then select the button to display the On Screen Display (OSD). The picture size will be reduced by 25% over the default setting. •• High: The power consumption will automatically power off timer can be set...

User Manual
Page 44
... the screen is turned off and the power indicator blinks even though the product is properly connected to the product and PC. Installation issue (PC mode) The screen keeps switching on all four sides of the screen when an HDMI or HDMI-DVI cable is properly connected to the product is off . Check the cable connection between the product and PC, and ensure the connectors are caused by using the product...
... the screen is turned off and the power indicator blinks even though the product is properly connected to the product and PC. Installation issue (PC mode) The screen keeps switching on all four sides of the screen when an HDMI or HDMI-DVI cable is properly connected to the product is off . Check the cable connection between the product and PC, and ensure the connectors are caused by using the product...
User Manual
Page 45
... range of the audio cable or adjust the volume. Check that the resolution and frequency for the PC are shadows or ghost images left on the screen have your PC sound card or software program. The screen is blurry. Adjust Brightness and Contrast. Screen color is blurry. The colors on the screen. There is still low after turning it up to Standard Signal Mode Table (P.48) in power-saving mode. Text is inconsistent. Windows 7, Windows 8, Windows 8.1 or Windows 10): Go to Control Panel...
... range of the audio cable or adjust the volume. Check that the resolution and frequency for the PC are shadows or ghost images left on the screen have your PC sound card or software program. The screen is blurry. Adjust Brightness and Contrast. Screen color is blurry. The colors on the screen. There is still low after turning it up to Standard Signal Mode Table (P.48) in power-saving mode. Text is inconsistent. Windows 7, Windows 8, Windows 8.1 or Windows 10): Go to Control Panel...
User Manual
Page 46
...•• Windows 10: Set power-saving mode in Settings → Personalization → Lock screen → Screen timeout settings → Power & sleep or BIOS SETUP on your PC or graphics card for further instructions on adjustment. Set the frequency on the PC. 46 How can I change the frequency? How can I change the resolution? •• Windows 7: Go to Control Panel → Appearance and Personalization → Display → Adjust Resolution, and adjust the resolution. •• Windows 8(Windows 8.1): Go to Settings → Control Panel → Appearance...
...•• Windows 10: Set power-saving mode in Settings → Personalization → Lock screen → Screen timeout settings → Power & sleep or BIOS SETUP on your PC or graphics card for further instructions on adjustment. Set the frequency on the PC. 46 How can I change the frequency? How can I change the resolution? •• Windows 7: Go to Control Panel → Appearance and Personalization → Display → Adjust Resolution, and adjust the resolution. •• Windows 8(Windows 8.1): Go to Settings → Control Panel → Appearance...


