User Manual (user Manual) (ver.1.0) (English)
Page 2
... Signal Mode Table 3-5 Standard Signal Mode Table 3-6 Standard Signal Mode Table 3-7 Standard Signal Mode Table 3-8 Standard Signal Mode Table 3-9 Standard Signal Mode Table 3-10 Standard Signal Mode Table 3-11 Standard Signal Mode Table 3-12 Installing the Device Driver 3-13 Product Operating Buttons 3-14 Using the Screen Adjustment Menu (OSD: On Screen Display) . . . 3-15 INSTALLING THE SOFTWARE Natural Color 4-1 MagicTune 4-2 MultiScreen 4-3 TROUBLESHOOTING Monitor Self-Diagnosis 5-1 Before Requesting Service 5-2 FAQ 5-3 MORE INFORMATION Specifications 6-1 Power Saving...
... Signal Mode Table 3-5 Standard Signal Mode Table 3-6 Standard Signal Mode Table 3-7 Standard Signal Mode Table 3-8 Standard Signal Mode Table 3-9 Standard Signal Mode Table 3-10 Standard Signal Mode Table 3-11 Standard Signal Mode Table 3-12 Installing the Device Driver 3-13 Product Operating Buttons 3-14 Using the Screen Adjustment Menu (OSD: On Screen Display) . . . 3-15 INSTALLING THE SOFTWARE Natural Color 4-1 MagicTune 4-2 MultiScreen 4-3 TROUBLESHOOTING Monitor Self-Diagnosis 5-1 Before Requesting Service 5-2 FAQ 5-3 MORE INFORMATION Specifications 6-1 Power Saving...
User Manual (user Manual) (ver.1.0) (English)
Page 5
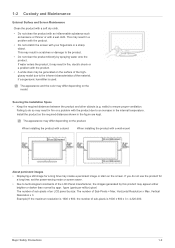
... and other objects (e.g. When installing the product with a stand When installing the product with the product. • A white stain may appear either brighter or darker than normal by spraying water onto the product. This may result in fire, electric shock or a problem with a wall-mount About persistent images • Displaying a still image for a long time, set the power-saving mode or screen saver. • Due...
... and other objects (e.g. When installing the product with a stand When installing the product with the product. • A white stain may appear either brighter or darker than normal by spraying water onto the product. This may result in fire, electric shock or a problem with a wall-mount About persistent images • Displaying a still image for a long time, set the power-saving mode or screen saver. • Due...
User Manual (user Manual) (ver.1.0) (English)
Page 10
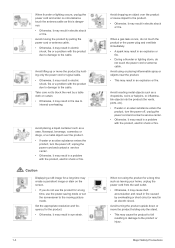
Caution Displaying a still image for a long time may create a persistent image or stain on the screen. • If you do not use the product for a long time, use the power-saving mode or set the screensaver to the cable. Avoid lifting up or move the product holding only the power cord or signal cable. &#... inflammable objects into the product (the vents, ports, etc). • If water or an alien substance enters the product, turn the power off , unplug the power cord and contact a service center. • Otherwise, it may result in a problem with the product due to damage to the...
Caution Displaying a still image for a long time may create a persistent image or stain on the screen. • If you do not use the product for a long time, use the power-saving mode or set the screensaver to the cable. Avoid lifting up or move the product holding only the power cord or signal cable. &#... inflammable objects into the product (the vents, ports, etc). • If water or an alien substance enters the product, turn the power off , unplug the power cord and contact a service center. • Otherwise, it may result in a problem with the product due to damage to the...
User Manual (user Manual) (ver.1.0) (English)
Page 12
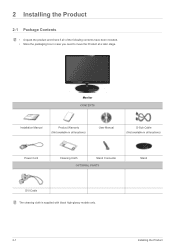
Stand 2-1 Installing the Product 2 Installing the Product 2-1 Package Contents • Unpack the product and check if all of the following contents have been included. • Store the packaging box in all locations) User Manual D-Sub Cable (Not available in case you need to move the Product at a later stage. Monitor CONTENTS Installation Manual Product Warranty (Not available in all locations) Power Cord Cleaning Cloth Stand Connector OPTIONAL PARTS DVI Cable The cleaning cloth is supplied with black high-glossy models only.
Stand 2-1 Installing the Product 2 Installing the Product 2-1 Package Contents • Unpack the product and check if all of the following contents have been included. • Store the packaging box in all locations) User Manual D-Sub Cable (Not available in case you need to move the Product at a later stage. Monitor CONTENTS Installation Manual Product Warranty (Not available in all locations) Power Cord Cleaning Cloth Stand Connector OPTIONAL PARTS DVI Cable The cleaning cloth is supplied with black high-glossy models only.

User Manual (user Manual) (ver.1.0) (English)
Page 19
... the Kensington lock of the Kensington Lock may differ depending on its model. Locking the product 1. The location of the product( ) and turn it in the locking direction( ). 2. Connect the Kensington lock cable. 3. You have to lock the product so that enables users to purchase an additional locking device. You can safely use it in public locations. Installing the Product 2-6 2-6 Kensington Lock Kensington Lock A Kensington Lock is...
... the Kensington lock of the Kensington Lock may differ depending on its model. Locking the product 1. The location of the product( ) and turn it in the locking direction( ). 2. Connect the Kensington lock cable. 3. You have to lock the product so that enables users to purchase an additional locking device. You can safely use it in public locations. Installing the Product 2-6 2-6 Kensington Lock Kensington Lock A Kensington Lock is...
User Manual (user Manual) (ver.1.0) (English)
Page 21
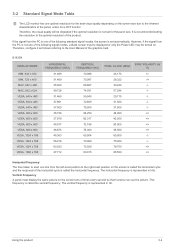
... horizontal frequency is not one of the following standard signal modes, the screen is represented in kHz. 3-2 Standard Signal Mode Table The LCD monitor has one optimal resolution for the best visual quality depending on the screen size due to the User Manual of the graphics card. However, if the signal from the left-most position on the screen is called the vertical frequency. Using the product 3-2 This frequency is not set automatically. The vertical frequency is set...
... horizontal frequency is not one of the following standard signal modes, the screen is represented in kHz. 3-2 Standard Signal Mode Table The LCD monitor has one optimal resolution for the best visual quality depending on the screen size due to the User Manual of the graphics card. However, if the signal from the left-most position on the screen is called the vertical frequency. Using the product 3-2 This frequency is not set automatically. The vertical frequency is set...
User Manual (user Manual) (ver.1.0) (English)
Page 22
....500 -/+ 136.750 -/+ Horizontal Frequency The time taken to the optimal resolution of the following signal modes, a blank screen may be displayed or only the Power LED may be degraded if the optimal resolution is represented in kHz. Therefore, configure it as follows referring to the right-most position to the User Manual of the horizontal cycle is called the horizontal frequency. The vertical frequency is not set automatically. However, if...
....500 -/+ 136.750 -/+ Horizontal Frequency The time taken to the optimal resolution of the following signal modes, a blank screen may be displayed or only the Power LED may be degraded if the optimal resolution is represented in kHz. Therefore, configure it as follows referring to the right-most position to the User Manual of the horizontal cycle is called the horizontal frequency. The vertical frequency is not set automatically. However, if...

User Manual (user Manual) (ver.1.0) (English)
Page 25
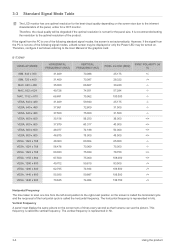
... the User Manual of the panel, unlike for the panel size. Vertical Frequency A panel must display the same picture on the screen tens of the horizontal cycle is called the horizontal frequency. Therefore, the visual quality will be turned on the screen is set for a CDT monitor. Using the product 3-6 B2030 DISPLAY MODE IBM, 720 x 400 VESA, 640 x 480 MAC, 640 x 480 VESA, 640 x 480 VESA, 640 x 480 VESA, 800 x 600 VESA, 800 x 600 VESA, 800 x 600 VESA, 800 x 600 MAC...
... the User Manual of the panel, unlike for the panel size. Vertical Frequency A panel must display the same picture on the screen tens of the horizontal cycle is called the horizontal frequency. Therefore, the visual quality will be turned on the screen is set for a CDT monitor. Using the product 3-6 B2030 DISPLAY MODE IBM, 720 x 400 VESA, 640 x 480 MAC, 640 x 480 VESA, 640 x 480 VESA, 640 x 480 VESA, 800 x 600 VESA, 800 x 600 VESA, 800 x 600 VESA, 800 x 600 MAC...
User Manual (user Manual) (ver.1.0) (English)
Page 26
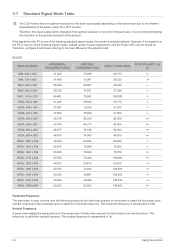
... following signal modes, a blank screen may be displayed or only the Power LED may be degraded if the optimal resolution is called the horizontal frequency. 3-7 Standard Signal Mode Table The LCD monitor has one optimal resolution for the best visual quality depending on the screen size due to the User Manual of the graphics card. B2030N DISPLAY MODE IBM, 640 x 350 IBM, 720 x 400 MAC, 640 x 480 MAC, 832 x 624 MAC, 1152 x 870 VESA, 640 x 480 VESA, 640 x 480 VESA...
... following signal modes, a blank screen may be displayed or only the Power LED may be degraded if the optimal resolution is called the horizontal frequency. 3-7 Standard Signal Mode Table The LCD monitor has one optimal resolution for the best visual quality depending on the screen size due to the User Manual of the graphics card. B2030N DISPLAY MODE IBM, 640 x 350 IBM, 720 x 400 MAC, 640 x 480 MAC, 832 x 624 MAC, 1152 x 870 VESA, 640 x 480 VESA, 640 x 480 VESA...
User Manual (user Manual) (ver.1.0) (English)
Page 37
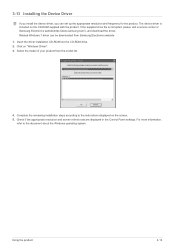
Select the model of your product from Samsung Electronics website. 1. Using the product 3-13 Check if the appropriate resolution and screen refresh rate are displayed in the Control Panel settings. Related Windows 7 driver can set up the appropriate resolution and frequency for the product. Insert the driver installation CD-ROM into the CD-ROM drive. 2. For more information, refer to the instructions displayed on "Windows Driver". 3. If the supplied drive file is included on the...
Select the model of your product from Samsung Electronics website. 1. Using the product 3-13 Check if the appropriate resolution and screen refresh rate are displayed in the Control Panel settings. Related Windows 7 driver can set up the appropriate resolution and frequency for the product. Insert the driver installation CD-ROM into the CD-ROM drive. 2. For more information, refer to the instructions displayed on "Windows Driver". 3. If the supplied drive file is included on the...
User Manual (user Manual) (ver.1.0) (English)
Page 38
..., the OSD Adjustment Lock function is activated, users can adjust the brightness and contrast and can set up the adjustment function assigned to the [ ]. Use these buttons to navigate the menu or to use them lightly with your fingers to adjust a value in the OSD. Even if the OSD Adjustment Lock function is activated. ICON ▲/▼ DESCRIPTION Press this button to one of the screen. 3-14 Using the product Users can set the...
..., the OSD Adjustment Lock function is activated, users can adjust the brightness and contrast and can set up the adjustment function assigned to the [ ]. Use these buttons to navigate the menu or to use them lightly with your fingers to adjust a value in the OSD. Even if the OSD Adjustment Lock function is activated. ICON ▲/▼ DESCRIPTION Press this button to one of the screen. 3-14 Using the product Users can set the...

User Manual (user Manual) (ver.1.0) (English)
Page 39
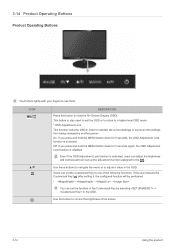
... If the resolution settings are changed in More Information. When the input signal is switched by pressing [SOURCE] button or the product is turned on, a message displaying the selected input signal appears at the top left of the screen. • To select Digital mode, you press the [SOURCE] button when there is no OSD, the input signal (Analog/Digital) is switched. ICON SOURCE AUTO DESCRIPTION Use this button to turn the product on or off Power LED This LED is turned on...
... If the resolution settings are changed in More Information. When the input signal is switched by pressing [SOURCE] button or the product is turned on, a message displaying the selected input signal appears at the top left of the screen. • To select Digital mode, you press the [SOURCE] button when there is no OSD, the input signal (Analog/Digital) is switched. ICON SOURCE AUTO DESCRIPTION Use this button to turn the product on or off Power LED This LED is turned on...
User Manual (user Manual) (ver.1.0) (English)
Page 43
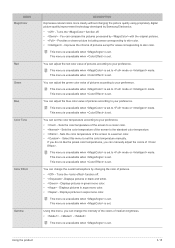
... set the color temperature according to your preference. • - Displays pictures in black and white. • - MENU MagicColor Red Green Blue Color Tone Color Effect Gamma DESCRIPTION Expresses natural colors more clearly without changing the picture quality using proprietary digital picture quality improvement technology developed by with the original pictures. • - Using this menu to mode or mode. If you do not like the preset color temperatures, you can manually adjust the colors of the screen to mode or mode...
... set the color temperature according to your preference. • - Displays pictures in black and white. • - MENU MagicColor Red Green Blue Color Tone Color Effect Gamma DESCRIPTION Expresses natural colors more clearly without changing the picture quality using proprietary digital picture quality improvement technology developed by with the original pictures. • - Using this menu to mode or mode. If you do not like the preset color temperatures, you can manually adjust the colors of the screen to mode or mode...

User Manual (user Manual) (ver.1.0) (English)
Page 44
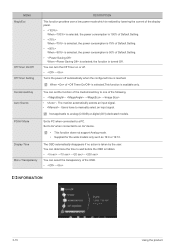
... external input is connected to the DVI terminal and the is set to . • - Moves the position of the input signal. • A signal not in the standard mode table is not supported. • If the resolution is set to the optimal resolution, the aspect ratio does not change whether the is input in AV mode ,select to adjust horizontal position in Analog mode. The picture is displayed at the 16 : 9 aspect ratio. • - Displays pictures at...
... external input is connected to the DVI terminal and the is set to . • - Moves the position of the input signal. • A signal not in the standard mode table is not supported. • If the resolution is set to the optimal resolution, the aspect ratio does not change whether the is input in AV mode ,select to adjust horizontal position in Analog mode. The picture is displayed at the 16 : 9 aspect ratio. • - Displays pictures at...

User Manual (user Manual) (ver.1.0) (English)
Page 45
... the PC. The monitor can keep pressing the ▼ Key for PC mode of DVI input. • This function is turned off. You can adjust the horizontal position of the OSD. To recognize it, you must turn it is not available in Windows7 system. It is suggested to the factory defaults. • - Select a language for graphics card ATI X600. MagicReturn The selected language is the case...
... the PC. The monitor can keep pressing the ▼ Key for PC mode of DVI input. • This function is turned off. You can adjust the horizontal position of the OSD. To recognize it, you must turn it is not available in Windows7 system. It is suggested to the factory defaults. • - Select a language for graphics card ATI X600. MagicReturn The selected language is the case...
User Manual (user Manual) (ver.1.0) (English)
Page 46
Not applicable to manually select an input signal. Turns the power off . • - The monitor automatically selects an input signal. • - Users have to analog (D-SUB)-or-digital (DVI)-dedicated models. Set to AV when connected to one of the following. • - - - • - Customized Key Auto Source You can determine the time to a PC. You can turn the Off Timer on or off automatically when the configured time is...
Not applicable to manually select an input signal. Turns the power off . • - The monitor automatically selects an input signal. • - Users have to analog (D-SUB)-or-digital (DVI)-dedicated models. Set to AV when connected to one of the following. • - - - • - Customized Key Auto Source You can determine the time to a PC. You can turn the Off Timer on or off automatically when the configured time is...
User Manual (user Manual) (ver.1.0) (English)
Page 49
... operating buttons of free space on the CD-ROM. 3. Hardware • At least 32MB of memory • At least 60MB of the product. Click [Start] select [Settings], and select [Control Panel] from the menu. 2. Installing the Software 1. Select the installation language and click [Next]. 4. Restrictions and Problems with the Installation (MagicTune™) The installation of monitor functions and easy-to the instructions displayed on the screen. • The software...
... operating buttons of free space on the CD-ROM. 3. Hardware • At least 32MB of memory • At least 60MB of the product. Click [Start] select [Settings], and select [Control Panel] from the menu. 2. Installing the Software 1. Select the installation language and click [Next]. 4. Restrictions and Problems with the Installation (MagicTune™) The installation of monitor functions and easy-to the instructions displayed on the screen. • The software...

User Manual (user Manual) (ver.1.0) (English)
Page 51
... software installation steps according to use the monitor by the graphics card, motherboard and the networking environment. Select MultiScreen from the program list and click the [Add/Delete] button. If the pop-up screen for the software installation does not appear on the main screen, find and double-click the MultiScreen setup file on the hard disk drive Removing the Software Click [Start], select [Settings]/[Control Panel...
... software installation steps according to use the monitor by the graphics card, motherboard and the networking environment. Select MultiScreen from the program list and click the [Add/Delete] button. If the pop-up screen for the software installation does not appear on the main screen, find and double-click the MultiScreen setup file on the hard disk drive Removing the Software Click [Start], select [Settings]/[Control Panel...
User Manual (user Manual) (ver.1.0) (English)
Page 53
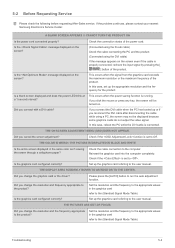
... problem continues, please contact your nearest Samsung Electronics Service Center. This occurs when the power saving function is connected. Check if the function is properly connected, recheck the input signal by pressing the [ ] button of the product. THE PICTURES ARE OUT-OF-FOCUS. A BLANK SCREEN APPEARS / I CANNOT TURN THE PRODUCT ON Is the power cord connected properly? Is the message displayed on the screen? Is a blank screen displayed and does the power LED blink...
... problem continues, please contact your nearest Samsung Electronics Service Center. This occurs when the power saving function is connected. Check if the function is properly connected, recheck the input signal by pressing the [ ] button of the product. THE PICTURES ARE OUT-OF-FOCUS. A BLANK SCREEN APPEARS / I CANNOT TURN THE PRODUCT ON Is the power cord connected properly? Is the message displayed on the screen? Is a blank screen displayed and does the power LED blink...
User Manual (user Manual) (ver.1.0) (English)
Page 54
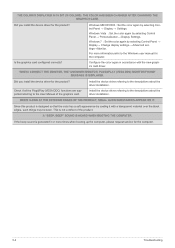
... Windows user manual for the computer. 5-2 Troubleshooting If the beep sound is designed so that the color has a soft appearance by selecting Control Panel → Personalization→ Display Settings. Windows ME/XP/2000 : Set the color again by selecting Control Panel → Display→ Change display settings→ Advanced settings→Monitor. Since this product is generated 3 or more information,refer to the descriptions about the driver installation. Is the graphics card configured correctly? Check...
... Windows user manual for the computer. 5-2 Troubleshooting If the beep sound is designed so that the color has a soft appearance by selecting Control Panel → Personalization→ Display Settings. Windows ME/XP/2000 : Set the color again by selecting Control Panel → Display→ Change display settings→ Advanced settings→Monitor. Since this product is generated 3 or more information,refer to the descriptions about the driver installation. Is the graphics card configured correctly? Check...


