
User Manual (user Manual) (ver.1.0) (English)
Page 32
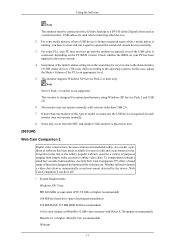
... of model is connected, the USB device recognized for optimal performance using Windows XP Service Pack 2 and USB 2.0. 6. As a result, a plethora of software has been made available for program installation 256 MB RAM (512 MB DDR RAM recommended) 16-bit color display at 800x600 (32 MB video memory with DirectX 3D support recommended) DirectX 8.1 or higher (DirectX 9.0c recommended) Webcam 31 USB cables are used as a normal monitor...
... of model is connected, the USB device recognized for optimal performance using Windows XP Service Pack 2 and USB 2.0. 6. As a result, a plethora of software has been made available for program installation 256 MB RAM (512 MB DDR RAM recommended) 16-bit color display at 800x600 (32 MB video memory with DirectX 3D support recommended) DirectX 8.1 or higher (DirectX 9.0c recommended) Webcam 31 USB cables are used as a normal monitor...
User Manual (user Manual) (ver.1.0) (English)
Page 41
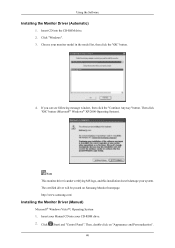
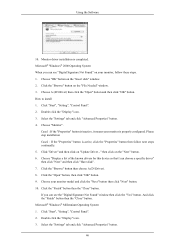
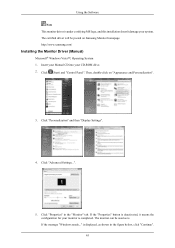
...-ROM drive. 2. Click "Windows". 3. Then click "OK" button (Microsoft® Windows® XP/2000 Operating System). Click (Start) and "Control Panel". http://www.samsung.com/ Installing the Monitor Driver (Manual) Microsoft® Windows Vista™, Operating System 1. If you can see following message window, then click the "Continue Anyway" button. Then, double-click on Samsung Monitor homepage. Using the Software Installing the Monitor Driver (Automatic) 1. Note This monitor driver is under certifying MS...
...-ROM drive. 2. Click "Windows". 3. Then click "OK" button (Microsoft® Windows® XP/2000 Operating System). Click (Start) and "Control Panel". http://www.samsung.com/ Installing the Monitor Driver (Manual) Microsoft® Windows Vista™, Operating System 1. If you can see following message window, then click the "Continue Anyway" button. Then, double-click on Samsung Monitor homepage. Using the Software Installing the Monitor Driver (Automatic) 1. Note This monitor driver is under certifying MS...
User Manual (user Manual) (ver.1.0) (English)
Page 43
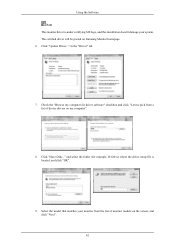
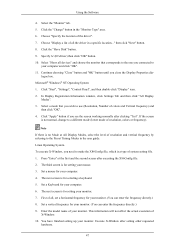
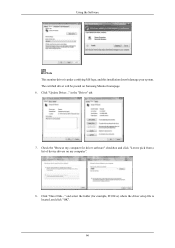
... device drivers on my computer". 8. Check the "Browse my computer for example, D:\Drive) where the driver setup file is under certifying MS logo, and this installation doesn't damage your monitor from a list of monitor models on Samsung Monitor homepage. 6. in the "Driver" tab. 7. The certified driver will be posted on the screen, and click "Next". 42 Select the model that matches your system. Click "Update Driver..."
... device drivers on my computer". 8. Check the "Browse my computer for example, D:\Drive) where the driver setup file is under certifying MS logo, and this installation doesn't damage your monitor from a list of monitor models on Samsung Monitor homepage. 6. in the "Driver" tab. 7. The certified driver will be posted on the screen, and click "Next". 42 Select the model that matches your system. Click "Update Driver..."
User Manual (user Manual) (ver.1.0) (English)
Page 45
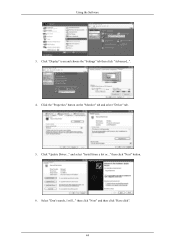
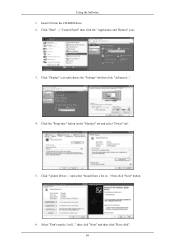
Select "Don't search, I will..." and select "Install from a list or..." Click "Update Driver..." then click "Next" button. 6. Using the Software 3. then click "Next" and then click "Have disk". 44 Click the "Properties" button on the "Monitor" tab and select "Driver" tab. 5. Click "Display" icon and choose the "Settings" tab then click "Advanced...". 4.
Select "Don't search, I will..." and select "Install from a list or..." Click "Update Driver..." then click "Next" button. 6. Using the Software 3. then click "Next" and then click "Have disk". 44 Click the "Properties" button on the "Monitor" tab and select "Driver" tab. 5. Click "Display" icon and choose the "Settings" tab then click "Advanced...". 4.
User Manual (user Manual) (ver.1.0) (English)
Page 47
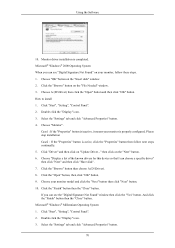
... this device so that I can see "Digital Signature Not Found" on your monitor model and click the "Next" button then click "Next" button. 10. Click "Start", "Setting", "Control Panel". 2. Click the "Browse" button on "Update Driver..." Double click the "Display" icon. 3. then click on the "Insert disk" window. 2. Microsoft® Windows® 2000 Operating System When you can choose a specific driver" then click "Next" and then click...
... this device so that I can see "Digital Signature Not Found" on your monitor model and click the "Next" button then click "Next" button. 10. Click "Start", "Setting", "Control Panel". 2. Click the "Browse" button on "Update Driver..." Double click the "Display" icon. 3. then click on the "Insert disk" window. 2. Microsoft® Windows® 2000 Operating System When you can choose a specific driver" then click "Next" and then click...
User Manual (user Manual) (ver.1.0) (English)
Page 48
... your monitor. Using the Software 4. Select "Show all the driver in a specific location..." Microsoft® Windows® NT Operating System 1. The third screen is for your monitor. 7. logue box. First of resolution, colors or frequency). Select a mode that corresponds to a different mode (lower mode of all, set a horizontal frequency for setting your computer. 6. Execute X-Window after clicking "Test". Choose "Specify the location of X-Window. 10. Click the "Have Disk" button. 9. In Display...
... your monitor. Using the Software 4. Select "Show all the driver in a specific location..." Microsoft® Windows® NT Operating System 1. The third screen is for your monitor. 7. logue box. First of resolution, colors or frequency). Select a mode that corresponds to a different mode (lower mode of all, set a horizontal frequency for setting your computer. 6. Execute X-Window after clicking "Test". Choose "Specify the location of X-Window. 10. Click the "Have Disk" button. 9. In Display...
User Manual (user Manual) (ver.1.0) (English)
Page 57
... is designed for program installation 256 MB RAM (512 MB DDR RAM recommended) 16-bit color display at 800x600 (32 MB video memory with versions older than one monitor of this monitor is connected, the USB device recognized for webcam use. This monitor is not supported. This monitor supports Windows XP Service Pack 2 or later only. Click the "Next" button. 56 Using the Software 5. Noise may not operate...
... is designed for program installation 256 MB RAM (512 MB DDR RAM recommended) 16-bit color display at 800x600 (32 MB video memory with versions older than one monitor of this monitor is connected, the USB device recognized for webcam use. This monitor is not supported. This monitor supports Windows XP Service Pack 2 or later only. Click the "Next" button. 56 Using the Software 5. Noise may not operate...
User Manual (user Manual) (ver.1.0) (English)
Page 65
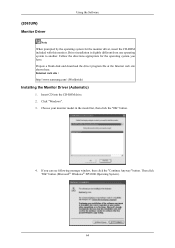
... web site : http://www.samsung.com/ (Worldwide) Installing the Monitor Driver (Automatic) 1. Choose your monitor model in the model list, then click the "OK" button. 4. If you have. Follow the directions appropriate for the monitor driver, insert the CD-ROM included with this monitor. Then click "OK" button (Microsoft® Windows® XP/2000 Operating System). 64 Using the Software {2063UW} Monitor Driver Note When prompted by...
... web site : http://www.samsung.com/ (Worldwide) Installing the Monitor Driver (Automatic) 1. Choose your monitor model in the model list, then click the "OK" button. 4. If you have. Follow the directions appropriate for the monitor driver, insert the CD-ROM included with this monitor. Then click "OK" button (Microsoft® Windows® XP/2000 Operating System). 64 Using the Software {2063UW} Monitor Driver Note When prompted by...
User Manual (user Manual) (ver.1.0) (English)
Page 66
...". 65 If the message "Windows needs..." Click (Start) and "Control Panel". The certified driver will be used as shown in the "Monitor" tab. http://www.samsung.com/ Installing the Monitor Driver (Manual) Microsoft® Windows Vista™, Operating System 1. is deactivated, it means the configuration for your system. Then, double-click on Samsung Monitor homepage. If the "Properties" button is displayed, as is. The monitor can be posted on...
...". 65 If the message "Windows needs..." Click (Start) and "Control Panel". The certified driver will be used as shown in the "Monitor" tab. http://www.samsung.com/ Installing the Monitor Driver (Manual) Microsoft® Windows Vista™, Operating System 1. is deactivated, it means the configuration for your system. Then, double-click on Samsung Monitor homepage. If the "Properties" button is displayed, as is. The monitor can be posted on...
User Manual (user Manual) (ver.1.0) (English)
Page 67
Using the Software Note This monitor driver is located, and click "OK". 66 Check the "Browse my computer for example, D:\Drive) where the driver setup file is under certifying MS logo, and this installation doesn't damage your system. Click "Have Disk..." Click "Update Driver..." and select the folder (for driver software" checkbox and click "Let me pick from a list of device drivers on Samsung Monitor homepage. 6. in the "Driver" tab. 7. The certified driver will be posted on my computer". 8.
Using the Software Note This monitor driver is located, and click "OK". 66 Check the "Browse my computer for example, D:\Drive) where the driver setup file is under certifying MS logo, and this installation doesn't damage your system. Click "Have Disk..." Click "Update Driver..." and select the folder (for driver software" checkbox and click "Let me pick from a list of device drivers on Samsung Monitor homepage. 6. in the "Driver" tab. 7. The certified driver will be posted on my computer". 8.
User Manual (user Manual) (ver.1.0) (English)
Page 69
then click "Next" button. 6. Click the "Properties" button on the "Monitor" tab and select "Driver" tab. 5. Select "Don't search, I will..." then click "Next" and then click "Have disk". 68 Click "Start" → "Control Panel" then click the "Appearance and Themes" icon. 3. Click "Display" icon and choose the "Settings" tab then click "Advanced...". 4. Insert CD into the CD-ROM drive. 2. Click "Update Driver..." and select "Install from a list or..." Using the Software 1.
then click "Next" button. 6. Click the "Properties" button on the "Monitor" tab and select "Driver" tab. 5. Select "Don't search, I will..." then click "Next" and then click "Have disk". 68 Click "Start" → "Control Panel" then click the "Appearance and Themes" icon. 3. Click "Display" icon and choose the "Settings" tab then click "Advanced...". 4. Insert CD into the CD-ROM drive. 2. Click "Update Driver..." and select "Install from a list or..." Using the Software 1.
User Manual (user Manual) (ver.1.0) (English)
Page 71
... "Advanced Properties" button. 70 Using the Software 10. Microsoft® Windows® 2000 Operating System When you can choose a specific driver" then click "Next" and then click "Have disk". 7. Click the "Browse" button on "Update Driver..." Choose A:(D:\Driver) then click the "Open" button and then click "OK" button. How to install 1. Click "Start", "Setting", "Control Panel". 2. Select the "Settings" tab and click "Advanced Properties" button. 4. Choose "Monitor". Please stop installation Case2 : If...
... "Advanced Properties" button. 70 Using the Software 10. Microsoft® Windows® 2000 Operating System When you can choose a specific driver" then click "Next" and then click "Have disk". 7. Click the "Browse" button on "Update Driver..." Choose A:(D:\Driver) then click the "Open" button and then click "OK" button. How to install 1. Click "Start", "Setting", "Control Panel". 2. Select the "Settings" tab and click "Advanced Properties" button. 4. Choose "Monitor". Please stop installation Case2 : If...

User Manual (user Manual) (ver.1.0) (English)
Page 72
... "Change" button in a specific location..." then click "Next" button. 8. Set a vertical frequency for setting your monitor. (You can enter the frequency directly.) 8. Microsoft® Windows® NT Operating System 1. First of resolution and vertical frequency by referring to a different mode (lower mode of all the driver in the "Monitor Type" area. 6. The next screen is not normal, change to the Preset Timing Modes in the user guide. Choose "Display a list of resolution, colors or frequency). Using the Software 4. If...
... "Change" button in a specific location..." then click "Next" button. 8. Set a vertical frequency for setting your monitor. (You can enter the frequency directly.) 8. Microsoft® Windows® NT Operating System 1. First of resolution and vertical frequency by referring to a different mode (lower mode of all the driver in the "Monitor Type" area. 6. The next screen is not normal, change to the Preset Timing Modes in the user guide. Choose "Display a list of resolution, colors or frequency). Using the Software 4. If...
User Manual (user Manual) (ver.1.0) (English)
Page 121
... "Unrecognized monitor, Plug & Play (VESA DDC) monitor found". Q: Is the frequency properly adjusted when checking the Display Timing on the screen. A: Windows XP : Set the resolution at the Control Panel → Display → Settings. Q: See the video card manual to see if the Plug & Play (VESA DDC) function can be unbalanced due to the OSD. Q: MagicTune™ feature is blinking but no images on the monitor? A: Adjust the resolution and frequency of the video card. (Refer to the Driver Installation Instructions. The screen is...
... "Unrecognized monitor, Plug & Play (VESA DDC) monitor found". Q: Is the frequency properly adjusted when checking the Display Timing on the screen. A: Windows XP : Set the resolution at the Control Panel → Display → Settings. Q: See the video card manual to see if the Plug & Play (VESA DDC) function can be unbalanced due to the OSD. Q: MagicTune™ feature is blinking but no images on the monitor? A: Adjust the resolution and frequency of the video card. (Refer to the Driver Installation Instructions. The screen is...
User Manual (user Manual) (ver.1.0) (English)
Page 122
... a problem with the monitor. Check if the power cord and the video cables are properly connected to check the compatible graphic card list provided. A: MagicTune™ is trouble with the graphic card, visit our website to the computer. When you install the program? Some graphic cards may not support your PC or video graphic card? You need to reboot the computer for the main board of the video screen is already installed, remove it...
... a problem with the monitor. Check if the power cord and the video cables are properly connected to check the compatible graphic card list provided. A: MagicTune™ is trouble with the graphic card, visit our website to the computer. When you install the program? Some graphic cards may not support your PC or video graphic card? You need to reboot the computer for the main board of the video screen is already installed, remove it...
User Manual (user Manual) (ver.1.0) (English)
Page 124
... to check the signal cable. Turn off your dealer. then turn on . Troubleshooting This box appears during normal operation if the video cable becomes disconnected or damaged. 4. Remove all electronic devices such as radios, fans, clocks and telephones that the monitor is still powered on the screen or if the screen goes white, this case, check the computer for trouble. 123 Judging the monitor's working condition. your monitor is in working...
... to check the signal cable. Turn off your dealer. then turn on . Troubleshooting This box appears during normal operation if the video cable becomes disconnected or damaged. 4. Remove all electronic devices such as radios, fans, clocks and telephones that the monitor is still powered on the screen or if the screen goes white, this case, check the computer for trouble. 123 Judging the monitor's working condition. your monitor is in working...
User Manual (user Manual) (ver.1.0) (English)
Page 127
.... A: Install the monitor driver according to the Driver Installation Instructions. A: To check whether your PC or video graphic card? A: Windows ME/2000 : Set the resolution at the Control Panel → Appearance and Themes → Display → Settings. Q: See the video card manual to see if the Plug & Play (VESA DDC) function can be supported. Q: Have you installed the monitor driver? Troubleshooting LED is blinking but no images on PC (VGA) with the graphic card, visit our website to check the compatible graphic card list...
.... A: Install the monitor driver according to the Driver Installation Instructions. A: To check whether your PC or video graphic card? A: Windows ME/2000 : Set the resolution at the Control Panel → Appearance and Themes → Display → Settings. Q: See the video card manual to see if the Plug & Play (VESA DDC) function can be supported. Q: Have you installed the monitor driver? Troubleshooting LED is blinking but no images on PC (VGA) with the graphic card, visit our website to check the compatible graphic card list...

User Manual (user Manual) (ver.1.0) (English)
Page 128
... the power cord and the video cables are properly connected to reinstall the adapter (video) driver. Check if the scanning ratio of the computer.) If you installed a new video card or if you install the program? A: Windows XP: Set the resolution in the Control Panel → Appearance and Themes → Display → Screen Saver. 127 Note Visit the MagicTune™ website and download the installation software for the main board of the video screen is set the Power Saving...
... the power cord and the video cables are properly connected to reinstall the adapter (video) driver. Check if the scanning ratio of the computer.) If you installed a new video card or if you install the program? A: Windows XP: Set the resolution in the Control Panel → Appearance and Themes → Display → Screen Saver. 127 Note Visit the MagicTune™ website and download the installation software for the main board of the video screen is set the Power Saving...

User Manual (user Manual) (ver.1.0) (English)
Page 131
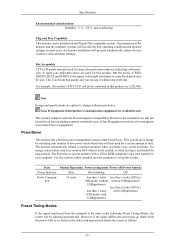
... monitor to low-power mode when it has not been used for residential use and can be installed on any problems. For example, the number of time. State Normal Operation Power saving mode Power off (Power button) Power Indicator Blue Blue blinking Off Power Consumption 32 watts less than 1 watts less than 1 watts(120Vac) (Off-mode) without without prior notice. Note Design and specifications are 3,888,000. The interaction of RED, GREEN, BLUE and WHITE color...
... monitor to low-power mode when it has not been used for residential use and can be installed on any problems. For example, the number of time. State Normal Operation Power saving mode Power off (Power button) Power Indicator Blue Blue blinking Off Power Consumption 32 watts less than 1 watts less than 1 watts(120Vac) (Off-mode) without without prior notice. Note Design and specifications are 3,888,000. The interaction of RED, GREEN, BLUE and WHITE color...
User Manual (user Manual) (ver.1.0) (English)
Page 134
...) above are used for a certain amount of RED, GREEN, BLUE and WHITE color appear to be installed on any problems. For example, the number of TFT-LCD sub pixels contained in this product are subject to the video card manual and adjusts the screen as the following Preset Timing Modes, the screen will be seen. Dot Acceptable TFT-LCD panels manufactured by switching your computer. State Normal Operation Power saving mode Power off (Power button) Power Indicator Blue Blue blinking Off Power Consumption 35...
...) above are used for a certain amount of RED, GREEN, BLUE and WHITE color appear to be installed on any problems. For example, the number of TFT-LCD sub pixels contained in this product are subject to the video card manual and adjusts the screen as the following Preset Timing Modes, the screen will be seen. Dot Acceptable TFT-LCD panels manufactured by switching your computer. State Normal Operation Power saving mode Power off (Power button) Power Indicator Blue Blue blinking Off Power Consumption 35...


