
User Manual (ENGLISH)
Page 7
... malfunction, causing electric shock or fire. Do not move the monitor by pulling only the wire or the signal cable. Never insert anything metallic into the monitor openings. Do not cover the vents on the monitor. Do not place water containers, chemical products or small metal objects... on the monitor cabinet. z The monitor may cause electric shock, fire or injury. Then contact a ...
... malfunction, causing electric shock or fire. Do not move the monitor by pulling only the wire or the signal cable. Never insert anything metallic into the monitor openings. Do not cover the vents on the monitor. Do not place water containers, chemical products or small metal objects... on the monitor cabinet. z The monitor may cause electric shock, fire or injury. Then contact a ...

User Manual (ENGLISH)
Page 12
.... Adjust buttons [ ] Adjust items in the upper left of the screen displaying the current mode -- MENU button [ ] MagicBright™™ [] Opens the OSD menu. MagicBright™™ is not on the contents of six settings by simply pressing MagicBright™ control button. 1) Custom Although the values... the case, adjust the brightness and contrast by our engineers, the pre-configured values may not be comfortable for your eyes depending on your monitor to the graphic card's DVI port using the OSD menu. 2) Text For documentations or work involving a lot of text. 3) Internet For...
.... Adjust buttons [ ] Adjust items in the upper left of the screen displaying the current mode -- MENU button [ ] MagicBright™™ [] Opens the OSD menu. MagicBright™™ is not on the contents of six settings by simply pressing MagicBright™ control button. 1) Custom Although the values... the case, adjust the brightness and contrast by our engineers, the pre-configured values may not be comfortable for your eyes depending on your monitor to the graphic card's DVI port using the OSD menu. 2) Text For documentations or work involving a lot of text. 3) Internet For...
User Manual (ENGLISH)
Page 15
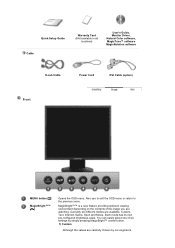
...the values are carefully chosen by our engineers, Quick Setup Guide Cable Warranty Card (Not available in all locations) User's Guide, Monitor Driver, Natural Color software, MagicTune™ software MagicRotation software D-sub Cable Power Cord DVI Cable (option) Front MENU button [ ] MagicBright™...;™ [] Opens the OSD menu. You can easily select one of the image you are available: Custom, Text, Internet, Game, Sport and Movie....
...the values are carefully chosen by our engineers, Quick Setup Guide Cable Warranty Card (Not available in all locations) User's Guide, Monitor Driver, Natural Color software, MagicTune™ software MagicRotation software D-sub Cable Power Cord DVI Cable (option) Front MENU button [ ] MagicBright™...;™ [] Opens the OSD menu. You can easily select one of the image you are available: Custom, Text, Internet, Game, Sport and Movie....
User Manual (ENGLISH)
Page 20
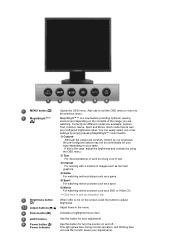
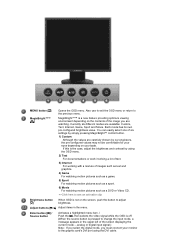
Adjust items in the menu. MENU button [ ] MagicBright™™ [] Opens the OSD menu. Currently six different modes are watching. You can easily select one of six settings by simply ...Also use to exit the OSD menu or return to adjust brightness. Power button [ ]/ Power indicator Use this button for turn the monitor on and off. / This light glows blue during normal operation, and blinking blue once as a DVD or Video CD. >>Click here... as a game. 5) Sport For watching motion pictures such as a sport. 6) Movie For watching motion pictures such as the monitor saves your taste.
Adjust items in the menu. MENU button [ ] MagicBright™™ [] Opens the OSD menu. Currently six different modes are watching. You can easily select one of six settings by simply ...Also use to exit the OSD menu or return to adjust brightness. Power button [ ]/ Power indicator Use this button for turn the monitor on and off. / This light glows blue during normal operation, and blinking blue once as a DVD or Video CD. >>Click here... as a game. 5) Sport For watching motion pictures such as a sport. 6) Movie For watching motion pictures such as the monitor saves your taste.
User Manual (ENGLISH)
Page 23
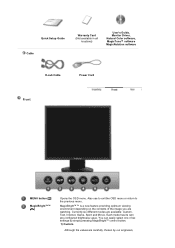
... by our engineers, Quick Setup Guide Cable Warranty Card (Not available in all locations) User's Guide, Monitor Driver, Natural Color software, MagicTune™ software MagicRotation software D-sub Cable Power Cord Front MENU button [ ] MagicBright™™ [] Opens the OSD menu. Currently six different modes are available: Custom, Text, Internet, Game, Sport and...
... by our engineers, Quick Setup Guide Cable Warranty Card (Not available in all locations) User's Guide, Monitor Driver, Natural Color software, MagicTune™ software MagicRotation software D-sub Cable Power Cord Front MENU button [ ] MagicBright™™ [] Opens the OSD menu. Currently six different modes are available: Custom, Text, Internet, Game, Sport and...

User Manual (ENGLISH)
Page 27
... the brightness and contrast by our engineers, the pre-configured values may not be comfortable for your eyes depending on your taste. Front MENU button [ ] Opens the OSD menu. MagicBright™™ [] MagicBright™™ is not on the contents of the image you are available: Custom, Text, Internet, Game, Sport...
... the brightness and contrast by our engineers, the pre-configured values may not be comfortable for your eyes depending on your taste. Front MENU button [ ] Opens the OSD menu. MagicBright™™ [] MagicBright™™ is not on the contents of the image you are available: Custom, Text, Internet, Game, Sport...
User Manual (ENGLISH)
Page 31
analog or digital input signal.) Note : If you select the digital mode, you are watching. MENU button [ ] MagicBright™™ [] Opens the OSD menu. MagicBright™™ is a new feature providing optimum viewing environment depending on the screen, push the button to adjust [] brightness. ...is the case, adjust the brightness and contrast by our engineers, the pre-configured values may not be comfortable for your eyes depending on your monitor to the graphic card's DVI port using the OSD menu. 2) Text For documentations or work involving a lot of text. 3) Internet For ...
analog or digital input signal.) Note : If you select the digital mode, you are watching. MENU button [ ] MagicBright™™ [] Opens the OSD menu. MagicBright™™ is a new feature providing optimum viewing environment depending on the screen, push the button to adjust [] brightness. ...is the case, adjust the brightness and contrast by our engineers, the pre-configured values may not be comfortable for your eyes depending on your monitor to the graphic card's DVI port using the OSD menu. 2) Text For documentations or work involving a lot of text. 3) Internet For ...

User Manual (ENGLISH)
Page 34
... viewing environment depending on the contents of six settings by our engineers, Quick Setup Guide Cable Warranty Card (Not available in all locations) User's Guide, Monitor Driver, Natural Color software, MagicTune™ software MagicRotation software D-sub Cable Power Cord DVI Cable (option) Front MENU button [ ] MagicBright™™...
... viewing environment depending on the contents of six settings by our engineers, Quick Setup Guide Cable Warranty Card (Not available in all locations) User's Guide, Monitor Driver, Natural Color software, MagicTune™ software MagicRotation software D-sub Cable Power Cord DVI Cable (option) Front MENU button [ ] MagicBright™™...
User Manual (ENGLISH)
Page 51
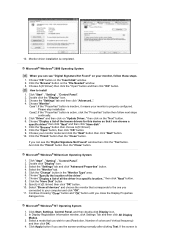
...Setting" , "Control Panel". 2. Choose the "Settings" tab and then click "Advanced..". 4. Click the "Browse" button then choose A:(D:\Driver). 8. Click the "Open" button, then click "OK" button. 9. Click the "Finish" button then the "Close" button. Microsoft® Windows® Millennium Operating System 1. Click "Start... button. 10. Click Start, Settings, Control Panel, and then double-click Display icon. 2. Click the "Have Disk" button 9. Choose "Monitor". Click "Driver" and then click on the "Insert disk" window. 2. Double click "Display" icon. 3. Continue choosing "Close" button and...
...Setting" , "Control Panel". 2. Choose the "Settings" tab and then click "Advanced..". 4. Click the "Browse" button then choose A:(D:\Driver). 8. Click the "Open" button, then click "OK" button. 9. Click the "Finish" button then the "Close" button. Microsoft® Windows® Millennium Operating System 1. Click "Start... button. 10. Click Start, Settings, Control Panel, and then double-click Display icon. 2. Click the "Have Disk" button 9. Choose "Monitor". Click "Driver" and then click on the "Insert disk" window. 2. Double click "Display" icon. 3. Continue choosing "Close" button and...

User Manual (ENGLISH)
Page 54
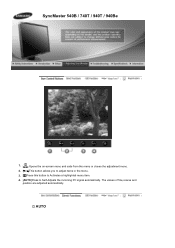
SyncMaster 740B / 940B 1. [ ]Opens the on-screen menu and exits from the menu or closes the adjustment menu. 2. [ ]This button allows you to adjust items in the menu. 3. [ ]Press this button to Activates a highlighted menu item. 4. [AUTO]Press to Self-Adjusts the incoming PC signal automatically. AUTO The values of fine,coarse and position are adjusted automatically.
SyncMaster 740B / 940B 1. [ ]Opens the on-screen menu and exits from the menu or closes the adjustment menu. 2. [ ]This button allows you to adjust items in the menu. 3. [ ]Press this button to Activates a highlighted menu item. 4. [AUTO]Press to Self-Adjusts the incoming PC signal automatically. AUTO The values of fine,coarse and position are adjusted automatically.

User Manual (ENGLISH)
Page 64
AUTO The values of fine,coarse and position are adjusted automatically. SyncMaster 740N / 940N 1. [ ]Opens the on-screen menu and exits from the menu or closes the adjustment menu. 2. [ ]This button allows you to adjust items in the menu. 3. [ ]Press this button to Activates a highlighted menu item. 4. [AUTO]Press to Self-Adjusts the incoming PC signal automatically.
AUTO The values of fine,coarse and position are adjusted automatically. SyncMaster 740N / 940N 1. [ ]Opens the on-screen menu and exits from the menu or closes the adjustment menu. 2. [ ]This button allows you to adjust items in the menu. 3. [ ]Press this button to Activates a highlighted menu item. 4. [AUTO]Press to Self-Adjusts the incoming PC signal automatically.

User Manual (ENGLISH)
Page 73
AUTO SyncMaster 940Fn 1. [ ]Opens the on-screen menu and exits from the menu or closes the adjustment menu. 2. [ ]This button allows you to adjust items in the menu. 3. [ ]Press this button to Activates a highlighted menu item. 4. [AUTO]Press to Self-Adjusts the incoming PC signal automatically. The values of fine,coarse and position are adjusted automatically.
AUTO SyncMaster 940Fn 1. [ ]Opens the on-screen menu and exits from the menu or closes the adjustment menu. 2. [ ]This button allows you to adjust items in the menu. 3. [ ]Press this button to Activates a highlighted menu item. 4. [AUTO]Press to Self-Adjusts the incoming PC signal automatically. The values of fine,coarse and position are adjusted automatically.
User Manual (ENGLISH)
Page 83
AUTO The values of fine,coarse and position are adjusted automatically. SyncMaster 540B / 740T / 940T / 940Be 1. [ ]Opens the on-screen menu and exits from the menu or closes the adjustment menu. 2. [ ]This button allows you to adjust items in the menu. 3. [ ]Press this button to Activates a highlighted menu item. 4. [AUTO]Press to Self-Adjusts the incoming PC signal automatically.
AUTO The values of fine,coarse and position are adjusted automatically. SyncMaster 540B / 740T / 940T / 940Be 1. [ ]Opens the on-screen menu and exits from the menu or closes the adjustment menu. 2. [ ]This button allows you to adjust items in the menu. 3. [ ]Press this button to Activates a highlighted menu item. 4. [AUTO]Press to Self-Adjusts the incoming PC signal automatically.

User Manual (ENGLISH)
Page 93
The values of fine,coarse and position are adjusted automatically. SyncMaster 540N 1. [ ]Opens the on-screen menu and exits from the menu or closes the adjustment menu. 2. [ ]This button allows you to adjust items in the menu. 3. [ ]Press this button to Activates a highlighted menu item. 4. [AUTO]Press to Self-Adjusts the incoming PC signal automatically. AUTO
The values of fine,coarse and position are adjusted automatically. SyncMaster 540N 1. [ ]Opens the on-screen menu and exits from the menu or closes the adjustment menu. 2. [ ]This button allows you to adjust items in the menu. 3. [ ]Press this button to Activates a highlighted menu item. 4. [AUTO]Press to Self-Adjusts the incoming PC signal automatically. AUTO

User Manual (ENGLISH)
Page 111
... or running MagicTune™ . Changing languages in specific monitors. Customized Key MagicColor Set Customized Key to the factory defaults. To reset the monitor settings to MagicColor. Applied only in MagicTune™ will be applied to monitor OSD(On Screen Display) languages.OSD language will be ...changed to MagicBright. Size Change the Size of the PIP window. Help Visit the MagicTune™ website or click to Auto Setup. Auto Setup Set Customized Key to open the Help files ...
... or running MagicTune™ . Changing languages in specific monitors. Customized Key MagicColor Set Customized Key to the factory defaults. To reset the monitor settings to MagicColor. Applied only in MagicTune™ will be applied to monitor OSD(On Screen Display) languages.OSD language will be ...changed to MagicBright. Size Change the Size of the PIP window. Help Visit the MagicTune™ website or click to Auto Setup. Auto Setup Set Customized Key to open the Help files ...


