Syncmaster 732N - Samsung LCD Analog Display
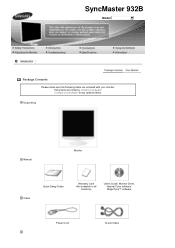
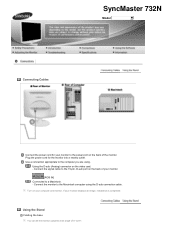
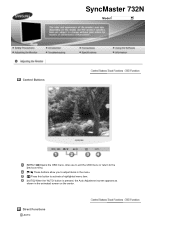
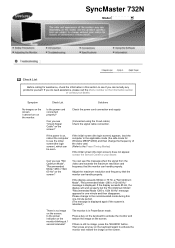
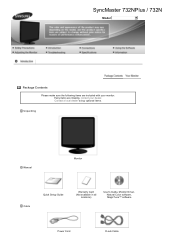
Syncmaster 732N
Related Manual Pages


Related Videos

Monitor LCD Samsung SyncMaster 732N
Duration: 3:29
Total Views: 4,319
Duration: 3:29
Total Views: 4,319
Syncmaster 732n Plus monitor samsung Venda no mercado livre
Duration: 1:31
Total Views: 2,020
Duration: 1:31
Total Views: 2,020
Similar Questions

Change Language On T200hd Syncmaster
Hello, I still have my T200HD Syncmaster. I purchased it in Korea. Can you help me change the langua...
Hello, I still have my T200HD Syncmaster. I purchased it in Korea. Can you help me change the langua...
(Posted by speedlimitmax 1 year ago)

Samsung Syncmaster B2030 Monitor
Required schematics of Samsung Syncmaster B2030 monitor.
Required schematics of Samsung Syncmaster B2030 monitor.
(Posted by sivankls 2 years ago)

Samsung Syncmaster 923nw Power Supply Schematic Diagram
I need schematic diagram for the power supply of Samsung Syncmaster 923NW because I can not recogniz...
I need schematic diagram for the power supply of Samsung Syncmaster 923NW because I can not recogniz...
(Posted by adolph923 8 years ago)

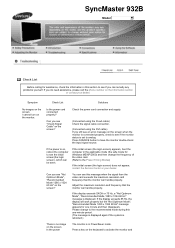
Samsung Syncmaster 732n Has Ghosting,how Do I Get Rid Of It
my samsung syncmaster 732N has ghosting is there a driver that will fix it
my samsung syncmaster 732N has ghosting is there a driver that will fix it
(Posted by dtebby 8 years ago)

Lcd Monitor Syncmaster 732n Plus Driver
(Posted by jbm2170 11 years ago)
Related Terms
The following terms were also used when searching for Syncmaster 732N - Samsung LCD Analog Display:- samsung 732n
- syncmaster 732n plus
- 732n samsung
- 17 samsung 732n
- 732n plus driver
- 732n driver
- 732n lcd monitor
- samsung 732n lcd
- samsung 732n price
- 732n price
- samsung 732n lcd monitor
- 732n 17 lcd monitor
- samsung 732n plus
- samsung syncmaster 732n lcd monitor
- samsung 732n driver
- 732n monitor
- samsung 732n spec
- samsung 732n plus driver
- samsung 732n plus monitor
- samsung 732n drivers
- samsung 732n monitor
- samsung 732n schematic
- samsung 732n defeito
- samsung 732n blank
- samsung 732n backlight problem
- samsung 732n backlight
- 732nw samsung
- samsung 732n power
- samsung 732n problem
- samsung 732n resolution
- samsung 732n service
- samsung 732n service manual
- samsung 732n specification
- samsung 732n specifications
- samsung 732n specs
- samsung 732n warranty
- samsung 732nplus
- samsung 732nplus monitor
- samsung 732nw
- syncmaster 732n
- syncmaster 732n driver
- 732n samsung driver
- 732n
- 732n backlight
- 732n backlight problem
- 732n blank
- 732n defeito
- 732n drivers
- 732n inverter
- 732n lcd
- 732n manual
- 732n plus
- 732n plus monitor
- 732n plus samsung
- 732n power
- 732n problem
- 732n resolution
- samsung 732n 17 lcd monitor
- 732n samsung lcd
- 732n samsung manual
- 732n samsung monitor
- 732n schematic
- 732n se apaga
- 732n service
- 732n service manual
- 732n specification
- 732n specifications
- 732n specs
- 732n warranty
- 732nplus monitor
- g 732n g 732s
- samsung 732
- samsung 732 w