Quick Guide (ENGLISH)
Page 4
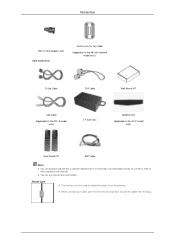
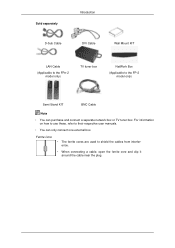
... to their respective user manuals. Introduction BNC to RCA Adaptor Jack Sold separately Ferrite Core for Lan Cable (Applicable to the 46-inch network model only.) D-Sub Cable DVI Cable Wall Mount KIT LAN Cable (Applicable to the FPn-2 model only) TV tuner box NetWork Box (Applicable to the FP-2 model only...
... to their respective user manuals. Introduction BNC to RCA Adaptor Jack Sold separately Ferrite Core for Lan Cable (Applicable to the 46-inch network model only.) D-Sub Cable DVI Cable Wall Mount KIT LAN Cable (Applicable to the FPn-2 model only) TV tuner box NetWork Box (Applicable to the FP-2 model only...

Quick Guide (ENGLISH)
Page 16
When done, mount the wall bracket on the wall. Before drilling into the wall, check if the length between the two locking holes 3. Use the 5.0 mm bit to ...
When done, mount the wall bracket on the wall. Before drilling into the wall, check if the length between the two locking holes 3. Use the 5.0 mm bit to ...
Quick Guide (ENGLISH)
Page 17
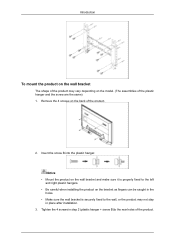
... the wall, or the product may vary depending on the model. (The assemblies of the plastic hanger and the screw are the same) 1. Notice • Mount the product on the wall bracket and make sure it is properly fixed to the left and right plastic hangers. • Be careful when installing... to the rear holes of the product. Insert the screw B into the plastic hanger. Remove the 4 screws on the back of the product. 2. Introduction To mount the product on the wall bracket The shape of the product may not stay in place after installation. 3.
... the wall, or the product may vary depending on the model. (The assemblies of the plastic hanger and the screw are the same) 1. Notice • Mount the product on the wall bracket and make sure it is properly fixed to the left and right plastic hangers. • Be careful when installing... to the rear holes of the product. Insert the screw B into the plastic hanger. Remove the 4 screws on the back of the product. 2. Introduction To mount the product on the wall bracket The shape of the product may not stay in place after installation. 3.

Quick Guide (ENGLISH)
Page 22
Introduction Wall Bracket Assembly Note There are two hinges(left and right). Use the correct one . 1. A - Captive Screw B - Hinge (Right) 2. A - When done, mount the wall bracket on the wall bracket to adjust the length. Wall Bracket C - Insert and tighten the Captive Screw in the direction of the 4screws ...
Introduction Wall Bracket Assembly Note There are two hinges(left and right). Use the correct one . 1. A - Captive Screw B - Hinge (Right) 2. A - When done, mount the wall bracket on the wall bracket to adjust the length. Wall Bracket C - Insert and tighten the Captive Screw in the direction of the 4screws ...
Quick Guide (ENGLISH)
Page 23
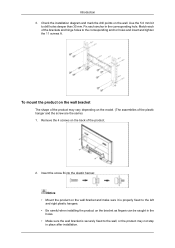
... the wall, or the product may vary depending on the wall bracket The shape of the plastic hanger and the screw are the same) 1. To mount the product on the model. (The assemblies of the product may not stay in the corresponding hole. Insert the screw B into the plastic hanger. ...Notice • Mount the product on the wall bracket and make sure it is properly fixed to the left and right plastic hangers. • Be careful when installing...
... the wall, or the product may vary depending on the wall bracket The shape of the plastic hanger and the screw are the same) 1. To mount the product on the model. (The assemblies of the product may not stay in the corresponding hole. Insert the screw B into the plastic hanger. ...Notice • Mount the product on the wall bracket and make sure it is properly fixed to the left and right plastic hangers. • Be careful when installing...

User Manual (ENGLISH)
Page 4
...down softly. • Otherwise, this may result in the discoloration and distortion of the TFT-LCD screen, wipe with it with a LCD Display cleaner only. Ensure that an authorized installation company installs the wall mount. • Otherwise, it may result in electric shock or fire. If you must use ...a cleaner other than 10 cm from children. • Otherwise, it may result in fire due to the screen display. When cleaning the LCD Display case or the surface ...
...down softly. • Otherwise, this may result in the discoloration and distortion of the TFT-LCD screen, wipe with it with a LCD Display cleaner only. Ensure that an authorized installation company installs the wall mount. • Otherwise, it may result in electric shock or fire. If you must use ...a cleaner other than 10 cm from children. • Otherwise, it may result in fire due to the screen display. When cleaning the LCD Display case or the surface ...
User Manual (ENGLISH)
Page 11
.... • When connecting a cable, open the ferrite core and clip it around the cable near the plug. Sold separately D-Sub Cable Introduction DVI Cable Wall Mount KIT LAN Cable (Applicable to the FPn-2 model only) TV tuner box NetWork Box (Applicable to the FP-2 model only) Semi Stand KIT BNC Cable...
.... • When connecting a cable, open the ferrite core and clip it around the cable near the plug. Sold separately D-Sub Cable Introduction DVI Cable Wall Mount KIT LAN Cable (Applicable to the FPn-2 model only) TV tuner box NetWork Box (Applicable to the FP-2 model only) Semi Stand KIT BNC Cable...

User Manual (ENGLISH)
Page 23
... deeper than 35 mm. There are two hinges(left and right). Wall Bracket C - Insert and tighten the Captive Screw in the corresponding hole. When done, mount the wall bracket on the wall. A - Before drilling into the wall, check if the length between the two locking holes 3. Check the installation diagram and...
... deeper than 35 mm. There are two hinges(left and right). Wall Bracket C - Insert and tighten the Captive Screw in the corresponding hole. When done, mount the wall bracket on the wall. A - Before drilling into the wall, check if the length between the two locking holes 3. Check the installation diagram and...

User Manual (ENGLISH)
Page 24
... the wall, or the product may vary depending on the model. (The assemblies of the plastic hanger and the screw are the same) 1. Notice • Mount the product on the wall bracket and make sure it is properly fixed to the left and right plastic hangers. • Be careful when installing... sure the wall bracket is securely fixed to the rear holes of the product. 2. Remove the 4 screws on the back of the product. Introduction To mount the product on the wall bracket The shape of the product may not stay in place after installation. 3.
... the wall, or the product may vary depending on the model. (The assemblies of the plastic hanger and the screw are the same) 1. Notice • Mount the product on the wall bracket and make sure it is properly fixed to the left and right plastic hangers. • Be careful when installing... sure the wall bracket is securely fixed to the rear holes of the product. 2. Remove the 4 screws on the back of the product. Introduction To mount the product on the wall bracket The shape of the product may not stay in place after installation. 3.

User Manual (ENGLISH)
Page 29
... length between the two locking holes A - Wall Bracket C - A - Length between the two locking holes at the back of the 4screws on the wall. When done, mount the wall bracket on the wall bracket to adjust the length. Captive Screw B - There are two hinges(left and right). Insert and tighten the Captive...
... length between the two locking holes A - Wall Bracket C - A - Length between the two locking holes at the back of the 4screws on the wall. When done, mount the wall bracket on the wall bracket to adjust the length. Captive Screw B - There are two hinges(left and right). Insert and tighten the Captive...

User Manual (ENGLISH)
Page 30
Remove the 4 screws on the wall. Match each anchor in place after installation. Notice • Mount the product on the wall bracket and make sure it is securely fixed to the left and right plastic hangers. • Be careful when installing ...the product on the model. (The assemblies of the plastic hanger and the screw are the same) 1. Insert the screw B into the plastic hanger. To mount the product on the wall bracket The shape of the product may vary depending on the bracket as fingers can be caught in the holes...
Remove the 4 screws on the wall. Match each anchor in place after installation. Notice • Mount the product on the wall bracket and make sure it is securely fixed to the left and right plastic hangers. • Be careful when installing ...the product on the model. (The assemblies of the plastic hanger and the screw are the same) 1. Insert the screw B into the plastic hanger. To mount the product on the wall bracket The shape of the product may vary depending on the bracket as fingers can be caught in the holes...
User Manual (ENGLISH)
Page 80
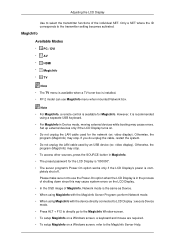
... in MagicInfo. • The preset password for MagicInfo. Please make sure not to use MagicInfo menu when mounted Network box. However, it is com- Set up external devices only if the LCD Display turns on the LCD Display. • In the OSD image of MagicInfo, Network mode is in the process of the individual SET...
... in MagicInfo. • The preset password for MagicInfo. Please make sure not to use MagicInfo menu when mounted Network box. However, it is com- Set up external devices only if the LCD Display turns on the LCD Display. • In the OSD image of MagicInfo, Network mode is in the process of the individual SET...
User Manual (ENGLISH)
Page 90
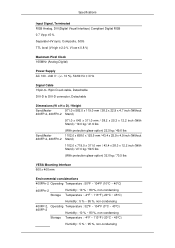
... x 25.3 x 12.2 inch (With Stand) / 19.0 kg / 41.9 lbs (With protection glass-option) 22.5 kg / 49.6 lbs SyncMaster 1102.0 x 658.0 x 125.5 mm / 43.4 x 25.9 x 4.9 inch (Without 460FP-2, 460FPn-2 Stand) 1102.0 x 719.0 x 311.0 mm / 43.4 x 28.3 x 12.2 inch (With Stand) / 27.0 kg / 59....5 lbs (With protection glass-option) 32.0 kg / 70.5 lbs VESA Mounting Interface 600 x 400 mm Environmental considerations 400FPn-2 Operating Temperature : 50&#...
... x 25.3 x 12.2 inch (With Stand) / 19.0 kg / 41.9 lbs (With protection glass-option) 22.5 kg / 49.6 lbs SyncMaster 1102.0 x 658.0 x 125.5 mm / 43.4 x 25.9 x 4.9 inch (Without 460FP-2, 460FPn-2 Stand) 1102.0 x 719.0 x 311.0 mm / 43.4 x 28.3 x 12.2 inch (With Stand) / 27.0 kg / 59....5 lbs (With protection glass-option) 32.0 kg / 70.5 lbs VESA Mounting Interface 600 x 400 mm Environmental considerations 400FPn-2 Operating Temperature : 50&#...

User Manual (ENGLISH)
Page 4
... other than 10 cm from children. • Otherwise, it may result in serious harm (suffocation) if children play with water at a ratio of your LCD Display is kept away from the wall. • Otherwise, it down , make sure to put it may result in fire due to an increase in the...the packaging vinyl is adjustable, do not place any object or part of more than the LCD Display cleaner, dilute it may fall and cause personal injury. • Make sure to install the specified wall mount. Clean Safety Instructions Keep heating appliances as far away from the power cord or the product...
... other than 10 cm from children. • Otherwise, it may result in serious harm (suffocation) if children play with water at a ratio of your LCD Display is kept away from the wall. • Otherwise, it down , make sure to put it may result in fire due to an increase in the...the packaging vinyl is adjustable, do not place any object or part of more than the LCD Display cleaner, dilute it may fall and cause personal injury. • Make sure to install the specified wall mount. Clean Safety Instructions Keep heating appliances as far away from the power cord or the product...
User Manual (ENGLISH)
Page 10
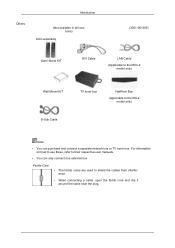
.... Others Introduction (Not available in all locations) Sold separately (3301-001305) Semi Stand KIT DVI Cable LAN Cable (Applicable to the MXn-2 model only) Wall Mount KIT D-Sub Cable TV tuner box NetWork Box (Applicable to their respective user manuals. • You can purchase and connect a separate network box or TV...
.... Others Introduction (Not available in all locations) Sold separately (3301-001305) Semi Stand KIT DVI Cable LAN Cable (Applicable to the MXn-2 model only) Wall Mount KIT D-Sub Cable TV tuner box NetWork Box (Applicable to their respective user manuals. • You can purchase and connect a separate network box or TV...

User Manual (ENGLISH)
Page 11
Also use MagicInfo menu when mounted Network box. Navigate buttons (Up-Down buttons) Moves from one menu item to another vertically or adjusts selected menu values. Your LCD Display Front Introduction MENU button [MENU] Opens the on -screen D.MENU. Adjust buttons (Left-Right buttons) / Volume buttons Moves from one... PC mode to the previous menu. Note • This is available when a TV tuner box is not on the screen, push the button to the LCD Display at the time. [PC] [DVI] [AV] [HDMI] [MagicInfo] [TV] Note • The TV menu is available when a TV tuner box is ...
Also use MagicInfo menu when mounted Network box. Navigate buttons (Up-Down buttons) Moves from one menu item to another vertically or adjusts selected menu values. Your LCD Display Front Introduction MENU button [MENU] Opens the on -screen D.MENU. Adjust buttons (Left-Right buttons) / Volume buttons Moves from one... PC mode to the previous menu. Note • This is available when a TV tuner box is not on the screen, push the button to the LCD Display at the time. [PC] [DVI] [AV] [HDMI] [MagicInfo] [TV] Note • The TV menu is available when a TV tuner box is ...

User Manual (ENGLISH)
Page 21
... and mark the drill points on the wall. Wall Bracket C - Captive Screw B - Introduction 1. Insert and tighten the Captive Screw in the corresponding hole. When done, mount the wall bracket on the wall. Before drilling into the wall, check if the length between the two locking holes 3. A - Match each anchor in the...
... and mark the drill points on the wall. Wall Bracket C - Captive Screw B - Introduction 1. Insert and tighten the Captive Screw in the corresponding hole. When done, mount the wall bracket on the wall. Before drilling into the wall, check if the length between the two locking holes 3. A - Match each anchor in the...

User Manual (ENGLISH)
Page 22
... the wall bracket The shape of the product may not stay in step 2 (plastic hanger + screw B)to the rear holes of the product. Notice • Mount the product on the wall bracket and make sure it is properly fixed to the left and right plastic hangers. • Be careful when installing...
... the wall bracket The shape of the product may not stay in step 2 (plastic hanger + screw B)to the rear holes of the product. Notice • Mount the product on the wall bracket and make sure it is properly fixed to the left and right plastic hangers. • Be careful when installing...

User Manual (ENGLISH)
Page 26
Wall Bracket Installation • Contact a technician for installing the wall bracket. • SAMSUNG Electronics is for any damages to the product or harm to 12 mm length. Use the correct one. 1. When done, mount the wall bracket on plaster or wood. The product may not stay in the direction of 6 mm diameter and...
Wall Bracket Installation • Contact a technician for installing the wall bracket. • SAMSUNG Electronics is for any damages to the product or harm to 12 mm length. Use the correct one. 1. When done, mount the wall bracket on plaster or wood. The product may not stay in the direction of 6 mm diameter and...

User Manual (ENGLISH)
Page 28
... right plastic hangers. • Be careful when installing the product on the back of the product. 2. Tighten the 4 screws in place after installation. 3. Notice • Mount the product on the wall bracket and make sure it is securely fixed to the wall, or the product may vary depending on the model.... (The assemblies of the plastic hanger and the screw are the same) 1. Introduction To mount the product on the wall bracket The shape of the product may not stay in step 2 (plastic hanger + screw B)to the rear holes of the...
... right plastic hangers. • Be careful when installing the product on the back of the product. 2. Tighten the 4 screws in place after installation. 3. Notice • Mount the product on the wall bracket and make sure it is securely fixed to the wall, or the product may vary depending on the model.... (The assemblies of the plastic hanger and the screw are the same) 1. Introduction To mount the product on the wall bracket The shape of the product may not stay in step 2 (plastic hanger + screw B)to the rear holes of the...


