Quick Guide (ENGLISH)
Page 3
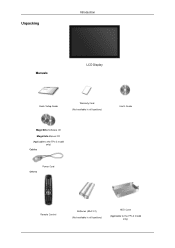
Unpacking Introduction Manuals LCD Display Quick Setup Guide Warranty Card (Not available in all locations) User's Guide MagicInfo Software CD MagicInfo Manual CD (Applicable to the FPn-2 model only) Cables Others Power Cord Remote Control Batteries (AAA X 2) (Not available in all locations) HDD Cover (Applicable to the FPn-2 model only)
Unpacking Introduction Manuals LCD Display Quick Setup Guide Warranty Card (Not available in all locations) User's Guide MagicInfo Software CD MagicInfo Manual CD (Applicable to the FPn-2 model only) Cables Others Power Cord Remote Control Batteries (AAA X 2) (Not available in all locations) HDD Cover (Applicable to the FPn-2 model only)
Quick Guide (ENGLISH)
Page 6
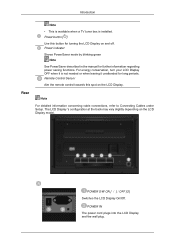
... mode by blinking green Note See PowerSaver described in the manual for long periods. Note For detailed information concerning cable connections, refer to Connecting Cables under Setup. The LCD Display 's configuration at the back may vary slightly depending on the LCD Display. For energy conservation, turn your LCD Display OFF when it is installed. POWER S/W ON [ ] / OFF [O] Switches the LCD Display On/Off. POWER IN The power cord plugs into the LCD Display and the wall plug. Remote Control Sensor Aim the remote control...
... mode by blinking green Note See PowerSaver described in the manual for long periods. Note For detailed information concerning cable connections, refer to Connecting Cables under Setup. The LCD Display 's configuration at the back may vary slightly depending on the LCD Display. For energy conservation, turn your LCD Display OFF when it is installed. POWER S/W ON [ ] / OFF [O] Switches the LCD Display On/Off. POWER IN The power cord plugs into the LCD Display and the wall plug. Remote Control Sensor Aim the remote control...
Quick Guide (ENGLISH)
Page 26
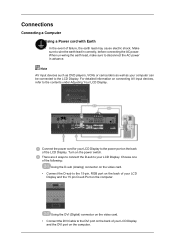
... input devices, refer to the 15-pin, RGB port on the back of the LCD Display. Choose one of failure, the earth lead may cause electric shock. Turn on the video card. • Connect the D-sub to the contents under Adjusting Your LCD Display. When un-wiring the earth lead, make sure to wire the earth lead in advance. Connections Connecting a Computer Using a Power cord...
... input devices, refer to the 15-pin, RGB port on the back of the LCD Display. Choose one of failure, the earth lead may cause electric shock. Turn on the video card. • Connect the D-sub to the contents under Adjusting Your LCD Display. When un-wiring the earth lead, make sure to wire the earth lead in advance. Connections Connecting a Computer Using a Power cord...

Quick Guide (ENGLISH)
Page 29
... the LCD Dis- Connect a set of the LCD Display or on the Set Top Box. PR, Y, PB port on the LCD Display and the PR, Y, PB jacks on the Set Top Box. 2. Note • Select Component for a typical Set Top Box are shown below. 1. Connect a Component cable between the BNC/COMPONENT IN - play and the AUDIO OUT jacks on the remote control. Connect a set of the LCD Display or on the DVD player. 2. For an explanation of Component video, consult your DVD manual.
... the LCD Dis- Connect a set of the LCD Display or on the Set Top Box. PR, Y, PB port on the LCD Display and the PR, Y, PB jacks on the Set Top Box. 2. Note • Select Component for a typical Set Top Box are shown below. 1. Connect a Component cable between the BNC/COMPONENT IN - play and the AUDIO OUT jacks on the remote control. Connect a set of the LCD Display or on the DVD player. 2. For an explanation of Component video, consult your DVD manual.

Quick Guide (ENGLISH)
Page 33
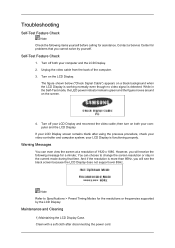
... video cable; Note Refer to change the screen resolution or stay in the Self-Test mode, the LED power indicator remains green and the figure moves around on both your video controller and computer system; Turn off both your computer and the LCD Display If your LCD Display screen remains blank after disconnecting the power cord. Warning Messages You can choose to Specifications > Preset Timing Modes for assistance. You can even view the screen...
... video cable; Note Refer to change the screen resolution or stay in the Self-Test mode, the LED power indicator remains green and the figure moves around on both your video controller and computer system; Turn off both your computer and the LCD Display If your LCD Display screen remains blank after disconnecting the power cord. Warning Messages You can choose to Specifications > Preset Timing Modes for assistance. You can even view the screen...
Quick Guide (ENGLISH)
Page 34
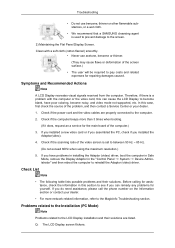
... the screen. 2) Maintaining the Flat Panel Display Screen. Check List Note • The following table lists possible problems and their solutions are properly connected to between 50 Hz ~ 85 Hz. (Do not exceed 60Hz when using the maximum resolution.) 5. Check if the power cord and the video cables are listed. If you have poor coloring, become noisy, and video mode not supported, etc. Problems related to the Installation (PC Mode) Note Problems related to the LCD Display installation...
... the screen. 2) Maintaining the Flat Panel Display Screen. Check List Note • The following table lists possible problems and their solutions are properly connected to between 50 Hz ~ 85 Hz. (Do not exceed 60Hz when using the maximum resolution.) 5. Check if the power cord and the video cables are listed. If you have poor coloring, become noisy, and video mode not supported, etc. Problems related to the Installation (PC Mode) Note Problems related to the LCD Display installation...

User Manual (ENGLISH)
Page 40
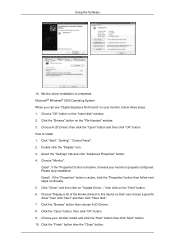
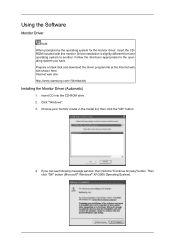
Prepare a blank disk and download the driver program file at the Internet web site shown here. Choose your monitor model in the model list, then click the "OK" button. 4. Click "Windows". 3. Then click "OK" button (Microsoft® Windows® XP/2000 Operating System). Using the Software Monitor Driver Note When prompted by the operating system for the operating system you can see following message window, then click the...
Prepare a blank disk and download the driver program file at the Internet web site shown here. Choose your monitor model in the model list, then click the "OK" button. 4. Click "Windows". 3. Then click "OK" button (Microsoft® Windows® XP/2000 Operating System). Using the Software Monitor Driver Note When prompted by the operating system for the operating system you can see following message window, then click the...
User Manual (ENGLISH)
Page 46
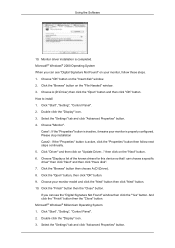
... click the "Display" icon. 3. How to install 1. Click "Driver" and then click on the "Next" button. 6. Choose your monitor is inactive, it means your monitor model and click the "Next" button then click "Next" button. 10. Microsoft® Windows® 2000 Operating System When you can choose a specific driver" then click "Next" and then click "Have disk". 7. then click on "Update Driver..." Click the...
... click the "Display" icon. 3. How to install 1. Click "Driver" and then click on the "Next" button. 6. Choose your monitor is inactive, it means your monitor model and click the "Next" button then click "Next" button. 10. Microsoft® Windows® 2000 Operating System When you can choose a specific driver" then click "Next" and then click "Have disk". 7. then click on "Update Driver..." Click the...
User Manual (ENGLISH)
Page 47
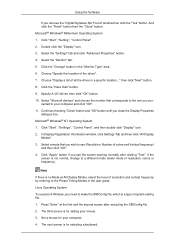
... is no Mode at the first and the second screen after clicking "Test". Specify A:\(D:\driver) then click "OK" button. 10. If the screen is a type of system setting file. 1. Click "Start", "Setting", "Control Panel". 2. Using the Software If you wish to use (Resolution, Number of colors and Vertical frequency) and then click "OK". 4. And click the "Finish" button then the "Close" button. Microsoft® Windows® Millennium Operating System 1. Select...
... is no Mode at the first and the second screen after clicking "Test". Specify A:\(D:\driver) then click "OK" button. 10. If the screen is a type of system setting file. 1. Click "Start", "Setting", "Control Panel". 2. Using the Software If you wish to use (Resolution, Number of colors and Vertical frequency) and then click "OK". 4. And click the "Finish" button then the "Close" button. Microsoft® Windows® Millennium Operating System 1. Select...

User Manual (ENGLISH)
Page 49
Perform the following steps remove MDC. Select MDC from the list and then click the "Add/Delete" button. Using the Software Uninstall The MDC program can be removed only by using the "Add or Remove Programs" option of the Windows® Control Panel. Using MDC Select "Setting/Control Panel" on the "Start" menu and then double-click "Add/Delete a program".
Perform the following steps remove MDC. Select MDC from the list and then click the "Add/Delete" button. Using the Software Uninstall The MDC program can be removed only by using the "Add or Remove Programs" option of the Windows® Control Panel. Using MDC Select "Setting/Control Panel" on the "Start" menu and then double-click "Add/Delete a program".
User Manual (ENGLISH)
Page 80
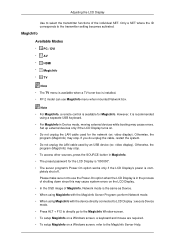
... to the MagicInfo Server Help. pletely shut off. Please make sure not to the transmitter setting becomes activated. Otherwise, the program (MagicInfo) may stop . • To access other sources, press the SOURCE button in MagicInfo. • The preset password for MagicInfo. Only a SET where the ID corresponds to use the Power-On option when the LCD Display is installed. • FP-2 model can use MagicInfo menu when mounted Network box.
... to the MagicInfo Server Help. pletely shut off. Please make sure not to the transmitter setting becomes activated. Otherwise, the program (MagicInfo) may stop . • To access other sources, press the SOURCE button in MagicInfo. • The preset password for MagicInfo. Only a SET where the ID corresponds to use the Power-On option when the LCD Display is installed. • FP-2 model can use MagicInfo menu when mounted Network box.
User Manual (ENGLISH)
Page 83
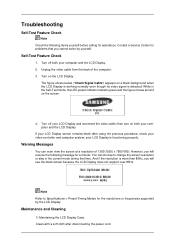
... LCD Display. Warning Messages You can choose to Specifications > Preset Timing Modes for assistance. Turn off your video controller and computer system; your LCD Display screen remains blank after disconnecting the power cord. Turn on the screen. 4. However, you will see the black screen because the LCD Display does not support over 85Hz. Contact a Service Center for a minute; Note Refer to change the screen resolution or stay in the Self-Test mode, the LED power indicator remains green...
... LCD Display. Warning Messages You can choose to Specifications > Preset Timing Modes for assistance. Turn off your video controller and computer system; your LCD Display screen remains blank after disconnecting the power cord. Turn on the screen. 4. However, you will see the black screen because the LCD Display does not support over 85Hz. Contact a Service Center for a minute; Note Refer to change the screen resolution or stay in the Self-Test mode, the LED power indicator remains green...

User Manual (ENGLISH)
Page 84
... the video screen is used to prevent damage to the screen. 2) Maintaining the Flat Panel Display Screen. Before calling for assistance, check the information in the "Control Panel −> System −> Device Administrator" and then reboot the computer to reinstall the Adaptor (video) driver. Symptoms and Recommended Actions Note A LCD Display recreates visual signals received from the computer. Problems related to the Installation (PC Mode) Note Problems related to the LCD Display installation...
... the video screen is used to prevent damage to the screen. 2) Maintaining the Flat Panel Display Screen. Before calling for assistance, check the information in the "Control Panel −> System −> Device Administrator" and then reboot the computer to reinstall the Adaptor (video) driver. Symptoms and Recommended Actions Note A LCD Display recreates visual signals received from the computer. Problems related to the Installation (PC Mode) Note Problems related to the LCD Display installation...
User Manual (ENGLISH)
Page 91
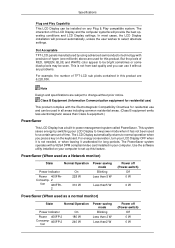
... been used as a Network monitor) State Normal Operation Power Indicator Power 400FPnConsump- 2 tion 460FPn2 On 228 W 310 W Power saving mode Blinking Less than 5 W Less than5 W Power off (Power-switch) Off 0 W 0 W PowerSaver (When used for long periods. The LCD Display automatically returns to be bright sometimes or some black pixels may be installed on any problems. For example, the number of RED, GREEN, BLUE and WHITE color appear to normal operation when you can use and...
... been used as a Network monitor) State Normal Operation Power Indicator Power 400FPnConsump- 2 tion 460FPn2 On 228 W 310 W Power saving mode Blinking Less than 5 W Less than5 W Power off (Power-switch) Off 0 W 0 W PowerSaver (When used for long periods. The LCD Display automatically returns to be bright sometimes or some black pixels may be installed on any problems. For example, the number of RED, GREEN, BLUE and WHITE color appear to normal operation when you can use and...

User Manual (ENGLISH)
Page 31
...: Using the D-sub (Analog) connector on the video card. • Connect the D-sub to the power port on the power switch. When un-wiring the earth lead, make sure to disconnect the AC power in correctly, before connecting the AC power. Note AV input devices such as DVD players, VCRs or camcorders as well as your computer can be connected to your LCD Display and the DVI port...
...: Using the D-sub (Analog) connector on the video card. • Connect the D-sub to the power port on the power switch. When un-wiring the earth lead, make sure to disconnect the AC power in correctly, before connecting the AC power. Note AV input devices such as DVD players, VCRs or camcorders as well as your computer can be connected to your LCD Display and the DVI port...

User Manual (ENGLISH)
Page 33
... found on the LCD Display . 3. Connecting Using a HDMI Cable Note • Input devices such as digital DVD are usually included with a tape inserted. Connect a video cable between the AUDIO OUTPUT jacks on the camcorder and the AV AUDIO IN [L-AUDIO-R] on the LCD Display . 2. Select AV for the Camcorder connection using the HDMI cable. • You cannot connect a PC to the HDMI terminal of the LCD Display using the Source button on the front of the LCD Display or on the...
... found on the LCD Display . 3. Connecting Using a HDMI Cable Note • Input devices such as digital DVD are usually included with a tape inserted. Connect a video cable between the AUDIO OUTPUT jacks on the camcorder and the AV AUDIO IN [L-AUDIO-R] on the LCD Display . 2. Select AV for the Camcorder connection using the HDMI cable. • You cannot connect a PC to the HDMI terminal of the LCD Display using the Source button on the front of the LCD Display or on the...
User Manual (ENGLISH)
Page 36
...® XP/2000 Operating System). Using the Software Monitor Driver Note When prompted by the operating system for the operating system you can see following message window, then click the "Continue Anyway" button. Prepare a blank disk and download the driver program file at the Internet web site shown here. Click "Windows". 3. Choose your monitor model in the model list, then click the "OK" button. 4. Driver installation is slightly different...
...® XP/2000 Operating System). Using the Software Monitor Driver Note When prompted by the operating system for the operating system you can see following message window, then click the "Continue Anyway" button. Prepare a blank disk and download the driver program file at the Internet web site shown here. Click "Windows". 3. Choose your monitor model in the model list, then click the "OK" button. 4. Driver installation is slightly different...
User Manual (ENGLISH)
Page 42
... Not Found" on the "File Needed" window. 3. Click the "Browse" button on your monitor model and click the "Next" button then click "Next" button. 10. Select the "Settings" tab and click "Advanced Properties" button. 4. Click the "Finish" button then the "Close" button. And click the "Finish" button then the "Close" button. Using the Software 10. Choose "OK" button on "Update Driver..." Click "Start", "Setting", "Control Panel". 2. Click "Driver" and then click on the...
... Not Found" on the "File Needed" window. 3. Click the "Browse" button on your monitor model and click the "Next" button then click "Next" button. 10. Select the "Settings" tab and click "Advanced Properties" button. 4. Click the "Finish" button then the "Close" button. And click the "Finish" button then the "Close" button. Using the Software 10. Choose "OK" button on "Update Driver..." Click "Start", "Setting", "Control Panel". 2. Click "Driver" and then click on the...

User Manual (ENGLISH)
Page 43
...". 11. Choose "Display a list of resolution, colors or frequency). Press "Enter" at All Display Modes, select the level of resolution and vertical frequency by referring to a different mode (lower mode of all the driver in the "Monitor Type" area. 6. Click the "Change" button in a specific location..." The next screen is for selecting a keyboard. 5. Linux Operating System To execute X-Window, you close the Display Properties dialogue box. Select the "Monitor" tab. 5. Set a vertical frequency...
...". 11. Choose "Display a list of resolution, colors or frequency). Press "Enter" at All Display Modes, select the level of resolution and vertical frequency by referring to a different mode (lower mode of all the driver in the "Monitor Type" area. 6. Click the "Change" button in a specific location..." The next screen is for selecting a keyboard. 5. Linux Operating System To execute X-Window, you close the Display Properties dialogue box. Select the "Monitor" tab. 5. Set a vertical frequency...
User Manual (ENGLISH)
Page 94
... not support over 85Hz. Turn off your LCD Display screen remains blank after disconnecting the power cord. The figure shown below ("Check Signal Cable") appears on a black background when the LCD Display is working normally even though no video signal is functioning properly. Warning Messages You can choose to Specifications > Preset Timing Modes for problems that time. Note Refer to change the screen resolution or stay in the Self-Test mode, the LED power indicator remains green...
... not support over 85Hz. Turn off your LCD Display screen remains blank after disconnecting the power cord. The figure shown below ("Check Signal Cable") appears on a black background when the LCD Display is working normally even though no video signal is functioning properly. Warning Messages You can choose to Specifications > Preset Timing Modes for problems that time. Note Refer to change the screen resolution or stay in the Self-Test mode, the LED power indicator remains green...


